RENOGY RBM500-CA Battery Monitor User Manual
Warning
Please read this guide carefully to avoid incorrect connections that can cause the battery monitor to malfunction and/or create a fire hazard. Disconnect the negative pole of the battery before installation.
- The Renogy Battery Monitor can’t be exposed in the sun for a long time or in the environment with large amounts of ultraviolet radiation when using or storing, in winter (< -10℃) and summer (>60℃) otherwise the life span of the LCD will be shortened.
Battery Safety
- Do NOT let the positive (+) and negative (-) terminals of the battery touch each other.
- Explosive battery gases may be present while charging. Be certain there is enough ventilation to release the gases.
- Be careful when working with large lead acid batteries. Wear eye protection and have fresh water available in case there is contact with the battery acid.
- It is the user’s responsibility to operate the equipment in a safe manner. Do not charge batteries in an enclosed environment unless allowed by the manufacturer of the battery.
- Never connect a load to a battery without using fuses or circuit breakers.
- Please follow the battery manufacturer’s safety instructions.
General Information
The Renogy Battery Monitor is a high precision device (also known as coulometer), which can test the voltage, current, and capacity of a battery to help users know the state of charge at any time. The Renogy Battery Monitor has a memory function which allows users to set a low voltage capacity alarm. It is suitable for mobile and portable equipment, e-bike, motorcycles, electric wheelchairs, and so on.
- The Renogy Battery Monitor is suitable for lithium batteries, lead acid batteries and nickel-metal hydride batteries that have voltage from 10V to 120V.
Identification of Parts
- LCD Interface
- Shunt/Sampler Holder
- 500A Shunt/Sampler

- 20ft (6m) Shielded Wire
- 3ft (1m) 20 AWG B+ Wire

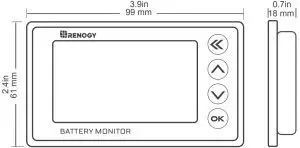
Dimension
Installation
Connection/Setup
First, connect the Shunt in series to the negative circuit of your battery. B- of shunt connects to B- of the battery. P- of shunt connects to P- of output and C- of charge.
Then take a wire of 0.3-0.75 mm². One end of the wire connects to positive of battery, another end connects to B+ of Shunt (either one is ok).
Finally connect the Shunt to the Renogy Battery Monitor by the shielded wire and the screen of the Renogy Battery Monitor display should turn on.
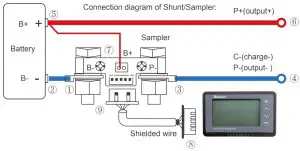
Attention: Please connect as shown. The shunt must be series connected to the negative circuit, DO NOT connect to the positive circuit.
Mounting
The Renogy Battery Monitor is fixed by tabs, so it is easy to install. First, open a rectangular orifice on your equipment panel according to the size. Then put The Renogy Battery Monitor into the rectangular orifice, and make sure the tabs are locked.
Operation
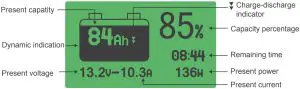
Interface description
Use steps
- Connect and check the current: Power on after completing the connection as shown, the screen should display capacity percentage. If the screen has no response, please check the connection. Then charge or discharge the battery and check whether the display current is equal to the actual current. If the deviation is large, please check the connection.
- Capacity calibration: On first use, the percentage and capacity are not the actual value, you need to calibrate the capacity to either 100% or 0%.First set the usable AH capacity of the battery as the preset AH capacity.For Lithium and Sealed Lead Acid batteries to calibrate to 100% charge the battery fully and hold the “up” key for 3s to set the capacity to 100%For Lithium batteries to calibrate to 0% discharge the battery completely and hold the “down” button key for 3s to set the capacity to zero.This will only have to be done on initial installation of the Renogy Battery Monitor or if the Battery Bank is replaced.
- Check and reset the actual capacity: If you find the displayed capacity doesn’t match the actual capacity during use, please check and reset the actual capacity.For Lithium batteries discharge the battery to 0% and hold the “down” key for 3s to set the capacity to 0, then set the preset capacity as large as possible.Now charge the battery fully and the displayed AH capacity should be the actual usable capacity. Then set the displayed AH capacity as the preset AH capacity.For Sealed Lead Acid batteries it is recommended to set the AH lower than the usable rating after conducting a capacity test or consulting the battery manufacturer.
User settings
Preset capacity and voltage setting:
- Press the key for 3s to enter setting menu;
- Click or key to select the setting items:
- CAP—Preset capacity: An initial capacity has been set at the factory, please set it according to the real capacity of your battery.
- HIGH V-Full capacity voltage: When the voltage is higher than the set value, the capacity will be automatically set to 100%.
- LOW V-Zero capacity voltage: When the voltage is lower than the set value, the capacity will be automatically set to 0%. If the discharge continues, the voltage value will flash, and the alarm will beep once every 10s.
- ALARM-Alarm setting: When the battery capacity is below the set capacity, the percentage and battery symbol will flash and the alarm will beep once every 10s.
- Attention: If you need to set the HIGH V and LOW V values, please confirm the full charge voltage and all discharge voltage specifications of your battery.
- Select CAP and click the key to enter the preset capacity setting; The set value will flicker, click the key can select other values, click the or key to select the correct values after this click the key to quit preset capacity setting.
- We can set other items with the same method as preset capacity. When all the items are set and all the values are correct, click the key to save the set and quit the setting menu.
Set capacity to zero or full:
On first use or change of the battery bank, the memory capacity should be set zero or full: In the main interface, hold the ![]() key for 3s to set the capacity zero, the percentage will be 0%; hold the
key for 3s to set the capacity zero, the percentage will be 0%; hold the ![]() key for 3s to set the capacity full, the percentage will be 100%.
key for 3s to set the capacity full, the percentage will be 100%.
Sleep mode wake up operation
- When the battery current is low, the Renogy Battery Monitor will go into a low power sleep mode, press any key to see the display if needed. When the battery current rises over normal value or the battery starts charging or discharging the Renogy Battery Monitor will wake up.
- The Renogy Battery Monitor can stay connected to the battery bank since it has a very low self-consumption.
Manual turn off backlight function
While charging the battery, the LCD screen’s backlight will also be slowly flashing. In order to turn off the backlight function, Long press front ![]() Keyboard can turn off the backlight, Long press again
Keyboard can turn off the backlight, Long press again ![]() Keyboard can Wake up the backlight.
Keyboard can Wake up the backlight.
Troubleshooting
- When connecting the load, if the backlight is blinking, the B- and P- of the shunt are wired inversely.
- When the battery current is low the Renogy Battery Monitor will enter a low power (sleep mode) and the backlight will turn off, press any button and the backlight will turn on for 10s.
- When the current changes frequently the data acquisition may produce an error, and it may affect the accuracy.
- When charging or discharging. The Renogy Battery Monitor will be working and the capacity displayed will be real-time numbers.
Technical Specifications
|
Description |
Parameter |
|
Working Voltage |
10.0 – 120.0 V |
|
Working dissipation |
10.0 – 15.0 mA |
|
Standby dissipation |
1.0 – 2.0 mA |
|
Voltage accuracy |
±1.0 % |
|
Current accuracy |
±1.0 % |
|
Capacity accuracy |
±1.0 % |
|
Backlight on current(>50A) |
100 mA |
|
Preset capacity value |
0.1 – 9999.0 Ah |
|
Temperature range |
-10-60°C(14-140°F) |
|
Weight (LCD Interface) |
2.6 oz / 75 g |
|
Size (LCD Interface) |
3.9*2.4*0.7 inch (9.9*6.1*1.8 cm) |
|
Shielded Wire |
20ft (6m) |
|
B+ Wire |
3ft (1m) |
Support
 report this ad
Address: S 2775 E Philadelphia St, Ontario, CA 91761, USATel: 909-287-7111Website: www.renogy.comSupport: [email protected]
References
Renogy® Official- offer all off grid solar system products
Renogy® Canada-Solar Off-grid Products
ç¬ç«å太é½å çºé»ã·ã¹ãã å°é | RENOGY JAPANãªã³ã©ã¤ã³ã·ã§ãã
Renogy® Official- offer all off grid solar system products
RENOGY如果新能源 | 让每个人拥有独立清洁的能源
Renogy black friday Bis Zu 30% Sparen| Renogy DE
High Quality Solar Products | Renogy UK
Solar Power Kits & Equipment for Sale | Renogy Australia
[xyz-ips snippet=”download-snippet”]