
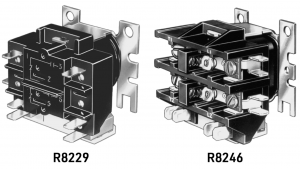
resideo R8229A Electric Heat Relay
INSTALLATION INSTRUCTIONS
APPLICATION
The R8229A and R8246A are decontrol replacements for most single or multiple element electric furnace sequencers and contactors. combinations of relays and contactors can be used to control up to 12 heating elements.
The relay or contactor can be used on furnaces using line voltage or pilot duty limits in 240 Vac and 120/240 Vac isolated fan and 240 Vac combination rated wiring systems.
The R8229A relay and R8246A contactor provide decontrol replacements for most single or multiple element electric heat relays, contactors, and sequencers used in electric heating appliances. Each R8229A relay switches a fan and 1 or 2 heating elements. Each R8246A contactor switches a fan and up to 4 heating elements. Two or three relays and contactors can be used together to control from 4 to 12 heating elements. The R8229A and R8246A may be used with either line voltage or pilot duty limit applications.
FEATURES
- Quick-connect terminals for maximum wiring flexibility.
- Terminal clamp screws also included on R8246A contactor.
- Field proven, reliable operation.
- Quiet-designed for electric heat use.
- Simple ON-OFF switching-readily understood, easily serviced, and eliminates cold startup drafts.
- Thermostat current draw is constant (0.23 amp).
- Single unit control of up to 2 heating elements plus fan with R8229A, or 4 heating elements plus a fan with R8246A; reduces control space and simplifies wiring in furnace
- Wiring accessories included to make installation quick and efficient.
- Mounts in any position. Mounting adapter plate supplied to simplify competitive device replacement.
- Meets or exceeds all industry standards
The electric heat relay switches up to two 5 kW elements plus a fan, and the contactor switches up to four 5 kW heating elements plus a fan. Because the R8229A and R8246A are designed for electric heat, they will replace sequencers, relays, and contactors.
Everything you need is included. This package includes:
- universal mounting plate (to assure quick, easy replacement)
- two Sheetmetal mounting screws.
- two nuts and bolts (for optional mounting).
- two 12 inch [304.8 mm] lead wires with quick-connects
- two wire nuts.
- six female quick-connect terminals.
- special instructions.
- special cross reference label.
Extra parts that may not be necessary on an installation can still be useful as additions to your regular tool kit.
- Replacing existing relays, contactors, and sequencers with the R8229A Electric Heat Relay or R8246A Electric Heat Contactor updates existing appliances to newer industry standards. Cold drafts are reduced because there is no time delay between heating elements. Decontrol with the R8229A Electric Heat Relay or R8246A Electric Heat Contactor:
- Gives quiet conventional ON and OFF switching. Special design based on a line of Resideo relays and contactors with years of reliable, trouble-free performance.
- The R8246A switches the maximum allowable NEC and Underwriters Laboratories Inc. circuit subdivision of 48 amperes. You can decontrol existing appliances with fewer controls. Saves you time and the homeowner money.
- Simplifies application, service, and checkout. One of the serviceman’s major complaints is that sequencing circuitry is too complex. The R8229A and R8246A can be applied to any electric heat furnace using the basic idea of ON and OFF switching of the elements and fan.
- Provides easy installation. The small size of the R8229A and R8246A makes installation in today’s compact wiring compartments easier. The universal mounting adapter plate and wiring accessories help assure that you have everything you need before you start
SPECIFICATIONS
Maximum Ambient Temperature: 165 °F [74 °C].
Terminals:R8229A: 1/4 inch male quick-connect terminals.R8246A: No. 10 terminal clamp screws and double male 1/4 inch quick-connects
NOTE: Female quick-connects should be selected with care. The use of a premium grade quick-connect, such as the AMP Faston “250” series or equivalent is recommended.
Dimensions: See Fig. 1 and 2.
Mounting Means: Two screws (up to No. 10 size) through holes in base. See Fig. 1.
Approvals:Underwriters Laboratories Inc. Component Recognized:File No. E59779, Guide No. NLDX2. Canadian Standards Association Component Recognition:File No. LR1620.
Coil Ratings:
| Pickup Voltage (maximum)a.b | 18 Vac |
| Pickup Voltage (nominal)a.b | 14 Vac |
| Dropout Voltage (nominal) | 6 Vac |
| Maximum Inrush VA at Rated Voltage | 6.2 VA |
| Nominal Inrush VA at Rated Voltage | 5.5 VA |
| Sealed VA (maximum) | 6.2 VA |
| Sealed VA (nominal) | 5.5 VA |
| Sealed Amp (nominal) | .23 amp |
a Voltage listed is for the base mounted vertical.b Instantly applied voltage simulating thermostat operation.
Control Voltage: 24V ac, 0.23 amp.Contact Ratings: -See Table 1 and Table 2.
Table 1. R8229 Ratings Per Pole.
|
Voltage |
First Pole | Second Poleb | ||||
|
Resistive Only Adapters |
Combined Inductivea.b and Resistive | Inductive Only | ||||
| Max. Load | Inductive | |||||
| AFL | ALR | AFL | ALR | |||
|
120,208, 240,277 |
25.0 | 26.0 | 6.4 | 18.0 | 7.0 | 35.0 |
| 480 | 12.5 | 13.6 | 3.2 | 9.0 | 3.5 | 17.5 |
| 600 | 10.0 | 10.4 | 2.56 | 7.2 | 2.8 | 14.0 |
Table 2. R8246 Ratings Per Pole.
|
Voltage |
First Pole | Second Poleb | ||||
|
Resistive Only Adapters |
Combined Inductivea.b and Resistive | Inductive Only | ||||
| Max. Load | Inductive | |||||
| AFL | ALR | AFL | ALR | |||
|
120,208, 240,277 |
48.0 | 48.0 | 7.0 | 42.0 | 12.0 | 72.0 |
| 480 | 24.0 | 24.0 | 3.5 | 21.0 | 6.0 | 36.0 |
| 600 | 19.2 | 18.5 | 2.8 | 16.8 | 4.8 |
28.8 |
a Either contact of the R8229 is rated for a 5 kW resistive load in combination with the motor load as shown in the table. Either contact of the R8246 is rated for a 10 kW resistive load in combination with the motor load as shown in the table. The total connected second pole load (inductive and resistive loads combined) cannot exceed the value given in the table for MAX LOAD. FOR EXAMPLE: With a 5 amp motor load, up to 43.0 amp resistive can be controlled by the same pole of a R8246A contactor at 240V ac.b A combined resistive and inductive load can be connected to either pole of the relay and contactor. Do not connect an inductive load to both poles. Fig. 1. Dimensions of relay and contactor base, in in. (mm).
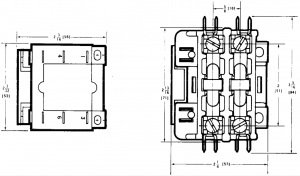
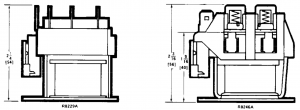 Fig. 2. R8229A electric heat relay and R8246 electric heat contactor dimensions in in. [mm].
Table 3. Replacement For:
|
Camstat |
Resideo | White- Rodgers | Therm-O-Disc | Texas Instruments |
Robertshaw |
RBM |
|
| S106 S206 S306 S406 14-10014-20014-30014-400 | R4154A R4154B R4154C R4154D R8154A R8154B R8154C R8154D R8206A R8206B R8206C R8330A | R8330BR8330CR8330DR8330ER8330FR8330GR8330HR8330JR8330KW879AaW879BaW879Ca W879Da | 24A1124A1224A1424A2024A2124A2224A5124A5224A5324A5424A5524A56 | 11 S Series 12S Series 14S Series 15S Series | 511 Series600 Series602 Series607 Series | TDS Series | 189 |
INISTALLATION
![]() CAUTION
CAUTION
- Installer must be a trained, experienced technician.
- Disconnect power supply before connecting wiring to prevent electrical shock and equipment damage.
- The fan must be controlled by the contactor connected to W1.
- Conduct a thorough checkout after the installation is complete.
Location
The design of the furnace and location of the original controls will guide R8229-R8246 location. Make sure the area selected is within the control’s ambient temperature rating of 165 °F [74 °C]. The control may be mounted in any position inside the furnace enclosure. It cannot be mounted on the outside.
WIRING
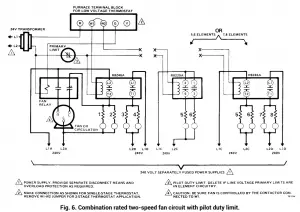
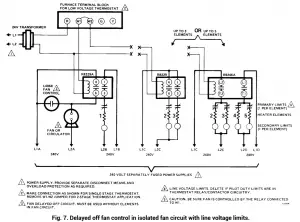
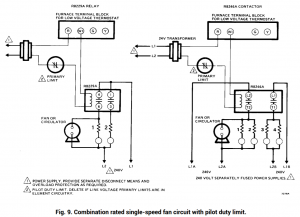
All wiring must comply with applicable codes and ordinances. Refer to Manufacturer’s wiring diagram if available. Fig. 6 to 9 show typical hookups using the R8229A and R8246A in different systems with up to 8 heating elements. Turn to the needed furnace system schematic.
- Remove all existing controls that are in the heating element circuits. DO NOT REMOVE:• Fan speed changeover relay.• Fuse blocks and terminal strips.• 24 volt transformer.• Limits and cutouts on the heaters.
- Remove all wiring except leads or wires from the:• Low voltage terminal block.• Changeover relay.• Heating elements and limits.• Line voltage fuse or terminal blocks.
- Seal all old screw holes with screws or duct tape.
- Use the control as a template and drill two 3/16 inch [4.8 mm] holes for each control in a convenient location. Mount the controls, using the screws on unexposed furnace surfaces. Use the nuts and bolts when mounting on a surface where the mounting hardware is exposed to the outside of the furnace.
- Replacement of the female wiring terminals that connect to the R8229A or R8246A is recommended. Use the terminals supplied. Follow the schematic for the system you are servicing and:a. Reconnect low voltage thermostat, relay and contactor coils, and changeover relay wires.b. Reconnect the fan circuit. Be sure the fan lead wires are the same as the original to ensure proper fusing. The fan must be controlled by the relay or contactor connected to W1.c. Reconnect the heater element circuits one at a time. Make sure that the line voltage wires (L1) to the element(s) are connected with the same size fuse as the return line (L2) for each element. There should be no more than 2-5 kW elements (2 elements and fan in combination rated circuits) per fuse pair or contactor pole (1-5 kW element per relay pole).d. All pilot duty limits must be in the coil circuit of ALL relays and contactors, or a line voltage limit must remain wired with each heating element.
Table 4. Equipment Required
| Number of (5 kW or less) Heater Elements in Furnace | Number of R8229A Relays/ R8246A Contactors Required | |
| Combination Rated Furnace (Fig. 6 and 9) | Isolated Fan Circuit Furnace (Fig. 7 and 8) | |
| 1 | 1 R8229 (or 1 R8246) | 1 R8229 (or 1 R8246) |
| 2 | 1 R8229 (or 1 R8246) | 1 R8246 |
| 3 | 1 R8246 | 2 R8229 or 1 R8246 + 1 R8229 |
| 4 | 1 R8246 | 1 R8246 + 1 R8229 |
| 5 | 1 R8246 + 1 R8229 | 1 R8246 + 1 R8229 |
| 6 | 1 R8246 + 1 R8229 | 2 R8246 |
| 7 | 2 R8246 | 2 R8246 + 1 R8229 |
| 8 | 2 R8246 | 2 R8246 + 1 R8229 |
 DO NOT REMOVE:
![]() FAN SPEED CHANGEOVER RELAY.
FAN SPEED CHANGEOVER RELAY.![]() TERMINAL STRIPS .
TERMINAL STRIPS .![]() 24 VOLT TRANSFORMER.
24 VOLT TRANSFORMER.![]() . LIMITS AND CUTOUTS ON THE HEATERS.Fig. 3. Remove old sequencers
. LIMITS AND CUTOUTS ON THE HEATERS.Fig. 3. Remove old sequencers
 REMOVE ALL WI RES EXCEPT FROM;
![]() LOW VOLTAGE TERMINAL STRIP.
LOW VOLTAGE TERMINAL STRIP.![]() FAN SPEED CHANGEOVER RELAY..
FAN SPEED CHANGEOVER RELAY..![]() HEATING ELEMENTS AND LIMITS.
HEATING ELEMENTS AND LIMITS.![]() LINE VOLTAGE FUSE OR TERMINAL BLOCKS.Fig. 4. Remove wiring
LINE VOLTAGE FUSE OR TERMINAL BLOCKS.Fig. 4. Remove wiring

![]() SEAL ANY HOLES IN PLENUM WITH DUCT TAPE.
SEAL ANY HOLES IN PLENUM WITH DUCT TAPE.![]() ORI LL 2 3/16 INCH [ 5 MM] HOLES FOR EACH R8246.Fig. 5. Install R8229A(s) and R8246A(s)
ORI LL 2 3/16 INCH [ 5 MM] HOLES FOR EACH R8246.Fig. 5. Install R8229A(s) and R8246A(s)

CHECKOUT AND SERVICE
![]() CAUTIONThe fan must be on whenever any heating elements are on
CAUTIONThe fan must be on whenever any heating elements are on
Checkout
Set the system thermostat to call for heat and make sure that all elements turn on and off properly and that fan starts and stops with the elements. In pilot duty limit systems, relay(s) and contactor(s) should drop out when control circuit is deenergized by the pilot duty limit. Perform system checkout procedure in “Troubleshooting” on page 7.
Service
The R8229A and R8246A are not field repairable. If any component fails, the entire control should be replaced. No adjustment or periodic service is required on these controls.
TROUBLESHOOTING
![]() CAUTIONThe R8229A and R8246A contacts carry line voltage. Disconnect power supply before working with or checking wiring.
CAUTIONThe R8229A and R8246A contacts carry line voltage. Disconnect power supply before working with or checking wiring.
Preliminary Checkout for System with Line Voltage Limits
- Check system wiring for any loose or broken connections.
- With power off, disconnect the fan at R8229A or R8246A. Turn power on and set the thermostat to call for heat. When the heater elements come on, check the limit controls on the heaters for proper operation. Replace any limit that does not de-energize its element. Turn the thermostat to the lowest setting and turn power off. Reconnect the fan and turn the power on. Turn the furnace on and off to be sure the fan and all heating elements operate properly.
Preliminary Checkout for System with Pilot Duty Limit.
- Check system wiring for any loose or broken connections.
- With power off, disconnect the fan at R8229A or R8246A. Turn power on and set the thermostat to call for heat. When furnace temperature rises to limit set point, the pilot duty limit should open the control circuit to de-energize the relay or contactor(s). All elements must turn off. Replace limit(s) which are not working properly. Turn the thermostat to the lowest setting and turn power off. Reconnect the fan and turn the power on. Sequence the furnace on and off to be sure the fan and all heating elements operate properly.
NOTE: Check out systems with circulator by lowering pilot duty limit setting with the power on. The relay(s) or contactor(s) should drop out as in the above procedure when furnace temperature rises to limit set point. If limit has a nonadjustable setting, disconnect one of the transformer secondary leads at the contactor coil terminals. The relay(s) or contactor(s) should drop out. (NOTE: This does not check the function of the limit itself.) Be sure to reconnect leads at coil terminals.
Transformer Checkout
- Use an AC voltmeter to measure the voltage across the secondary terminals. If voltage is 24 Vac ± 10 percent, proceed to check the R8229A or R8246A. If incorrect, proceed to step 2.
- Check that voltage across transformer primary is within ± 10 percent of rated voltage. If correct, replace the transformer. If the primary voltage is incorrect, correct source problems
R8229A and R8246A System Checkout
Refer to applicable wiring diagrams. Note that if several R8229 relays and R8246A contactors are used in combination, the troubleshooting procedure must be adapted for the individual system.
- Move the thermostat set point above the room temperature so that thermostat calls for heat:a. If system does not start, proceed to step 2.b. If fan and/or some heating elements start (but not all), proceed to stepc. If fan and heating elements all come on properly, proceed to step 4.
- Jumper Rh to W1 at the thermostat:a. If fan and heating elements now begin operating, check thermostat and wiring and replace thermostat if necessary. Proceed to step 4.b. If neither fan nor heating elements operate (and system wiring was checked), replace the relay or contactor.NOTE: See Preliminary Checkout for System with Pilot Duty Limit in systems with pilot duty limit before replacing relay or contactor.
 CAUTIONThe R8229A and R8246A contacts carry line voltage.
 - Jumper across the relay or contactor terminals controlling the inoperative fan or heating element. If the fan or element now starts, the contacts are not conducting; replace the relay or contactor.NOTE: If element is not energized, check to see that second stage of thermostat is operating (or that R to W2 is jumped for single-stage thermostat). In hookup with more then one R8229A or R8246A, check to see that control circuit wiring is as specified by the appropriate schematic.
- When all elements and fan are on, break the power supply to the relay and contactor by lowering the thermostat set point (or removing jumper Rh-W1) so that switch breaks. Check to make sure that all heating stages turn off. The fan should turn off when the elements go off unless the fan is wired for delayed off (see Fig. 8).

[xyz-ips snippet=”download-snippet”]