ResMed ApneaLink Air Instruction Manual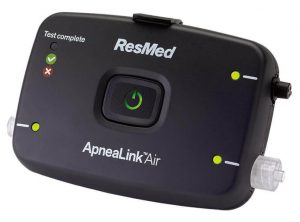
Introduction
Your physician or healthcare provider has given you the ApneaLink Air device to test if you have sleep-disordered breathing. The device collects information related to how much and how well you breathe at night. Read these instructions thoroughly before you begin your test.
Intended use
The ApneaLink Air device is indicated for use by Health Care Professionals (HCP), where it may aid in the diagnosis of sleep disordered breathing for adult patients. ApneaLink Air records the following data: patient respiratory nasal airflow, snoring, blood oxygen saturation, pulse and respiratory effort during sleep. The device uses these recordings to produce a report for the HCP that may aid in the diagnosis of sleep disordered breathing or for further clinical investigation. The device is intended for home and hospital use under the direction of a HCP.
Contraindications
- The ApneaLink Air system must not be used in the vicinity of an MRI device.
- Explosive Hazard: Do not use the ApneaLink Air system in an explosive atmosphere or in the presence of flammable anesthetics or gases.
General warnings and cautions
![]() WARNINGDo not use the system if any of the accessories are ripped, broken or bent or if the housing of the ApneaLink Air device is broken.
WARNINGDo not use the system if any of the accessories are ripped, broken or bent or if the housing of the ApneaLink Air device is broken.
![]() CAUTION
CAUTION
- In the US, Federal law restricts this system to sale by or on the order of a physician.
- Do not set up the ApneaLink Air system while it is attached to a personal computer via USB.
Equipment
The ApneaLink Air system includes: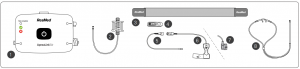
- ApneaLink Air device
- Effort sensor (optional)
- Belt
- Oximeter belt clip (optional)
- Oximeter (optional)
- Disposable oximeter finger sensor (optional)
- Reusable oximeter finger sensor (optional)
- Nasal cannula
- Bag (not shown)
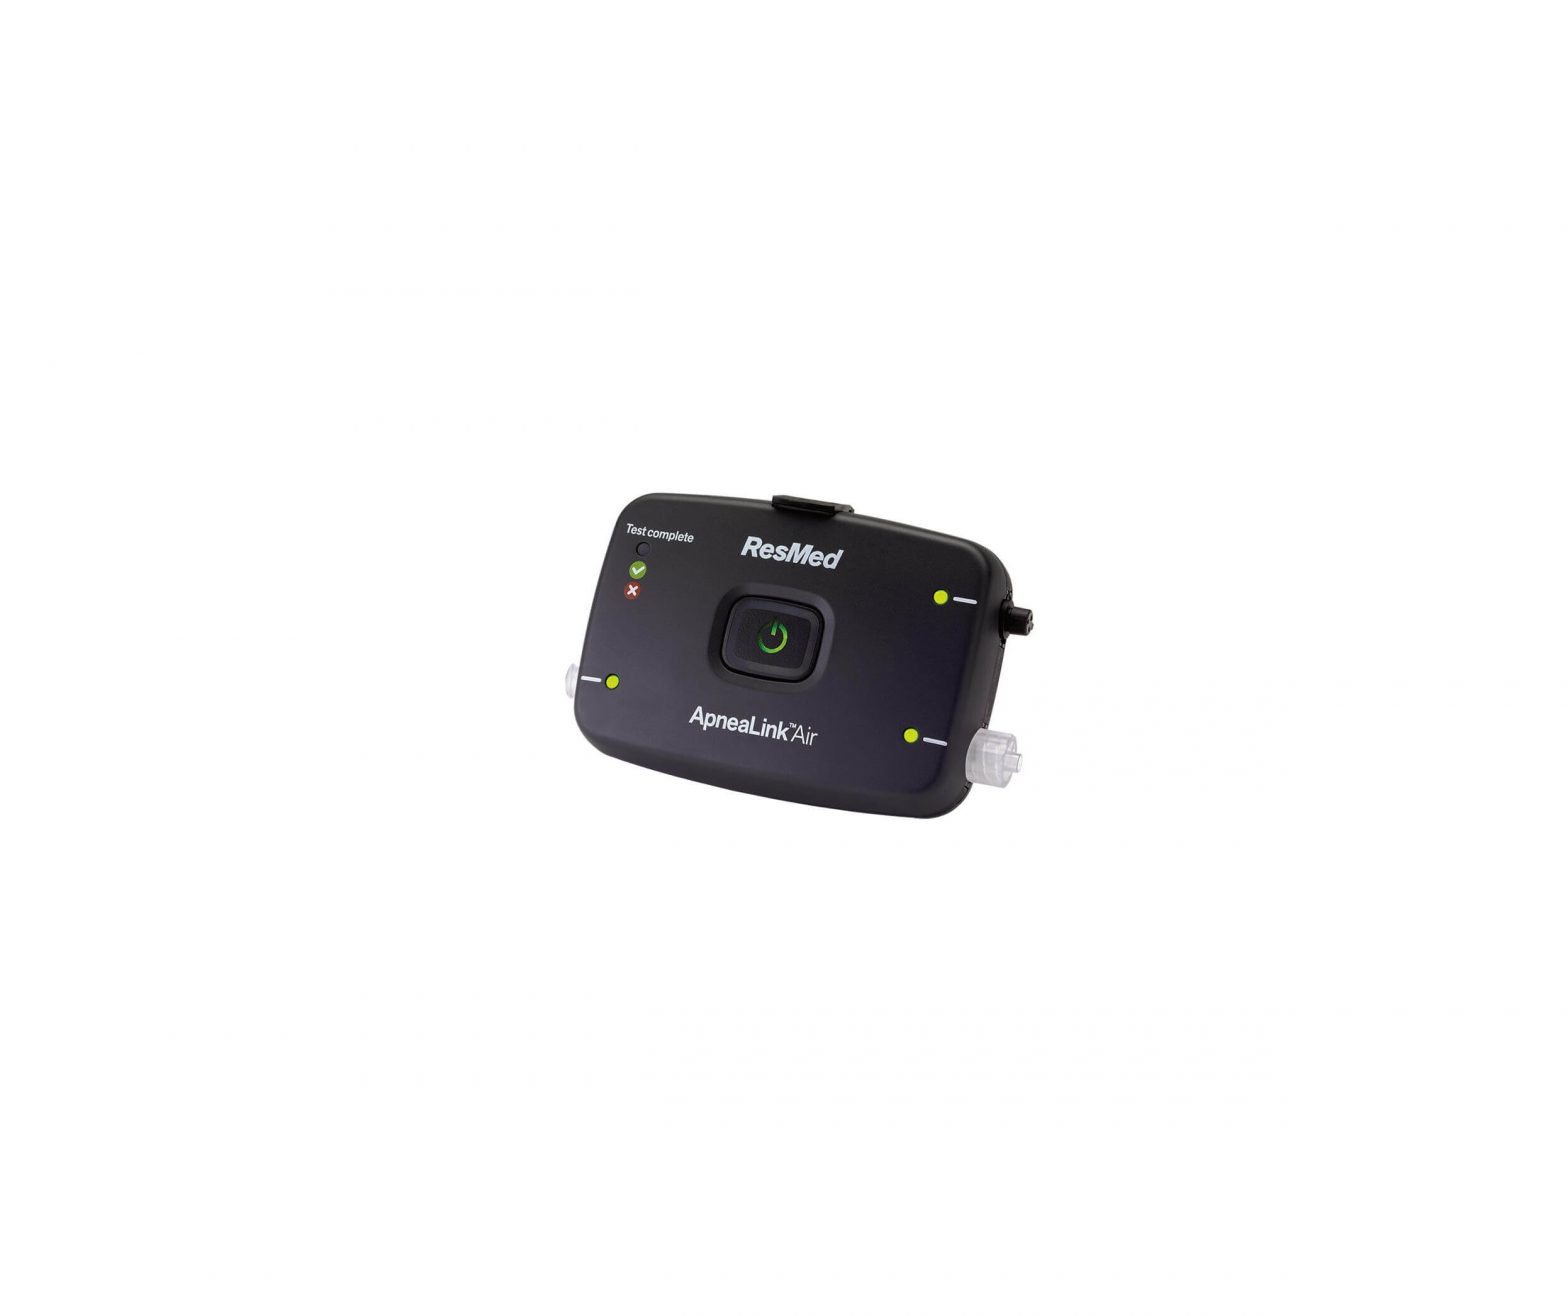
ApneaLink
The ApneaLink Air device has the following lights, connectors and button:
- Test complete indicator light
- Nasal cannula connector and accessory light
- Power button
- Oximeter connector and accessory light
- Effort sensor connector and accessory light
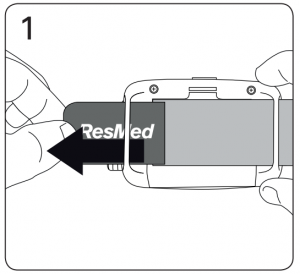
Putting the device on the belt
Before putting the device on the belt, ensure that the batteries are installed. To install the batteries, open the battery cover on the back of the device and insert two new AAA batteries.
- Thread one end of the beltthrough the slots on theback of the device. Checkthat the device is positionedas shown.
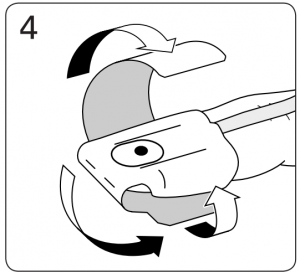
 Follow these steps if you are using the effort sensor:
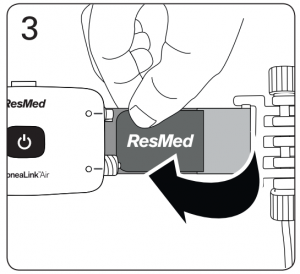
 - Flip the device over. Thread the end of the belt closest to the device through one of the slots on the effort sensor (if used).
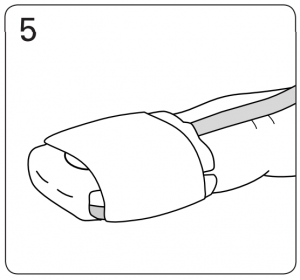
- Fasten the tab to the belt. Slide the device into a position that is close to the effort sensor.
 Follow these steps if you are using the effort sensor:
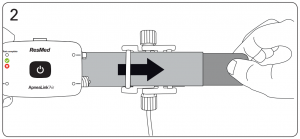
Connecting the accessories to the device
![]() CAUTIONDo not blow into the nasal cannula or effort sensor connectors.
CAUTIONDo not blow into the nasal cannula or effort sensor connectors.
The accessories may already be attached to the device. If they are not attached, connect them as shown.
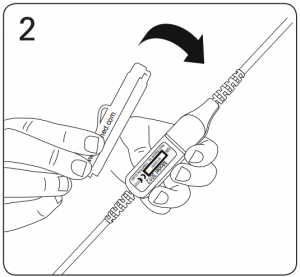
Connecting the nasal cannula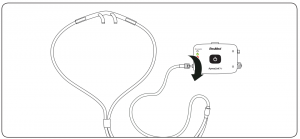 Unscrew and remove the protective cap and insert the connector end of the nasal cannula into the nasal cannula connector on the device. Turn clockwise until the connector is secure.Note: Retain the protective caps to use at the completion of the test.
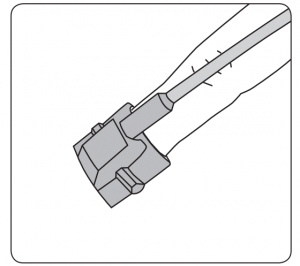
Connecting the effort sensor (if used)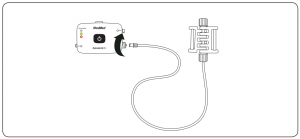 Unscrew and remove the protective cap and insert the connector end of the effort sensor into the effort sensor connector on the device. Turn clockwise until the connector is secure.
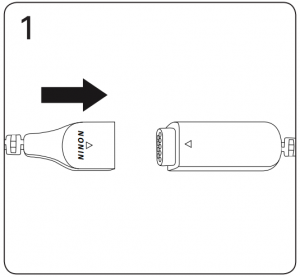
Connecting the oximeter (if used) NONIN
- Attach the oximeter finger sensor to the oximeter.
- Attach the belt clip to the oximeter.
- Attach the oximeter to the oximeter connector on the device by pushing it on.
Fitting the belt
![]() CAUTIONTo avoid irritation or allergic reactions, wear the belt and device over a long sleeved shirt.
CAUTIONTo avoid irritation or allergic reactions, wear the belt and device over a long sleeved shirt.
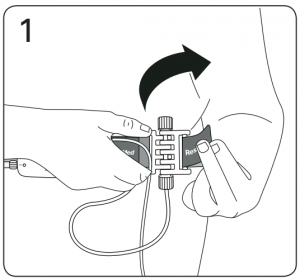
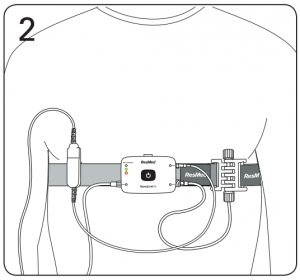
- Pull the belt around your body. Thread the end of the belt through the slot on the effort sensor (if used) and fasten the tab to the belt. If you are not using the effort sensor, attach the tab to the belt.
- Check that the belt is secure and comfortable and that the device is positioned over the centre of your chest.
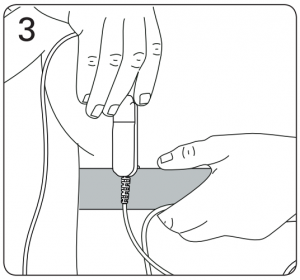
- If using an oximeter, slide the clip onto the belt. The clip should be worn on the same side of your body as the oximeter finger sensor.
Fitting the accessories
![]() CAUTIONIf you develop redness, irritation or a rash from the nasal cannula or finger sensor, discontinue use and contact your healthcare provider or physician. You may be having an allergic reaction.
CAUTIONIf you develop redness, irritation or a rash from the nasal cannula or finger sensor, discontinue use and contact your healthcare provider or physician. You may be having an allergic reaction.
Nasal cannula
![]() WARNINGEnsure that the cannula is fitted as described so as not to pose a strangulation risk.
WARNINGEnsure that the cannula is fitted as described so as not to pose a strangulation risk.
- Insert the prongs into your nostrils. Make sure the curved side is pointing towards the back of your nose.
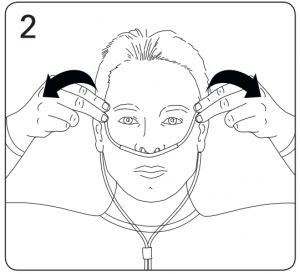
- Loop the plastic tubing around your ears.
- Pull the slider up towards your chin until the plastic tubing is secure and comfortable.
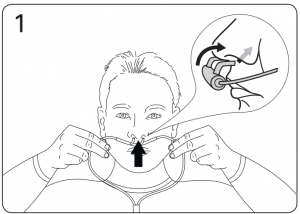
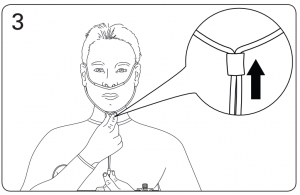
Note: If the nasal cannula does not stay in your nose, use medical tape or adhesive bandages on your cheeks to hold it in place.
Disposable finger sensor (if used)
![]() WARNINGEnsure that the oximeter clip is positioned on the same side of the body as the finger sensor so as not to pose a strangulation risk.
WARNINGEnsure that the oximeter clip is positioned on the same side of the body as the finger sensor so as not to pose a strangulation risk.
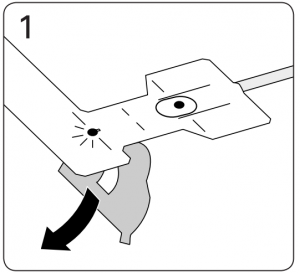
- . Remove the backing from the sensor.
- Place the sensor over the fourth finger on your nondominant hand. Line up the picture of the fingernail on the finger sensor with your own fingernail.
- Fold the tabs around the sides of your finger.
- Fold the top flap under your finger and wrap it around your finger
- The sensor should be positioned as shown.Note: If the finger sensor is uncomfortable, you can move it to a different finger or your other hand.
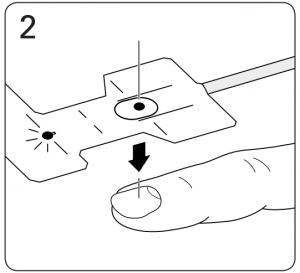
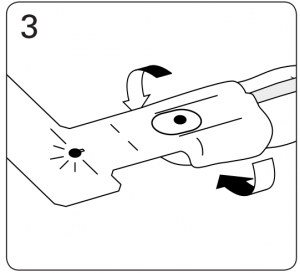
 Note: If the finger sensor is uncomfortable, you can move it to a different finger or your other hand.
 Reusable finger sensor (if used)
![]() WARNINGEnsure that the oximeter clip is positioned on the same side of the body as the finger sensor so as not to pose a strangulation risk.
WARNINGEnsure that the oximeter clip is positioned on the same side of the body as the finger sensor so as not to pose a strangulation risk.
- To fit the reusable finger sensor, slip it over the index finger on your non-dominant hand as shown.Note: If the finger sensor is uncomfortable, you can move it to a different finger or your other hand.
 Note: If the finger sensor is uncomfortable, you can move it to a different finger or your other hand.
Starting the test
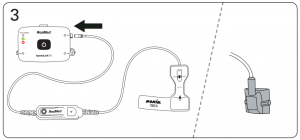
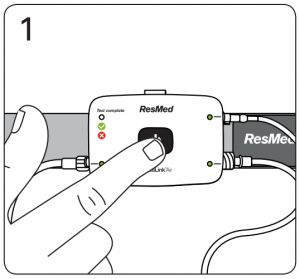
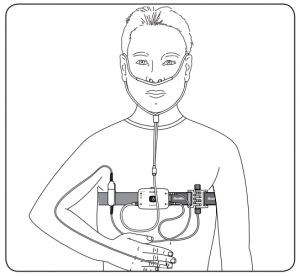 When properly set up, the full system looks like this.
- Press and hold the power button in the centre of the device for about three seconds or until the light turns on.
- . Check that lights next to the accessories you are using are green. If any of these lights are red and blinking, the accessories are not attached correctly.

Once you have started the test, go to sleep as normal. The lights on the device will dim after 10 minutes. If you have to get up during the night for any reason, leave the device on unless you do not intend to go back to sleep. You can remove the oximeter finger sensor if you need to go to the bathroom or wash your hands. Replace the oximeter finger sensor before going back to sleep.
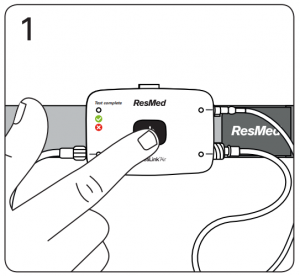
Stopping the test – check if test complete
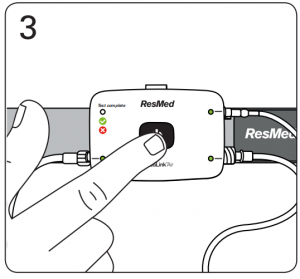
- 1. Press the power button for about three seconds.
- Check that the test complete indicator light is lit and green. This means the test is complete. If the test indicator light is red, replace the batteries and repeat the test tomorrow night.
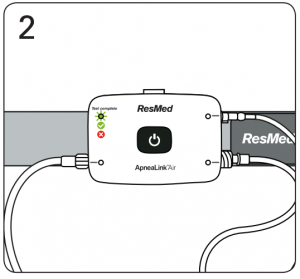
- Press and hold the power button for about three seconds to turn off the device.
Note:
- To re-check the test complete indicator light, press the power button until the light turns on (about three seconds), then briefly press the power button again.
- To replace the batteries, open the battery cover on the back of the device and insert two new AAA batteries.
- The device does not need any servicing or maintenance before recording.
Disassembling and returning the device
When the test is completed:
- Remove the belt from your body.
- Remove all the connectors from the device.
- Screw the protective caps back on the effort sensor and nasal cannula connectors.
- Disconnect the finger sensor from the oximeter.
- Remove the device from the belt.
- Throw away the nasal cannula and the disposable finger sensor (see the Equipment section on the first page).
- Place everything else back in the bag and return it to your physician or healthcare provider as requested.Do not attempt to clean the device.
Troubleshooting
|
Problem/Possible cause |
Possible solution |
|
The test complete indicator light doesn’t turn on when I press the power button |
|
| The batteries are depleted. | Replace the batteries by opening the battery cover and inserting two new AAA batteries. |
| The device is faulty | If the light does not turn on after replacing the batteries, return the device to your physician or healthcare provider. |
|
One of the accessory lights is red after I begin the test |
|
| The accessory hasn’t been connected correctly | Leave the device turned on and reconnect the accessory according to the instructions. If using the oximeter, reconnect the finger sensor to the oximeter. Check that the light has turned green. |
| The accessory is not fitted correctly. | Leave the device turned on and refit the accessory according to the instructions. Check that the light has turned green. |
| The accessory or device is faulty | If you cannot get the light to turn green, return the device and accessories to your physician or healthcare provider. |
|
All of the lights (including the test complete indicator light) are red and blinking when I turn the device on |
|
| The device is faulty. | Return the device to your physician or healthcare provider. |
|
The effort accessory light is red and blinking when I wake up the morning |
|
| The effort sensor became disconnected during the night. | Replace the batteries and use the device again tomorrow night. |
|
One of the other accessory lights is red and blinking when I wake up in the morning. |
|
| One of the other accessories became disconnected during the night. | Check the test complete indicator light as described in Stopping the test. If the light is green, the test was successful. If the light is red, replace the batteries and use the device again tomorrow night. |
|
The test complete indicator light is red when I turn off the device in the morning. |
|
| The device did not gather enough data. | Replace the batteries and use the device again tomorrow night. |
|
The test complete indicator light is off when I turn off the device in the morning. |
|
| The batteries became depleted during the night | Replace the batteries and use the device again tomorrow night. |
Electromagnetic compatibility
The ApneaLink Air complies with all applicable electromagnetic compatibility requirements (EMC) according to IEC60601-1-2, for residential, commercial, and light industry environments. Wireless communications equipment such as wireless home network device, mobile phones, cordless telephones and their base stations, walkie-talkies can affect the device and should be kept at least a distance d away from the device. As example the distance d for a typical mobile phone with a maximum output power of 2 W would be 10‘ 8“ (3.3 m).For further details, see “Electromagnetic Emissions and Immunity” on www.resmed.com on the Products page under Service & Support. If you do not have internet access, please contact your ResMed representative.
Symbols
IP22 Protected against finger sized objects and against dripping water when tilted up to 15 degrees from specified orientation.
![]() Manufacturer: ResMed Ltd 1 Elizabeth Macarthur Drive Bella Vista NSW 2153 Australia.See ResMed.com for other ResMed locations worldwide. For patent and other intellectual property information, see ResMed.com/ip. ApneaLink and AirView are trademarks and/or registered trademarks of the ResMed family of companies.
Manufacturer: ResMed Ltd 1 Elizabeth Macarthur Drive Bella Vista NSW 2153 Australia.See ResMed.com for other ResMed locations worldwide. For patent and other intellectual property information, see ResMed.com/ip. ApneaLink and AirView are trademarks and/or registered trademarks of the ResMed family of companies.
 Global leaders in sleep and respiratory medicineResMed.com
References
[xyz-ips snippet=”download-snippet”]