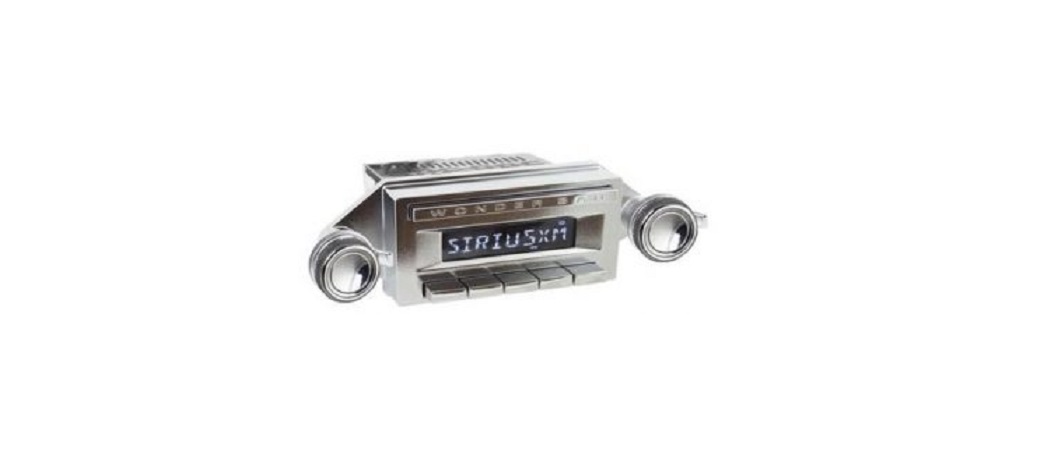
Retro Sound Modern Sound For Your Classic User Manual
General Features
- General Features (available features vary by model)
- AM/FM tuner with 30 presets and RDS (Radio Data System)
- HD Radio® Tuner (Motor 4HD Only)
- Selectable international tuner frequencies
- Built-in MOSFET amplifier
- Patented InfiniMount Bracket System for maximum installation flexibility
- Available with period-correct knobs and bezel for your vehicle
- Separate power antenna and amplifier turn-on leads
- Rear-mounted auxiliary inputs
- 3 EQ presets plus user-controlled bass, mid-range, treble, fader, and balance adjustments
- Selectable 32,000 color LCD illumination with user presets (Motor 2A, Motor 2DAB and Motor 4HD Only)
- Rear-mounted USB ports plays MP3, WMA and FLAC files (Motor 2A, Motor 2DAB and Motor 4HD Only)
- Built-in Bluetooth® for hands-free calling and audio streaming (microphone included)(Motor 2A, Motor 2DAB and Motor 4HD Only)
- Multi-channel pre-amp outputs (front, rear, subwoofer) (Motor 2A, Motor 2DAB and Motor 4HD Only)
- The only SiriusXM®-ready™ classic car radio (SiriusXM® Connect vehicle tuner and subscription required) (Motor 4HD Only)
- Made for iPod®/iPhone® (Motor 4HD Only)
- Wireless audio browsing from your iPhone® or Android device (Motor 4HD Only)
- Manufacturer warranty (see page 28)
PRECAUTIONS
PLEASE OBSERVE THESE PRECAUTIONS WHEN OPERATING THIS UNIT:
This user’s manual does not cover the installation process. Please review the Installation and Assembly Manual included in your Radio Motor box carefully before attempting installation.
Retro Manufacturing, LLC is not liable for any problems resulting from improper installation of the unit.
If you have questions about installing your radio, visit our support website at help.retromanufacturing.com, contact us via email at [email protected] retromanufacturing.com or chat with us online.
- This unit is designed for operation with a negative ground 12-volt DC battery system. Do not operate this unit with other battery systems, especially an 18-volt or 24-volt DC or a positive ground system. If you have a 6-volt system, you need to either convert to 12-volt DC or purchase a separate inverter that will increase the voltage to 12-volts. NOTE: The inverter needs to be rated at 10 amps or higher for the radio to operate properly.
- This unit is not designed for a marine environment. Please do not use the unit where it will be exposed to moisture or excessive dust. Exposure to moisture will damage the unit and void your warranty.
- Keep the volume of your radio at a level that allows you to hear outside noises, such as emergency sirens and train crossing warnings. Prolonged exposure to high volume levels may also result in hearing loss.
The information enclosed in this user manual is a universal guide to assist you in your radio’s operation. Some features covered in this manual are not available in every model. This manual may be updated from time to time.
Please check our website for the latest updates:
Accessories
Speakers
RetroSound® started in the speaker business and developed its radio line to be perfectly matched with RetroSound® speakers. Together RetroSound® Radios and Speakers produce the most accurate audio available for your classic car.
Amps & Subs
RetroSound® amplifiers and subwoofers are designed to work seamlessly with RetroSound® radios to fill in the low frequencies usually missing from a classic vehicle’s sound system.
Speaker Pods
RetroPod® speaker modules are great for classics that have no factory speaker locations. They mount to any flat surface and direct sound towards the listener for a balanced mix. Paint or wrap them for a perfect match to the interior of your classic vehicle.
USB/AUX Extension Cable
The RetroSound® USB/Auxiliary extension cable is available in black or chrome and features a 53” extension of both a USB input and a standard 3.5mm auxiliary input.
Antennas
RetroSound® offers OE-quality replacement antennas featuring chrome plated brass masts that are almost impervious to the elements and provide an improved ground plane for enhanced AM/FM reception.
RetroMat®
RetroMat® sound dampening makes a considerable difference in the audio quality you can achieve in your classic car. Installing proper sound dampening eliminates road noise and vibrations, enhancing the tonal quality of your favorite music.
Radio Operation Instructions
Front Panel Controls
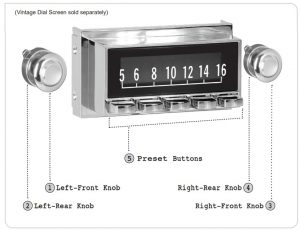
Power On/OffPress the Left-Front Knob(1) to turn the unit on. RETROSOUND will appear on the screen. Press and hold the Left-Front Knob(1) to turn the unit off.GOODBYE will appear on the screen to confirm that it has turned off.
VolumeRotate the Left-Front Knob(1) to adjust the volume between 0-46 (minimum-maximum).
ModeRotate the Left-Rear Knob(2) clockwise to select from available listening sources*: RADIO(AM/FM/HD), DAB, AUX 1, AUX 2, USB 1, USB 2, BT Audio, or SiriusXM®. (*Available sources vary by model)
NOTE: The USB mode will not appear unless a USB device is plugged in.
The USB and auxiliary inputs are located at the back of the Radio Motor. The auxiliary input(s) may be used to play music from any portable device with a standard headphone output, such as an MP3 player, iPod®/iPhone® portable CD player, or portable satellite radio receiver. The USB inputs allow you to control your iPod®/iPhone® (on Motor 4 Only) or play music from a flash drive. The USB cables must be routed to an accessible area during installation to use the USB inputs. A USB/AUX extension cable may be required for your vehicle.
Radio TuningRotate the Right-Front Knob(3) to tune to the next or previous AM/FM frequency, HD Radio® station (when available), or DAB/DAB+ channel. With HD set to “On,” the radio will tune to the HD station automatically if available and display an H next to the frequency. (Motor 4HD only)
NOTE: When the radio is tuned to a strong FM station, the stereo indicator will appear in the LCD’s upper right corner (two oval circles).
Radio BandsRotate the Right-Rear Knob(4) counter-clockwise to cycle through the five radio bands (two AM and three FM).
Storing Radio Presets (For all Radio Faces, except Apache)There are six radio presets for each radio band. For presets one through five, tune to the desired radio station and then press and hold the desired Preset Button(5) to store the station into memory. To set the sixth preset, rotate the Right-Rear Knob(4) clockwise and hold for 3 seconds to store.
Storing Radio Presets for an Apache Radio FaceTo store a preset on an Apache Radio Face, rotate the Right-Front Knob(3) to tune to the desired station, then rotate the Right-Rear Knob(4) clockwise to select the desired preset(1-6). Once selected, press the Right-Front Knob(3) to store.
Recalling Radio Presets (for all Radio Faces, except Apache)To recall radio presets, press the appropriate Preset Button(5) in the selected radio band. To recall preset six, rotate the Right-Rear Knob(4) clockwise and release it.
Recalling Radio Presets for an Apache Radio FaceTo recall a radio preset, rotate the Right-Rear Knob(4) clockwise and release it. Repeat to move through the presets.
Mute/PausePress the Right-Front Knob(3) to mute/unmute or pause/play depending on the source mode.
System Settings
The System Settings sub-menu enables access to the numerous additional features of your RetroSound® radio. Press and hold the Right-Front Knob(3) for three seconds to access the sub-menu. Then rotate the Right-Front Knob(3) to cycle through the available sub-menu options. Once in a specific sub-menu, press and release the Right-Front Knob(3) to change the options.
Auto Seek/ManualThis sub-menu toggles between Auto Seek or Manual tuning. In Auto Seek mode, the radio will tune to the next available station when tuning.To access the AUTO SEEK/MANUAL sub-menu, press and hold the Right-Front Knob(3) for three seconds, AUTO SEEK will be displayed. Press and release the Right-Front Knob(3) to select between AUTO SEEK or MANUAL. Once the desired setting is shown, let the unit time out to set.
A StoreThis sub-menu activates A STORE which will automatically fill FM presets on all three FM bands, six presets each (eighteen total presets) with the strongest radio stations available in your area.To access the A STORE sub-menu, press and hold the Right-Front Knob(3) for three seconds. Rotate the Right-Front Knob(3) until A STORE appears on the screen. Press the Right-Front Knob(3) to activate. This process can take up to one minute to complete.
HD On/Off (Motor 4HD Only)This sub-menu activates HD Radio® which will automatically tune to an HD Radio® station when available. HD Radio® is set to “On” by default. To access the HD sub-menu, press and hold the Right-Front Knob(3) for three seconds. Rotate the Right-Front Knob(3) until HD appears on the screen. Press and release the Right-Front Knob(3) to select the desired option. Once the desired setting is shown, let the unit time out to set.
HD Store (Motor 4HD Only)This sub-menu activates HD STORE which will automatically fill FM presets on all three FM bands, six presets each (eighteen total presets) with the strongest HD Radio® stations available in your area.To access the HD STORE sub-menu, press and hold the Right-Front Knob(3) for three seconds. Rotate the Right-Front Knob(3) until HD STORE appears on the screen. Press the Right-Front Knob(3) to activate. This process can take up to one minute to complete.
Local/DistantThis sub-menu adjusts the sensitivity of the FM tuner. When listening to the FM tuner, selecting LOCAL will focus the tuner in the local area, making the signal stronger. Selecting DISTANT will broaden the signal and allow your local stations to be listened to at a greater distance when traveling.
To access the LOCAL/DISTANT sub-menu, press and hold the RightFront Knob(3) for three seconds. Rotate the Right-Front Knob(3) until LOCAL/DISTANT appears on the screen. Press and release the RightFront Knob(3) to select the desired option. Once the desired setting is shown, let the unit time out to set.
ClockThis sub-menu sets the clock.
To access the CLK sub-menu, press and hold the Right-Front Knob(3) for three seconds. Rotate the Right-Front Knob(3) until CLK appears on the screen, then press the Right-Front Knob(3) to select. To adjust the hours, rotate the Right-Front Knob(3) clockwise or counter-clockwise.
Adjusting past 12 will change between AM and PM. Once the hour is set, press the Right-Front Knob(3) to adjust the minutes, rotate the Right-Front Knob(3) to adjust. Once the desired time is shown, let the unit time out to set.
Clock 12/24This sub-menu changes the clock from a twelve-hour clock to a twentyfour-hour clock. The default setting is for a twelve-hour clock (CLK 12).
To access the CLK 12/24 sub-menu, press and hold the Right-Front Knob(3) for three seconds. Rotate the Right-Front Knob(3) until CLK 12 appears on the screen. Press and release the Right-Front Knob(3) to select the desired option. Once the desired setting is shown, let the unit time out to set.
Display Frequency/ClockThis sub-menu sets the screen to display either the radio station you’re listening to, (DISP FREQ), or the current time (CLK).
To access the DISP sub-menu, press and hold the Right-Front Knob(3) for three seconds. Rotate the Right-Front Knob(3) until DISP FREQ appears on the screen. Press and release the Right-Front Knob(3) to select either DSIP FREQ or DISP CLK. Once the desired setting is shown, let the unit time out to set.
Clock ON/OFFThis sub-menu sets the radio to display or hide the current time when the radio is off. The default setting displays the time when the radio is off (CLK ON).
To access the CLK ON/OFF sub-menu, press and hold the Right-Front Knob(3) for three seconds. Rotate the Right-Front Knob(3) until CLK ON appears on the screen. Press and release the Right-Front Knob(3) to select the desired option. Once the desired setting is shown, let the unit time out to set.
Beep On/OffThis sub-menu sets the audible beep confirmation that sounds during the operation of the radio on or off. Select BEEP ON to hear the audible beep or BEEP OFF to disable it.
To access the BEEP sub-menu, press and hold the Right-Front Knob(3) for three seconds. Rotate the Right-Front Knob(3) until BEEP appears on the screen. Press and release the Right-Front Knob(3) to select the desired option. Once the desired setting is shown, let the unit time out to set.
Display Color (Motor 2A, Motor 2DAB, and Motor 4HD only) This sub-menu changes the display color. The default setting is SCAN, which will cycle through all of the available colors.
To access the display color sub-menu, press and hold the Right-Front Knob(3) for three seconds. Rotate the Right-Front Knob(3) until SCAN appears on the screen. Press and release the Right-Front Knob(3) to select the desired color preset. Once the desired setting is shown, let the unit time out to set.
To create a custom color, press and hold the Right-Front Knob(3) for three seconds to access the sub-menu system. Rotate the Right-Front Knob(3) until SCAN (or current color) appears on the screen. Press and release the Right-Front Knob(3) until you see USER. Rotate the Right-Front Knob(3) clockwise to access the RGB settings and press the Right-Front Knob(3) to select. Rotate the Right-Front Knob(3) to set a color value for RED, then press the Right-Front Knob(3) to move to the next color. Repeat the steps to adjust the values for each color. Once the desired color is set, press the Right-Front Knob(3) to accept the settings and let the unit time out to set
WARNING: Setting all RGB values to “00” will make the display unreadable. Resetting your radio will NOT reset the display.
Dimmer High/LowThis sub-menu sets the radio’s display brightness to high (DIMM HIGH), medium (DIMM MEDIUM), or low (DIMM LOW).
To access the DIMMER sub-menu, press and hold the Right-Front Knob(3) for three seconds. Rotate the Right-Front Knob(3) until DIMMER appears on the screen. Press and release the Right-Front Knob(3) to select the desired option. Once the desired setting is shown, let the unit time out to set.
RDS (Radio Data System)This sub-menu turns the RDS function on or off. RDS tuners can automatically tune in stations according to the music style (or talk) they broadcast. With the RDS function ON, and if the FM station you are listening to is broadcasting RDS information, the radio station call letters, song info, artist info, and other messages will appear on the display. Not all FM stations use RDS, nor will all RDS functions work in every location.
To access the RDS sub-menu, press and hold the Right-Front Knob(3) for three seconds. Rotate the Right-Front Knob(3) until RDS appears on the screen. Press and release the Right-Front Knob(3) to toggle RDS ON or RDS OFF. Once the desired setting is shown, let the unit time out to set.
Program TypeThis sub-menu allows you to select from 31 predefined program types (i.e. News, Info, Sports). Once set, you will be able to use PTY SEEK to findsimilar stations to your selected program type.
To access the PTY sub-menu, press and hold the Right-Front Knob(3) for three seconds. Rotate the Right-Front Knob(3) until PTY appears on the screen. Press and release the Right-Front Knob(3) to enter the list of program types. Rotate the Right-Front Knob(3) to select between the available options. Once the desired program type is shown, press the Right-Front Knob(3) to accept. PTY SEEK will appear on the screen, indicating that the radio is searching the FM band for stations with your selected program type. If none are found, the radio will revert to the last station selected.
Alternative FrequencyThis sub-menu enables the radio to automatically search for another frequency that provides the same station when the signal gets weak.
To access the AF sub-menu, press and hold the Right-Front Knob(3) for three seconds. Rotate the Right-Front Knob(3) until AF ON/OFF appears on the screen. Press and release the Right-Front Knob(3) to select the desired option. Once the desired setting is shown, let the unit time out to set.
Traffic AnnouncementsThis sub-menu toggles the traffic announcements function on or off. The traffic announcements function is part of the RDS and allows FM stations to broadcast traffic announcements that scroll across the screen or audible traffic alerts to your radio.
To access the TA sub-menu, press and hold the Right-Front Knob(3) for three seconds. Rotate the Right-Front Knob(3) until TA ON/OFF appears on the screen. Press and release the Right-Front Knob(3) to select the desired option. Once the desired setting is shown, let the unit time out to set.
Clock TimeThis sub-menu toggles the clock time feature on or off. If the radio station supports clock time, your radio will synchronize its clock with the radio station’s clock.
To access the CT sub-menu, press and hold the Right-Front Knob(3) for three seconds. Rotate the Right-Front Knob(3) until CT ON/OFF appears onthe screen. Press and release the Right-Front Knob(3) to select the desired option. Once the desired setting is shown, let the unit time out to set.
Bluetooth® On/Off (Motor 2A, Motor 2DAB, and Motor 4HD only)This sub-menu toggles Bluetooth® on or off. Bluetooth® must be enabled before you can connect a Bluetooth® device.
To access the BT sub-menu, press and hold the Right-Front Knob(3) for three seconds. Rotate the Right-Front Knob(3) until BT ON/OFF appears on the screen. Press and release the Right-Front Knob(3) to select the desired option. Once the desired setting is shown, let the unit time out to set.
Bluetooth® Connect/Disconnect (BT must be “ON”)This sub-menu enables the radio to be discoverable on your Bluetooth® device. Choose BT CONNEC to allow your device to connect, and BT DISCON to disconnect Bluetooth® devices.
To access the BT CONNEC/DISCON sub-menu, press and hold the Right-Front Knob(3) for three seconds. Rotate the Right-Front Knob(3) until BT CONNEC/DISCON appears on the screen. To connect a device, press and release the Right-Front Knob(3) to select BT CONNEC, then search for “RETROSOUND” in your phone’s Bluetooth® device list. Enter password “0000” if prompted. To disconnect a device, press and release the Right-Front Knob(3) to select BT DISCON, then let the unit time out to disconnect the current device
Area USA/EUR/AUS/JAP/RUSThis sub-menu allows you to set your area to receive the appropriate broadcasts for your region. The default setting is the United States (USA).
To access the AREA sub-menu, press and hold the Right-Front Knob(3) for three seconds. Rotate the Right-Front Knob(3) until AREA USA appears on the screen. Press and release the Right-Front Knob(3) to select the desired region (USA/EUR/AUS/JAP/RUS). Once the desired region is shown, let the unit time out to set.
Volume Last/AdjustThis sub-menu adjusts the volume level at which the radio will turn on. The default setting is VOL LAST, which means the radio turns on at the volume level at which the radio was turned off. VOL ADJUS allows you to preset the volume level at which the radio turns on from 0-46, regardless of the volume level at which the radio was turned off (see “Volume” on page 5).
To access the VOL sub-menu, press and hold the Right-Front Knob(3) for three seconds. Rotate the Right-Front Knob(3) until VOL appears on the screen. Press and release the Right-Front Knob(3) to select the desired option. If VOL ADJUS is selected, rotate the Right-Front Knob(3) clockwise (AD VAL is shown) and press the Right-Front Knob(3) to accept. Rotate the Right-Front Knob(3) again to adjust the level between 0-46. Once desired setting is shown, let the unit time out to set.
SEL Panel (Motor 1A, Motor 2A, Motor 1DAB, and Motor 2DAB only)This sub-menu changes the operating mode between Normal (with pushbuttons) and Apache (without push-buttons).
To access the SEL PANEL sub-menu, press and hold the Right-Front Knob(3) for three seconds. Rotate the Right-Front Knob(3) until SEL PANEL appears on the screen. Press and release the Right-Front Knob(3) to enter the panel choices. Rotate the Right-Front Knob(3) to select the desired option. Once the desired setting is shown, let the unit time out to set.
Software InfoThis sub-menu displays the unit’s software version.To access the sub-menu, press and hold the Right-Front Knob(3) for three seconds. Rotate the Right-Front Knob(3) until the software version appears on the screen (there are no adjustable settings in this menu).
System ResetThis sub-menu resets the unit to factory settings.To access the RESET sub-menu, press and hold the Right-Front Knob(3) for three seconds. Rotate the Right-Front Knob(3) until RESET appears on thescreen. Press and release the Right-Front Knob(3) to reset the unit to factory settings. The unit will reset and turn off
Digital Signal ProcessorThis sub-menu sets the Digital Signal Processor (DSP) Setting. The default setting is off (DSP OFF). When activated, you are able to select one of three preset equalization settings:
- CLASSIC: This setting offers subtle sonic adjustments that lend themselves to classical music.
- POP: This setting accentuates bass and treble frequencies and is suitable for popular music.
- ROCK: This setting accentuates treble frequencies and is suitable for rock music
To access the DSP sub-menu, press the Left-Front Knob(1) once, DSP OFF will be displayed. Rotate the Left-Front Knob(1) clockwise to select from the available presets. Once the desired setting is shown, let the unit time out to set.
NOTE: If using one of the preset DSP settings, any manual adjustments to Mid, Bass, or Treble will not save when the radio is powered off.
BassThis sub-menu adjusts the radio’s bass levels.
To access the BASS sub-menu, press and release the Left-Front Knob(1) until BASS appears on the screen. Rotate the Left-Front Knob(1) clockwise or counter-clockwise to select the desired level. Once the desired setting is shown, let the unit time out to set.
MidThis sub-menu adjusts the radio’s mid levels.
To access the MID sub-menu, press and release the Left-Front Knob(1) until MID appears on the screen. Rotate the Left-Front Knob(1) clockwise or counter-clockwise to select the desired level. Once the desired setting is shown, let the unit time out to set.
TrebleThis sub-menu adjusts the radio’s treble levels.
To access the TREBLE sub-menu, press and release the Left-Front Knob(1) until TREBLE appears on the screen. Rotate the Left-Front Knob(1) clockwise or counter-clockwise to select the desired level. Once the desired setting is shown, let the unit time out to set.
BalanceThis sub-menu adjusts the radio’s balance from left to right.
To access the BAL sub-menu, press and release the Left-Front Knob(1) until BAL appears on the screen. Rotate the Left-Front Knob(1) clockwise or counter-clockwise to select the desired level. Once the desired setting is shown, let the unit time out to set.
FaderThis sub-menu adjusts the radio’s fader from front to back.
To access the FADER sub-menu, press and release the Left-Front Knob(1) until FADER appears on the screen. Rotate the Left-Front Knob(1) clockwise or counter-clockwise to select the desired level. Once the desired setting is shown, let the unit time out to set.
XBASSThis sub-menu enables or disables the XBAS function. XBAS boosts the low frequencies resulting in enhanced bass tones.
To access the XBAS sub-menu, press and release the Left-Front Knob(1) until XBAS appears on the screen. Rotate the Left-Front Knob(1) clockwise or counter-clockwise to select the desired option. Once the desired setting is shown, let the unit time out to set.
Subwoofer (Motor 4HD only)This sub-menu toggles the subwoofer RCA output on or off.
To access the SUB sub-menu, press and release the Left-Front Knob(1) until SUB appears on the screen. Rotate the Left-Front Knob(1) clockwise or counter-clockwise to select the desired option. Once the desiredsetting is shown, let the unit time out to set.
Subwoofer Volume (Motor 4HD only)This sub-menu adjusts the subwoofer volume between 0-12 and will only appear as an option when SUB ON is selected in the Subwoofer menu.
To access the SUB VOL sub-menu, press and release the Left-Front Knob(1) until SUB VOL appears on the screen. Rotate the Left-Front Knob(1) clockwise or counter-clockwise to select the desired setting. Once the desired setting is shown, let the unit time out to set.
Subwoofer Frequency (Motor 4HD only)This sub-menu adjusts the frequency crossover point of the subwoofer between 80Hz, 120Hz, or 160Hz.
To access the SUB sub-menu, press and release the Left-Front Knob(1) until SUB 120H appears on the screen. Rotate the Left-Front Knob(1) clockwise or counter-clockwise to select the desired setting. Once the desired setting is shown, let the unit time out to set.
Bass FrequencyThis sub-menu adjusts the bass tones’ frequency crossover point between 60Hz, 80Hz, 100Hz, or 200Hz.
To access the BAS sub-menu, press and release the Left-Front Knob(1) until BAS 80H appears on the screen. Rotate the Left-Front Knob(1) clockwise or counter-clockwise to select the desired setting. Once the desired setting is shown, let the unit time out to set.
Mid Frequency (Motor 2A, Motor 2DAB, and Motor 4HD only)This sub-menu adjusts the mid-tones’ frequency crossover point between 0.5KHz, 1.0KHz, 1.5KHz, or 2.5KHz.
To access the MID sub-menu, press and release the Left-Front Knob(1) until MID 1.0K appears on the screen. Rotate the Left-Front Knob(1) clockwise or counter-clockwise to select the desired setting. Once the desired setting is shown, let the unit time out to set.
Treble FrequencyThis sub-menu adjusts the treble tones’ frequency crossover point between 0.5KHz, 10.0KHz, 12.5KHz, 15.0KHz, or 17.5KHz.
To access the TRE sub-menu, press and release the Left-Front Knob(1) until TRE 10.0K appears on the screen. Rotate the Left-Front Knob(1) clockwise or counter-clockwise to select the desired setting. Once the desired setting is shown, let the unit time out to set.
USB Device Instructions
USB InputsUSB inputs (Motor 2A, Motor 2DAB, and Motor 4HD only) are located at the rear of the Radio Motor. The USB cables must be routed during installation to a convenient and accessible location for connecting USB devices.
NOTE: The USB Mode will not appear in the menu unless a USB device is plugged in.
USB Device ConnectionConnect your USB Flash Drive, iPod®/iPhone®, or other supported USB devices to one of the USB inputs. The radio will display USB1 or USB2 for three seconds indicating the device has been connected successfully.After connecting a USB device, the radio will display the USB icon ![]() on the screen and automatically find your songs and begin playback.
on the screen and automatically find your songs and begin playback.
USB Device Operation (Apache users see page 23)The Preset Buttons(5) will enable you to play/pause, listen to 10 seconds of each song (INTRO), randomly shuffle all songs (RDM), and navigate folders
- To play or pause a song, press the First Preset Button.
- To activate/deactivate intro mode, press the Second Preset Button.
- To activate/deactivate shuffle mode, press the Third Preset Button.
- To navigate to the previous folder, press the Fourth Preset Button.
- To navigate to the next folder, press the Fifth Preset Button.
- To switch to the next song, rotate the Right-Front Knob(3) clockwise.
- To switch to the previous song, rotate the Right-Front Knob(3) counterclockwise.
- To activate/deactivate repeat, rotate the Right-Rear Knob(4) clockwise.
Bluetooth® Device Instructions
Bluetooth® (Motor 2A, Motor 2DAB, and Motor 4HD only) When using a Bluetooth® device for the first time, you must enable Bluetooth® and pair the device with the unit. (see pages 11)
Making a CallTo make a call, dial the desired number on the paired cell phone. Once dialing is in progress; CALLING will appear on the screen. When a call is in progress, TALK will appear on the screen along with the elapsed call time (TALK 00:00).
During a call, the radio music source will be muted, and the call audio will broadcast through your car’s speaker system.
Answering a CallWhen a call is incoming, any audio playback from the current source will either be muted or paused (depending on the source). PHONE IN will be shown on the screen along with the caller ID if it is enabled by the phone/ carrier. To accept the call, rotate the Left-Rear Knob(2) counterclockwise. To end the call, rotate the Left-Rear Knob(2) again counterclockwise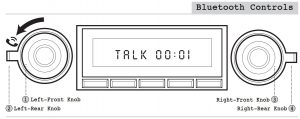
Streaming MusicWith a device paired, rotate the Left-Rear Knob(2) clockwise to select BT AUDIO. Next, select your desired playback source on your device (Apple Music®, Spotify®, Pandora®, YouTube Music®, etc.) and play the music as you normally would.
Browsing Music (not available on all devices)Some devices will allow you to browse folders and skip songs using the Right-Front Knob(3) and the Right-Rear Knob(4). To skip songs, rotatethe Right-Front Knob(3). To browse music, rotate the Right-Rear Knob(4) counterclockwise to access the browsing sub-menu, then rotate the RightFront Knob(3) to cycle through the options (artist, album, song, folder) and press the Right-Front Knob(3) to make your selection.
SiriusXM® Instructions
SiriusXM® Satellite Radio (Motor 4HD only)A SiriusXM® Connect Vehicle Tuner, antenna, and SiriusXM® subscription are required to use the satellite radio functionality. For more information on SiriusXM®, please visit www.SiriusXM.com.
Installation CheckAfter installing your SiriusXM® Connect Vehicle Tuner and antenna, check that your installation was successful by tuning to the preview channel. Rotate the Left-Rear Knob(2) clockwise until SiriusXM® appears on the screen, then rotate the Right-Front Knob(3) to tune to channel 1. You should be able to hear the SiriusXM® preview on this channel. If you cannot hear the preview channel, check your tuner’s installation instructions to ensure your SiriusXM® Connect Vehicle Tuner is installed correctly.
SiriusXM® ActivationTo activate your SiriusXM® account, you’ll need the Radio ID of your tuner. To display your Radio ID, set the radio source to SiriusXM® by rotating the Left-Rear Knob(2) clockwise until SiriusXM® appears on the screen.Rotate the Right-Front Knob(3) to tune to channel 0. The Radio ID will appear on the screen. You can also find your Radio ID on the bottom of the SiriusXM® Connect Vehicle Tuner and in its packaging. It’s a good idea to write this number down and store it in a safe place for reference.
NOTE: The SiriusXM® Radio ID does not include the letters I, O, S, or F.
In the USA, you can activate your account at www.SiriusXM.com/activate-now or by calling SiriusXM® Listener Care at 866.635.2349
In Canada, you can activate your account at www.SiriusXM®.ca/activatexm or by calling XM Customer Care at 877.438.9677
As part of the activation process, the SiriusXM® satellites will send an activation message to your tuner. When your radio detects that the tuner has received the activation message, your radio will display a message to confirm that the subscription updated. Once subscribed, you can tune to channels available in your subscription plan. The activation process usually takes 10 to 15 minutes but may take up to an hour. Your radio will need to be powered on and receiving the SiriusXM® signal to receive the activation message.
SiriusXM® Tuner OperationTo access the SiriusXM® Connect Vehicle Tuner, set the radio source to SiriusXM® by rotating the Left-Rear Knob(2) clockwise until SiriusXM® appears on the screen.
SiriusXM® TuningRotate the Right-Front Knob(3) to change channels up or down.
SiriusXM® Preset BandsYou can store five SiriusXM® channels in three bands for a total of 15 presets. To cycle between the SiriusXM® bands, rotate the Right-Rear Knob(4) counter-clockwise. Storing/Recalling SiriusXM® Presets There are five presets for each SiriusXM® band. To set a preset, tune to the desired station, then press and hold the appropriate Preset Button(5) to store the station into memory. To recall a SiriusXM® preset, press the appropriate Preset Button(5) in the selected radio band.
Replay™ ModeThe Replay™ mode allows you to play, pause, skip, fast-forward, and rewind.
Pause/ResumeTo pause SiriusXM® playback and enter Replay™ mode, press the RightFront Knob(3). The screen will display IR PAUSED to indicate you are in Replay™ mode. To resume playback, press the Right-Front Knob(3) again. During playback in Replay™ mode, the channel audio will continue to be stored until Replay™ mode is exited.
Playback Controls in Replay™ ModeTo rewind, press and hold the Fourth Preset Button. To fast forward, press and hold the Fifth Preset Button. To skip to previous track/marker, press and release the Fourth Preset Button. To skip to the next track/marker, press and release the Fifth Preset Button. To exit Replay™ mode and return to the live satellite radio broadcast, press and release the First Preset Button.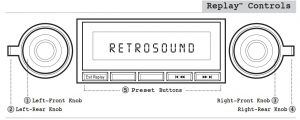
Display SettingsEach SiriusXM® channel will broadcast text information such as the channel name, artist, song title, and content. To cycle through the display information, rotate the Left-Rear Knob(2) counter-clockwise. Each time the knob is rotated, the display will change as follows: Channel>Artist>Title>Info>Category>Time>Station.
SiriusXM® Sub-Menu SystemThe SiriusXM® sub-menu system can only be accessed while in the SiriusXM® source mode. To access the sub-menu, rotate the Right-RearKnob(4) clockwise once.
While in the sub-menu system, rotate the Right-Front Knob(3) clockwise to cycle to the next sub-menu selection.
- Category (specific music/news/sports channels)
- Direct (direct tuning to a specific station)
- Mature OFF (toggles Mature Channel Lock on or off)
- Mature Code (changes the Mature Channel Lock passcode)
- Signal (SiriusXM® signal strength
To select a specific sub-menu, press the Right-Front Knob(3). To exit the sub-menu, rotate the Right-Rear Knob(4) clockwise.
CategoryThis feature enables the ability to search for channels based upon their specific category.
To access the sub-menu system, rotate the Right-Rear Knob(4) clockwise once. Rotate the Right-Front Knob(3) clockwise until you see CATEGORY on the screen. Press the Right-Front Knob(3) to enter the category selections. Rotate the Right-Front Knob(3) to cycle through the available options. Once the desired category is shown, press the Right-Front Knob(3) to accept your selection. Rotating the Right-Front Knob(3) will now cycle through every channel within the selected category.
Direct Channel TuningThis feature enables the ability to tune to any channel by entering the channel number directly.
To access the sub-menu system, rotate the Right-Rear Knob(4) clockwise once. Rotate the Right-Front Knob(3) clockwise until you see DIRECT on the screen. Press the Right-Front Knob(3) to enter the first channel number. Rotate the Right-Front Knob(3) to set the value of the first number, then press the Right-Front Knob(3) to accept and move to the next number. Rotate the Right-Front Knob(3) once more to set the second number and press the Right-Front Knob(3) to confirm the selection.
Setting the Mature Channel LockThis feature enables the ability to limit access to SiriusXM® channels with mature content. When enabled, the Mature Channel Lock feature requires you to enter a passcode to tune to the locked channels. The default passcode is 1111.
To access the sub-menu system, rotate the Right-Rear Knob(4) once. Rotate the Right-Front Knob(3) clockwise until you see MATURE OFF on the screen. Press and release the Right-Front Knob(3) to set a channel lock code. Rotate the Right-Front Knob(3) to set the first number, then press the Right-Front Knob(3) to accept and move on to the next number. Repeat this process for the remaining numbers and press the Right-Front Knob(3) to accept the final number and turn the mature lock on.
Changing the Mature Channel Lock PasscodeThe Mature Channel Lock passcode can be changed by entering the current code and setting a new one.
To access the sub-menu system, rotate the Right-Rear Knob(4) once. Rotate the Right-Front Knob(3) until you see MATU CODE on the screen. Press the Right-Front Knob(3) to enter the current passcode (default is 1111). Rotate the Right-Front Knob(3) to set the first number, press the Right-Front Knob(3) to accept, and move on to the next number. Repeat this process for the remaining numbers and press the Right-Front Knob(3) to accept and enter a new code. Repeat the process above to set a new code.
Signal StrengthThis Sub-Menu displays the current SiriusXM® signal strength on the screen.
To access the sub-menu system, rotate the Right-Rear Knob(4) once. Rotate the Right-Front Knob(3) clockwise until you see SIGNAL. The signal strength will be displayed on the screen.
SiriusXM® TroubleshootingIf your SiriusXM® Connect Vehicle Tuner does not appear to be functioning properly, and one of these advisory messages appears on the display, try some of these troubleshooting tips.
CHK TNR (check tuner)This message indicates an issue with your SiriusXM® Connect Vehicle Tuner.
- Check that your tuner is securely plugged into the back of the Radio Motor.
- Check the wires between your unit and the SiriusXM® tuner for damage.
- Check the tuner to ensure that it is not damaged.
CHKANT (check antenna)This message indicates an issue with your SiriusXM® antenna connection.
- Check that your SiriusXM® antenna is plugged into the tuner and that the connection is secure.
- Check that the SiriusXM® antenna is not damaged.
- If the antenna connections are secure and the advisory message is still displayed, turn the radio off and back on to reset the advisory message.
BUSY (no signal)This message indicates that your SiriusXM® tuner isn’t acquiring the audio or program information from the satellite. If this message does not go away after a few seconds, the satellite signal is too weak at your current location. To solve this issue:
- Make sure the antenna is mounted away from metal objects.
- Move the vehicle to a new location – especially if your vehicle is parked underground or in a parking garage.
CH UNAVL (channel unavailable)This message indicates that the current channel is unavailable. This error can happen for several reasons:
- The channel may no longer be available on SiriusXM®.
- The channel may not be available with your current SiriusXM® subscription package.
CH LOCKED (mature channel locked)This message indicates that the Mature Channel Lock has locked the channel.
- Enter the Mature Channel Lock code.
- Tune to a channel that is not locked by the Mature Channel Lock.
- Disable the Mature Channel Lock (see page 21 for instructions).
Apache Radio Instructions
Apache Mode (operation without push-buttons)To set up your radio to function with the Apache Radio Face, press and hold the Right-Front Knob(3) for three seconds to access the sub-menu system. Rotate the Right-Front Knob(3) to cycle through the choices until SEL PANEL appears. Press and release the Right-Front Knob(3) to select between APACHE and NORMAL. With APACHE displayed on the screen, let the unit time out to set.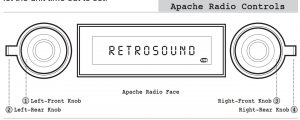
Storing Radio PresetsTo store a preset on the Apache Radio Face, rotate the Right-Front Knob(3) to tune to the desired station, then rotate the Right-Rear Knob(4) clockwise to select the desired preset (1-6). Once selected, press the Right-Front Knob(3) to store.
Recalling Radio PresetsTo recall a preset, turn the Right-Rear Knob(4) clockwise and release.Repeat to move through the saved presets.
USB Device Playback (Motor 2A, Motor 2DAB, and Motor 4HD only) After connecting a USB device, the radio will display the USB icon ![]() on the screen and automatically find your songs and begin playback.The Left-Front Knob(1) will enable you to listen to 10 seconds of each song (INTRO), randomly shuffle all songs (SHUFFLE), and turn on repeat (REP ALL/REP ONE).
on the screen and automatically find your songs and begin playback.The Left-Front Knob(1) will enable you to listen to 10 seconds of each song (INTRO), randomly shuffle all songs (SHUFFLE), and turn on repeat (REP ALL/REP ONE).
To activate/deactivate INTRO, press and release the Left-Front Knob(1) until INTRO appears on the screen, rotate Left-Front Knob(1) to toggle INTRO ON or INTRO OFF. Let the unit time out to set.
To activate/deactivate SHUFFLE/REP, press and release the Left-Front Knob(1) until SHUFFLE appears on the screen, rotate Left-Front Knob(1) to select REP ALL/SHUFFLE/REP ONE. Let the unit time out to set. To go to the next folder, rotate the Right-Rear Knob(4) clockwise. To go to a previous folder, rotate the Right-Rear Knob(4) counter-clockwise
Troubleshooting
| Problem | Possible Cause | Action to Solve Problem |
| Radio will not turn on (no lights, no sound) | Constant +12V (yellow) wire not connected or incor- rect voltage | Check all connections for proper voltage with a volt meter. Voltage range: 12- 15 volts |
| +12V ignition/ac- cessory (red) wire not connected or incorrect voltage | Check +12V accessory (red) wire connection and test voltage | |
| Ground (black) wire not connected | Check ground connection | |
| Fuse on constant +12V (yellow) wire is blown | Replace blown fuse | |
| No sound heard from unit but unit lights up | Volume turned all the way down | Increase radio volume |
| Internal amp in protection mode | Check speaker leads for any grounded or shorted wires or reset sys- tem to factory defaults* | |
| Wrong source mode selected | Make sure the unit is in the desired source mode (RADIO,AUX) | |
| Unit blows fuses | Possible short in wiring or incorrect fuse used | Make sure only fuses with correct 15 amp ratings are used and check all wiring connections for possible short |
| Battery hooked up backwards | Make sure battery is prop- erly connected |
*System ResetTo restore/reset the unit to factory defaults see page 13.
Frequently Asked Questions
Do your radios work on 6 volt systems or on positive ground systems?
No. Our radios are 12 volt, negative ground only. After-market converters and inverters are available but must provide at least 10 amps of continuous output
I’m having problems getting the radio to turn on.
RetroSound® radios require 12 volts to both power leads. The red lead (+12 volt accessory) goes to a switched power source, and the yellow to a constant +12 volt power source. Using a volt meter, check the voltage when the key is turned from “off” to “on”. If there is a significant drop in the voltage, the circuit to which you have the yellow lead attached cannot handle the additional draw of the radio. You will need to find another circuit that can handle the additional draw of the radio, or you will need to go directly to the battery
What speaker wire do you recommend I use?
We recommend using 16 gauge wire for our speakers.
I have all 4 speakers connected to your radio and the display is lit up like it is working, but there’s no sound coming out.
This usually indicates one of two things:
- Speaker wires touching each other or the vehicle chassis at some point. Check each speaker lead from radio to speaker.
- Speaker impedance below 4 ohms. Older speakers are usually not compatible with modern electronics.
My car originally came with a switch to control my automatic antenna. Can I use the RetroSound® radio’s remote antenna wire to control my antenna?
No, you cannot. Your factory antenna is known as “semi-automatic.” It requires a switch to either extend or retract the antenna. You must retain this switch to control your antenna; the RetroSound® radio’s power antenna wire is for more modern “fully-automatic” antennas not requiring a separate switch.
The sound output is all mid-range, with very little bass and astrangled-sounding upper range. What is wrong?
One of your speaker wires is connected backwards. This is called being “out of phase.” Check to make sure positive is wired to positive and negative to negative on all your speakers.
Will cutting or bending the InfiniMount Brackets void the warrantyor harm the unit?
No. The RetroSound® patented InfiniMount Bracket system has been designed specifically to be bent, cut and modified to simplify radio installation. Modifying the radio’s brackets is actually encouraged to ensure proper fit.
If you have questions about modifying the brackets, contact us via email at[email protected] or visit help.retromanufacturing.com.
How much should I tighten the shaft nuts when installing thebrackets and mounting the radio to the dash?
DO NOT OVERTIGHTEN the shaft nuts. The shaft nuts are NOT the only means of securing the radio to the dash. There is a backstrap included which works with the shaft nuts to secure the radio to the dash. Please note that overtightening the shaft nuts could break the shafts. Retro Manufacturing, LLC will not be responsible for broken shafts due to overtightening the shaft nuts.
I have your radio with an amplifier connected, but hear a whining/ buzzing sound through the speakers when I step on the accelerator.
If you have an external amplifier installed and experience a high-pitched noise that varies with the engine’s RPM, there are many possible solutions:
- Make sure the amplifier’s gain controls are not turned all the way up. Amplifiers amplify everything, including noise.
- Try grounding the amplifier near where it is installed.
- Try a filter on the amplifier’s 12 volt power lead. Make sure to use a filter that includes a ground wire.
- On rare occasions, noise can be introduced through the antenna lead.If disconnecting the antenna makes the noise go away, you need to replace or repair the antenna plug where it goes into the radio
Specification
FM
- Tuning Range (USA, EUR, AUS, JAP, RUS tuning capable): 87.5-107.9MHz
- Antenna Terminal: External Antenna Connector
- Usable Sensitivity: 12.5dBf
- Selectivity: 75 dB @400kHz
- Signal to Noise Ratio: 62dB (Stereo), 67dB (Mono)
- Harmonic Distortion @ 1 kHz: 0.8% (Stereo), 0.5% (Mono)
- Separation: 32dB @1kHz
- Frequency Response : 30-16,000Hz
AM
- Tuning Range (USA, EUR, AUS, JAP, RUS tuning capable): 530-1710kHz
- Antenna Terminal: External Antenna Connector
General
- Dimensions (Radio Face): 3.5”W x 1.5”H x 1.05”D (dimensions will vary depending on product purchased)
- Dimensions (Radio Motor): 3.96”W x 1.98”H x 4.30”D
- Power Requirements: 11.5-14.4V
- Current Consumption (during operation): Max. 15A
- Current Consumption (car off): <3.5 mA
- Output Power (@14.4volts @4ohm @1% THD): 18x4w RMS 40×4 Max
- Output Impedance: 4-8ohm
- AUX Input (aux cable length, 8”): >300 mV / 6 kΩ
NOTE: All specifications are subject to change without notice.
Warranty
Your unit comes with a manufacturer’s warranty covering any defects in materials and workmanship. Retro Manufacturing, LLC (collectively referred to as “the warranter”) at its option will either (a) repair your unit with new or refurbished parts, or (b) replace it with a new or refurbished unit. The warranty period starts from the original purchase date and is valid for the length of time indicated in the chart below. The decision to repair or replace will be made by the warranter.
| ITEM | WARRANTY |
| Motor 1A, Motor 2A, Motor 1DAB, Motor 2DAB | One (1) Year |
| Motor 4HD | Two (2) Years |
During the “Parts” warranty period, there will be no charge for parts. You must mail in your unit during the warranty period. This warranty only applies to products purchased and serviced in the United States or Puerto Rico. This warranty is extended only to the original purchaser of a new product which was not sold “as is.” A purchase receipt or other proof of the original purchase date is required for warranty service.
To handle a warranty issue, contact us at [email protected] or 888.325.1555 for a Return Authorization (RA) number. All returns and warranty issues must be accompanied by a RA number. Any product received without a RA number will be refused.
LIMITED WARRANTY-LIMITS AND EXCLUSIONS
This warranty ONLY COVERS failures due to defects in materials and workmanship, and DOES NOT COVER normal wear and tear or cosmetic damage. The warranty ALSO DOES NOT COVER damages which occurred during shipment, failures which are caused by products not supplied by the warranter, failures which result from accident, misuse, abuse, neglect, bug infestation, mishandling, misapplication, alteration, faulty installation, set-up adjustment, maladjustment of consumer control, improper maintenance, improper antenna, inadequate signal reception or pickup, power line surge, improper voltage supply, lightning, modification, commercial use (such as use in hotels, offices, restaurants, or other business uses) or rental use of the product, or service by anyone other than Retro Manufacturing, LLC, or damage that is attributable to acts of God.
THERE ARE NO EXPRESS WARRANTIES EXCEPT AS LISTED UNDER “LIMITED WARRANTY”. THE WARRANTER IS NOT LIABLE FOR INCIDENTAL OR CONSEQUENTIAL DAMAGES RESULTING FROM THE USE OF THIS UNIT OR ARISING OUT OF ANY BREACH OF THIS WARRANTY. (As examples, this excludes damages for lost time, cost of having someone remove or re-install an installed unit if applicable, travel to and from the servicer, and loss of media, data or other memory contents. The items listed are not exclusive, but are for illustration only.) ALL EXPRESS AND IMPLIED WARRANTIES, INCLUDING THE WARRANTY OF MERCHANTABILITY, ARE LIMITED TO THE PERIOD OF THE LIMITED WARRANTY.
Some states do not allow the exclusion or limitation of incidental or consequential damages, or limitations on how long an implied warranty lasts, so the exclusions may not apply to you. This warranty gives you specific legal rights and you may also have other rights which vary from state to state. If a problem with this unit develops during or after the warranty period, you may contact your dealer or Retro Manufacturing, LLC.
7470 Commercial Way | Henderson, NV 89011help.retromanufacturing.com
 RETROMANUFACTURING

References
[xyz-ips snippet=”download-snippet”]