REVOLT Rechargeable Master Gardener User Manual
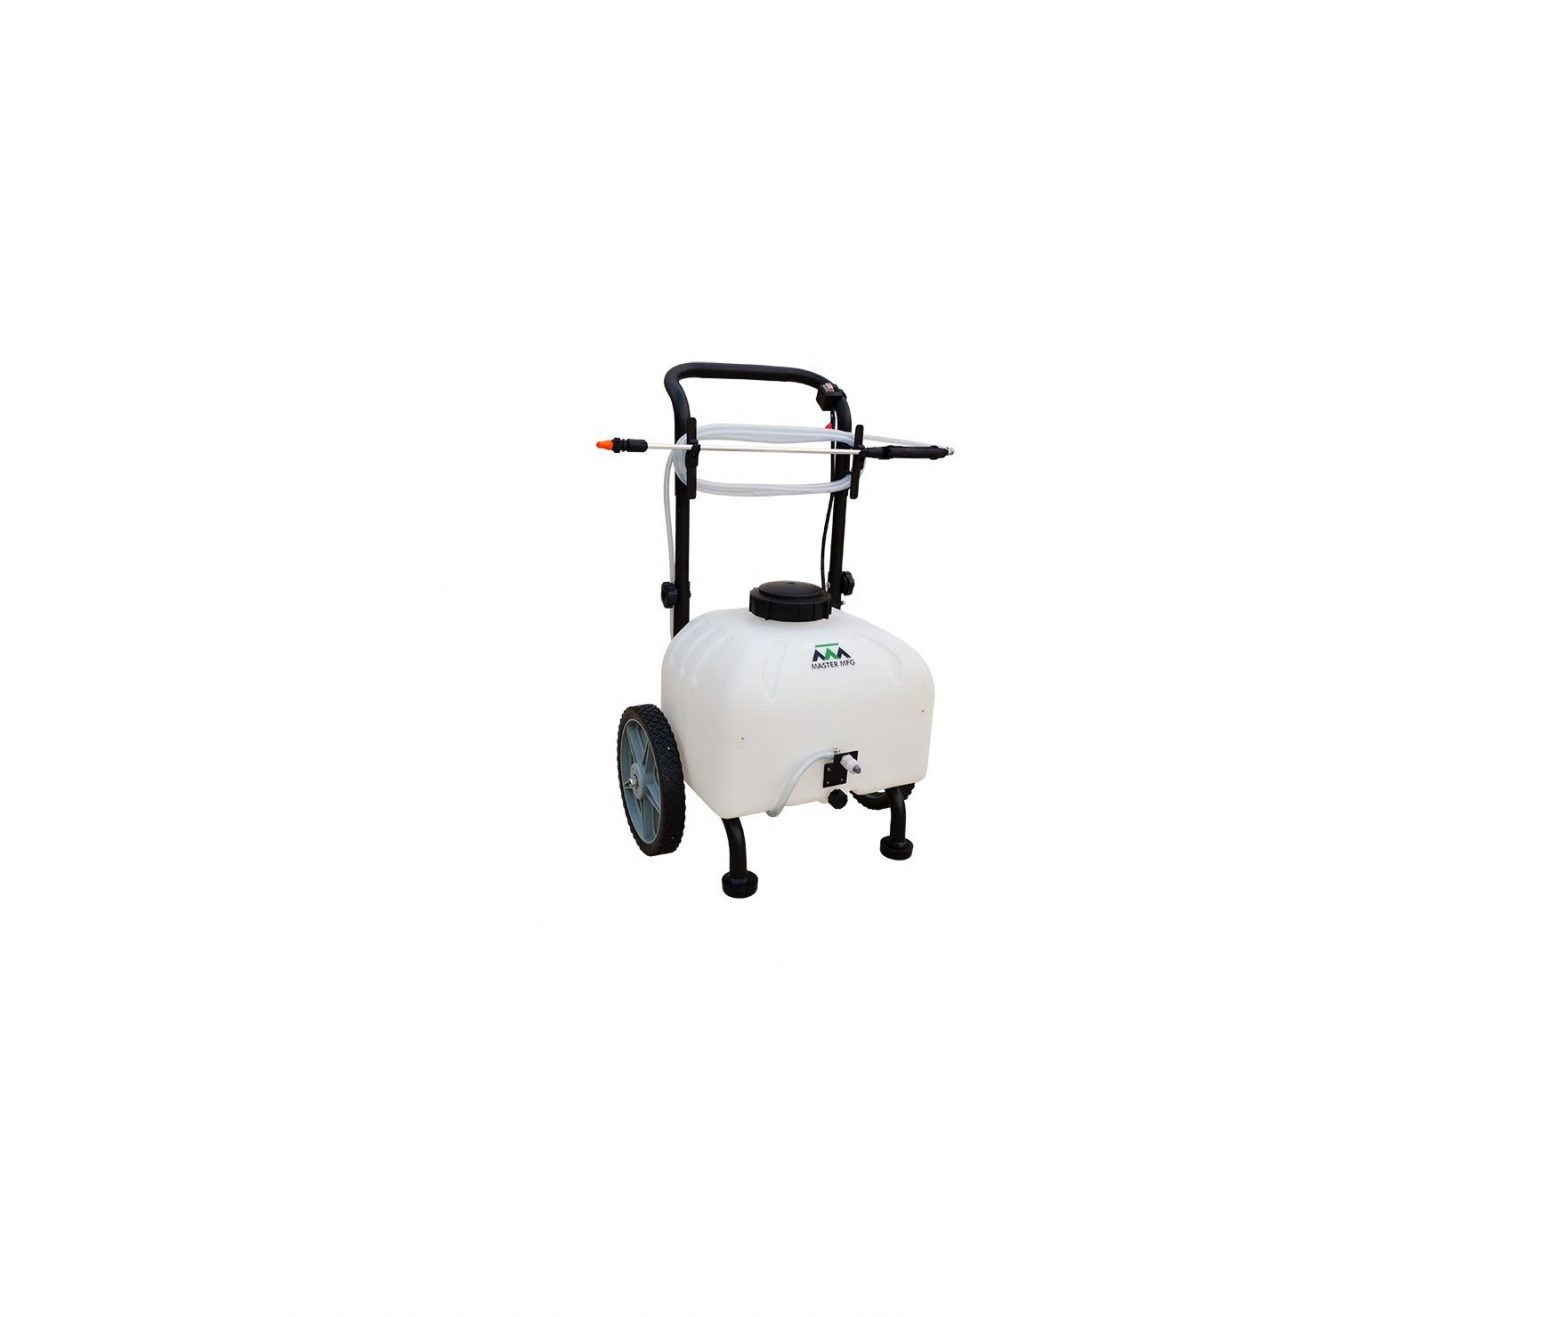
INTRODUCTIONCongratulations on the purchase of your Revolt Master Gardener. This sprayer has been manufactured to provide years of dependable and efficient use in spraying a wide range agricultural pesticides, herbicides and other non-flammable liquids.
IMPORTANT NOTE:THE PURPOSE OF THIS MANUAL IS TO ASSIST YOU IN THE ASSEMBLY, OPERATION, SERVICING AND STORAGE OF YOUR SPRAYER. PLEASE READ THROUGH THIS MANUAL COMPLETELY TOO FULLY UNDERSTAND HOW TO OPERATE AND MAINTAIN YOUR EQUIPMENT. KEEP YOUR MANUAL IN A SAFE, CONVENIENT PLACE FOR FUTURE REFERENCE. ALWAYS MENTION THE MODEL AND PART NUMBER IN ANY CORRESPONDENCE.
WARRANTYSprayers sold shall be warranted from defects in workmanship and material when used within the service and scope for which they were designed for a period of two years from date of purchase. Warranty covers replacement parts ONLY.
Contact our Spraying Division for warranty parts at 800.825.5397. DO NOT RETURN PRODUCT TO YOUR DISTRIBUTOR/DEALER. Please have original proof of purchase, model number of sprayer and part number of part from illustrated parts breakdown in this manual.
TOOLS REQUIRED
PHILLIPS SCREWDRIVER
INCLUDED HARDWARE
IMPORTANT NOTE:THE REVOLT BATTERY PACK IS NOT CHARGED PRIOR TO SHIPPING. IT WILL REQUIRE APPROXIMATELY FOUR HOURS TO FULLY CHARGE WITH THE INCLUDED REVOLT BATTERY CHARGER.
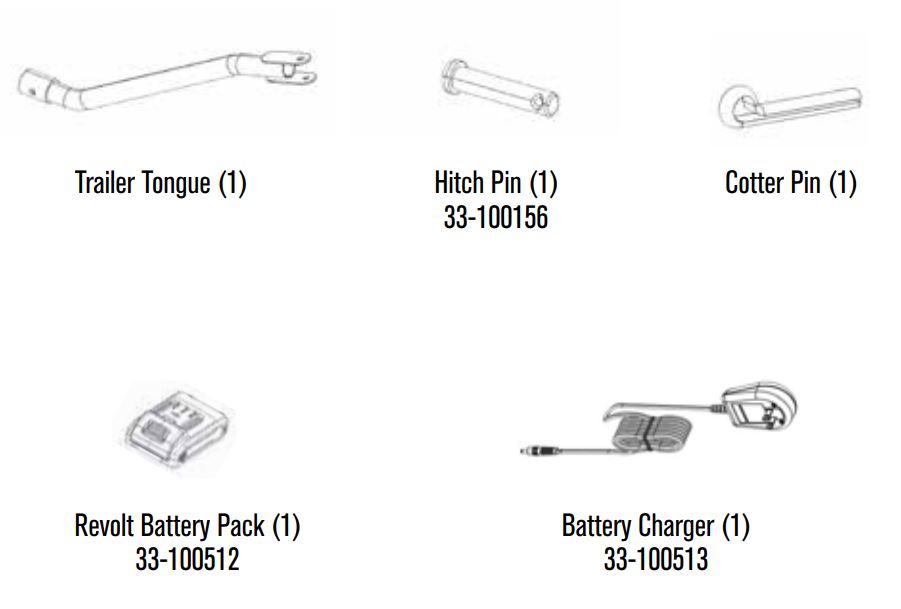
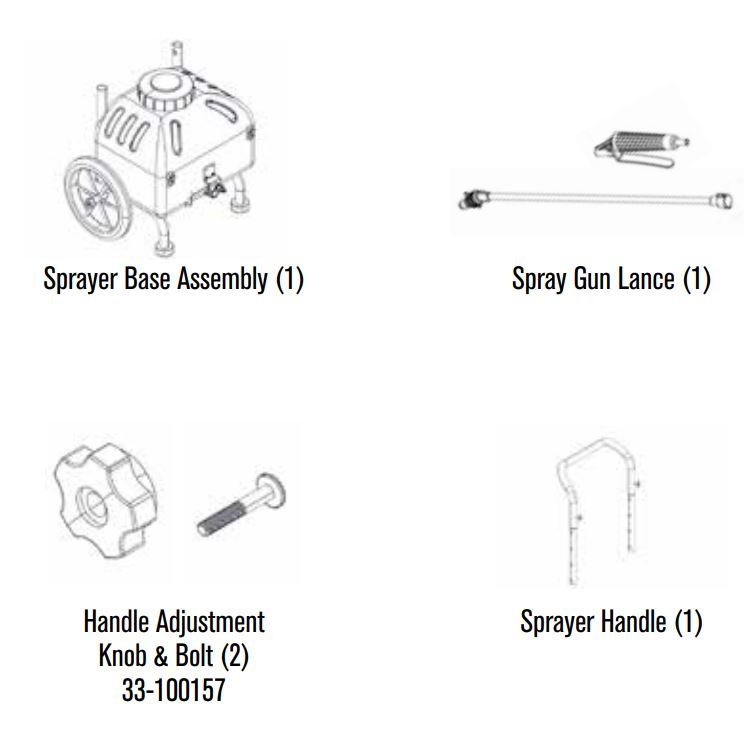
PARTS
1.
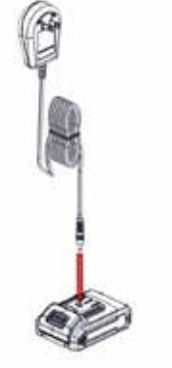
NOTE: The Revolt Series Battery Pack is not charged out of the carton and requires four hours to fully charge.
NoneConnect Battery Charger to the open hole on top of Revolt Battery Pack. Plug the Battery Charger into an appropriate outlet.
Charging Revolt Battery Pack
2.
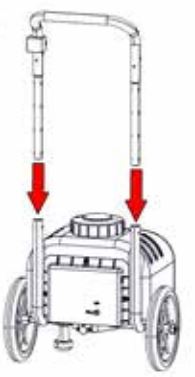
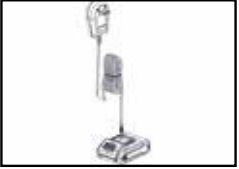
Insert the Sprayer Handle into the Sprayer Base Assembly. Make sure the Sprayer Handle is slipped through the wire clamp that is attached to Sprayer Base Assembly.
Installs Sprayer Handle on Sprayer

3.
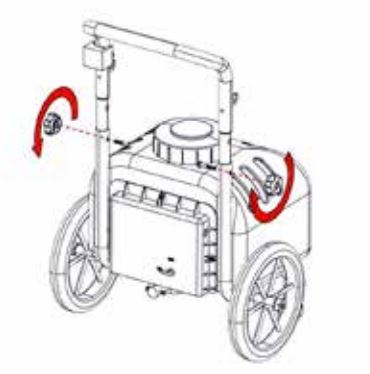
Secure Sprayer Handle to the Sprayer with Handle Adjustment Knobs & Bolts. Tighten securely.
Use Phillips Screwdriver to tighten screw that is on the Wire Clamp to secure wiring to frame.
Secures Sprayer Handle to Sprayer

4.
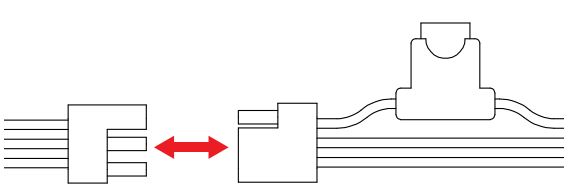
Locate the Wiring Harness Connectors at base of the Sprayer Handle and exiting the back panel of the Sprayer.
Connect Wiring Harness Connectors. Ensure they are fully seated.
Connects Battery Dock to Power Switch
5.
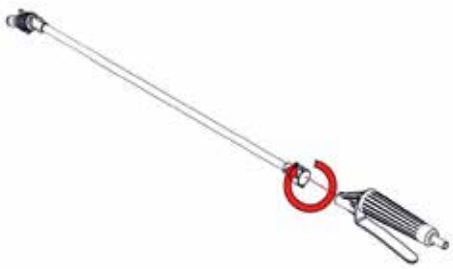
NOTE: Screw hand tight to ensure there will be no leaks when operating.
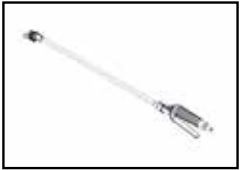
NoneThread Spray Gun Nozzle onto the end of the Spray Gun Shaft. Make sure there is an O-ring before threading onto Spray Gun Shaft.
Connects Spray Gun Shaft to Handle
6.
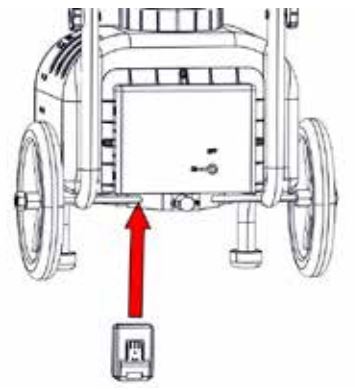
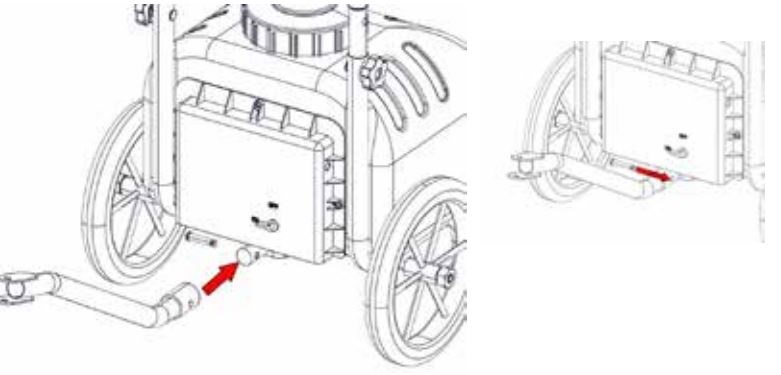
NOTE: Remove from compartment by pressing the release button on the Battery Pack.
NoneInsert the Revolt Battery Pack into the open dock that is situated at the bottom of the back panel of Sprayer. A click will be heard when properly attached.
Installs Revolt Battery Pack in Dock
7.
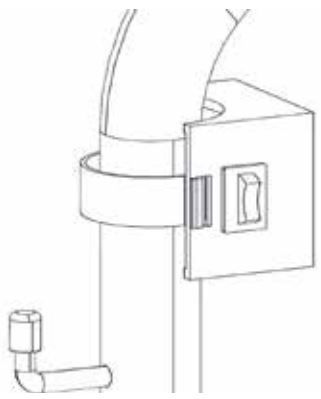
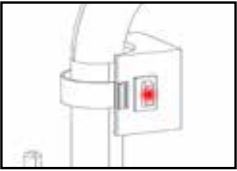
NOTE: The Power Switch will light up on the ON position. If it doesn’t, the Battery Pack will need to be fully charged.
NoneWhen ready for spraying, flip the Power Switch on that is located on the Sprayer Handle.
Turns On Power to Sprayer
8.
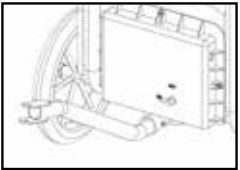
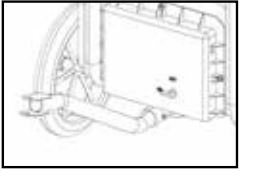
NoneAttach Trailer Tongue to the back-end of Sprayer and align holes between both items. Insert Hitch Pin into open holes to secure Trailer Tongue. Add Cotter Pin into open hole of Hitch Pin to secure Hitch Pin.
Installs Trailer Tongue on Sprayer
 9.
9.
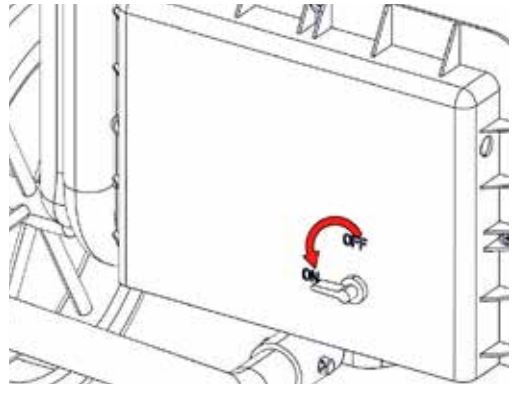
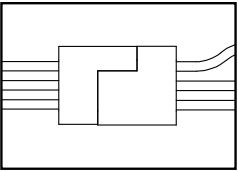
NoneTo convert over to broadcast spraying, turn the Back Panel Valve Switch from Off to On.
Allows for Broadcast Spraying
SAVE THESE INSTRUCTIONS
![]() WARNINGRead and understand all instructions. Failure to follow all instructions listed below, may result in electric shock, fire and/or serious personal injury.
WARNINGRead and understand all instructions. Failure to follow all instructions listed below, may result in electric shock, fire and/or serious personal injury.
- Before Using The Battery Pack & Charger: Read this operator’s manual and all labels on the battery pack.
- Caution: To reduce risk of injury, ONLY CHARGE REVOLT BATTERY PACK WITH REVOLT SERIES CHARGERS. Other types of batteries may burst causing personal injury and damage. Do not wire a battery pack to a power supply plug or the DC outlet of a vehicle. Batteries will be permanently disabled or damaged.
- Avoid Dangerous Environments: Do not charge battery pack in rain, snow, damp or wet locations. Do not use battery pack or charger in the presence of explosive atmosphere (gaseous fumes, dust or flammable materials) because sparks may be generated when inserting or removing battery pack, possibly causing a fire.
- Charge In A Well Ventilated Area: Do not allow smoking or open flames near charging battery pack. Vented gases may explode.
- Do Not Burn Or Incinerate Battery Packs: Battery packs may explode, causing personal injury or damage. Toxic fumes and materials are created when battery pack burns.
- Do Not Crush, Drop or Damage: Do not use a battery pack or charger that has received a sharp blow, been dropped, run over, or damaged in any way.
- Do Not Disassemble: Incorrect reassembly may result in the risk of electric shock, fire or exposure to battery chemicals.
- Battery Chemicals Cause Serious Burns: Never allow contact with skin, eyes or mouth. If a damaged battery pack leaks battery chemicals, use rubber or neoprene gloves to dispose of it. If skin is exposed to battery fluids, wash with soap and water, and rinse with vinegar. If eyes are exposed to battery chemicals, immediately flush with water for 20 minutes and seek medical attention. Remove and dispose of contaminated clothing.
- Do Not Short Circuit: A short circuited battery pack may cause a fire, personal injury, and product damage. A batter pack will short circuit if a metal object makes a connection between the positive and negative contact on a battery pack. Do not place a battery pack near anything that may cause a short circuit such as coins, keys or nails in your pocket.
- Disposing of Revolt Battery Packs: Lithium-Ion Batteries need to be disposed of according to federal, state and local regulations. Contact a recycling agency in your area for recycling locations. Even discharged battery packs contain some energy. Before disposing, use electrical tape to cover the terminals to prevent the battery pack from shorting, which could cause a fire or explosion.
OPERATION – IMPORTANT SAFETY INFORMATION
Now that you have assembled your sprayer, there is some important safety and health information you need to know with regard to handling and spraying chemicals.
![]() TAKE NOTE! THIS SAFETY ALERT SYMBOL FOUND THROUGHOUT THIS SECTION IS USED TO CALL YOUR ATTENTION TO INSTRUCTIONS INVOLVING YOUR PERSONAL SAFETY AND THE SAFETY OF OTHERS. FAILURE TO FOLLOW THESE INSTRUCTIONS CAN RESULT IN PROPERTY DAMAGE, INJURY OR DEATH.
TAKE NOTE! THIS SAFETY ALERT SYMBOL FOUND THROUGHOUT THIS SECTION IS USED TO CALL YOUR ATTENTION TO INSTRUCTIONS INVOLVING YOUR PERSONAL SAFETY AND THE SAFETY OF OTHERS. FAILURE TO FOLLOW THESE INSTRUCTIONS CAN RESULT IN PROPERTY DAMAGE, INJURY OR DEATH.
NOTE: THE USE OF CORROSIVE OR FLAMMABLECHEMICALS IN THIS SPRAYER IS HAZARDOUS AND WILL ALSO VOID YOUR WARRANTY.
GENERAL CHEMICAL SAFETY
WARNINGPesticides are hazardous chemicals. Heed the warning below and follow all instructions carefully. Improper handling of chemicals can result in serious injury orillness, or cause damage to humans, animals or the general environment.
BEFORE SPRAYING
- Sprayer Prep: ALWAYS inspect and prepare the sprayer before use according to the directions provided in this manual.
- Keep Sprayer Off: Do not turn power on to the sprayer until ready to spray in order to avoid unintentional spray release.
- Broadcast Nozzle Down: Make sure the broadcast nozzle is oriented to spray straight down before starting the sprayer.
- Wind Speed: NEVER spray when wind exceeds 4 MPH in order to minimize spray drift.
- Clear Area: ALWAYS keep work area clear of people and pets. Post warning notices to restrict access by the public for the period recommended on chemical label.
- Operator Age: To operate this sprayer, you must be 16 years of age or older. Pesticides are extremely toxic to children.
- Chemical Label: ALWAYS READ and FOLLOW all chemical label instructions.
- State & Federal Laws: ALWAYS refer to state and federal regulations with regard to the application of a particular chemical you plan to use.
- Flammables: NEVER use any flammable chemicals, such as diesel fuel, in the sprayer.
- Corrosives: DO NOT use corrosive chemicals, such as bleach, in the sprayer. They can weaken the sprayer and its parts, resulting in leaks. Always check with chemical manufacturer for compatibility with sprayer.
- Emergency Procedures: Before handling chemicals, carefully review the “Statement of Practical Treatment” on the chemical label.
DURING SPRAYING
- Over Application: DO NOT over apply pesticide. Apply at a rate recommended by chemical manufacturer. Excess pesticide can be dangerous to humans, damage desirable plants, and contaminate soil and water sources.
- Never Point Spray Gun: NEVER point the spray gun at people or animals.
- Children & Pets: ALWAYS exercise extra caution when spraying near areas accessible to children and pets.
- Eating & Smoking: DO NOT eat, drink, smoke, rub your eyes or touch any part of your bare skin while handling chemicals and spraying.
- Heat & Flames: DO NOT spray near open flames or sources of heat.
- Spills: ALWAYS clean up spills immediately per instructions on the chemical label.
- Unattended: ALWAYS turn off vehicle and set brake or block wheels, turn off power to sprayer, and relieve system pressure before leaving sprayer unattended.
AFTER SPRAYING
- Clean Sprayer: ALWAYS clean the sprayer immediately after use according to the directions provided in this manual.
- Decontaminate: ALWAYS decontaminate yourself immediately after you are finished with spraying and handling chemicals. Wash all exposed areas of the body with soap and water. Remove and launder clothing.
- Chemical Disposal & Storage: ALWAYS dispose or store remaining chemicals properly as recommended on the chemical label.
- Health Monitoring: Monitor the health of operators who are frequently exposed to pesticides, as recommended by the chemical label.
![]() WARNINGChemical spills, sprayer leaks, personal contamination, and poisoning are accident situations which you may encounter. All require an immediateresponse. In the event these accidents take place, follow first aid instructions on the chemical label and contact poison control for further advice (1-800-222-1222). If victim collapses or isn’t breathing CALL 911.
WARNINGChemical spills, sprayer leaks, personal contamination, and poisoning are accident situations which you may encounter. All require an immediateresponse. In the event these accidents take place, follow first aid instructions on the chemical label and contact poison control for further advice (1-800-222-1222). If victim collapses or isn’t breathing CALL 911.
OPERATION – PREPARING & USING SPRAYER
If the sprayer has been used previously, it must be prepared BEFORE EACH SUBSEQUENT USE.
![]() WARNINGRead the following instructions carefully for inspecting and using the sprayer. Damaged or clogged equipment could result in leaks or uncontrolled spray.Leaks could result in injury to the operator or bystanders from chemical exposure, or cause damage to the environment.
WARNINGRead the following instructions carefully for inspecting and using the sprayer. Damaged or clogged equipment could result in leaks or uncontrolled spray.Leaks could result in injury to the operator or bystanders from chemical exposure, or cause damage to the environment.
IMPORTANT NOTE:THIS SPRAYER IS NOT CERTIFIED FOR USE IN DISPENSING POTABLE WATER OR OTHER CONSUMABLE LIQUIDS.
PREPARING SPRAYER
- Review Safety Information: Review safety information in this manual and manufacturer chemical label before use.
- Sprayer Attachment: Ensure the sprayer is securely attached to a vehicle if using trailer hitch for spraying.
- Empty Tank: Ensure the sprayer has been thoroughly flushed and drained of all residual chemical prior to uses.
- Inspect & Test: Inspect the tank and components for any cracks or leaks. Replace any damaged parts. IMPORTANT: After any repair, ALWAYS test for leaks with water one final time before use.
- Check Drain Cap: Before filling tank, ensure drain cap at bottom of tank is securely tightened.
USING SPRAYER
- Protective Equipment: ALWAYS wear protective equipment as directed on the chemical label.
- Assess Wind & Area Conditions: Before spraying, determine if wind conditions are suitable. DO NOT spray if wind speeds are greater than 4 MPH. DO NOT spray if bystanders are in the intended area and verify that area is in a well-ventilated outdoor area.
- Power Off: Before filling tank, make sure power to the sprayer and the vehicle is off and brakes are set to prevent unintended movement.
- Filling Tank: Remove sprayer tank lid and add chemical/water dilatation ratios that are called out by chemical label. Ensure chemical is thoroughly mixed with a stirring device and then securely thread tank lid back on sprayer tank.
- Broadcast Valve Switch: Close broadcast valve switch to prevent accidental spray release.
- Turn On Power: Flip on power switch that is located on the sprayer handle.
SPOT SPRAYING
- Spot Spraying: To spot spray, pull the gun trigger. Make sure nozzle of gun is pointed towards vegetation in need of spraying.
- Adjustable Nozzle: Twist the spray nozzle to adjust from a straight stream to wide pattern mist. Note: It is not unusual for the operator to be exposed to chemical drips while adjusting the nozzle use chemical resistant gloves when twisting.
BROADCAST SPRAYING
- Broadcast Valve Switch: Open broadcast valve switch to allow flow from tank to boom nozzle.
- Ensure Correct Pattern: Make sure boom nozzle is pointed straight down. If not, loosen the nozzle retaining nut and adjust orientation of the boom nozzle opening to point straight down. Note: It is not unusual for the operator to be exposed to chemical drips while adjusting the broadcast nozzle. Chemical resistant gloves should be worn.
- Turn On Power: Flip on power switch that is located on the sprayer handle.
OPERATION – CLEANING, DECONTAMINATING & STORAGE
When done using the sprayer, it is always important to clean the sprayer and decontaminate yourself. Do not store the sprayer with chemicals in the tank, as it is unsafe and could also result in damage.
![]() WARNINGClean-up and decontamination procedures must be followed after each use. Improper equipment clean-up and disposal of chemicals can result in dangerous chemical exposure to humans and the environment, as well as equipment damage. Personal decontamination is required after spraying to minimize unsafe exposure to chemicals and potential illness.
WARNINGClean-up and decontamination procedures must be followed after each use. Improper equipment clean-up and disposal of chemicals can result in dangerous chemical exposure to humans and the environment, as well as equipment damage. Personal decontamination is required after spraying to minimize unsafe exposure to chemicals and potential illness.
CLEANING & DECONTAMINATING SPRAYER
- Drain Tank: If there is excess pesticide left in tank, drain into a suitable container. Note: when draining pesticides, be sure to wear protective gear such as rubber gloves and eye protection for increased safety.
- Unused Chemical: Properly store or dispose of unused chemical in its original, suitable container and make sure to follow chemical manufacturer’s recommendations and according to local hazardous waste disposal regulations.
- Flush Sprayer: Flush sprayer per the chemical manufacturer’s recommendations.
- Decontaminate & Launder: Decontaminate yourself after handling chemicals by removing clothing worn, washing exposed body parts with soap and water, and laundering clothing separately from other wash.
SPRAYER STORAGE
Prepare the sprayer for end-of-season storage by running RV anti-freeze through the system. This will keep internal parts lubricated, protect against corrosion, and keep the unit from freezing.
IMPORTANT NOTE:ALLOWING YOUR SPRAYER TO FREEZE, WITHOUT TAKING PROPER WINTERIZATION STEPS, VOIDS YOUR WARRANTY.
![]() WARNINGThe sprayer will be damaged if it freezes. Protect the sprayer from freezing during storage by following instructions below.
WARNINGThe sprayer will be damaged if it freezes. Protect the sprayer from freezing during storage by following instructions below.
PREPARING SPRAYER FOR STORAGE
- Add RV Anti-Freeze: Pour one gallon of RV anti-freeze into the sprayer tank.
- Spray Briefly: Turn on the pump motor and squeeze the gun trigger briefly until fluid sprays out.
REMOVING SPRAYER FROM STORAGE
- Drain RV Anti-Freeze: Drain the RV anti-freeze that is left in the tank through the tank drain port into a suitable container.
- Flush with Water: Fill tank with fresh water and have it run through system. Operate spray gun and boom until the system is completely flushed. Be sure to set up containers to capture the flushing of the RV anti-freeze.
- Disposal: Dispose of RV anti-freeze and flush water properly.
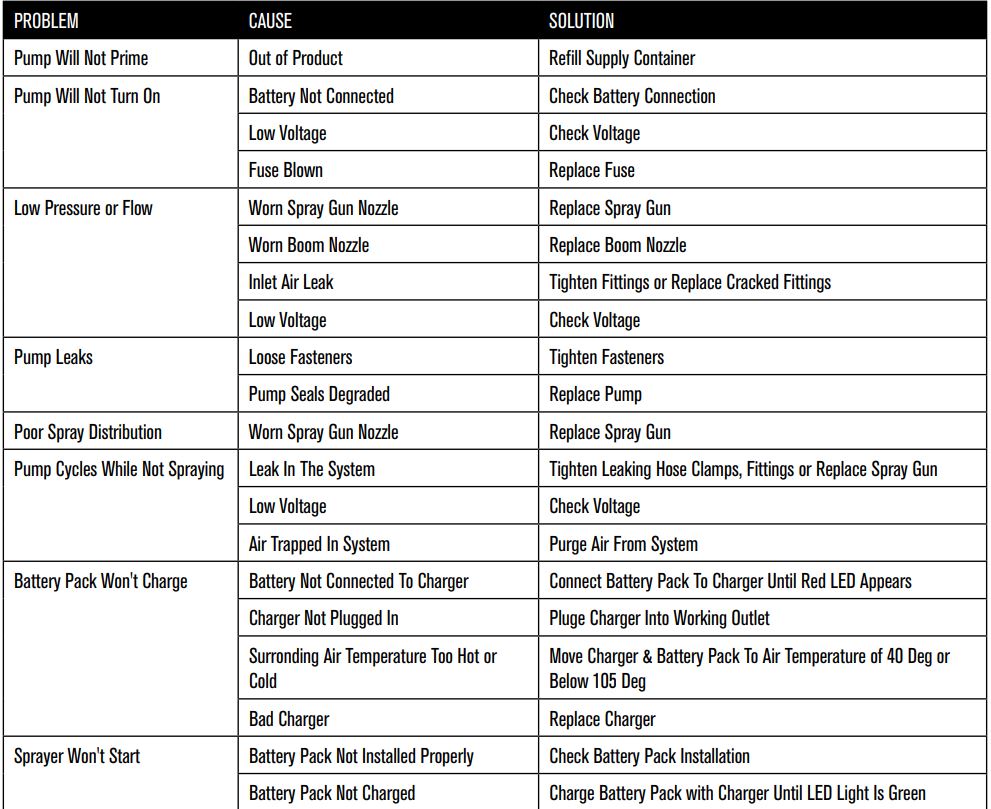
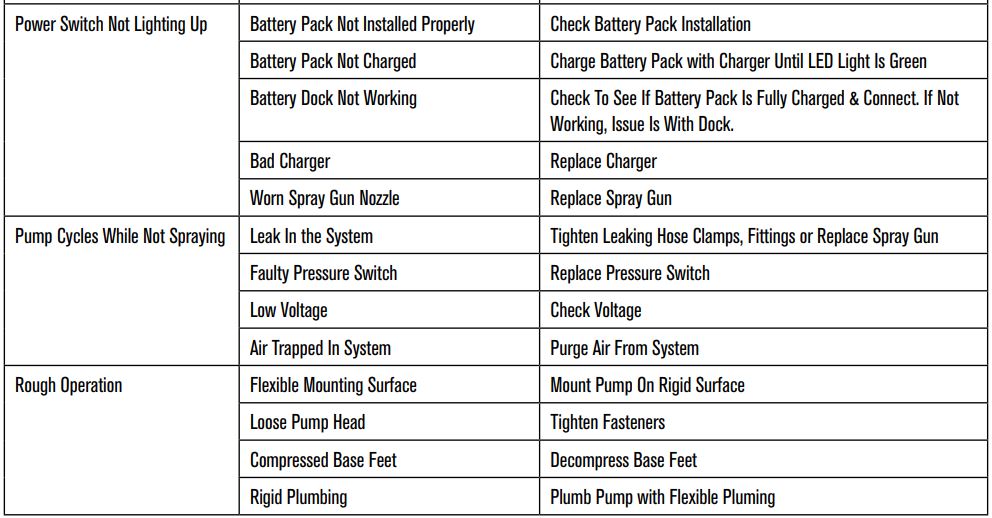
TROUBLESHOOTING
Here you will find solutions for some of the most common issues users have with sprayers.
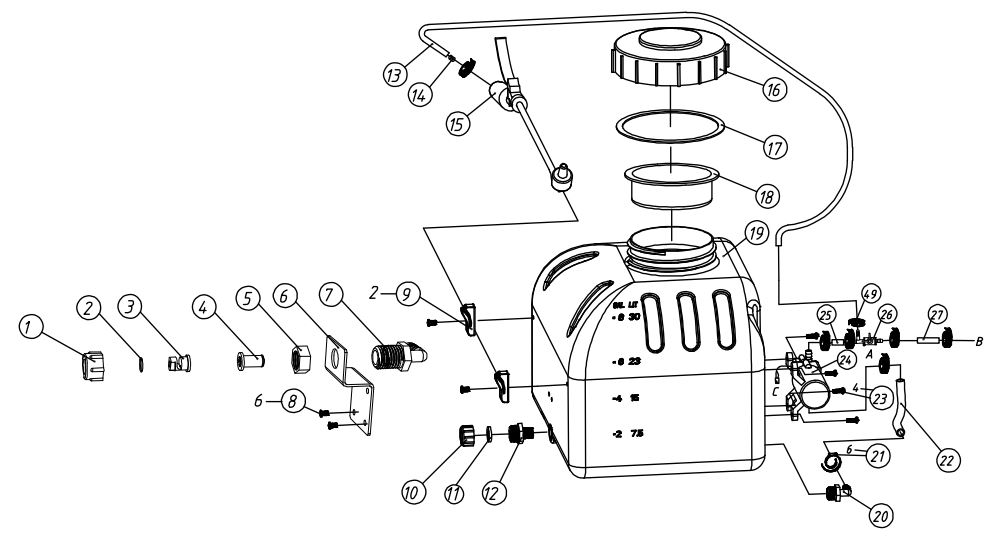
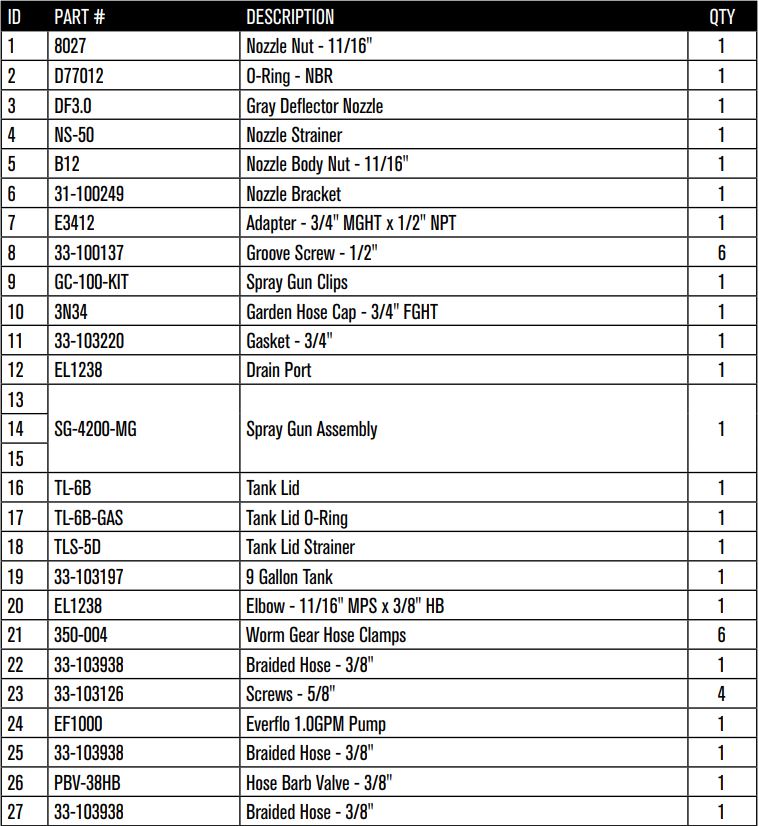
SPRAYER BREAKDOWN
BREAKDOWN – TANK ASSEMBLY
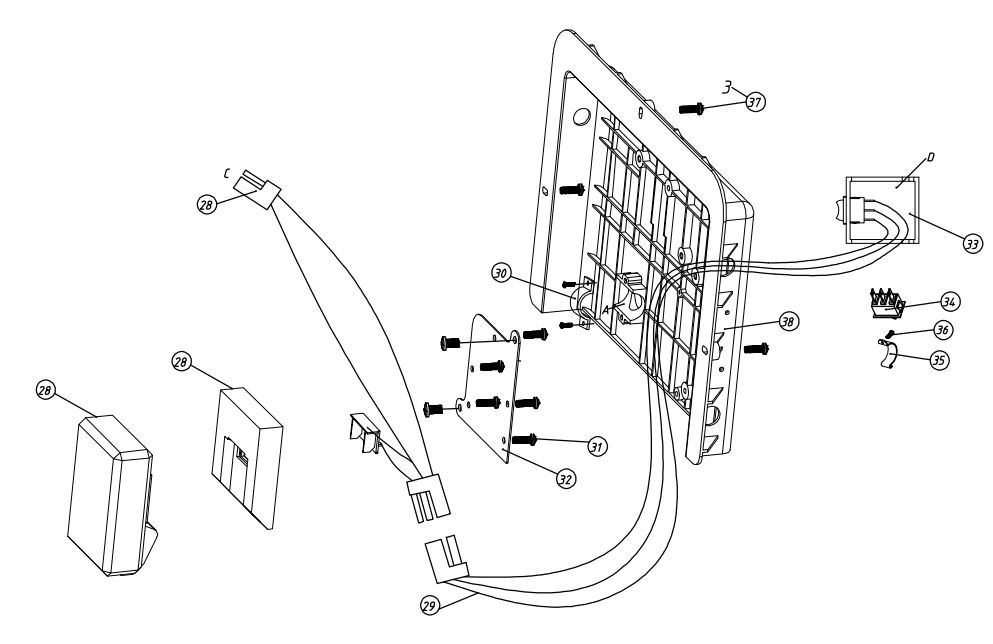
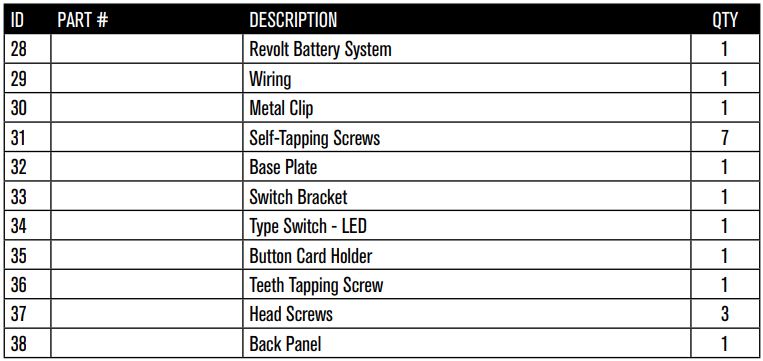
BREAKDOWN – POWER ASSEMBLY
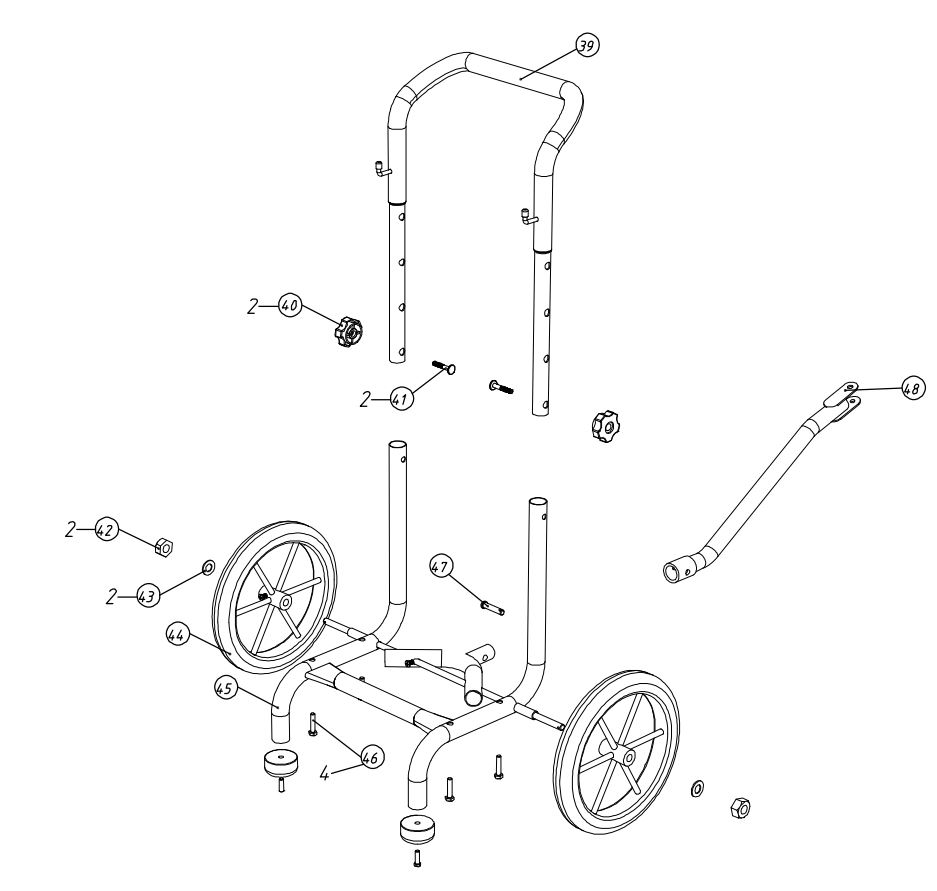
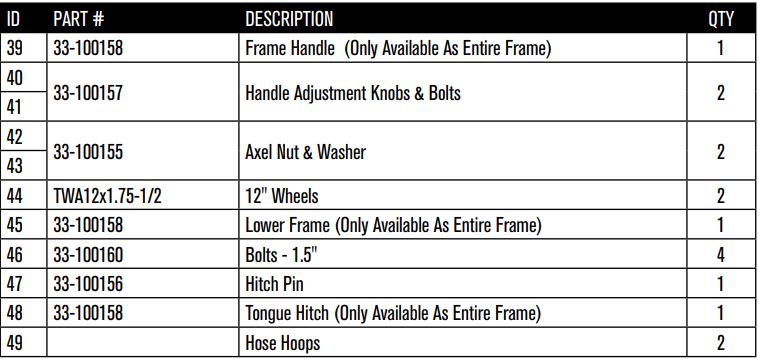
BREAKDOWN – FRAME ASSEMBLY
NOTES

REVMAS-M
800.825.5397
References
[xyz-ips snippet=”download-snippet”]