REXING 6448420 H3 Trail Camera Built-in Electronic Bird Caller User Manual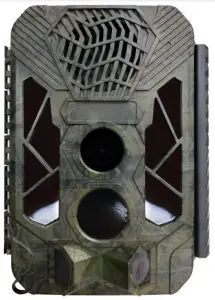
Overview
Thank you for choosing REXING! We hope you love your new products as much as we do.
If you need assistance, or have any suggestions to improve it, please contact us. You can reach us via [email protected] or call us at (203) 800 – 4466.Our support team will respond you as soon as possible.
Always a surprise in Rexing. Check us out here
https://www.facebook.com/rexingusa/https://www.instagram.com/rexingdashcam/https://www.rexingusa.com/support/registration/
- Facebook

- Instagram
- Site
- Product Support


Introduction
Congratulations on the purchase of your new device. You have selected a high-quality product. The operating instruction is one constituent of this product. It contains important information about safety, use and disposal.Before using the product, familiarize yourself with all operating and safety instructions. Use this product only as described and only for the specified areas of application.
CopyrightThis documentation is subject to copyright protection.Any copying or reproduction, including extracts thereof, and the reproduction of images (even in a modified state), is only permitted with the written authorisation of the manufacturer.
Intended Use
This device is intended only for recording digitalphotos and videos, particularly for observing wildlife.It is not intended for any other use or for uses extending beyond those stated. This device is not intended for use in commercial or industrial environments.The manufacturer accepts no responsibility for damage caused by failure to observe these instructions, improper use, incompetent repairs, making unauthorised modifications or for using unapproved replacement parts. The operator alone bears liability.When the equipment will be placed in the outdoor filming, rapid changes in the weather could lead to error record.
SafetyPlease read below safety precautions carefully before using the camera.
- Do not try to disassemble the product case. Only authorized technician can repair the product.
- The camera will be hot after using for too long time. This is normal
- Please use the accessory provided by our factory.
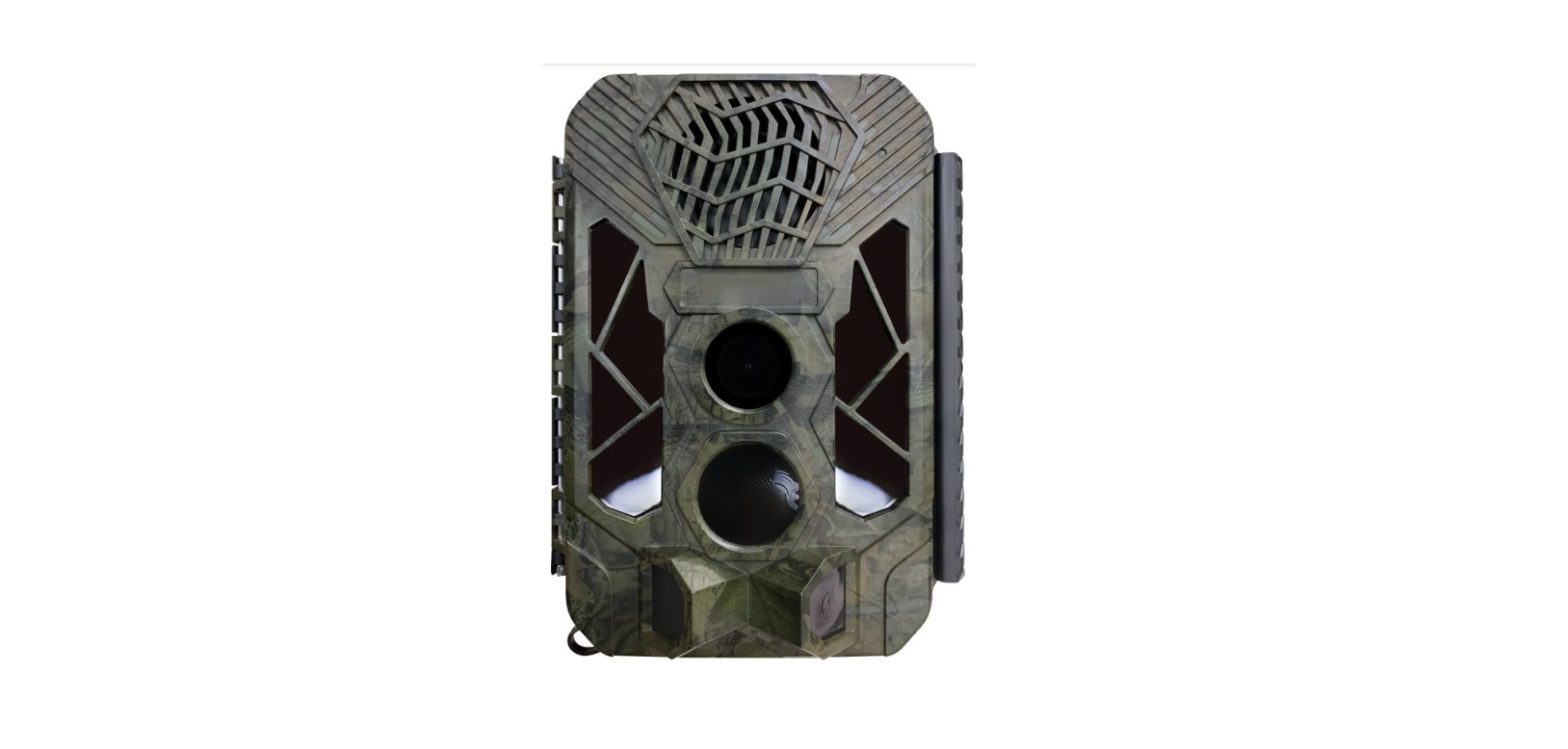
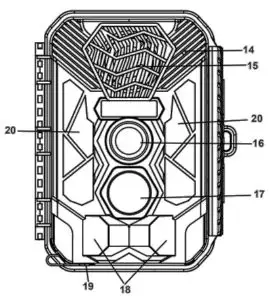
Parts Of The Camera
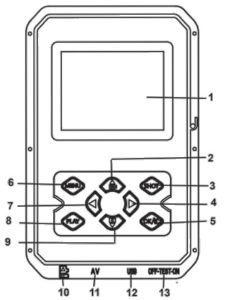
- Display Screen
- 2.Up/Video Button
- Shot Button
- Right Button
- OK Button
- Speaker
- Menu Button
- Left Button
- Playback Button
- Down/Photo Button
- Micro SD Card Slot
- AV Jack
- USB Jack
- OFF-TEST-ONMode Button
- Infrared LEDs
- Lens
- Front Motion Sensor
- Side Motion Sensor
- DC port
- Infrared
Power Supply
Please install batteries before using the camera.
- Open the camera case and remove the battery cover. Install 12 pieces of 1.5V AA brand Alkaline batteries. Please make sure the electrode is correct.
- If the camera is in low power, please connect the camera to a power adapter(not provide) for power supply; When power supplied, the adapter must use DC6V / 1.5A (it must have enough current of 1.5A or more); if the adapter is not used properly, the machine may be burned. The adapter only powers the machine and has no charging function
Inserting Storage Media
Please prepare a Class 6 Micro SD card and insert it into the camera for saving more files. Before recording, please format the memory card first.
- Support Micro SD card, up to 512GB. Suggest to use at least class 6 or above high speed card. Otherwise, it will lead to abnormal shooting files, and make the boot time longer, shooting crash and other abnormal phenomena.
- To avoid malfunction, the memory card should be far away water, strong vibration, dust, hot source and direct sunlight.
- Do not insert the memory card forcibly. Please refer to the marking on the camera.
- For the first time use, please wait for the memory card temperature reach the ambient temperature. The camera will be short-circuit influenced by environment temperature and humidity. Please notice protection for the camera when using it outdoor.
- If the capacity of memory card is full ,the camera will stop recording automatically and the LEDs will go out.
- Press the edge of the card gently to pop-up the TF card.
Basic Operation
Turn On And Off The Camera
Switch the Mode Button to “Test” to turn on the camera.Switch the Mode Button to “Off” to turn off the camera.
System SetupSwitch Mode Button to “Test”, then you can set the system parameters.
- Press Video/Photo button to switch between these two modes.
- Press Menu button to open the setup menu.
- Press Up/Down button to scan all menu. Then press OK button to enter the options interface.
- Press Up/Down button to scan all options. And press OK button to confirm options.
- Press Menu button again to turn back to last menu or exit the setup menu.
Setup menu and functions are as below:
ModeSet the working mode. In capture mode, the camera just take pictures. In Video mode, the camera just record video. In capture&video mode, the camera will take a photo first, then start to record video.Options:【Photo】/【Video】/【Photo & Video】.
MP3 SettingSet the timing to play various sounds of birds and beasts to attract and drive animals.Options:【ON】/【OFF】When you choose to turn on, you can set 8 groups of time periods to play regularly. After setting the time, click the OK button to set the sound. There are many kinds of bird and beast sounds built-in, which can be customized to add or delete (the sound source must be in MP3 format,the file name must consist of letters or numbers).
MP3 VolumeThe volume of the playing sound can be set and the maximum distance can be up to 1000 meters.Options:【Volume 1】/【Volume 2】/【Volume 3】/【Volume 4】/【Volume 5】.
Photo & AlarmSet the alarm sound after the induction shooting.Options:【 open 】/【 close 】When you choose to turn on, you can set the length of the alarm playing time. After setting the time, click the OK button to set the sound and play the set sound source after sensing the shooting; the sound can be customized to add or delete (the sound source must be in MP3 format, the file name must consist of letters or numbers).
Photo ResolutionSet the still image resolution.Options:【20MP (5200x3900P)】/【16MP(4608x3456P)】/【12MP(4000x3000P)】/【 8MP(3264x2448P)】/【5MP(2592x1944P)】/【 3MP(2048x1536P)】/【1MP(1280x960P)】.
Photo SeriesSet the photo number of continuous shooting. In photo mode, the camera will take photos continuously.Options:【1 photo】【/ 2 photos in series】【/ 3 photos in series】/【10 photos in series】.
Video ResolutionSet the video resolution. The bigger the resolution is, the longer the video time can be stored.Options:【2688x1520P 20FPS】/【1920x1080P】/【1280x720P】/【848x480P】/【720x480P】/【640x480P】/【320x240P】.
TL Video ResolutionSet the resolution of time lapse video.Options:【3264x2448P】/【2592x1944P】/【2048x1536P】.
Video LengthSet the duration of recording a video clip. The shortest time is 3 seconds and the longest time is 10 minutes.Options:3 seconds~10 minutes.
Audio RecordingOpen this function, the camera will record audio when recording video.Options:【On】/【Off】.
Shot LagSet the time of delay shooting when the camera detects the motion. Within the selected time, the camera will not record any image or video. It can avoid to store too much same events and save more capacity.Options:5 seconds~60 minutes.
Side Motion SensorsOpen/close the side motion sensors.Options:【On】/【Off】.
Sensitivity Motion SensorsSet the sensitivity of the sensors. Environmental impact is small indoors, you can choose “Low”. In outdoor, choose “Middle” in normal condition. Choose “High” if the environment impact is huge outdoors. The temperature can also influence the sensor sensitivity. “High Sensitivity” applies to mild environment. “Low Sensitivity” applies to cold environment.Options:【Low】/【Middle】/【High】.
Target Recording TimeSet the target recording time. As shown in below picture, you can set the start and stop time. The camera will work just in the stated time slot. In other time, the camera will keep in standby state.Options:【On】/【Off】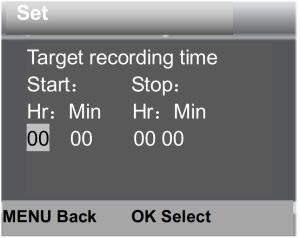
Time Lapse
In Time lapse menu, there are three options as below
[Normal]: The camera will take pictures automatically as per set time interval. For example, set the interval time to 1 hour, the camera will take a photo each hour. If you want to observe that a plant blooms, the camera will take 24 photos in 24 hours to record the whole process of blooming.[TL Video]: You can set the interval time. The time range is from 1 second to 24 hours. For example, set the interval to 1 hour, the camera will take a photo each hour. If the camera works for 24 hours, there will be 24 photos. These photos will be converted into a video.[Off]: Close the time lapse function.
LanguageSet the language display on screen.Options:【English】【/ Deutsch】【/ Dansk】【/ Suomi】/Svenska】【Español】/【Français】/【Italiano】/【Nederlands】/【Português】/【Simplified Chinese】/【Traditional Chinese】/【Japanese】.
Endless CaptureSet the camera to record video in loop, the camera will cycle through the shots, and the earliest document will be deleted when the card is full.Options:【On】/【Off】.
Time & DateSet the date and time of camera.The date format: dd/mm/yyyy, yyyy/mm/dd ,mm/dd/yyyy.The time format: 24h,12h.Press Left/Right button to choose the item. Press Up/Down button to adjust the value. And press OK button to confirm.Options:【Set time & date】/【Time format】/【Date format】.
Photo StampStamp the date &time on the photos or not.Options:【Time & date】/【Date】/【Off】.
Password ProtectionSet the power-on password of the camera. The password is four digits, each digit ranges from 0 to 9 or A to Z.If you forget the password, You must upgrade the firmware again.Options:【On】/【Off】.
Beep SoundOpen/close the button sound.Options:【On】/【Off】.
Format Memory CardFormatting the memory card will delete all data permanently. Before using a new memory card or a card that has been used in another device previously, please format the memory card.Options:【Yes】/【No】.
Serial NO.Set the unique serial number for the camera. The number is four digits,each digit ranges from 0 to 9 or A to Z.Options:【On】/【Off】.
Reset SettingsRestore the camera to factory default settings including password, serial number and so on. All settings will be deleted.Options:【Yes】/【No】.
VersionLook up the Firmware information of the camera.
Take Photos, Record Video ,Playback
Switch the Mode Button to “Test”. In this mode, you can take photos, record video and playback files manually
- Take Photos:Press Photo button to switch to photo mode. Press Shot button to take a picture.
- Record Video : Press Video button to switch to video mode. Press Shot button to start to record a video clip. Press Shot button again to stop recording.
- Playback: Press Playback button to enter the playback interface. Press Up/Down button to scan photos or video. When playback video, press OK button to play the video. Press OK button again to have a pause. Press Menu button to stop playback. Press Playback button again to exit the playback mode.Playback Menu:
- Delete current file:Delete the current photo or video. Options:【Cancel】/【Delete】.
- Delete all files:Delete all photo and video files in the memory card. Options:【Cancel】/【Delete】.
- Activate slide show:Playback the photos in slide way. Each photo display 3 seconds. Press OK button to stop playing.
- Write protect:Lock the file. It can avoid accident deletion. Options:【Write-protect current file】/ 【Write-protect all files】/【Unlock current file】/ 【Unlock all files】.
Aligning the cameraIn test mode you can adjust the optimum exposure angle and the range of the motion sensors. During alignment, consider whether the use of the side motion sensors may be useful for attaining the desired observation results. You can activate/deactivate the side motion sensors using the above-described menu.Please adjust the camera as follows:
- Fasten the camera to a tree or similar object at a height of 1–1.3 meters and align the camera in the desired direction. Please remove the protective tape from the PIR sensor before using, or it will affect the sensing distance. Then move slowly from one side of the target area to the other side. While doing this, monitor the motion display
- . If this light turns blue, you are detected by one of the activated side motion sensors. If lights turn green, you are detected by the front motion sensor. By this way, you can align the camera to the best angle and distance.
Working ModeSwitch the Mode Button to “TEST”. After turn on the camera, the upper right corner should show the capacity of shooting, and then turn the Mode button to the “ON”, the screen will display 15 seconds countdown, then the LEDs and screen will go out. The camera begins to operate independently and enter standby mode.If the wild animals enter the detection range of the motion sensors, the camera will quickly turn on and take a picture or video. After the shooting, the camera automatically returns to the standby mode and waits for the next sensor trigger to shoot (the interval between the next trigger is the time set based on the user’s motion sensing in the menu)
Night ModeDuring the night,the infrared LEDs will turn on automatically to provide necessary light for taking pictures. This makes it is possible to taking picture at a distance about 3m to 20m without overexposing the at night. However, reflective objects such as traffic signs can cause overexposure if they are located within the recording range.In night mode, the pictures just can display white and black.When record a video for long time in the evening, the low voltage may have a great influence on the stability of the machine. Do not record video with low voltage in the evening.
Timed play sound mode
- Switch the Mode Button to “TEST”. When the device starts up, the date and time setting interface will pop up(it will pop up only when the factory is restored or the power is disconnected for a long time). Please set the date and time correctly and press OK button to confirm. The set time and date will be displayed below the video mode.
- Enter the menu to select MP3 settings or directly press the OK/Sound button to quickly enter the MP3 settings (after the timer playback function is turned on, the time period monitoring and timer photography functions will be disabled), you can set the timer playback time period, press the OK button to confirm and enter MP3 audio source setting, select the audio source to be played, press the OK button to start a trial broadcast and press the menu button to return after confirming.
- Switch the Mode Button to “ON” and the screen will display a countdown of 15 seconds. Then the red LED light and the screen will be off and the camera will start to operate independently and enter standby mode.
- If the time reaches the set start playing time, the device will automatically start to play the set sound. During the playing process, if any animal enters the detection range of the sensor, the camera will quickly take pictures or video. After the shooting is completed, the sound will be continue to play until the time reaches the set end playing time, stop playing and the device enters standby mode (turning on this function does not affect normal sensing and triggering shooting).Note: The audio source is in the MP3 folder of the TF card. The MP3 file will be formatted out when the card is formatted. Please format the card carefully.After adding or deleting an MP3 audio source (the audio source must be in MP3 format and the file name must be composed of English letters or Numbers), you need to reset the playback content.

Using the wall bracket
You can mount the camera permanently on a wall or tree using the supplied wall bracket. Before mounting the wall bracket you should ensure that all existing screws are tight. The best installation height distance from the ground about 1 meter.
Components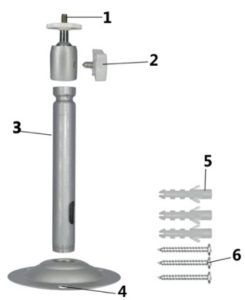
- Tripod screw
- Bracket fixing screw
- Bracket support rod
- Drill holes
- Wall plugs
- Screws
Mounting the wall bracket
Required tools
- Drill
- 6 mm masonry/concrete drill bit
- Phillips head screwdriver
CAUTION
- Ensure that there are no electric lines, water or heating pipes installed at the proposed drilling location.
- The supplied wall plugs are only suitable for mounting on concrete and stone. Before starting the installation, please check your installation location carefully for its suitability for the plugs. The assembly material used must be suitable for the respective location. If in doubt, consult a professional.
Install Steps
- Mark the drill holes by holding the foot of the wall bracket at the desired mounting location and marking the hole positions.
- Use a drill with a 6 mm drill bit to drill the required holes and insert the plugs and insert the wall plugs flush with the wall.
- Screw the wall bracket to the wall using the supplied screws.
- Mount the camera on the tripod screw and screw the camera a little way on (about three turns).
- Turn the camera in the desired direction and lock it with the lock nut.
- To move the camera into its final position, undo the two pivot bolts a little, position the camera and fix the position by tightening the two pivot bolts.
Connecting To TV
The camera can transfer the video signal to an external monitor or a television. Please follow below instructions to operate
- Connect the camera to the TV via provided AV cable.
- Turn on the TV and set it to AV mode.
- Turn on the camera, switch the Mode Button to “Test”.
- Once connection is successful, the camera will enter playback mode and the screen turn black. Theimage will show on the TV.
Download Files To The Computer
There are two ways to download files from the memory card to a computer:
- By inserting the memory card into a card reader
- By connecting the camera to a computer using the supplied USB cable.
Using a Card Reader
- Pop-up the memory card from the camera and insert it into a card reader. Then connect the card reader to a computer.
- Open [My Computer] or [Windows Explorer] and double-click the removable disk icon that represents the memory card.
- Copy image or video files from the memory card to your computer.
 report this ad
Connecting the Camcorder to a PC by the USB Cable
- Connect the camera to the computer via USB cable. Turn on the camera, the screen will display “MSDC”.
- Open [My Computer] or [Windows Explorer]. A “Removable Disk” appears in the drive list.Double-click the “Removable Disk” icon to view its contents. All files are stored in the folder named “DCIM”.
- Copy the photos or files to your computer.
References
[xyz-ips snippet=”download-snippet”]