
S800Quick Start Guide
Please read
Overview
Thank you for choosing REXING! Please reach us via [email protected] or call us at (203) 800-4466 if you need assistance or have any suggestions to improve the products. Our support team will respond you as soon as possible.
Rexing always surprises. Check us out here.

www.rexingusa.com/support/registration/
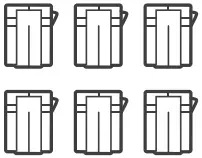
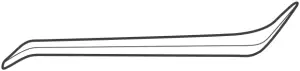
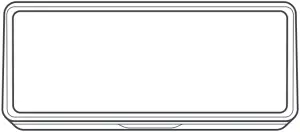
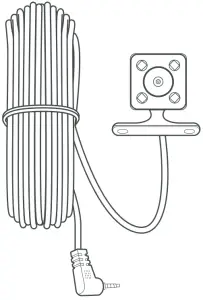
What’s in the Box?
(1.) (2.)

(3.) (4.)
(5.) (6.)
(7.) (8.)
- Quick Start Guide
- Safety Guide
- Car Power Connector (12ft)
- 3M Adhesive Mount
- Cable Adhesive Spacer
- Cable Management Tool
- Rexing S800 Dashboard Camera
- Rear Camera with Cable
Camera Overview
Front
Top Side
Bottom
- 7″ IPS Touch Screen
- USB Port
- SIM Card Slot
- GPS Antenna Port
- Power Button
- Rear Camera Port
- Micro SD Card Port
- Reset Button
- Camera Angle Adjustment Dial
- 3M Adhesive Mount
- Front Camera
- Slide Adhesive Mount On
- Slide Adhesive Mount Off
Screen Icons
![]()
- Battery
- Time and Date
- Bluetooth
- GPS Navigation (no signal)
- Radio
- Compass
- Go Back
- Home
- Browsing History
- Brightness Control
- Car Assist
- Volume Control
- App Store
- Google Play Store
- Music Player
- Video Recording (off)
- Settings
![]()
- Battery Charging
- Wi-Fi Signal Acquired
- 4G LTE Signal
- Music (not playing)
- Location (not found)
Installation

Orient the mount as shown
Step 1:Install the Adhesive Mount
Orient the mount as shown on the illustration above.Clean your windshield surface thoroughly and allow it to dry before applying the static cling. Peel off one plastic layer from the static cling and apply it to your preferred spot. Peel off the other plastic layer and attach the Rexing adhesive mount onto it. Make sure the mount is facing to the correct slide in direction.
Firmly press the mount onto the windshield. Wait at least 20 minutes before mounting the camera.

Step 2:Insert the Memory Card
The Rexing S800 accepts [Class 10/UHS-1 or higher] Micro SD memory cards up to 256GB. You will need to insert a memory card before you can begin recording. Before inserting or removing a memory card, first ensure you’ve powered down the device. Please go to www.rexingusa.com/smart-connect/ for more details of the SIM card activation and functions.
Step 3: Power the Camera and Format the Memory Card
Power the camera by connecting the charger to the car cigarette lighter and camera. Before you start using a new memory card, you must format the card within the camera using the format function. This will ensure the S800 records to your memory card properly and without error. Always backup important data stored on the memory card before formatting.

To format the memory card, make sure you have inserted your memory card, then turn on the device by connecting to a power source.
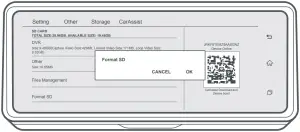
Press the OK button to confirm formatting the card
Press ![]() on the left corner of Main Menu. Select “Storage” and then press “Format SD”. Press “OK” to confirm formatting the card.
on the left corner of Main Menu. Select “Storage” and then press “Format SD”. Press “OK” to confirm formatting the card.
After the SD card is formatted, you may now disconnect.
Step 4: Installing the Rear Camera
Mount the rear camera as shown below. Use the provided rear camera cable to connect the rear camera to the front camera.

Step 5: Installing the Camera onto the Windshield
Place the camera on the mount and carefully route the power cable around the windscreen and tuck it under the trim.
Plug the car charger cable to a 12V DC power outlet or the car cigarette lighter.
Connect car charger to the camera. The camera will auto-start recording once it’s powered on.
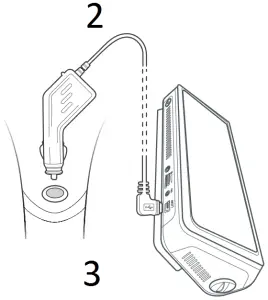
- Connect the power cable to the dash cam
- Plug the charger into a power outlet or a cigarette lighter
- Plug the Mini-USB connector to the Mini-USB port on the dash cam
Basic Operation
Device Power
The device will be automatically powered on when plugged into a 12V accessory socket or a cigarette lighter when receives a charge (i.e.: the vehicle is started).
To turn the device on manually, press and hold the Power button until the welcome screen appears.
The camera will automatically start recording when it is powered on.
![]()
Press and hold the Power button to turn the device on manually
Power the camera on. Click ![]() on Main Menu to enter video recording. Click
on Main Menu to enter video recording. Click ![]() to enter Camera Settings.
to enter Camera Settings.
Dash cam will automatically return to Main Menu after 30 seconds if there is no actions taken.
Press ![]() on Main Menu to enter System Settings.
on Main Menu to enter System Settings.
Video Recording
The camera will automatically start recording when the device receives a charge. Click ![]() on Main Menu and enter video recording. Press
on Main Menu and enter video recording. Press ![]() to stop recording and press
to stop recording and press ![]() to resume recording. Press
to resume recording. Press ![]() to lock the current video footage.
to lock the current video footage.
![]()
Video Playback
To playback a video on the device, click ![]() on Main Menu to enter video recording. Press
on Main Menu to enter video recording. Press ![]() to enter the video list; toggle through list and press the file to play videos.
to enter the video list; toggle through list and press the file to play videos.
![]()
During playback, rewind and fast forward the video to desired specific time.
When the GPS Logger is connected to the camera, it will record and you can access the information while playing back your recordings using the CarAssist App.
![]()
Press GPS Navigation on Main Menu. Click “Settings” on the right corner and turn on the GPS feature. Selecting Google Map. The dash cam will automatically search for the GPS signal once it’s connected to the GPS Antenna.
After a GPS signal is found, the screen will show your location on Google Map.
GPS Signal – Searching GPS Signal – Active
![]()

Taking Photos
Press ![]() to enter Video Recording; click
to enter Video Recording; click ![]() to stop recording. Select
to stop recording. Select ![]() to access photo feature. Then press
to access photo feature. Then press ![]() again to take photos.
again to take photos.

Review and Delete Photos
To review photo, click ![]() when in recording, then select folder “Capture” to review the photos.
when in recording, then select folder “Capture” to review the photos.
To delete a photo, press ![]() on the right corner and select one photo or all photos for delete.
on the right corner and select one photo or all photos for delete.
Smart Connect
1. Click ![]() on Main Menu to enter Smart Connect Feature; Download the App by scanning the QR code.
on Main Menu to enter Smart Connect Feature; Download the App by scanning the QR code.
(1.) (2.)
2. Open the CarAssist App on your mobile device. Press “Scan Device” then scan the QR code on dash cam.
3. Once binding successfully, dash cam will be shown “Online”.
(3.)

4. Using the CarAssist App, you can take a picture/video or view a live preview of the dash cam screen, start/stop recording, as well as view and save your captures with your mobile device. By using this App, you may also locate your car 24/7 and check the live surroundings with your mobile devices.
report this adFor further instruction regarding the Smart Connect feature, please visit www.rexingusa.com/smart-connect/.
Enjoy Your Product!
Download theRexing S800 Manual
https://www.rexingusa.com/support/product-support/
References
[xyz-ips snippet=”download-snippet”]