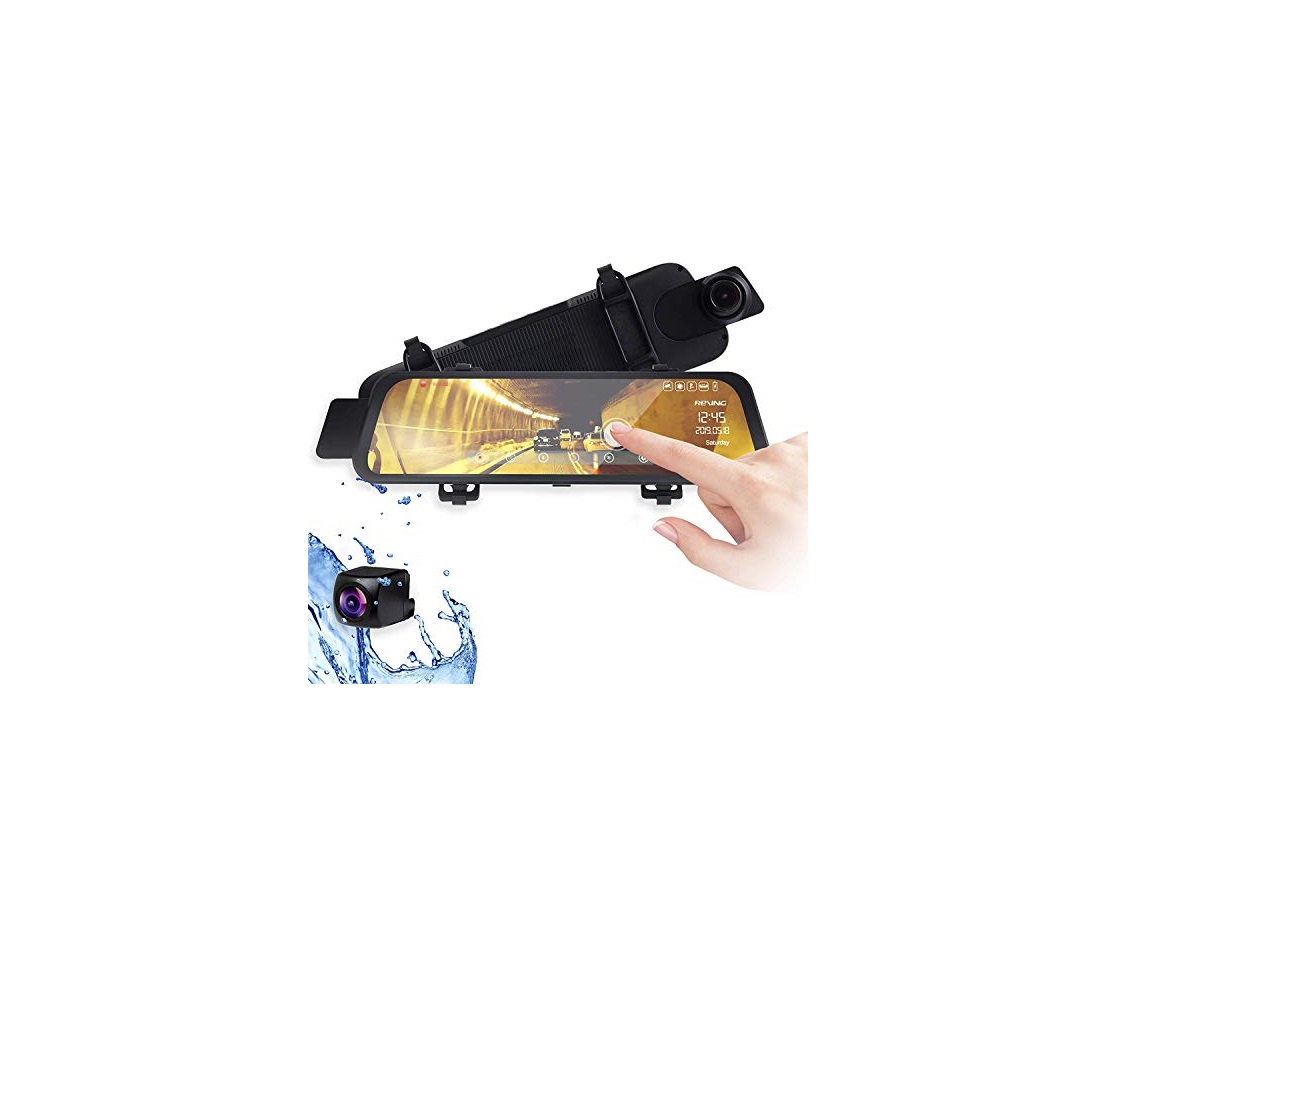
REXING M1 HD Dual Channel rear View 10″ IPS Touch Screen Mirror

Overview
Thank you for choosing REXING! We hope you love your new product as much as we do. If you need assistance, or have any suggestions to improve it, please contact us. You can reach us via [email protected] or call us at (203) 800-4466. Our support team will respond you as soon as possible.
Always a surprise in Rexing. Check us out here.


What’s in the Box
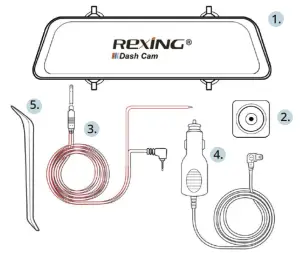
- Rexing M1 Dash Cam
- Waterproof HD Rear Camera
- Rear Camera Extension Cable (18ft)
- Car Charger (12ft)
- Cable Management Tool
- M1 Quick Start Guide
- Safety Guide
Camera Overview


- Power Button / Screen Toggle Button
- USB Charging Port
- Rear Camera Port
- Micro SD (TF) Card Slot
- GPS Logger Port (M1 not support)
Screen Icons
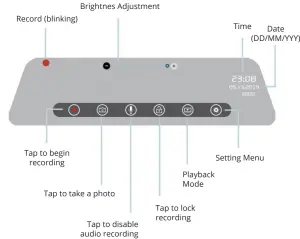
* Swipe left/right on touchscreen to switch front/rear view * Swipe up/down on touchscreen to adjust view angle
Installation
Step 1:Install the Dash Cam
Unhook the straps in the back of the front camera, then wrap them around your rearview mirror. Connect the straps to the hook on the back of the camera to secure the camera to the rearview mirror.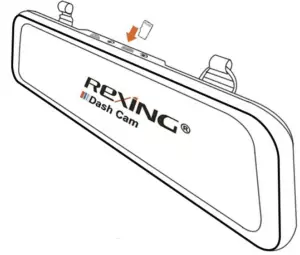 Step 2:Insert the Memory Card
The Rexing M1 accepts [Class 10/UHS-1 or higher] Micro SD memory cards up to 256GB. You will need to insert a memory card before you can begin recording. Before inserting or removing a memory card, first ensure you’ve powered down the device. Gently push the memory card in until you hear a click, and allow the spring release to push the card out.
Step 3:Power the Camera and Format the Memory Card
Power the camera by connecting the charger to the car cigarette lighter and camera. To ensure the M1 records to your memory card properly and without error. Before you start using a new memory card, you must format the card within the camera using the format function. Always backup card before formatting.
To format the memory card, make sure you have inserted your memory card, then turn on the device by connecting to a power source.Upon turning on the camera, tap Record button to stop recording. Then tap the Settings button to access the Settings Menu.
Use the arrow keys to navigate to the “Format” option. Once this option is highlighted, tap “Yes” to continue. You will be asked to confirm your choice. Tap “OK” to confirm.
You may now disconnect from power. The camera will shut down after 3 seconds. The camera should begin recording automatically the next time it is powered on.Press the Yes button to confirm formatting the card Step 4:Hardwire the red line to rear tail reverse light
In order to use automatic backup camera switch function, connect the red line of rear camera to your car’s rear tail reverse light. When put the car on reverse, the dash cam will automatically switch to backup camera view.
Step 5:Mount the Rear CameraMount the rear camera as shown below. Use the rear camera extension cable to connect the waterproof rear camera to the front camera.

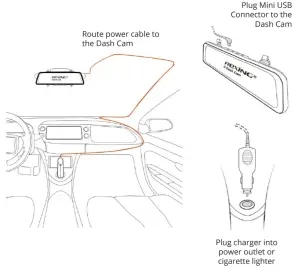
Step 6:Installing the Camera onto the Rear Mirror
Unhook the straps in the back of the front camera, then wrap them around your rearview mirror and carefully route the power cable around the windscreen and tuck it under the trim.
Plug the Car Charger Cable to a 12V DC power outlet or the car cigarette lighter.
Connect car charger to the camera. The camera will auto-start recording once powered on.
Basic Operation
Device PowerThe device will be automatically powered on when plugged into a 12V accessory socket or cigarette lighter when receives a charge (i.e.: the vehicle is started).
To turn the device on manually, press and hold the POWER button until the welcome screen appears.
The camera will automatically start recording when powered on.
Menu SettingsPower the camera On. If the camera is recording, tap the record button to stop recording.Tap ![]() button and toggle to the playback mode.Tap
button and toggle to the playback mode.Tap ![]() button once to enter the settings menu for a Mode.Press
button once to enter the settings menu for a Mode.Press ![]() to enter system settings (set up).
to enter system settings (set up).
Video Recording
The camera will automatically start recording when the device receives a charge. The red dot will blink when recording. Tap the record button to stop recording.
Video Playback
Playback of videos can be done on the device or a computer.
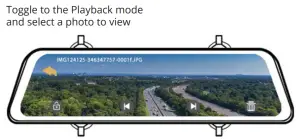
To playback a video on the device, switch to Playback mode by tapping the Playback button on the display menu.
Use the ![]() icons on the left to switch between front and rear camera recordings, as well as locked recordings and photos.
icons on the left to switch between front and rear camera recordings, as well as locked recordings and photos.
In Playback Mode, you may lock or delete recordings with the respective icons on the bottom right of the display, right beneath the time and date.
Scroll between your files by swiping up and down on the file list.
To play back a recording, tap the name of the file you want to play back, then tap on the preview frame to play.
While playing back a recording, you can ![]() (pause),
(pause), ![]() (play),
(play), ![]() (rewind), or
(rewind), or ![]() (fast forward) the recording by tapping the icons on the display.
(fast forward) the recording by tapping the icons on the display.
To exit a recording, tap the ![]() icon on the topleft of the display.
icon on the topleft of the display.
To exit Playback Mode, tap the ![]() display. icon on the top left of the
display. icon on the top left of the

To playback a video on the computer, use an SD card adapter. To playback a video using an SD card adapter, remove the memory card and insert it into an SD card adapter. Place the adapter in the computer.Recommended Media Players: QuickTime Media Player / VLC / Windows Media Player
Insert your micro SD into an SD card adapter, then insert the SD card adapter into your computer (or card reader) to access your card storage. Your front and rear camera videos will be stored under the “Video” folder, sorted into the “F” and “R” subfolders respectively.
Locked videos can be found on the memory card under the “Lock” folder.
Taking Photos
To take a photo, tap the ![]() button to take a photo.
button to take a photo.
To view a photo, stop video recording and tap ![]() button to Playback Mode. And tap
button to Playback Mode. And tap ![]() in the Playback Mode to enter the photo playback.
in the Playback Mode to enter the photo playback.
![]()
![]()
![]()
Swipe on the screen to toggle through your photos.
To delete a photo, stop video recording and toggle to the Playback Mode and toggle through the videos and photos to the one you want to delete.
Press ![]() on the right side corner. And tap the YES button to delete selected file.
on the right side corner. And tap the YES button to delete selected file.
report this ad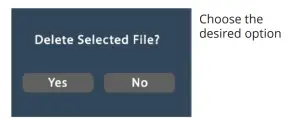
References
[xyz-ips snippet=”download-snippet”]