
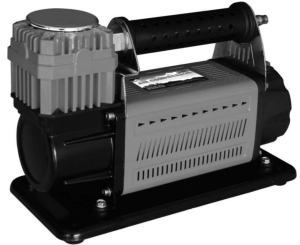
RIDGE RYDER Air Compressor
Due to continuing improvements, actual product may differ slightly from the product described. Items described such as tools and hardware within this manual may not be included. Images and drawing are for illustrational purposes only. Instructions in this manual are a guide only and each individual requirements and circumstances may be different.
⚠ CAUTION:To prevent serious injury, please read and understand all warnings and instructions before use.
GENERAL INFORMATION
| Maximum Air Flow: | 160 LPM (Litres Per Minute) |
| Voltage: | 12V DC |
| Cylinder Diameter: | 60mm |
| Maximum Current: | 45 Amp |
| Maximum Pressure: | 150 PSI |
| Thermal Cut Out Protection: | Active at 105°C |
| Duty Cycle: | 45 Minutes at 40 PSI |
| Motor Output Power: | 0.73HP (0.54kw) |
| Cooling: | Cooling Fins |
| Power Cables: | 2.4m with Heavy Duty Battery Clamps |
| Control: | On/Off Toggle Switch |
| Electrical Current Protection: | Circuit Breaker with Reset Button |
| Adaptor Hose: | 0.5m Rubber Hose with Quick Connectors, Gauge and Deflation Button |
| Extension Hose: | 5m Rubber Hose with Quick Connectors |
| Valve Connectors: | 1 x Screw Type and 1 x Thumb Lock Quick Connector |
| Gauge: | 0-150 PSI |
| Overall Dimensions (L x W x H): | 32.5cm x 15cm x 26.5cm |
| Net Weight: | 8.7kg |
| Base: | Metal Sand Tray with Rubber Feet.Can be Permanently Mounted to a Vehicle |
| Storage: | Heavy Duty Bag with Zipper |
| General Accessories: | 3 x Accessory Inflation Adaptors for Sporting / Camping Equipment |
Operation Time vs Pressure (Tyre Inflation)*
|
Tyre – 205/60 R16 |
Tyre – 275/70 R16 |
||
|
Time (Minutes, Seconds) |
PSI (kg/cm²) | Time (Minutes, Seconds) |
PSI (kg/cm²) |
|
0 min, 36 sec |
14.2 PSI (1kg/cm²) | 1 min, 18 sec | 14.2 PSI (1kg/cm²) |
| 1 min, 12 sec | 28.4 PSI (2kg/cm²) | 2 min, 36 sec |
28.4 PSI (2kg/cm²) |
|
1 min, 48 sec |
42.6 PSI (3kg/cm²) | 4 min, 00 sec | 42.6 PSI (3kg/cm²) |
| 2 min, 30 sec | 56.8 PSI (4kg/cm²) | 5 min, 30 sec |
56.8 PSI (4kg/cm²) |
Flow Rate (Litre/Minute) vs Amp Draw vs Pressure (Continues Operation)*
|
Air Flow (Litre/min) |
Motor Amp Draw |
PSI (kg/cm²) |
|
160 Litre/min |
N/A | 0 PSI (0kg/cm²) |
| 124 Litre/min | 38 Amp |
14.2 PSI (1kg/cm²) |
|
108 Litre/min |
40 Amp | 28.4 PSI (2kg/cm²) |
| 94 Litre/min | 42 Amp |
42.6 PSI (3kg/cm²) |
|
88 Litre/min |
43 Amp | 56.8 PSI (4kg/cm²) |
| 80 Litre/min | 43 Amp |
71 PSI (5kg/cm²) |
| *As tested at 13V DC, individual results may vary depending on each compressor and environmental conditions. |
UNPACKING
When unpacking, please check to ensure all parts are included. Refer to colour box packaging for included accessories. Should any part be missing or broken, please call the store where you purchased this compressor from as soon as possible.
COMPRESSOR PRINCIPLES
MPORTANT: This air compressor is designed for operation on a 12 volt electrical system / supply ONLY.Ridge Ryder Air Compressor has many uses when 4WDriving, camping, fishing, caravanning as well as around the home. It is important for the safety and performance of any vehicle, trailer or caravan that the tyre pressures are regularly checked and maintained. For the 4wd traveller tyre pressure will need to be varied depending on the terrain travelled. Highway and bitumen roads require high pressures, whereas terrains such as sand will require a low pressure to increase tyre traction. By travelling with a Ridge Ryder Air Compressor you will have the ability to adjust the tyre pressure safely and reliably according to the terrain travelled, as well as inflate tyres that have been repaired after a puncture.
NOTE: This compressor is not designed for quick inflation of high volume low pressure items such as air beds or inflatable boats. A more suitable item for this application would be a 12 volt high volume air pump.Ridge Ryder Air Compressor is designed for reliability, performance, versatility, and ease of operation.
F.A.D. (FREE AIR DELIVERY) RATING:
F.A.D. (Free Air Delivery) rating is the actual quantity in LPM (Litres per Minute), of compressed air that is discharges at 0 kPa from the compressor unit.
OPERATING RATINGS:
The LPM (Litres per Minute) rating and inflation times varies according to how much pressure is in the tyre being inflated. The lower the pressure in the tyre results in a greater LPM (Litres per Minute) capability.Ridge Ryder Air Compressor F.A.D. has been rated at 0 kPa. Please refer to the front of this manual for full details of the compressor performance at varying pressure levels.
POWER CONSUMPTION:
A Ridge Ryder Air Compressor operates of your vehicle battery system or 12 volt power supply (not included). Air compressors can consume a lot of power, for maximum performance the battery system or power supply must be in excellent condition, where possible you should have your vehicle engine running to maintain a charging current to the battery. The compressor will still operate if the engine is not able to be switched on, so long as the battery is in excellent condition. During operation monitor your battery voltage so it does not get to low to restart the vehicle. Please refer to the front of this manual for full details on the compressor amperage (amp) draw details. All details in this manual are based on a continuous operation cycle.
OVERHEATING PROTECTION:
This Air Compressor is equipped with an automatic thermal cut out protection device. If the compressor reaches an unsafe operating temperature, a protection circuit will cut the power to prevent damage. If the protection circuit activates; immediately disconnect the unit from the power source and allow it to cool.
The compressor should take approximately 15 minutes to cool depending on ambient conditions. The compressor protection circuit will automatically reset when the units temperature returns to a safe operating level.
NOTE: The thermal cut out will operate when the motor reaches 105°C. The cylinder head will operate at a higher temperature. Please refer to the front of this manual for full details on the compressor maximum duty cycles. Always allow your compressor to cool before reuse.
|
WARNING Ridge Ryder Air Compressor generates a lot of heat so wear appropriate gloves to protect your hands; do NOT touch the unit with bare hands after operation, use the carry handle. Always allow the compressor to cool completely before storage. |
SAFETY OPERATING PROCEDURES
When using this Compressor, safety precautions should always be followed to reduce the risk of personal injury and damage to the compressor or your vehicle.
POWER CONNECTION:Use caution when connecting the unit to a power source, as batteries can vent explosive gasses. Avoid connections that could produce a spark. Consult your vehicle manual or a qualified auto electrician for proper connection procedures. When connecting to the power source ensure correct polarity, (+) to (+) and (-) to (-), refer to step 5 on page 6 of this manual.
SAFE HANDLING:Only move and hold the unit by the carry handle. NEVER carry the compressor by the hose or power cords.
INFLATION:Only inflate the tyres to the manufacturers recommended pressure (consult your vehicle manual). DO NOT over inflate, as tyre failure or serious injury could occur.NOTE: This compressor is not fitted with a pressure relief valve.
STOPPING AND RESTARTING:Turning the compressor on at high pressure can overload the unit and result in blowing the fuse or tripping the circuit breaker. If starting at a higher inflation pressure, it is a good idea to turn the compressor on first before attaching the hose to the tyre valve. If you are stopping the compressor and restarting during an inflation operation, then you should remove the hose from the valve once you have turned the unit “off”, then turn the compressor on and reconnect to the tyre valve.
WORKING AREA CONDITIONS:Keep the working area well lit. Do not use this compressor in the presence of flammable gases or liquids. Use the compressor in dry conditions only to avoid potential risk of electrical shock.
KEEP CHILDREN AWAY:Keep children away from working area, never let children operate the compressor.
USING OF LEATHER GLOVES AND SAFETY GLASSES:When handling the compressor, always use hand protection to eliminate the possibility of burns. Always wear approved safety glasses when working with compressed air from your compressor. NEVER aim the air stream at anyone’s eyes or skin.
CORRECT USE OF COMPRESSED AIR:Do NOT use the compressor for pumping, compressing or transferring any gas or liquid other than air. This compressor is NOT designed for use as a source of breathable air.
FREE AIR FLOW:This compressor is designed for continues air flow, Never block the flow of the air with any device or accessory. Damage to the compressor or serious injury may occur and void the manufactures warranty.
SMALL ITEMS:Extra caution should be taken when inflating small objects such as; small tyres, bicycle tyres and sporting balls as rapid inflation will occur. Pay close attention to the pressure gauge and be prepared to stop the compressor when desired or manufactures pressure is reached.
STAY ALERT:Watch what you are doing. Use your common sense. Do not use this compressor when you are tired, stressed or WHEN UNDER THE INFLUENCE OF DRUGS, ALCOHOL OR MEDICATION
REPLACEMENT PARTS AND ACCESSORIES:The compressor is permanently lubricated during manufacture. It is not necessary to lubricate this unit. Only genuine replacement parts should be used when repairing or servicing the unit. Any serving or repairs should be carried out by a qualified technician.Never use a compressor that shows any signs of damage.
WARNING LABELS, STICKERS AND MODIFICATIONS:Do NOT discard or remove and warning labels or name plates on this compressor. These contain important safety information; Never modify this compressor in any way. This will void the manufactures warranty.
OPERATING YOUR COMPRESSOR
Before operating the compressor check that you are in a safe location away from busy roads and traffic, inspect the compressor and accessories for any sign of damage. If there is signs of Damage do NOT use the compressor and replace damaged parts
STEP 1:Place the compressor on a dry level surface near the 12 volt vehicle battery or power source.
STEP 2:Connect the 5 metre air hose to the compressor using the quick connector. To use the quick connector follow these steps:(a) Slide the retaining ring back on the female air hose quick connector on the hose and hold.(b) Connect the air hose to the compressor by firmly inserting the male quick connector located on the compressor unit into the female quick connector.(c) Release the retaining ring to lock the connectors in place.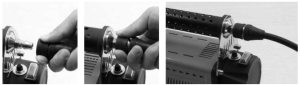 Note: If your tyre is near to the power supply and you can easily reach the valve, you do not need to connect the 5 metre extension hose you can connect the 0.5 metre adaptor hose (with gauge) directly to the unit using the same procedure as described above.
STEP 3:Connect the 0.5 metre adaptor hose to the 5 metre extension hose using the quick connects.Refer to Step 2 for details on using the quick connectors.
STEP 4:Choose whether you wish to use the screw type connector or the thumb lock quick connector. The screw type connector will give you the best results.(a) If you choose the screw type connector, the screw type connector is already attached to the 0.5 metre hose and is ready for use.(b) If you choose the thumb lock adaptor, simply screw the end of the adaptor into the screw type connector on the 0.5 metre hose; ensure a good seal is made. The thumb lock adaptor is now ready to connect.
STEP 5:Connect the compressor to your battery or power source.(a) Connect the Red battery alligator clip, located at the end of the power cord from the compressor unit. To the “+” on your 12 volt battery or power source.(b) Connect the Black battery alligator clip, located at the end of the power cord from the compressor unit. To the “–” on your 12 volt battery or power source.
STEP 6:Test the connections and air flow by switching the compressor “on” with the “on/off” switch located on the body of the compressor.CAUTION: When testing the compressor direct the hose away from yourself or any persons nearby
STEP 7:
Inflating the tyre.Connect the air hose to the tyre:
- Remove the valve cap (if equipped) from the tyre valve system.(a) If using the screw type connector, screw the brass inflator onto the tyre valve system. Finger tight only.(b) If using the thumb lock connector, using your thumb press and hold the lever down, firmly press onto the tyre valve system to create a good seal, now release the lever.Inflate the tyre by switching “on” the compressor unit with the “on/off” switch located on the body of the compressor. Watch the pressure gauge closely to monitor the tyre pressure, once the manufactures specifications or your desired pressure has been reached turn the compressor unit off.
- Refit the valve cap after you have completed the inflating process.NOTE: The pressure gauge can often read higher during the inflation process due to the air flow through the hose, once the compressor unit is turned off you may find the actual pressure is not quite enough and you may need to turn the compressor back on to add some more air. If you have to turn the compressor back on to add more pressure you must follow the “STOPPING AND RESTARTING” procedure check above.
STEP 8:Allow you compressor to cool before stowing away. Place cooled compressor neatly into the bag supplied and close ready for the next use. Store the compressor in a dry location.
COMPRESSOR OPERATING TIPS
TIP 1: It is always good practice to confirm the tyre pressure with a separate gauge.TIP 2: Use the “deflation button” located on the back of the gauge on the 0.5 metre hose to accurately adjust the tyre pressure while the hose is still connected.TIP 3: The 0.5 metre hose can be use to deflate the tyres before entering terrain which requires a lower tyre pressure. (This is a very slow process)TIP 4: If starting at a higher inflation pressure, then it is a good idea to turn the compressor on first before attaching the hose to the tyre valve. This reduces the unnecessary strain applied to the compressor, maximizing the life and reliability.TIP 5: If you are stopping the compressor and restarting during an inflation operation, then you should remove the hose from the valve once you have turn the unit “off”, then turn the compressor on and reconnect to the tyre valve. This reduces the unnecessary strain applied to the compressor, maximizing the life and reliability.TIP 6: If your tyre is near to the power supply and you can easily reach the valve, you do not need to connect the 5 metre extension hose, you can connect the 0.5 metre adaptor hose directly to the compressor unit.TIP 7: When inflating small objects such as; small tyres, bicycle tyres and sporting balls, rapid inflation will occur. Pay close attention to the pressure gauge and be pre pared to stop the compressor when desired or manufactures pressure is reached.
MAINTENANCE
- All moving parts within the compressor have been lubricated at the factory. No internal lubrication is required once fist removed from the box.
- Check the air filter regularly by removing the cover, suggests a schedule of every 6 months. Clean or replace the air filter, to clean the filter wash in mild soapy water and rinse well.
- Check battery cables, fuse and electrical connections regularly, making sure that they are in good condition.
- Before and after every use inspect the compressor signs of damage to the unit and hoses.
TROUBLE SHOOTING
This should be used as a guide only; we recommend you seek professional advice should you experience any technical issues.
Compressor does not operate under normal conditions:
- Vehicle battery or power source should be in good working order and fully charged.
- Check wiring connection is correct as per instruction within this manual.
- Check all the electrical connections and cables are in good condition, free from corrosion and connected properly.
- Earth power cable should be connected directly to the earth terminal on the battery or power source not the vehicle chassis.
- Only the power cables supplied with this air compressor should be used, any other cable may not be of a high enough specification to supply sufficient power to the compressor.Compressor operates but the tyre is not inflating:
- Check the hoses are connected properly.
- Inspect for any leaks in the hoses.
Compressor stops during operation:
- Check the vehicle battery or power source it should be in good working order and fully charged.
- Check the circuit breaker, reset if necessary.
- Compressor is equipped with an automatic thermal cut out protection device. If the compressor reaches an unsafe operating temperature, a protection circuit will cut the power to prevent damage. If the protection circuit activates; immediately disconnect the unit from the power source and allow it to cool.
Air is leaking from the hoses:
- Check the deflator button is completely out and in good condition.
- Check the screw type fitting is threaded onto the valve correctly and has a good seal.
- Check the thumb lock adaptor is connected onto the valve correctly and has a good seal.
- Check the o-ring inside the screw type and thumb lock connectors are in good condition.
- Check all the quick connectors are secured properly with the outer retaining ring locked in place.
WARRANTY
This product is guaranteed against defects for a period of 60 months from date of purchase.
This warranty is provided by Super Cheap Auto Pty Ltd ACN 085 395 124 (Supercheap Auto) of 751 Gympie Rd Lawnton QLD 4501 Ph (07) 3482 7500. Supercheap Auto will offer a repair, replacement product or store credit if the product is assessed as being defective during the warranty period..
To claim under this warranty, take this product to the Front Service Desk of your nearest Supercheap Auto store. For store locations, visit www.supercheapauto.com.au (AUS) or www.supercheapauto.co.nz (NZ). You will need your receipt or proof of purchase. Additional information may be requested of you to process your claim. Should you not be able to provide proof of purchase with a receipt or a bank statement, identification showing your name, address and signature may be required to process your claim.
This product may need to be sent to the manufacturer to assess the defect before determining any claim. Faults or defects caused by product modification, misuse and abuse, normal wear and tear or failure to follow user instructions are not covered under this warranty…
Our goods come with guarantees that cannot be excluded under the Australian Consumer Law.You are entitled to a replacement or refund for a major failure and for compensation for any other reasonably foreseeable loss or damage. You are also entitled to have the goods repaired or replaced if the goods fail to be of acceptable quality and the failure does not amount to a major failure.
Any expenses incurred relating to the return of this product to store will normally have to be paid by you. For more information contact your nearest Supercheap Auto store.
 report this ad
The benefits to the consumer given by this warranty are in addition to other rights and remedies of the Australian Consumer Law in relation to the goods and services to which this warranty relates.
PLU: 299651 CODE: RRAC1Manufactured and packaged for SRGS PTY LTD ABN 23 113 230 050751 Gympie Road, Lawnton, Queensland 4501, AustraliaMADE IN CHINA

References
[xyz-ips snippet=”download-snippet”]