Mini Gobo Moving Head Light
 User Manual
Please read the instructions carefully before use
Geneal Instructions
unpackingThank you for choosing our company’s products, in order to make you safe, fast and easy to use this product please read the ‘user manual’ before using the device, and strictly in accordance with “user roamer to install or use the device, In case of any doubt during the process, please feel free to contact with us or the distributor, meanwhile, we welcome your valuable suggestion, we will be happy to provide you with high-quaRy consulting and after-sales service.
Attachments:
- Mid Gabo Moving head Light 1PCS
- Power cable: 1PCS
- Bradcet 1PCS, Screw. 2PCS
- User Guide: 1PCS
Notice:
- Before using this unit Please look around the manual to ensure the product can be used normally be sure the voltage and frequency of the power supply match the power requirements of the fixture.
- Do not place the product in unstable places.
- The power supply should not exceed the range specified in the manual of +/- 10%
- World environment temperature:-20ºC-40ºC
- After power off, If It needs to be used again, please cool down over 20 minutes.
- To guarantee the life of the product, please don’t put it in a wet place and also not use it in a place over 40 degrees.
- This unit Is intended for indoor use only and should be prevented from water, moisture, and shake.
- Always replace with the exact same type of fuse, replacement with anything other than the specified fuse can cause fire or electric shock and damage your unit, and will void your manufactures warranty.
Technical Specification
- Applicable power: AC100-240V (50HZ / 60HZ)
- LED light source: Imported high-brightness LED white light beads.
- color: 8 colors
- Focusing: manual focus
- Beam angle: 11 •
- Pattern: 8 patterns, adjustable speed.
- Horizontal I vertical rotation angle: horizontal 540′, vertical 180
- Strobe / dimming: electronic variables.
- Electronic linear dimming: 0-100%
- Working mode: automatic, voice control, DMX512, master-Slave.
- Channel mode: 9/11 two control channel mode.
- Size: L • W • H = 280 • 210 260mm:
- Weight: 3.4KG
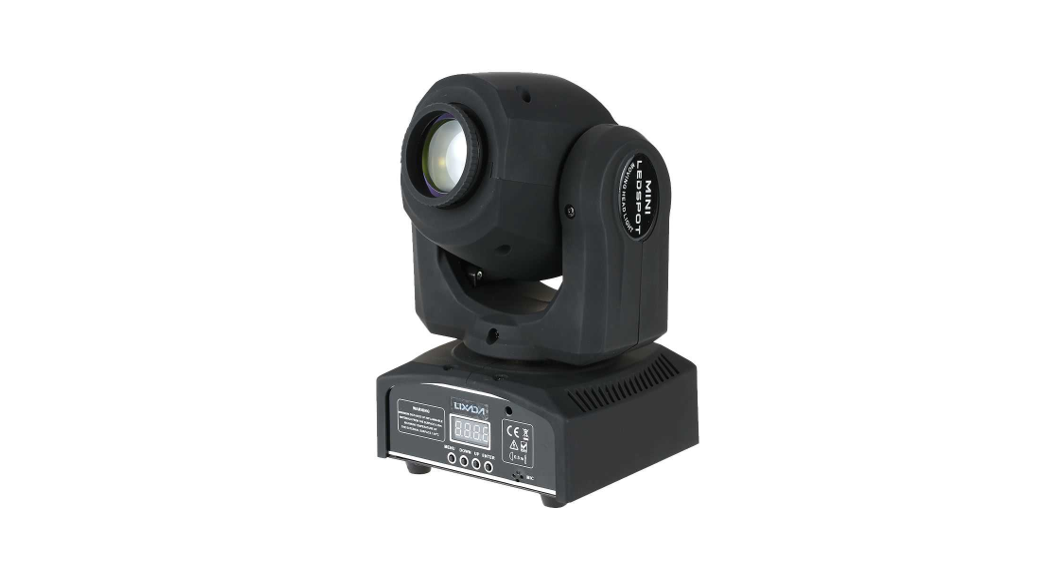
Front Panel
- MENU: select program function
- UP: Select the menu up
- DOMN: Select the menu down
- ENTER: Confirm the selected function
Menu function and function settings
|
MENU |
Function setting description |
| Adds | Select DMX Address (1-512): Press “ENTER’ to enter, press ‘UP” and “DOWN’ to select, then press ‘ENTER’ to confirm |
| Chad | Channel mode: The lamp has 9CH / 11CH two-channel mode, press ‘ENTER’ to enter, press ‘UP’ or ‘DOWN” to select mode, press ‘ENTER” to confirm the selected mode. |
| Shred | Show mode: The unit has Sh 0 – Sh 4 five-show modes, press ENTER to enter, press UP or DOWN to select mode, press ENTER key to confirm the selected mode. |
| dind | Dimming mode: The unit has five dimming modes, press ENTER to enter, press UP or DOWN to select mode, press ENTER to confirm the selected mode |
| SLnd | Slave selection mode: The unit has SL 1 – SL 2 two slave mode, press UP or DOWN to select, usually select SL 1, press ENTER key to confirm |
| Soun | Voice control selection: Press ENTER to enter, press UP or DOWN to selection(OFF, •on•to activate voice control, ‘OFFlo turn voice control oft, press ENTER key to confirm the selection |
| SenS | Voice control sensitivity selection (0 -100): Press ENTER to enter, press UP or DOWN to modify the value to select sensitivity, press ENTER key to confirm |
| Pint | X-exls forward and reverse rotation selection: Press ENTER to enter, press UP or DOWN to select ‘on’ or “yes”, “on’ Is forward rotation, “yes’ Is reverse rotation, press ENTER to confirm the selection |
| tint | Y aids forward and reverse rotation selection: press ENTER to enter, press UP or DOWN to select ‘on” or yes’, ‘on” Is forward rotation, yes’ Is reverse rotation, press ENTER to confirm the selection |
| Led | The display backlight Is always on or off Select: Press ENTER to enter, press UP or DOWN to select, “on” is always on, “off” Is off. |
| disp | Display forward or Inverted display melectIon: ‘dies” Is the positive display, ‘dsir Is the inverted display, press the ENTER key to select. |
| test | Autotest: please User no set it |
| tenp | Light source surface temperature detection: Press the ‘ENTER” key to enter the system, view the device light source surface temperature at this time. |
| rSet | Fbcture Reset: press “ENTER’ to Reset the fixture. |
How to control the fixture
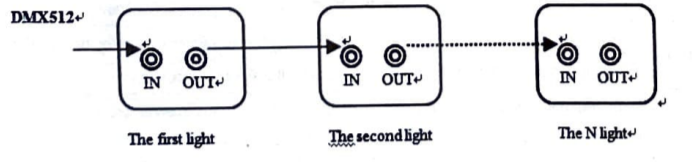
- DMX512 controllerUse the international standard DMX512 console, as shown below, with a signal cable to connect the console and the light. Note: All connected lights must be set to the same channel (9CH or 11CH) mode; otherwise, the lights will not be synchronized. After connecting the fixture and the console, turn on the power to all devices, the fixtures begin to work and reset. After the fixture is reset, all the fixtures should display one of the same address codes (1 to 512), Indicating that the fixture has received a signal from the DMX512 and the console can control the operation of the light.

-
Masterlslave operationAccording to the scene needs, use the signal line to connect the lamp as shown below; all the lamps must be set in the same channel mode (9CH / 11CH); otherwise, the equipment will be out of step; after the lamps are connected, turn on the power of all the lamps, The fixtures will select one of the mainframes, the mainframe will show as Sh 0, and the display screens of all the other slaves will be uniformly displayed as SL 1 or SL 2. At this time, all the fixtures will work synchronously with the mainframe

DMX512 Channel Control Function Instructions
|
Channel |
Value |
Function |
|
| 9CH | 11CH | ||
| CHI | CH1 | 000-255 | Control light horizontal rotation (X-axis) |
| CH2 | 000-255 | Fine-tune the light horizontal rotation (X-axis fine-tuning) | |
| CH2 | CH3 | 000-255 | Control the vertical rotation of light (Y-axis) |
| CH4 | 000-255 | Fine-tune the light vertical rotation (Y-axis fine-tuning) | |
| CH3 | CH115 | 000-127 | Control light color selection |
| 128-189 | Control light color wheel rotation speed, rotation speed changes from fast to slow | ||
| 190-193 | Color wheel stops turning | ||
| 194-255 | Control light color wheel rotation, rotation speed from slow to fast change | ||
| CH4 | CH6 | 000-063 | Control Gobo selection |
| 064-127 | Control Gobo jitter selection | ||
| 128-189 | Control light Gobo wheel rotation speed, rotation speed changes from fast to slow | ||
| 190-193 | Gobo wheel stops rotating | ||
| 194-255 | Control light Gobo wheel rotation speed, rotation speed from slow to fast change | ||
| CH5 | CH7 | 000-007 | Control light Is off, the light is oft |
| 008-015 | Turn on the light | ||
| 016-131 | Control the light strobe speed, strobe speed changes from slow to fast | ||
| 132-139 | Turn on the light | ||
| 140-181 | Control fight quickly closed, slowly open | ||
| 182-189 | Turn on the fight | ||
| 190-231 | The control light turns on quickly, turns off slowly. | ||
| 232-239 | Turn on the light | ||
| 240-247 | Control light random stroboscopic. | ||
| 248-255 | Turn on the light | ||
| CH8 | CHB | 000-255 | Adjust the fixture brightness: 0 -100% |
| CH7 | CH9 | 000-255 | Control X-axis I Y-axis rotation speed, rotation speed changes from fast to slow |
| CH8 | CH10 | 000-069 | No Function |
| 070-079 | The light shut off when the X/ Y axis Is rotated | ||
| 080-089 | No Function | ||
| 090-099 | Ughts turn of when the color wheel Is turned | ||
| 100-109 | No Function | ||
| 110-119 | The light shut off when the gobo Is turned | ||
| 120-199 | No Function | ||
| 200-209 | Reset | ||
| 210-249 | No Function | ||
| 250-255 | Voice control function | ||
| CH9 | CH11 | 000-020 | Standard lighting effects |
| 021-040 | Stage fighting effects | ||
| 041-060 | TV lighting effects | ||
| 061-080 | Architectural lighting effects | ||
| 081-100 | Theater lighting effects | ||
| 101-255 | Default standard lamp effect |
Troubleshooting
When the following problems occur on the device, follow the prompts to troubleshoot the problem:
- The fixture is off or the fixture is not working: Check if the power switch, power cable, etc. are Intact, plug and socket are plugged together, and check If the device settings and Input voltage are correct.
- In master-slave mode, lamps do not work or are not responding, or are not synchronized. Please check the following tips,A Confirm whether the connected device has only one host, the host display shows “Sh 0″, and the rest for the slave, the display shows ‘SL 1″ or ‘SL 2”, otherwise the slave should be set to the unified model.B Confirm whether the channel settings of all slaves are unified (CH9 or CH11).C Confirm that all fixtures horizontal rotation Is set to the “on” state of “Pen” and whether the vertical rotation Is set to the “on” state of “h r.D Check the signal cable is intact.E Turn of the power for 3-5 seconds, then restart the power.
- In the DMX512 mode, the fixture does not work or no response or is not synchronized, please check the following tips:A Confirm that all devices are set In the unified channel control mode (C119 or CH11).B Check If the equipment has received the DMX512 signal (when receiving 512 signals, the display shows the same address code: one of 1 – 512), and check whether the cable is intact.C Check the console Is normal, set up correctly.
- The device does not have a sound control response:A Check whether the device’s audio control sensitivity settings are correct. For details, see the ‘Device Menu Functions and Setting Instructions” section.B Check whether the device MIC is connected well.The above method still can not solve the problem, please contact the dealer or our company’s after-sales department.
Fixture cleaning
The cleaning of the Internal must be carried out periodically to optimize light output. Cleaning frequency depends on the environment in which the fixture operates: damp, smoking or particularly dirty surrounding can cause a greater accumulation of dirt on the fixture’s optics.
- Clean with a soft cloth using normal glass cleaning fluid.
- Always dry the parts carefully.
- Clean the external optics at least every 20 days. Clean the internal optics at least every 30/60 days.
Statement
The product undergoes rigorous testing before delivery, with good performance, complete accessories, and undamaged packaging. All users must strictly abide by the “User Manual’ to use this product, otherwise, we are not responsible for any product quality problems caused by Ignoring the ‘User Manuel”! If you purchase our products and have quality problems during normal use and need to be repaired, please contact the dealer nearest to you or our after-sales service department and we will be happy to assist you.
[xyz-ips snippet=”download-snippet”]