
![]() 82-5201-01 Email/Text GeneratorOperator’s Manual
82-5201-01 Email/Text GeneratorOperator’s Manual
Part Number: 71-0556Revision: P7Released: 9/17/21RKI Instruments, Inc.www.rkiinstruments.com
Product Warranty
RKI Instruments, Inc. warrants gas alarm equipment sold by us to be free from defects in materials, workmanship, and performance for a period of one year from the date of shipment from RKI Instruments, Inc. Any parts found defective within that period will be repaired or replaced, at our option, free of charge. This warranty does not apply to those items which by their nature are subject to deterioration or consumption in normal service, and which must be cleaned, repaired, or replaced on a routine basis. Examples of such items are:a) Absorbent cartridgesb) Pump diaphragms and valvesc) Fusesd) Batteriese) Filter elements
Warranty is voided by abuse including mechanical damage, alteration, rough handling, or repair procedures not in accordance with the operator’s manual. This warranty indicates the full extent of our liability, and we are not responsible for removal or replacement costs, local repair costs, transportation costs, or contingent expenses incurred without our prior approval.THIS WARRANTY IS EXPRESSLY IN LIEU OF ANY AND ALL OTHER WARRANTIES AND REPRESENTATIONS, EXPRESSED OR IMPLIED, AND ALL OTHER OBLIGATIONS OR LIABILITIES ON THE PART OF RKI INSTRUMENTS, INC. INCLUDING BUT NOT LIMITED TO, THE WARRANTY OF MERCHANTABILITY OR FITNESS FOR A PARTICULAR PURPOSE. IN NO EVENT SHALL RKI INSTRUMENTS, INC. BE LIABLE FOR INDIRECT, INCIDENTAL, OR CONSEQUENTIAL LOSS OR DAMAGE OF ANY KIND CONNECTED WITH THE USE OF ITS PRODUCTS OR FAILURE OF ITS PRODUCTS TO FUNCTION OR OPERATE PROPERLY.This warranty covers instruments and parts sold to users by authorized distributors, dealers, and representatives as appointed by RKI Instruments, Inc.We do not assume indemnification for any accident or damage caused by the operation of this gas monitor, and our warranty is limited to the replacement of parts or our complete goods.
Overview
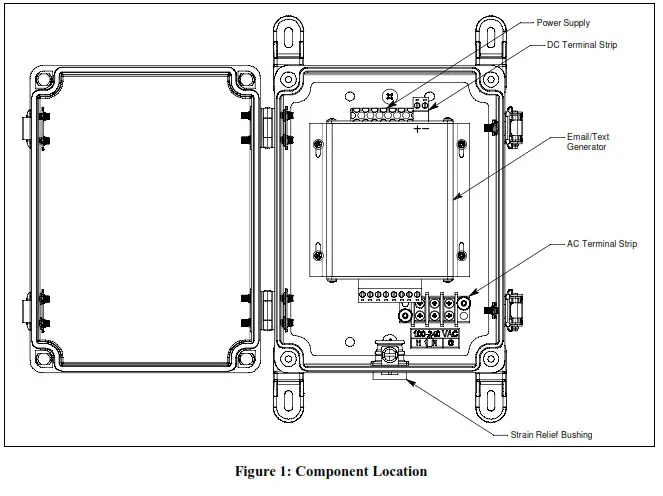
The 82-5201-01 email/text generator is capable of monitoring 4 sets of contacts and sending out an email and/or text message when a contact opens or closes. It can also send out an email and/or text message when it is powered up.The email/text generator is installed in a plastic housing that has a strain relief bushing on the bottom. An AC/DC power supply is installed beneath the email/text generator. The power supply’s AC input terminals are wired to a terminal strip at the bottom of the mounting plate to make it easy to connect power at the installation site. The DC output wires are wired to the email/text generator’s input terminals.
Specifications
| Input Power | 9 – 12 VDC OR110/240 VAC | |
| Email Broker | SMTP (what most email brokers, such as Gmail and Outlook, use) | |
| NN i Fi | 2.4 Gliz* Does not support 5 GHz networks, captive portal networks, or networks whose passwords have special characters such as #$%* | |
| Contacts | 4 contact closure input ports | |
| LED | Flashing White | The device is trying to connect to WiFi. |
| Flashing Green | The device is properly connected to WiFi and is ready for operation. | |
| Yellow | The device is booting up. | |
| Flashing Blue lx/second | The device is in Configuration Mode and should appear as a WiFi network on your computer, phone, or tablet. | |
| Flashing Blue 2x/second | The device is trying to send an email and/or text. | |
| Flashing Random Colors | The device is restoring factory default settings. | |
| Single Red Flash | Email/text sending failed. It is normal for the generator to return to flashing green after 5 seconds. | |
| Double Red Flash | There is an issue with Device Settings. It is normal for the generator to return to flashing green after 5 seconds. | |
| Triple Red Flash | WiFi connection cannot be established with the configured network. |
Installation
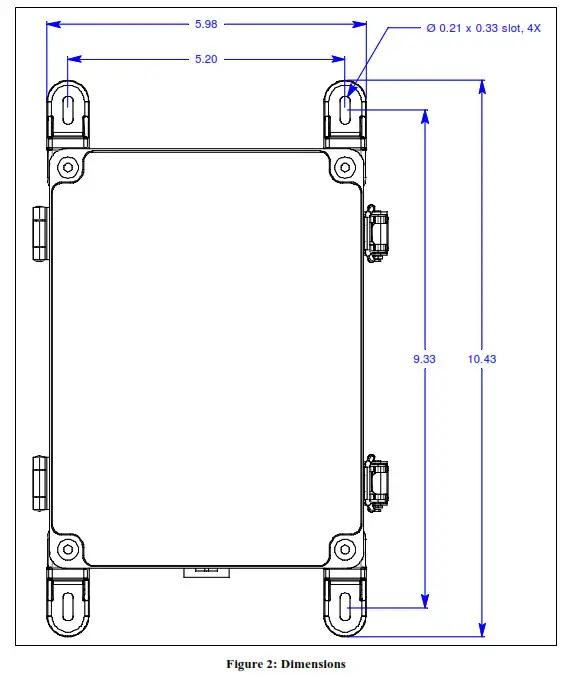
- Select the mounting site. When you select the mounting site consider the following factors:• Is an AC or DC power source available?• Is there enough room to open the housing door and make wiring connections (see Figure 2)?
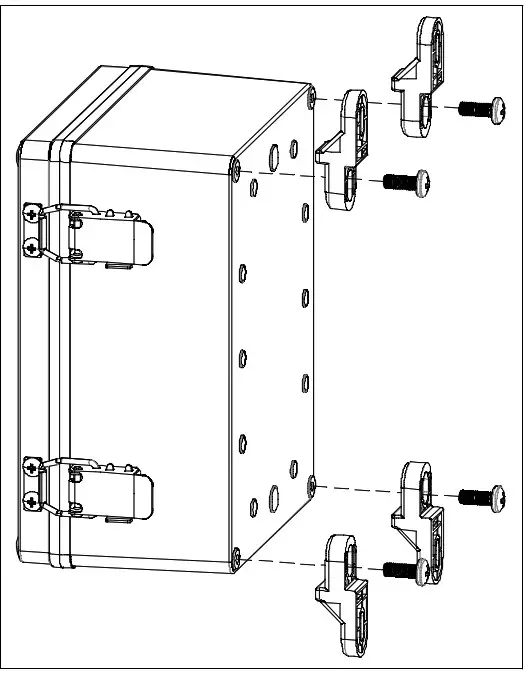
- The mounting feet and hardware to install the mounting feet are shipped in a bag inside the housing. Install the mounting feet as shown below.

- Position the monitor on a vertical surface at eye level (4 1/2 to 5 feet from the floor).
- Use 3/16” screws through the slots in the mounting feet at each corner of the housing to secure the housing to the mounting surface.
Wiring
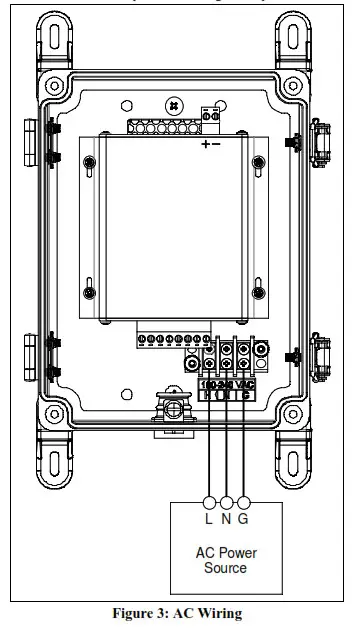
- If using AC power:a. Unscrew and remove the kep nuts from the AC terminal strip’s cover.b. Route the AC wires through the strain relief bushing on the bottom of the housing.c. Connect a line wire from the AC power source to the “H” terminal on the AC terminal strip.d. Connect a neutral wire from the AC power source to the “N” terminal on the AC terminal strip.e. Connect a ground wire from the AC power source to the “G” terminal on the AC terminal strip.f. Reinstall the AC terminal strip’s cover using the kep nuts. If using a 9 – 12 VDC power source:a. Disconnect the factory-installed red and black wires from the email/text generator’s input terminals.b. Route the DC wires through the strain relief bushing on the bottom of the housing.c. Connect the power source’s “+” line to the “+” terminal on the DC terminal strip.d. Connect the power source’s “-” line to the “-” terminal on the DC terminal strip.
- Wire the 2 terminals for each Contact Closure Input to the contacts they are intended to monitor.
- Tighten the screw on the strain relief bushing to secure the wires.
- Turn on the power source.
 If using a 9 – 12 VDC power source:a. Disconnect the factory-installed red and black wires from the email/text generator’s input terminals.b. Route the DC wires through the strain relief bushing on the bottom of the housing.c. Connect the power source’s “+” line to the “+” terminal on the DC terminal strip.d. Connect the power source’s “-” line to the “-” terminal on the DC terminal strip.
Configuration
Entering Configuration Mode and Initial Connection
- Connect power to the device. If it’s the first time the device has been turned on, it will turn on in Configuration Mode and the LED will be flashing blue. If the LED is flashing green, press the Mode button on the right side of the device to switch to Configuration Mode using a tool with a 90° angle.
- Navigate to the WiFi screen on your computer, phone, or tablet and find NCD_Email.
- The password to join the network is NCDBeast.
- Your device may automatically launch a browser and take you to the configuration web interface. If it does not, you may need to tap the network name again (on a phone or tablet) or type 172.217.28.1 into a Chrome, Firefox, or Safari browser window (on a computer).
- The device’s configuration web interface appears.


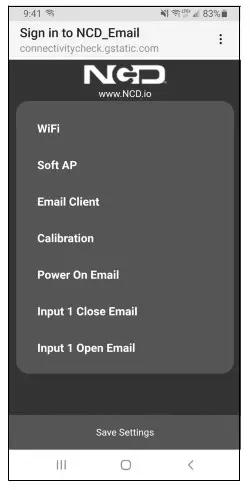
WiFi Configuration

- Network: Select a 2.4 GHz WiFi network from the drop-down menu. The device does not support 5 GHz networks.
- Hidden Network: If your network does not appear, manually enter the 2.4 GHz network’s SSID.The device does not support 5 GHz networks. Do not enter anything in the Hidden Network field if you selected a network from the Network drop-down menu.
- Password: If your network is password-protected, enter the password. The device does not support networks whose passwords have special characters such as #$%*. If your network is not password-protected, leave this field blank.
- DHCP: Select the box if the network you are connecting to is a DHCP network. Deselect the box if you need to assign a static IP address.NOTE: The rest of the fields are only active if DHCP is deselected.
- Default Gateway: Enter the network’s default gateway IP.
- Subnet Mask: Enter the network’s subnet mask IP.
- DNS Primary: Enter a valid DNS primary server IP. The IP can match the network settings or it can be a common DNS server. 8.8.8.8 is the IP for Google’s primary DNS lookup server.
- DNS Secondary: Enter a valid DNS secondary server IP. The IP can match the network settings or it can be a common DNS server. 8.8.4.4 is the IP for Google’s secondary DNS lookup server.
- Static IP: Enter the static IP address that you want the device to use on your network.
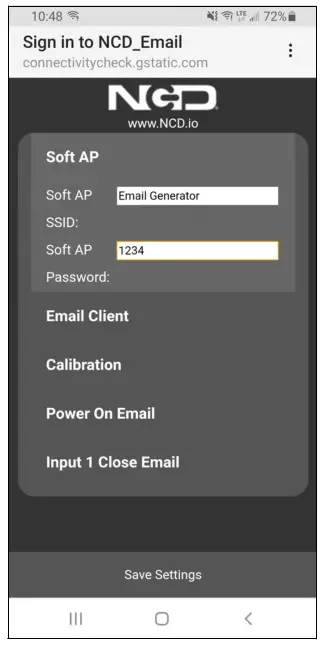
Soft AP Configuration
- Soft AP SSID: While in Configuration Mode, the device acts as a WiFi access point and broadcasts an SSID. Enter the SSID you’d like the device to broadcast.
- Soft AP Password: Enter the password you want the device to require when trying to connect to its WiFi access point.
Email Client Configuration
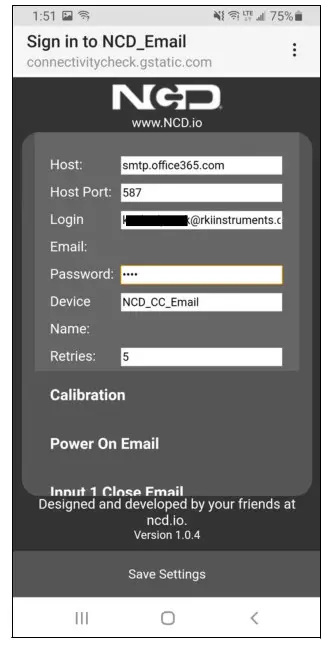
- Host: Enter the email broker’s SMTP host address. Common addresses are smtp.gmail.com and smtp-mail.outlook.com.
- Host Port: Enter the email broker’s SMTP port. Most email brokers that support SMTP connections use port 587.
- Login Email: Enter the email address you’d like to use to generate emails/texts.
- Password: Enter the password used to access the email address entered in the log-in Email.
- Device Name: Enter the text you want to appear in the signature of sent emails/texts.
- Retries: Enter the number of times you want the device to attempt to send emails and/or texts if the initial attempt is unsuccessful.
NOTE: If you are going to use a Gmail address to send emails/texts, make sure the “Allow less secure apps” setting is selected in your Google account.
Calibration Configuration

- Debounce Cycles: This setting defines how many CPU cycles are needed to determine a change in status. Most contacts bounce when they first make contact and this setting prevents those bounces from being recorded as separate events.Do not change this setting unless recommended by RKI Instruments, Inc.
- Input Validate: This setting defines how many milliseconds the contact must stay in a changed state before the device sends an email and/or text. The default setting is 5000 milliseconds (5 seconds).
Power On and Input Emails/Texts
The device will generate emails and/or texts when the device powers on and/or when any of the contacts close or open. You must make email/text settings for each event type (Power On, Input 1 Close, Input 1 Open, etc.) individually, even if they are all going to the same email address and/or phone number. If you don’t want emails/texts sent for a particular event type, leave the fields blank.
 report this ad
- Subject: Enter the subject title for the email/text generated from the event type. The text must be alphanumeric and cannot contain any special characters.
- Message Body: Enter the body for the email/text generated from the event type. The text must be alphanumeric and cannot contain any special characters.NOTE: The Power On message includes a WiFi signal strength percentage in addition to any entered text.
- Recipients: Enter the email address(es) and/or phone number(s) you want to receive emails/texts for the event type. Separate multiple email addresses and/or phone numbers with a comma (ie. ,). Do not add any spaces between email addresses or phone numbers. For phone numbers, you must use a ______ format where the domain name used in the blank field depends on the number’s wireless carrier.
| Wireless Carrier | Domain Name |
| AT&T | txt.att.net (SMS)ORmms.att.net (MMS) |
| Boost Mobile | sms.myboostmobile.com (SMS)ORmyboostmobile.com (MMS) |
| Cricket | sms.cricketwireless.net (SMS)ORmms.cricketwireless.net (MMS) |
| Google Fi | msg.fi.google.com (SMS & MMS) |
| Metro PCS | mymetropcs.com (SMS & MMS) |
| Sprint | messaging.sprintpcs.com (SMS)ORpm.sprint.com (MMS) |
| T-Mobile | tmomail.net (SMS & MMS) |
| Tracfone | mmst5.tracfone.com (MMS) |
| U.S. Cellular | email.uscc.net (SMS)ORmms.uscc.net (MMS) |
| Verizon | vtext.com (SMS)ORvmpix.com (MMS) |
| Virgin Mobile | vmobl.com (SMS)ORvmpix.com (MMS) |
| Xfinity Mobile | vtext.com (SMS)ORmypixmessages.com (MMS) |
Troubleshooting
| Problem | Solution’ |
| Unable to access configuration web interface | II’ the LED is not flashing blue, press the Mode button on the side of the device using a tool with a 90° angle.Try using a different computer, phone, or tablet.On a computer that is connected to the device, launch a Chrome, Firefox, or Safari window and type in 172.217.28.1. |
| LED repeatedly flashes 3 times (won’t connect to WiFi network) | Ensure the network you are trying to connect to is a 2.4 GHz network. The device does not support 5 GHz networks.Ensure the network password does not contain characters like #$%*.Move the device to within 10 feet of the router/access point and try again. |
| LED repeatedly flashes twice (email/text not going through) | Make sure the “Allow less secure apps” setting is selected in your Google account.Make sure the settings in the Email Client portion of the configuration web interface are correct. |
NOTE: The email/text generator is a 3rd party device. Please contact NCD at https://community.ncd.io/ for email/text generator support.82-5201-01 Email Generator
References
[xyz-ips snippet=”download-snippet”]