Roadstar TRA-300D+ Portable DAB+ / FM
Radio User Manual
Your new unit was manufactured and assembled under strict ROADSTAR quality control.Thank-you for purchasing our product for your music enjoyment. Before operating the unit, please read this instruction manual carefully.Keep it also handy for further future references.
TRA-300D+
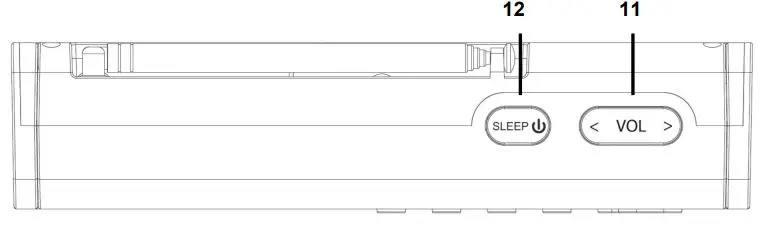
TOP
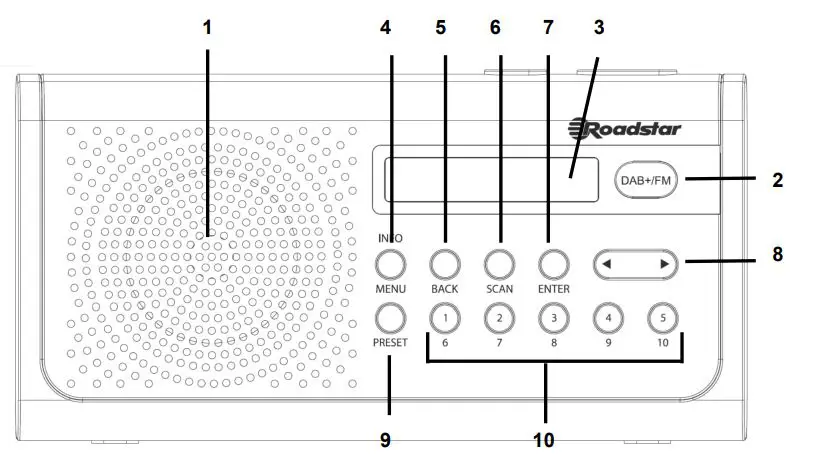
FRONT
REAR
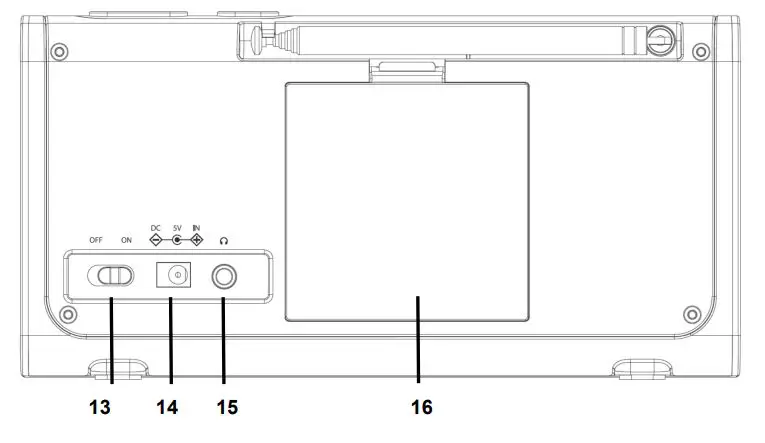
LOCATION OF CONTROLS
- SPEAKER
- DAB+/FM
- LCD DISPLAY
- INFO/MENU
- BACK
- SCAN
- ENTER
- ◄► (FORWARD/BACK)
- PRESET
- PRESET LOCATIONS 1-10
- VOLUME+/-
- SLEEP/TIMER/ POWER
- POWER ON/OFF SWITCH
- DC POWER
- EARPHONE OUT
- BATTERY COMPARTMENT
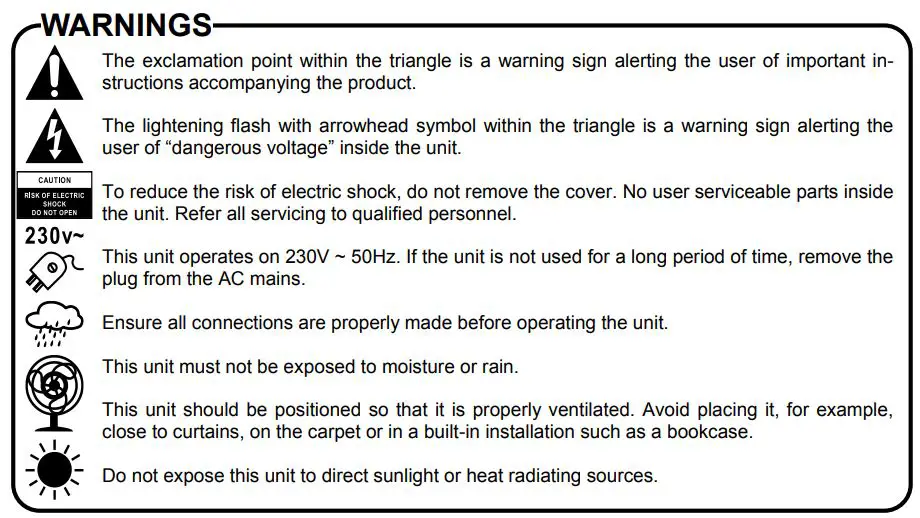
PRECAUTION
- INSTRUCTIONS – All the safety and operating instructions should be read before the radio is operated. The manual should be retained for future reference.
- HEED WARNINGS – All warnings on the appliance and in the operating instructions should be adhered to.
- WATER AND MOISTURE – The appliance should not be used near liquids or in rooms with a high level of humidity.
- VENTILATION – The appliance should be situated so that its location or position does not interfere with its proper ventilation.
- HEAT – The appliance should be situated away from heat sources such as radiators, stoves or other appliances that produce heat.
- POWER SOURCE – The radio should be connected to power supply only of the type described in the operating instructions or as marked on the appliance.
- POWER CORD PROTECTION – Power supply cords should be routed so that they are not likely to be walked on or pinched by items placed upon/against them.
- OBJECT AND LIQUID ENTRY – Care should be taken so that objects do not fall and liquids are not spilled into the enclosure through openings.
- SERVICING – The user should not attempt to service the appliance beyond that descrive in the user operating instructions. All the servicing should be referred to qualified service personnel
Note: If the display does not function properly or no reaction to operation of any control may due to the electrostatic discharge. Switch off and disconnect the power cord and remove all the batteries, then turn the power back on after a few seconds.
POWER SOURCES
AC POWER: You can power your portable stereo system by plugging the AC/DC adaptor into the DC plug (14) at the back of the unit and into a wall AC power outlet. Check that the rated voltage of your appliance matches your local voltage.
BATTERY POWER: To use the radio with batteries, disconnect the AC/DC adaptor and in-sert 4 × “LR6” batteries into the compartment (16).Be sure that the batteries are inserted correctly to avoid damage to the appliance.Remove the batteries when the radio will not be used for a long period of time, as this will cause leakage to the batteries and subsequently damage to your radio.
POWER ON/OFF
- Switch the [POWER] button (13) to ON to power on the radio.
- Switch the [POWER] button (13) to OFF to power off the radio.
TO USE THE RADIO
- Press and hold the [POWER] button (12) to power on;
- (The first time you power on the radio, the radio will scan the DAB radio stations automatically. It will display and play the first station after the scan is done);
- Select the band (DAB or FM) by pressing the [DAB/FM] button (2);
- Adjust radio frequency to your desired station;
- Adjust the volume with the [VOLUME +/-] (11) to the desired level;
- To power off the radio, press the [POWER] button (12) for 2 seconds.Note: For a better reception reorient the antenna.
DAB+ PRESET
To store a preset, select preferred station press [PRESET] button (9) for 2 seconds. The LCD will show “Preset Store”, use [◄►] (8) buttons to choose preset number from 1 to 10 you wish to use. Press [ENTER] (7) to store.
RECALL A PRESET STATION
- Press the [PRESET] button (9);
- Select the desired preset by using the [◄►] (8) buttons
- Confirm with the [ENTER] button (7).You can select with [PRESET LOCATION BUTTONS] (10) from 1 to 5 preset stations. To select Preset from 6 to 10, press and hold the relevant button.
FM STATION SCAN
Press and hold the [INFO/MENU] (4) button for 2 seconds. Press [ENTER] button (7) to confirm.You can choose with [◄►] (8) buttons STRONG STATIONS ONLY, or ALL STATIONS.Confirm with [ENTER] button (7) .Press [SCAN] (6) button to SCAN radio.
MANUAL SCAN
Press [◄►] (8) buttons to scan a station. When station found, the scan will stop.To fine tune the frequency you can press [◄►] (8) buttons to advance in 0.05 MHz increments
DAB SCAN
There are 2 types of scan. Quick scan and Auto scan.Quick scan: press [SCAN] (6) button
To perform FULL SCAN, press and hold [INFO/MENU] (4) button for 2 seconds.When the Full Scan option appears press [ENTER] (7) button
INFO
When the radio station is playing, press the [INFO] button (3) repeatedly to cycle through the information broadcasted by the radio as follow:
UNDER DAB
- DLS (Dynamic Label Segmenting): Radio text broadcasted from the DAB station such as the news, songs being played…etc.
- PTY (Programme Type): shows which type of programme you are listening to, “Music”, “Talk”, “News” etc.
- Channel/Frequency: The frequency of DAB is displayed such as “11C 220.352MHz”.
- Audio info: The display shows the digital audio bit rate of the current reception.
- Signal error: The signal strength is displayed graphically.
- Time/Date: The time and date are set automatically.
UNDER FM
- RT (Radio text): Text broadcasted from the FM station
- Program type: shows which type of programme you are listening to.
- Time/Date: The time and date are set automatically.
- Frequency: the FM frequency for the radio station in playing.
- Mono / Stereo: Automatic switching between mono and stereo reception.
Note: Time and date accuracy depends on the info broadcasted from the radio station.
SYSTEM SETTINGS
In FM / DAB mode there is an option menu.
1. Press and hold [INFO/MENU] (4) for 2 seconds to access to the options.2. When the FULL SCAN option appears press [◄►] (8) buttons and find DRC or PRUNE, press [ENTER] (7) button.
DRC (Dynamic Range Compression): This function reduces the differences between the loudes and quietest audio being broadcast. It makes quiet sounds comparatively louder, and loud sounds comparative quieter (only if offered by the provider).
PRUNE: Removes all invalid stations indicated in the station list with a “?” in front of the station name.
FACTORY RESET: Press and hold [INFO/MENU] button (4) for 2 seconds.Enter in SYSTEM, FACTORY RESET and choose YES, press [ENTER] (7) button.The software will return to default settings.
BACKLIGHT: select with press [◄►] (8) buttons BACKLIGHT, press [ENTER] (7) to enter, select with press [◄►] (8) buttons following info:
- TIMEOUT: you can choose : ON/10/20 etc.
- LANGUAGE: in SYSTEM SETTINGS, select with [◄►] (8) buttons desired language
CLOCK AND DATE SETTING
When the radio is ON:
- Press and hold [INFO/MENU] (4) to access to the menu;
- Use the [◄►] (8) buttons to select “System”;
- Confirm with the [ENTER] (7) ;
- Use the [◄►] (8) to select “Time”;
- Confirm with the [ENTER] (7) ;;
- Use the [◄►] (8) to select “Set Time/Date”;
- Confirm with the [ENTER] (7) ;
- Use the [◄►] (8) to adjust the hour;
- Confirm with the [ENTER] (7) ;
- Use the [◄►] (8) to adjust the minutes;
- Confirm with the [ENTER] (7) ;
- Repeat steps 10 and 11 to set the date
You can choose auto update: Use the [◄►] (8) buttons in INFO/MENU, and select UPDATE FROM ANY,UPDATE FROM DAB, UPDATE FROM FM or NO UPDATE.
SLEEP TIMER
The sleep timer switches the radio off automatically after an adjustable time.When the radio is ON press repeatedly the [SLEEP] (12) to choose the desired timer.
Note: To remove the sleep timer select “Sleep OFF”
ALARM SETTING
When the radio is ON:
- Press repeatedly the [INFO/MENU] button (4) for 2 seconds.
- Press [◄►] (8) and find SYSTEM, press [ENTER] (7) button;
- Press [◄►] (8) and find ALARM, press [ENTER] (7) button;
- ALARM 1 SETUP will appear on the display.
- Press [◄►] (8) , to choose ALARM 1 or ALARM 2. Press [ENTER] (7) to confirm.
- Press [◄►] (8) to choose ON or OFF, then press [ENTER] (7) to confirm.
- Once ALARM ON is set, Press [◄►] (8) and [ENTER] (7) to set hours and minutes.
- Press [◄►] (8) to choose duration 15/30/45//60/90/120 and press [ENTER] (7) button to confirm.
- Choose BUZZER, DAB or FM with [◄►] (8) and find ALARM, press [ENTER] (7) button;
- Select WEEKDAYS, DAILY, ONCE or WEEKENDS with [◄►] (8), press [ENTER] (7) button;
- Select desired VOLUME level and press [ENTER] (7) button;
- Once all settings are done, “ALARM SAVED “ will appear on display.
- To disable ALARM, repeat step 1-6 and choose OFF;
SNOOZE MODE
When alarm sounds, you can press [SLEEP/TIMER/POWER] (12) button to activate the snooze mode and deay the alarm for 5 minutes.
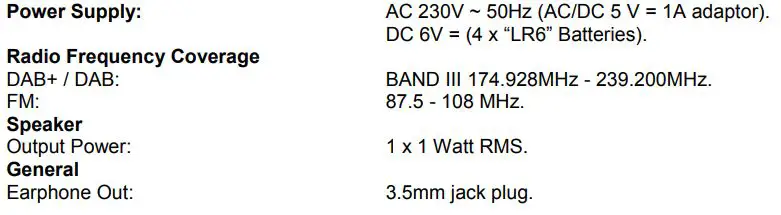
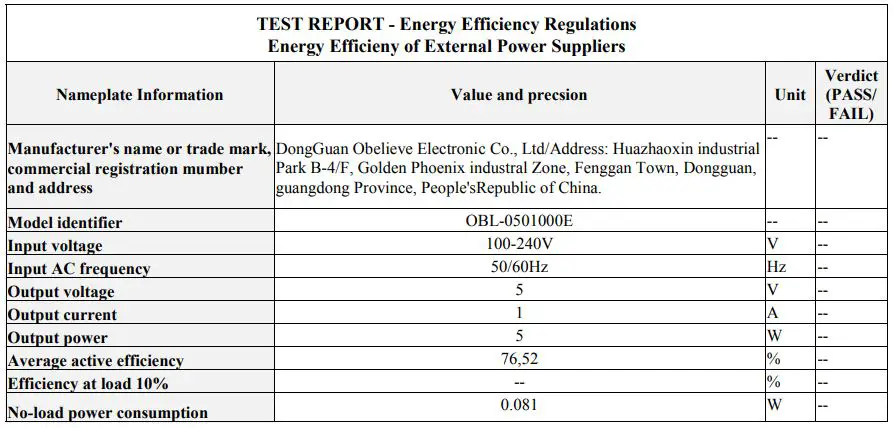
TECNICAL SPECIFICATIONS
CORRECT DISPOSAL OF THIS PRODUCT (Waste Electrical & Electronic Equipment)
![]() This marking shown on the product or its literature, indicates that it should not be disposed withother household wastes at the end of its working life. To prevent possible harm to the environment or human health from uncontrolled waste disposal, please separate this from other types of wastes and recycle it responsibly to promote the sustainable reuse of material resources. Household users should contact the retailer where they purchased this product, or their local government office, for details of where and how they can take this item for environmentally safe recycling. Business users should contact their supplier and check the terms and conditions of the purchase contract. This product should not be mixed with other commercial wastes for disposal.
This marking shown on the product or its literature, indicates that it should not be disposed withother household wastes at the end of its working life. To prevent possible harm to the environment or human health from uncontrolled waste disposal, please separate this from other types of wastes and recycle it responsibly to promote the sustainable reuse of material resources. Household users should contact the retailer where they purchased this product, or their local government office, for details of where and how they can take this item for environmentally safe recycling. Business users should contact their supplier and check the terms and conditions of the purchase contract. This product should not be mixed with other commercial wastes for disposal.
Hereby, Roadstar Management SA declares that the radio equipment type TRA-300D+ is in compliance with Directive 2014/53/EU.The full text of the EU declaration of conformity is available at the following internet address: http://roadstar.com/images/ce/TRA 300D+.pdf or by scanning the following QR Code.

Roadstar Warranty Terms and ConditionsRoadstar- by means of its sales organisation, representative or distributor- guarantees its products against manufacturing defects in material and/or workmanship throughout the period of warranty.Should the product fail to work or shows manufacturing defect within the warranty period,Roadstar- by means of its sales organisation, representative or distributor – will take the necessary actions to restore the perfect functioning of the product. To repair or to replace is at discretion of Roadstar or it’s reppresentative or distributor. The warranty period is in accordance with directive 99/44/CE of the European Union. For all non EU members, please refer to the local law of each country. This warranty does not cover normal wear and tear of the product and/or its parts, any damage, failure, or loss caused by accident, misuse, and any other failure not directly related to a defect of the product. This warranty does not void consumer’s rights in accordance with EU Directive99/44/ CE. For further information please visit the website www.roadstar.com, or write to [email protected].
MANUAL VER.:1.203.09.2020
Roadstar Management SA, via Passeggiata 7 CH 6883 Novazzano (Switzerland)
 report this ad
![]() is a registered Trademark of Roadstar S.A. – Switzerland. All rights reserved.
is a registered Trademark of Roadstar S.A. – Switzerland. All rights reserved.
References
[xyz-ips snippet=”download-snippet”]