rock space AX1800 Dual-Band Wi-Fi 6 Router Installation Guide
Basic Installation
Connect your new router to the internet.
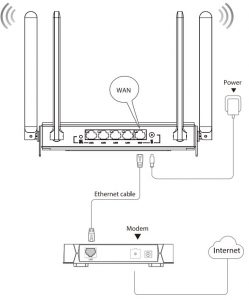
- Power on the new router.
- Connect the WAN port of the new router to the LAN port of your modem or the Ethernet jack using an Ethernet cable. The WAN LED indicator lights on.
Wireless Network Settings
Method 1: Setup via RS Home APP
Before you start, download the RS Home App on your mobile device (smart phone or tablet). A smart phone is used for illustration here.
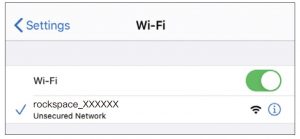
- Connect your smart phone to the WiFi network of the router (the default WiFi network information is labeled on the bottom of the router).
- Open the RS Home App.

- Check whether the Ethernet cable is properly connected, then click “Next”. The App will detect your connection type automatically. If it is fail to detect your connection type, please choose a suitable connection type from the list:If your Internet connection type is PPPoE, enter your PPPoE user name and password and tap “Next”.If your internet connection type is dynamic II), tap “Next”. If your internet connection type is static IP, enter your IP address and other information your ISP provides, and tap ‘Next”.
- 4. Select your Time Zone. According to your location, please select appropriate option from the list, then click “Next”.
- Customize the WiFi Name and WiFi Password, then click “Confirm”. The coming page is the summary information for your setting. Please remember your Wi-Fi name and password, then click “Done.
- After completing the network setting, your router will restart automatically. This time your phone will be disconnected from the router. Please back to the WLAN list of your phone to choose the new Wi-Fi name and input the correct password.
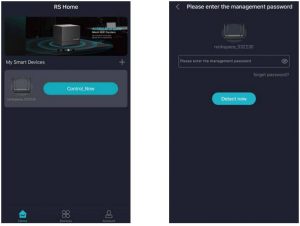
- Access the App and dick Control Now and enter the management password, then dick °Detect Now to manage your router.WiF1 Name & PasswordIn this section, you can view and change the WiFi name and password of the WiFi network of the router. Procedures: Step 1 Access the RS Home App, and enter the manage page and choose More Setting> NETWORK SETT1NGS>MAIN WIFI SETTING.Step 2 Customize the WiFi Name and WiFi Password. Step 3 Tap Save.Notes: Please wait with patience if the router takes a bit longer to reboot at the last step of the settings.


 WiF1 Name & PasswordIn this section, you can view and change the WiFi name and password of the WiFi network of the router. Procedures: Step 1 Access the RS Home App, and enter the manage page and choose More Setting> NETWORK SETT1NGS>MAIN WIFI SETTING.Step 2 Customize the WiFi Name and WiFi Password. Step 3 Tap Save.
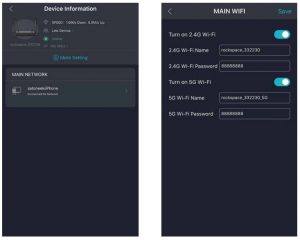 Notes: Please wait with patience if the router takes a bit longer to reboot at the last step of the settings.
Method 2: Web UI Setting
Internet Setting Login in via IP Address:
Step 1. Connect to the wireless network (the SSID name of the router has been provided on the back of the router, which could be customized in the following settings)
Step 2. Open your browser on your device and enter 192.168.0.1 or http://re.rockspace.local in the address bar and click “LOGIN” on the start page. Then click “Start”.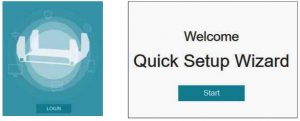
Step 3. Select your Time Zone. According to your location, please select a appropriate option from the list, then click “Next’.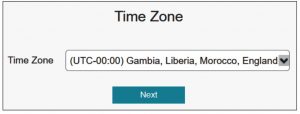
Step 4. Select your Connection Type. The router supports three connection types: PPPoE, Dynamic IP, and Static IP. Auto configuration will show up here. You could select the specific kind of connection type that fits in your network by providing information as required. Click “Next”.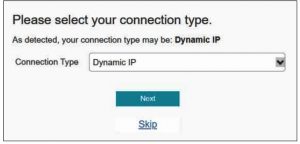
NOTES: If your Internet connection type is PPPoE, enter your PPPoE user name and password and tap ‘Next”‘. If your Internet connection type Is dynamic IP, tap “Next”. If your Internet connection type is static IP, enter your IP address and other information your ISP provides, and tap “Next”.
Step 5. Here comes the WiFi Settings page. Personalize your network by inputting a name and password for it. You can also share the WiFi password with login password, otherwise input another one down below for the login password. Click “Next’.
Now you successfully complete the setup on the website.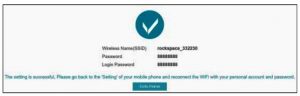
After this setting, the router will reboot again. Go to your wifi network list and find the SSID named by yourself. Connect to the AX1800 router by entering the new password.
Step 6. Open your browser on your device and enter 192.168.0.1 or http:/fre.nxIcspace.local in the address bar and input your login password (which has been set before). Click “LOGIN”.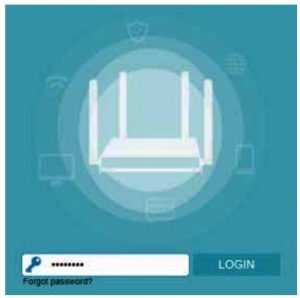
Step 7. Here you are successfully connect to the new wifi network and you can customize the functions you need on this page. There are different settings on the left side.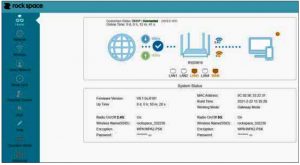
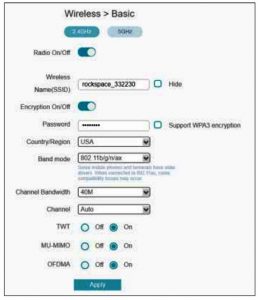
Dual Band Setting
- Goes to Wireless on the left column and select Basic, and you could modify WiFi 5510 Name and Password separately for two bands and then click “Apply.
- The router will reboot and you can reconnect by applying the new customized network SSID and password in a few seconds.
Firmware Upgrade
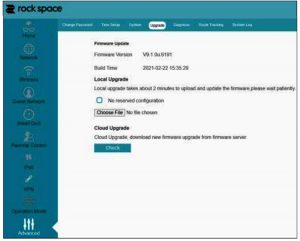
Go to Advanced on the left column and select Upgrade. The latest version would be available if there’s one. You could select the online upgrade, local upgrade or cloud upgrade here.
FAQ
Q: How can I reset the router?A: Keep pressing the Reset button for about S secs and gurantee that your device is on power. Wait for a while, the router will restart automatically.
Q: What if I forget my password of the router?A: You can reset the router and login in the router to set it up again. You can access RS Nome app>More Sening>NETWORK SETTINGS>MAIN WIFI SETRNG to manage the WiFi name and password.Or you can login the Web UI go to Wireless>gasic to customize password for your own.
Q: How can I update the firmware?A: Go to RS some app and click Control Now>More Setting>Firmware Update. Do not power off the router during the process. The router will reboot when the update is finished.
Q: How can I select my connection type?A: You can follow the route: access RS Home>More Setting>NETWORK SETTINGS>Internet SETTING>Internet Access Methods and choose the type you want or consult your ISP for reference.
Q: Why cannot my device connect to the 5GHz WiFi signals?A: Please make sure that your 5GHz band is on and not be hided. In this case, you can check the status of 5GHz through RS Home app>More Setting>NETWORK SETTINGS>MAIN WIFI SETTING. Turn on the 5GHz band if its off. Otherwise, you should make sure the your devices are supporting 5GHz signals. Only those support 5GHz signals could be detected and connected.
Q: What if the app could not recognize the device or connect to the device?A: First please make sure that your Ethernet cable with Internet connection is securely plugged into the WAN port rather than LAN port. Please make sure that your routers are securely connected to the SSID that belongs to the mesh network. Follow the steps below:
Step 1. Click the WiFi Name of router right on the upper left side;Step 2. Click the “+”and choose Router to add your device:Step 3. The app will detect the device in this case and click Control Now to get it work. Connection is now successful. This approach could be applied in any situation when you reconnect the router and it fails to react immediately.
FCC Statement
This equipment has been tested and found to comply with the limits for a Class B digital device, pursuant to part 15 of the FCC Rules. These limits are designed to provide reasonable protection against harmful interference in a residential installation. This equipment generates, uses and can radiate radio frequency energy and, if not installed and used in accordance with the instructions, may cause harmful interference to radio communications. However, there is no guarantee that interference will not occur in a particular installation. If this equipment does cause harmful interference to radio or television reception, which can be determined by turning the equipment off and on, the user is encouraged to try to correct the interference by one or more of the following measures:
- Reorient or relocate the receiving antenna.
- Increase the separation between the equipment and receiver.
- Connect the equipment into an outlet on a circuit different from that to which the receiver is connected.
- Consult the dealer or an experienced radio/TV technician for help.
FCC Radiation Exposure Statement:This device complies with FCC radiation exposure limits set forth for an uncontrolled environment and it also complies with Part 15 of the FCC RF Rules. This equipment must be installed and operated in accordance with provided instructions and the antenna(s) used for this transmitter must be installed to provide a separation distance of at least 20 cm from all persons and must not be co-located or operating in conjunction with any other antenna or transmitter. End-users and installers must be provided with antenna installation instructions and consider removing the no-collocation statement.
This device complies with Part 15 of the FCC Rules. Operation is subject to the following two conditions: (1) this device may not cause harmful interference, and (2) this device must accept any interference received, including interference that may cause undesired operation.
Caution! Any changes or modifications not expressly approved by the party responsible for compliance could void the user’s authority to operate the equipment.
Contact![]() rock spaceShenzhen Renqing Excellent Technology Co., Ltd.
rock spaceShenzhen Renqing Excellent Technology Co., Ltd.
Shenzhen Renqing Excellent Technology Co Ltd.
Address: 104, No.15, Longfu Industrial Zone, Huarong Road, Tongsheng Community, Dalang Street Longhua District Shenzhen, China Technical supports:
Phone: +1-833-816-6558
Serve Time:(EST: 9:00-17:00 / PDT: 06:00-14:00 Monday to Friday) 24hour Online After-sales Service: https://rockspace. afterservice. vip
Email: [email protected] cc
Official Website: www.rockspace.cc
24 hour online After-Sales Service
Scan QR code To visit
https: //rockspace. afterservice. vip
[xyz-ips snippet=”download-snippet”]