
![]() Rock power 300Portable Power StationUSER GUIDE
Rock power 300Portable Power StationUSER GUIDE
Before using or storing, please read this manual carefully, and charge your Rock power 300 with the included charging adapter.
Introduction
Thank you for purchasing Rock power Portable Power Station.Before using or storing, please read this manual carefully, and charge your Rock power 300 with the included charging adapter. If you have any questions or issues, please contact our customer services team for further assistance.Email: [email protected]Free Call: (US) (877)-756-8666 Service time: Mon.-Fri. : 9:00-17:00 PSTFacebook: @RockpalsOfficialsWebsite: www.rockpals.com
What’s In The Box
1 x Rock power 300 Portable Power Station1 x AC Charging Adapter1 x Car Charger Cable1 x Warranty Card1 x Safety Precautions Card1 x User Guide1 x Quick Start Card
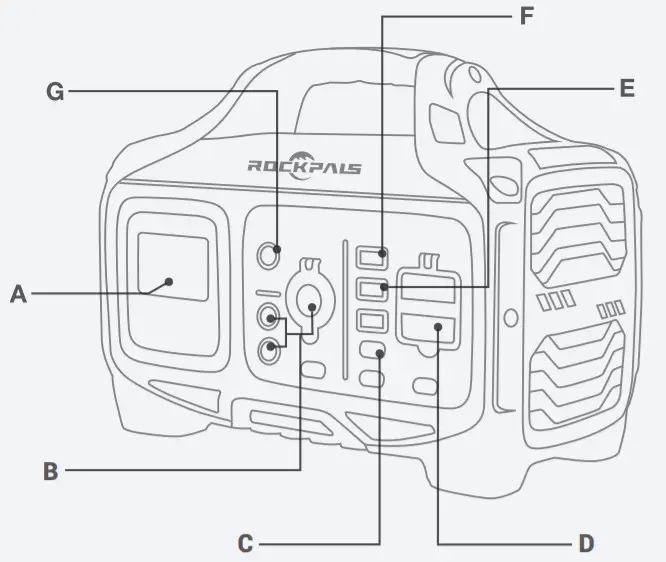
| A. LCD DisplayB. 12V OutputC. USB-C PDD. AC Outlet | E. USB-AF. USB-A QCG. DC Input |
LCD Display
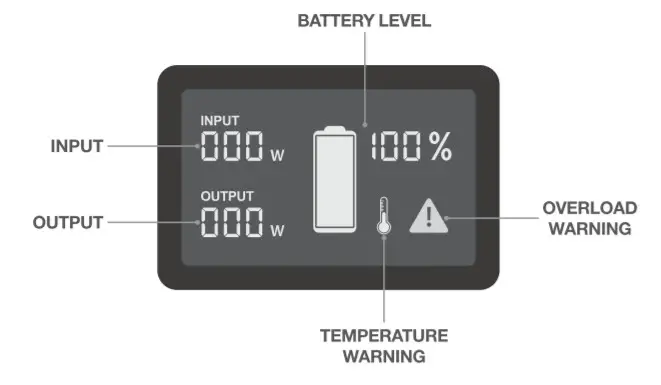
| INPUT: | Shows the amount of power (watts) going into the Rock power 300 while charging. |
| OUTPUT: | Shows the amount of power(watts) your devices are using while plugged into the Rock power 300 |
| BATTERY
LEVEL: |
Shows 10 segments, approximating 10%-20%-30% -40%-50%-60%-70%-80%-90%-100% capacity. When charging your Rock power 300 you will notice a battery segment blinking, this indicates the current charge status. Once fully charged, all battery segments will be lit and remain solid. |
| OVERLOAD WARNING: | Power draw exceeds the port’s maximum allowance, indicated by red light on the port’s button. You need to remove the device in corresponding port first, and then press the button of the port to recover |
| TEMPERATURE WARNING: | The unit is over-heating. Allow it to cool, and then press the main power button to recover |
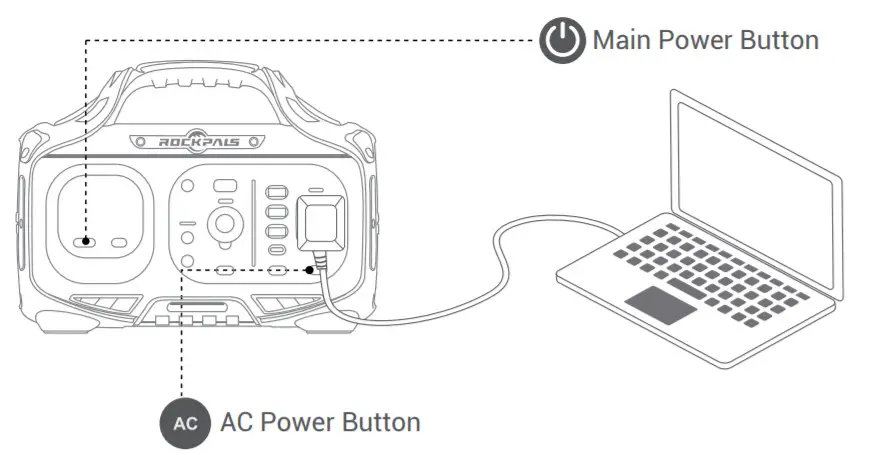
Using Your Rock power 300
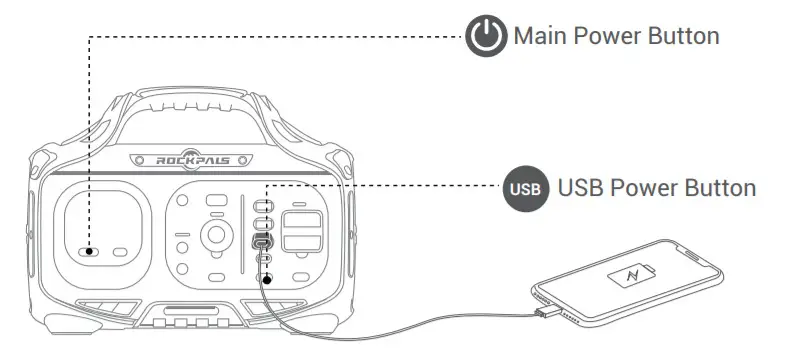
Press and hold the main power button for 2 seconds, the power station will be turned on.Press and hold the 12V/USB/AC button for 2 seconds to turn on the corresponding output port(when not using certain ports, make sure to turn them off to conserve power) You’ll know the output port is turned on when the green LED light on the button is illuminated Press the “DISPLAY” button to turn on/off the LCD display.Notice:
- Please use this power station to power your device at temperatures ranging from -10 ℃~40 ℃
- Before using, please check whether the power of your device exceeds the output range of this unit. This power station will enter protection mode if the power of your device exceeds the output range
USB OUTPUT
- Long press the main power button, and then press the “USB” power button, USB-A, USB-A QC, USB-C PD output will be turned on, the green The LED light on the button is illuminated.
- Plug your devices into corresponding ports, you will see the amount of power(watts) your devices are using marks on the LCD display.
DC Output
- Long press the main power button, and then press the “DC” power button, the DC output will be turned on, the green LED light on the button is illuminated.
- Plug your devices into corresponding ports, you will see the amount of power(watts) your devices are using marks on the LCD display.

AC Output
- Long press the main power button, and then long-press the “AC” power button, the AC output will be turned on, the green LED light on the button is illuminated.
- Open the cover of AC output ports.
- Plug your devices into corresponding ports, you will see the amount of power(watts) your devices are using marks on the LCD display.
What it Powers
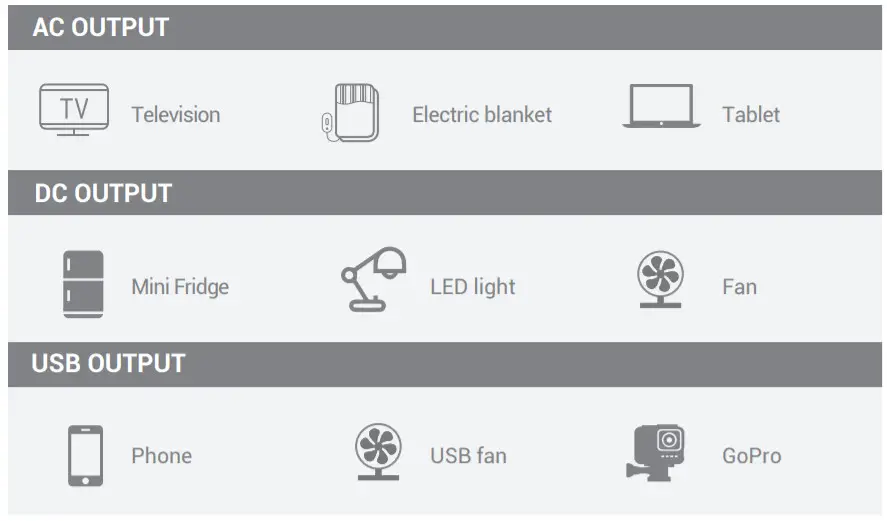
As the ambient temperature and battery usage times change, the use time of the power station will change.Please confirm the power of the device in the instruction manual or catalog of the device.When the charging specification of the device exceeds the maximum value of this unit, this power station will enter automatic protection mode, the output will be turned off automatically. Before using, please ensure your electronic device is below 300W.
Charging Your Rock power 300
There are the following 3 charging ways
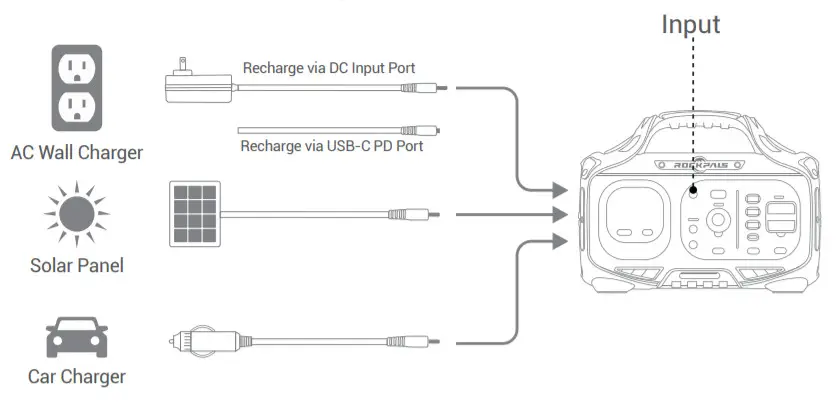
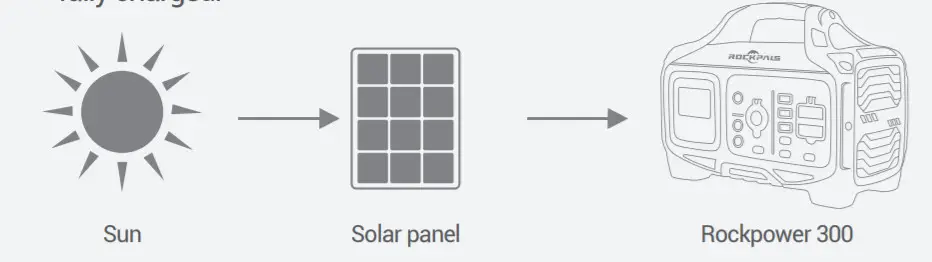
Charging from Solar
① Place the solar panels in direct sunlight (we recommend Rock power solar panels)② Please connect the DC output terminal of the solar panel to the charging port of the power station, and the LCD display will show the charging status. (Please charge at the temperature range of 0 °C ~ 40 °).③ During the charging process, when the battery temperature rises, the cooling fan will automatically turn on to lower the battery temperature.④ Remove the charging device from the solar panel and power station after fully charged.
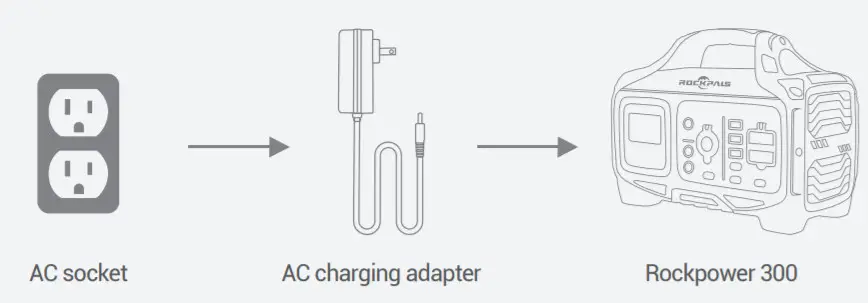
Charging from AC Adapter
① Insert the AC adapter into the socket, and then connect the other end to the DC or Type C input charging port of the power station. The LCD display will show the charging status② When it is fully charged, the overcharge protection of the power station will be turned on and the charging automatically disconnected.③ During the charging process, when the battery temperature rises, the cooling fan will automatically turn on to lower the battery temperature.④ Remove the charging adapter from the power station after fully charged.
Charging from Car Charger(12V/ 24V)
① Connect the included car charging cable into carport.② Connect the other end of car charging cable into the charging port of the power station, and the LCD display will show the charging status.③ When it is fully charged, the overcharge protection of the power station will be turned on and the charging automatically disconnected.④ During the charging process, when the battery temperature rises, the cooling fan will automatically turn on to lower the battery temperature.⑤ Remove the charging adapter from the power station after fully charged.

Charging Indication
The battery indicator shows the remaining battery capacity.
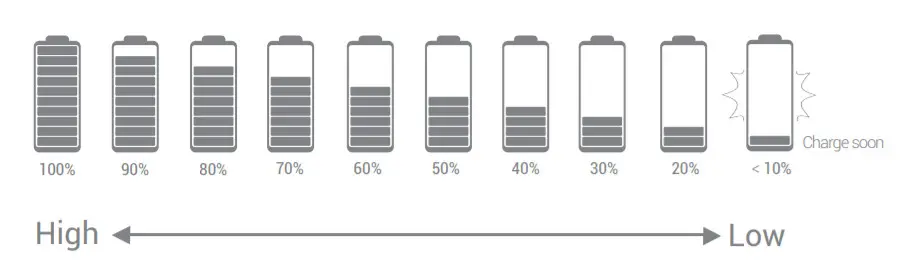
The power marquee will be 10%-20%-30%-40%…..100%, displayed in 10 segments. When the battery capacity is below 20%, the power marquee could to show the specific remaining amount of capacity. At this time, please change as soon as possible; when the battery capacity is below 10%, the power marquee will flash and the AC output will be forced to close. In addition, if you do not use it for a long time, please charge the power supply every three months.
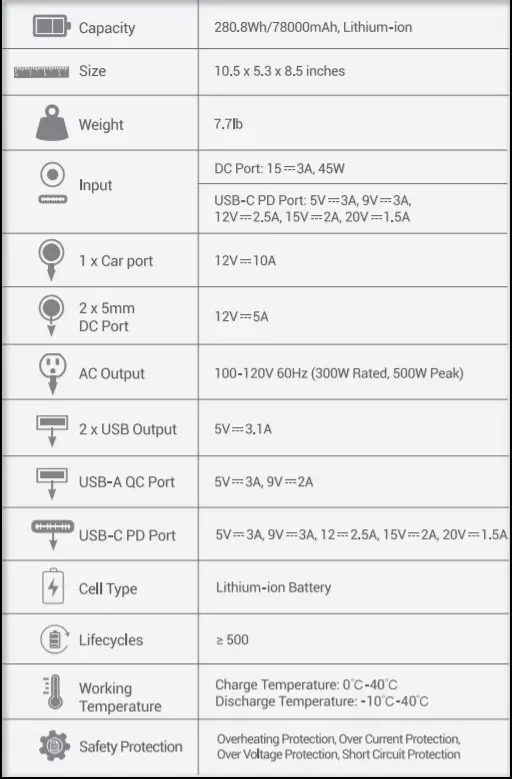
Technical Specifications
Frequently Asked Questions
Why this power station cannot supply power to other devices (no output)?① Please check whether the power button and output ports of the power station are turned on (there’s no output if the ambient temperature is beyond -10 °C to 40 °C).② Check if the device is completely inserted into the output port of power station; Whether there is foreign matter at the port of the device and power station.③ Please refer to the marquee of the LCD display to confirm the remaining battery capacity of the power station. If it’s less than 10%, the power station needs to be recharged.④ Check if the voltage and current specifications of the device exceed the range of the power station.⑤ Please confirm whether the power station is automatically turned on overcurrent/ overload/ over temperature function due to other reasons.How to release the automatic protection function after it is activated?Follow these stepsA: If the OVERLOAD mark is lit on the LCD display① Disconnect the device first.② Short press the power button to release the automatic protection mode.B: If the LCD display is completely black① Disconnect the device first.② Charge the power station for 2~3 minutes.③ Short press the power button to release the automatic protection mode.Why is the adapter hot while charging the power station?Our accessories include an AC adapter that can be used up to 65°, in addition, the adapter is UL/PSE certified, please feel free to use it.What is overload protection?Overload protection is that the power station will automatically turn off when the power of the device exceeds the rated output power. The LCD display will alert when the power system detects that the device being used is shorted or overloaded. Please confirm whether the device parameter specifications meet the scope of the power station before using it.Can I charge this power station while supplying power at the same time?When the power station is in recharging, the USB/ TYPE-C/ DC output ports are workable; but there is no AC output at this period.How do i know if my device will work with the Rockpower 300? You will need to check the amount of power your device requires.This may require some research on your end. An online search or examining the user guide for your devices should suffice. To be compatible with the Rockpower 300 you should use devices that require less than 300W.How to know the working times for my device?Working time = (280.8Wh*0.85)/working power of the device. For reference, assuming your device consumes 30W (possibly a 40-inch TV), the working time is 280.8Wh*0.85/30W ≈ 8hrCan i take Rock power 300 on a flight? No, Under FAA regulations we are not allowed to take any battery exceeding 100Wh on a plane, Rockpower 300 is 280.8Wh.AC and DC output, which way is best to power my CPAP machine?For Optimal Use with CPAP. Rockpower 300 can power your CPAP by two ways: 110V AC plug and 12V DC plug. Strongly recommend that CPAP users use DC to DC converter to work with this unit and turn off or remove the heater/ humidifier, it should last longer. To buy the DC converter, please consult with your CPAP supplier or simply find us for a guide.Is this Rockpower 300 uses a Modified-sine wave inverter or a Pure-sine wave inverter?The Rockpower 300 uses a pure sine wave inverter, pure sine wave inverters use more sophisticated technology to protect even the most sensitive electronics. Pure sine wave inverters produce power which equals – or is better than – the power in your home. Appliances that may not function properly, or which may be permanently damaged, without pure, smooth power will be safe with pure sine inverters.
CONTACT US
![]() www.rockpals.com
www.rockpals.com![]() [email protected]
[email protected]![]() 1-877-756-8666(Mon.-Fri.:9:00-17:00 PST)
1-877-756-8666(Mon.-Fri.:9:00-17:00 PST)![]() @RockpalsOfficials
@RockpalsOfficials
![]()
Made in ChinaWeb:www.rockpals.comEmail:[email protected]
 report this ad
References
[xyz-ips snippet=”download-snippet”]