
ROCKVILLE 4-Channel Powered Stereo Mixer Owner’s Manual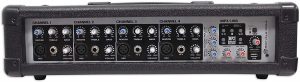
Includes
- Powered mixer
- Owner’s manual
- Remote control
- Warranty card
- Power cable
IMPORTANT SAFETY INSTRUCTIONS
CAUTION RISK OF ELECTRIC SHOCK, DO NOT OPEN
- To reduce risk of electric shock, never open the unit. There are no serviceable parts. Refer service to an authorized Rockville service center.
- Do not expose this unit to any kind of moisture.
- Please ensure that the unit is situated in a properly ventilated area.
- Make sure the unit is placed on a level and stable surface.
Functions
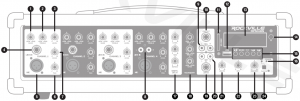
- Channel Bass control: ±15dB
- Channel Treble control: ±15dB
- Channel Level control: Volume level should be lower than the master level. This control acts as a preamp. If you are using a device that has a volume output control, you will need to match levels by adjusting the level controls on each unit.
- Line/High impedance 1/4″TS input: This input may be used as either a high-impedance microphone input or for line-level devices such as a cassette player, CD player, video projector, or laptop. Will also allow connection from an electric guitar, bass, or keyboard. It is a two conductor input with an impedance of 10K ohms.
- Microphone/Low impedance XLR input: Connect balanced low impedance microphones with an input impedance of 1K ohms. PIN 1 = shield, PIN 2 = positive (hot), PIN 3 = negative (cold)
 WARNING: When using condenser microphones, make sure that Phantom power (48V) is switched on (see item 24).
 - Channel Pan: Used to adjust left to right balance.
- Channel Echo: Controls the amount of echo added to the input signals.
- Channel 4 RCA Line In: Used to connect line level sources such as CD players, cassette decks, laptops, MP3 players, etc. Mono audio sources can be connected using an RCA “Y” cable connector.
- RCA Record Out: Sends signal to a recording device or any other line level device.
- Balanced 1/4″TRS Line Out: Sends the music signal to another amplifier, a powered subwoofer, powered speakers, monitors, or any other external device.
- SD card slot: Inserting an SD card will set the RPM48S to SD mode and it will automatically begin to play music.
- USB port: Inserting a USB flash drive will set the RPM48S to USB mode and it will automatically begin to play music.
- Display screen
- IR remote receiver
- MP3 player:Play button: Press during playback to pause. Press button again to resume play. In radio mode, press to scan and save all available stations. In USB/SD mode, used to access folders (see page 7).Mode: Use to switch between input modes (USB/SD, BT, Radio).Repeat button: Press once to repeat the entire folder. Press twice for random mode. Press three times to repeat all tracks. Press four times to repeat one track. Previous button: Press to go to the previous track (USB, SD, and BT) or station (radio).Next button: Press to go to the next track (USB, SD, and BT) or station (radio).
- Power indicator LED
- Digital delay effect (echo) controls:Level: Adjusts the mix level of the effect.Time: Controls the time interval of the delay.Repeat: Controls the rate of the delay
- 3-band equalizer: Adjusts treble, mid, and bass frequencies ±15dB
- Balanced 1/( TRS Line In: Used to connect line level sources: mixing consoles, samplers, CD players, cassette decks, DAT machines, and other audio interfaces.
- RCA Line In: Used to connect line level sources: DJ controller, mixer, samplers, CD players, cassette decks, DAT machines, MP3 players, etc. Mono audio sources can be connected using an RCA “Y” cable connector.
- Line In volume control
- MP3 volume control
- Master volume control
- Phantom power ON/OFF (Red LED indicates power on): When activated, phantom power provides 48 volts DC to power condenser mics.Please note: Do not plug or unplug devices and mics while phantom power is on. It can cause severe damage to the mic. When phantom power is turned off, it is recommended you wait approximately 7 seconds to allow time for the voltage to completely die out.
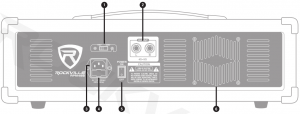
- Variable voltage selector switch (110V/220V)
- UR Speaker outputs: 1/4-TS jacks accept 4 and 8-ohm speakers. WARNING: Do not operate below rated minimum impedance.
- IEC AC power socket
- User-serviceable fuse
- Power switch
- Cooling fan
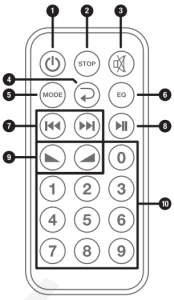
- Power
- Stop: Press to stop audio playback.
- Mute: Press to silence audio output.
- Repeat: Press once to repeat the entire folder. Press twice for random mode. Press three times to repeat all tracks. Press four times to repeat one track.
- Mode: Use to switch between input modes (USB/SD, BT, Radio)
- EQ: Press to cycle through preset EQs (Pop, Rock, Jazz, Classic, Country, Normal)
- Previous/Next: Press to go to the previous track in USB, SD, and BT mode. In radio mode, press to go to the previous saved station. Press to go to the next track in USB, SD, and BT mode. In radio mode, press to go to the next saved station.
- Play/Pause: Press during USB, SD, and BT playback to pause. Press button again to resume play. Press and hold in radio mode to scan and auto-save all available stations.
- Volume up Volume down: Press to lower the volume, and press to raise the volume.
- Number pad: Use the number pad to directly select tracks in USB, SD, and Bluetooth mode.
Operation
Bluetooth Pairing and Operation
- Press the MODE button on the unit, or the remote, until you see BLUETOOTH on the display.
- Ensure that your device is in Bluetooth mode and discoverable.
- Find “RPM48S” on your device’s list of available Bluetooth connections and select it.
- Once successfully paired, the RPM48S’s LCD display will show “BLUETOOTH CONNECTED.”
- You can control playback from your device, the MP3 control panel, or the remote.
Media Playback Sources
- The RPM48S will accept various media playback devices:
- To connect a turntable or CD player, use the CHANNEL 4 RCA inputs.
- To connect an MP3 player or smartphone, use the ‘A” Line In jack or the RCA Line In inputs
USB/SD Operation
Inserting a USB flash drive or an SD card into the corresponding port/slot will set the RPM48S to USB/SD mode and it will automatically begin to play music. USB/SD playback will override Bluetooth playback.
Music Playback (USB/SD and Bluetooth)Play button: Press to play/pause current track.Next button: Press to go to the next track.Previous button: Press to go to the previous track.
FM RadioPlay button: Press the play/pause button to scan and save all available stations.Next button: Press to go to the next station.Previous button: Press to go to the previous station.
Folder Selection (USB/SD only)
- Press and hold the play/pause button to enter the folder interface menu.
- Use the Previous/Next buttons to select the desired folder. Folder name will appear at the bottom right of the screen, and track number will appear at the top left. Track name and duration will appear on the right.
- Press the Play/Pause button to start or stop the current track.
SetupIn this setup there is a powered subwoofer connected to the 1/4″ Line Out jack on the front of the unit (fig. a) and two 8-ohm speakers connected to the 1/4″4 Ohm L/R Outputs on the back of the unit.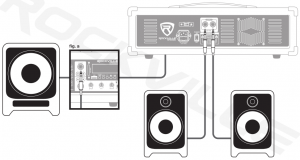
In this setup there is a powered stage monitor connected to the 1/4″ Line Out jack on the front of the unit (fig. b) and two 4-ohm speakers connected to the 1/4″4 Ohm L/R Outputs on the back of the unit.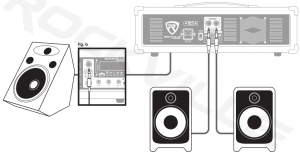
Once your speakers are hooked up, there are a variety of ways to use the RPM48S’s many inputs and outputs. Please note: The line level consumer devices connected to Channels 1-3 can also be connected to Channel 4, but will require an RCA to W” cable.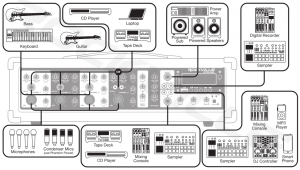
Features/Specifications
- RMS Power Stereo Output:175W x 2 I @ 8 Ohm250W x 2 @ 4 Ohm
- Program Power Output:350w x 2 @ 8 Ohm500W x 2 @ 4 Ohm
- Peak Power Output:700W x 2 @ 8 Ohm1000W x 2 @ 4 Ohm
- Built-in Bluetooth with long range and great sound quality
- FM radio
- Individual volume, echo, bass, and treble controls
- Adjustable echo and delay effects
- 3-Band Equalizer (treble, mid, bass)
- USB and SD inputs
- MP3 volume control
- Line In volume control
- Master volume control
- A pan knob on each channel for balancing left and right output
- 4 balanced XLR inputs
- 4 1/4- TS inputs
- 1 RCA Line input
- 1 1/4- line input
- 1/4- line output for adding a subwoofer or more amplifiers or powered speakers
- 1 RCA Rec output
- UR Speaker outputs: VC TS (4 or 8 ohm per channel)
- +48V Phantom power
- Fan Vent Cooling System
- 110/220 Variable voltage
- Dimensions: 18.T x 8.T x 6.3″
- Weight: 19.8 Lbs.
Troubleshooting
| PROBLEM | SOLUTION |
| No power |
|
| No sound |
|
| Noise |
|
| Buzzing sound | Make sure you are using a proper cable. For 1/4″ cables, there are 3 types: instrument, TS (unbalanced), and TRS (balanced). Check the requirements of the connected gear and make sure you are using the appropriate cable. |
| Bluetooth pairing fails/no sound |
|
| No USB/SD playback |
|
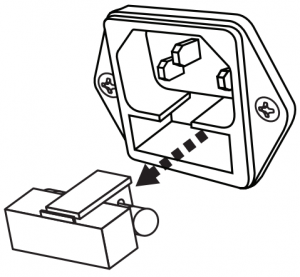
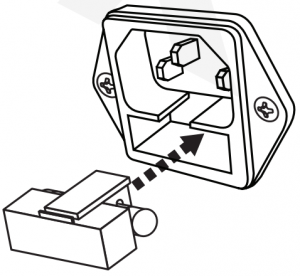
Fuse Replacement
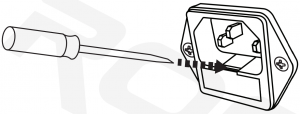
- Use a screwdriver to release the fuse holder.
- Remove the fuse holder.
- Remove the fuse
- Replace the fuse.
- Reinsert the fuse holder.
FEDERAL COMMUNICATIONS COMMISSION COMPLIANCE INFORMATION
Responsible party name: RockvilleAddress: 600 Bayview Ave, Entrance A, Inwood, NY 11096
Hereby declares that the product Rockville RPM48S 4-channel mixer complies with FCC rules as mentioned in the following paragraph:This device complies with Part 15 of the FCC rules. Operation is subject to the following two conditions: (1) this device may not cause harmful interference, and (2) this device must accept any interference received, including interference that may cause undesired operation.
Note: This equipment has been tested and found to comply with the limits for a Class B digital device, pursuant to Part 15 of the FCC rules. These limits are designed to provide reasonable protection against harmful interference in a residential installation. This equipment generates, uses, and can radiate radio frequency energy and, if not installed and used in accordance with the instructions, may cause harmful interference to radio communications. However, there is no guarantee that interference will not occur in a particular installation. If this equipment does cause harmful interference to radio or television reception, which can be determined by turning the equipment off and on, the user is encouraged to try to correct the interference by one or more of the following measures:
- Reorient or relocate the receiving antenna.
- Increase the separation between the equipment and receiver.
- Connect the equipment to an outlet on a circuit different from that to which the receiver is connected.
- Consult the dealer or an experienced radio/TV technician for help.
WHO READS MANUALS?Instead, go to vimeo com/537459475 or scan the QR code and watch a short video that shows you how to set this item up and how to use it.If you prefer written instructions, please read ahead! With Rockville you get many options.

[xyz-ips snippet=”download-snippet”]