![]()
RDD66.1″ IN-DASH DOUBLE DIN TOUCHSCREENMULTIMEDIA ENTERTAINMENT SYSTEMOWNER’S MANUAL![]()
Thank you for purchasing this Rockville 6.1 Double DIN Touchscreen Multimedia Entertainment System.
Please read this installation guide carefully for proper use of your Rockville RDD6. Should you need technical assistance please call our technical help line at 1-646758-0144, Monday through Friday, 9am to 5pm EST.
![]()
- When the interior of the car is extremely cold and the unit is used soon after switching on the heater, moisture may form on the disc or the optical parts of the player and proper playback may not be possible. If moisture forms on the disc, wipe it off with a soft cloth. If moisture forms on the optical parts of the player, do not use the player for about one hour. The condensation will disappear naturally allowing normal operation.
- Driving on extremely bumpy or rough roads can cause the disc to skip during playback.
- This unit uses precision parts and components for its operation. In the event that trouble arises, never open the case, disassemble the unit, or lubricate the rotating parts. Contact your Rockville service center.
- This equipment has been tested and found to comply with the limits for a Class B digital device, pursuant to Part 15 of the FCC Rules. These limits are designed to provide reasonable protection against harmful interference in a residential installation. This equipment generates, uses, and can radiate radio frequency energy and, if not installed and used in accordance with the instructions, may cause harmful interference to radio communications. However, there is no guarantee that interference will not occur in a particular installation. If this equipment does cause harmful interference to radio reception, which can be determined by turning the equipment off and on, the user is encouraged to consult an experienced radio technician for help.
- Apple is not responsible for the operation of this device or its compliance with safety and regulatory standards. Please note that the use of this accessory with iPod or iPhone may affect wireless performance iPhone and iPod are trademarks of Apple Inc., registered in the U.S. and other countries.
- This product incorporates copyright protection technology that is protected by U.S. patents and other intellectual property rights. Use of this copyright protection technology must be authorized by Rockville, and is intended for home and other limited viewing uses only unless otherwise authorized by Rockville. Reverse engineering or disassembly is prohibited. Use of this product by the customer is restricted to play program materials to which the Rockville copy-right protection process has been applied.
- The Bluetooth® word mark and logos are registered trademarks owned by Bluetooth SIG, Inc. and any use of such marks by Rockville is under license.
 WARNINGFor your safety, the driver should not operate the controls while driving. Also, while driving, keep the volume to a level at which external sounds can be heard.
FEATURES
- 6.1 High Resolution TFT-LCD Digital Touch Screen
- 800 x 480 Screen Resolution
- Selectable Backgrounds
- 16:9 (Wide Screen) or 4:3 (Letterbox) Switchable Aspect Ratio
- 300:1 Contrast Ratio
- Picture Control: Brightness/Contrast/Saturation/Hue/Definition
- PAL/NTSC Compatible
- Supports DVD/DVD+R/DVD-R/DVD+RW/DVD-RW/VCD/SVCD/CD/CD+R/CD-R/CD-RW/CD+RW/MP3/MP4/ Divx5.0/ID3
- Micro SD Card Reader, Supports Double High Speed SDHC (32G) Card
- USB 2.0 Input (MP3, MP4, MPEG4, WMA, WAV, OGG, FLAC, APE)
- Repeat/Program/Random/Intro Play on MP3 Play
- FM/AM Receiver w/ 18 FM/12 AM Preset Station Capability
- Auto Memory Store/Preset Scan · 2 Band Equalizer: Bass and Treble
- Preset and Custom EQ (Flat/Classic/Rock/Jazz/Pop/custom)
- DSP Audio Control (Treble/Bass/Sub woofer/Fader/Balance)
- Virtual Surround or Down Mix Stereo output selection
- Electronic Encoder Volume Control
- Mute/Loudness/Clock Function
- Electronic Anti-Shock
- Power Output: 4 x 18W RMS / 4 x 50W Peak
- 3 Sets 5V Preamp Outputs (Front, Rear, and Sub woofer)
- 2 Channel Rear Audio/Video Output
- AUX Input (1 Channel Video Input/2 Channel Audio Input)
- Rear View Camera Input
- Steering Wheel Control Compatible (requires no additional equipment)
- Bluetooth Capability for Hands Free (with Phone book and A2DP) and Streaming Music
- iPod Touch and iPhone integration via USB
- Pandora/Spotify integration with iPhone via USB
- Supports iPhone Charging
- 3.5mm Front AUX/MP3 Input
- Built-in High Sensitivity BT Microphone
- Full Function Remote Control Included
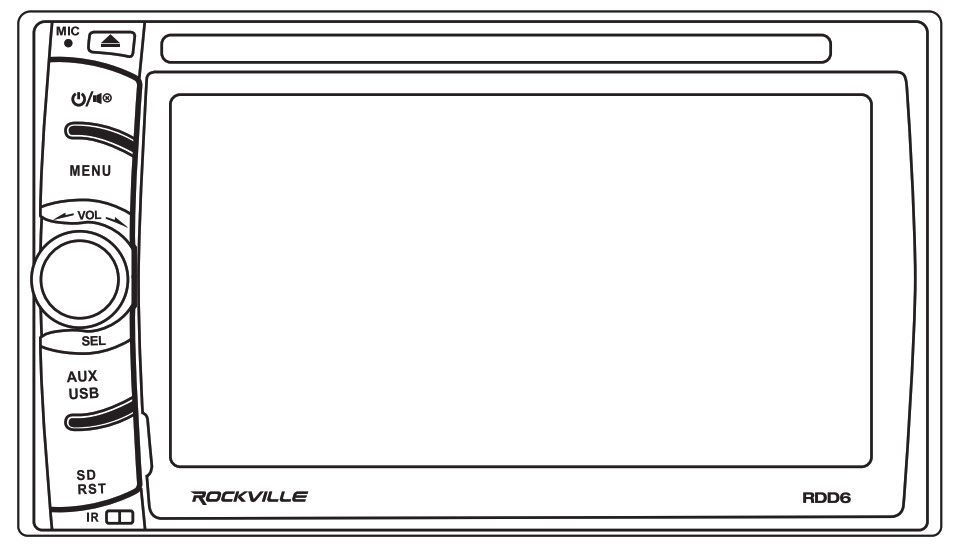
RECEIVER CONTROLS
- IR Receiver
- Micro SD card slot / Reset button
- USB Port / AUX in
- Volume / Select Knob
- Menu button
- Power / mute button
- Mic
- Eject
- CD/DVD Slot
- Touchscreen
 IR Receiver
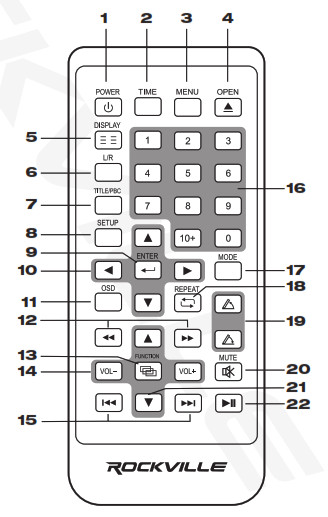
REMOTE CONTROL FUNCTIONS
- Power
- Time
- Menu
- Eject
- OSD (during video playback)
- Channel Button
- Return/PBC menu display
- Set Up (System settings)
- Enter
- Menu navigation
- OSD button
- Rewind / Fast Forward
- AM / FM Select
- Volume – / +
- Previous / Next
- Number pad
- Mode select
- Repeat
- Display angle adjustment
- Mute
- Reserve
- Pause / Play
MAIN INTERFACE
The RDD6 is a multimedia head unit with a 6 inch touch screen interface. You can access all primary functions from the home screen.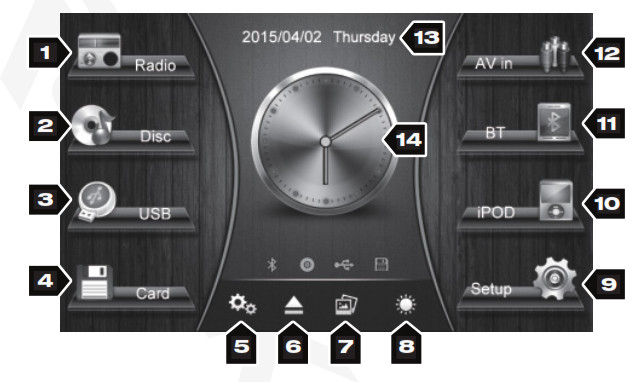
- Radio tuner
- CD/DVD mode
- USB mode
- SD mode
- Quick Settings menu
- Eject
- Change background image
- Screen brightness settings
- System set-up
- iPod/iPhone mode
- Bluetooth mode
- AV i mode
- Day/Date
- Time
RADIO
Touch the Radio icon on the home screen or press MODE key on the remote control to access radio functions.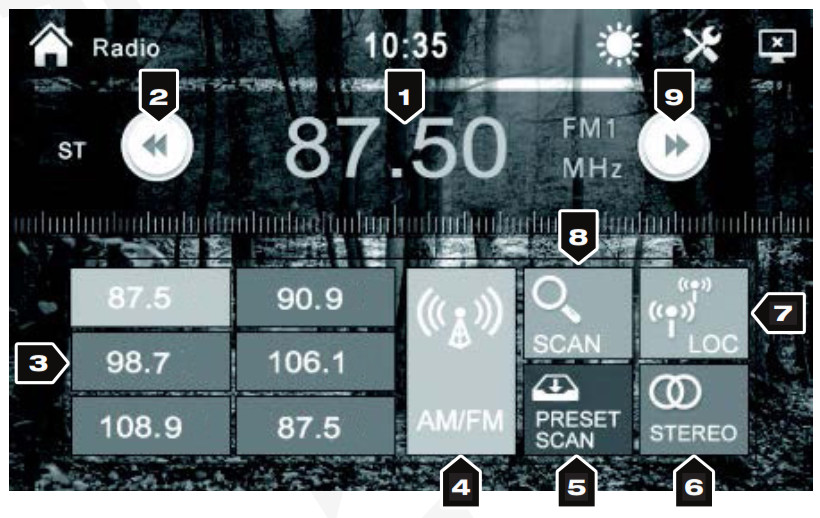
- Displays current frequency.
- Touch once to begin semi auto search back through frequencies. When a station with a strong signal is found, the search will automatically stop. Or you can touch the key again to manually stop the search. Touch and hold to fine tune frequencies.
- Touch to choose the desired station. Touch and hold to assign station.
- Touch to switch radio bands.
- Touch once to browse stations. Touch again to stop browsing.
- Touch to switch between MONO and STEREO.
- Touch to switch between LOC and DX modes.
- Touch to activate PS/AS function. The system will automatically scan radio stations and store those with a strong signal in the presets. After search is finished the system will browse through programmed stations, pausing at each one for 3 seconds.
- Touch once to begin semi auto search back through frequencies. When a station with a strong signal is found, the search will automatically stop. Or you can touch the key again to manually stop the search. Touch and hold to fine tune frequencies.
CD/DVD
Insert disc or touch the CD or DVD icons on the home screen to access CD/DVD functions.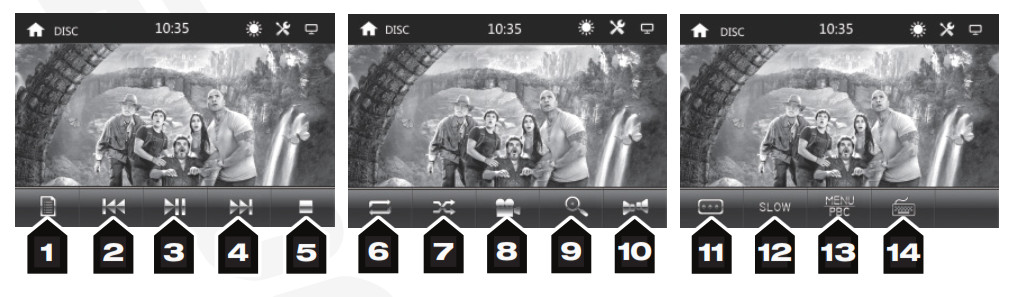
- File list
- Previous
- Play/Pause
- Next
- Stop
- Repeat
- Random
- Viewing angle (not available on all DVDs)
- Zoom
- Switch soundtrack
- Select subtitle language
- Slow motion
- Menu/PCB
- Manual track selection
USB/SD
When connecting a USB flash drive or inserting an SD card, the unit will automatically switch to the corresponding mode. This will bring up the USB/SD functions.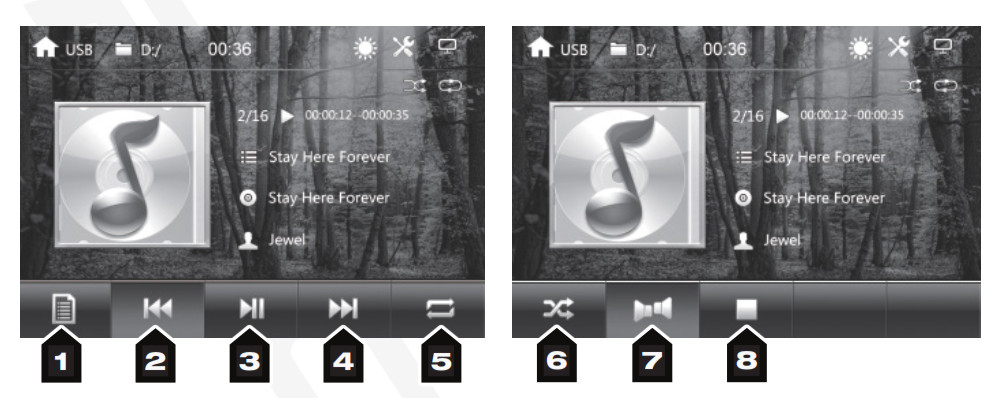
- File list
- Previous
- Play/Pause
- Next
- Repeat
- Random
- Switch soundtrack
- Manual track selection
iPOD TOUCH /iPhone
Direct Compatibility With iPhone/iPod Touch and USB Devices Connect your compatible iPhone or iPod Touch (iOS9.3 to 10.3) with your device’s USB cable and enjoy full music control and functionality directly on the receiver. The receiver will display album title, song title, and artist names. The receiver will also charge your iPhone/iPod when connected to the USB port.
Pandora and Spotify Integration via USB ConnectionControl Pandora or Spotify on your iPhone or iPod Touch from the head unit via USB connection. Displays album title, song title, and artist as well as album art when available.
BLUETOOTH
When driving it is important to keep your hands on the wheel and your eyes on the road. Bluetooth integration allows you to make and receive hands free phone calls directly on the receiver. Our Bluetooth technology is the latest on the market. It supports recent calls, phone book, and more. With A2DP you can wirelessly stream music from your Bluetooth phone or MP3 player right to your audio system.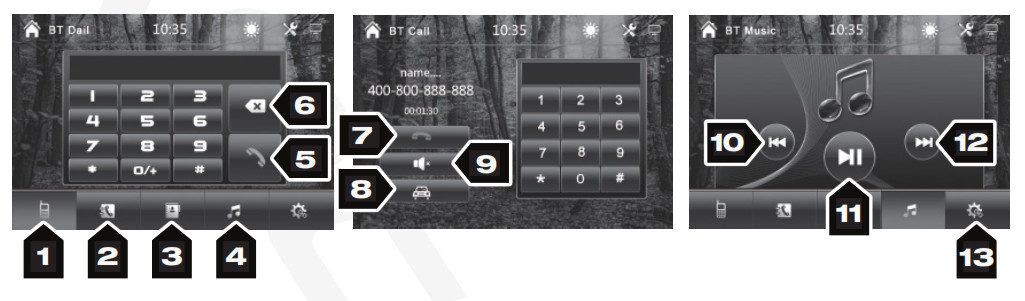
- Dial
- Call log
- Phone book
- Music
- Call
- Delete
- End call
- Switch between vehicle speakers and phone speaker
- Microphone
- Previous
- Play/Pause
- Next
- Menu/PCB
- Device settings
PairingWhen the unit is in paring mode, the words “Waiting for Pairing” will be displayed in the number display box above the keypad.
- Make user your device is in Bluetooth mode and discoverable.
- Search for and select ROCKVILLE in your device’s available Bluetooth device list.
- Upon pairing you maybe prompted for a passcode. Please enter 0000.
Making/Answering callsTo make a call:
- Enter the phone number via the on-screen keypad, the remote control, or the phone itself.
- After inputting the phone number press the Call key to initiate the call.
- During the call press the key with the CAR icon (page 13, item 9) to switch between the vehicle speakers and the phone speaker.
- To end the call press the End call key.
- When a call comes in the unit will automatically switch to the Bluetooth and HandsFree mode interface.
To answer a call:
- Calls can be answered manually by pressing the Call key. Alternatively, the unit can be set to Auto Answer mode in the Bluetooth settings menu. In this mode, an incoming call will automatically be answered without the need to touch the screen or your phone.
- To end the call press the End call key.
Music Playback via BluetoothMusic from your A2DP capable phone can be played via the head unit. You can use the Bluetooth music interface to control your music or you can use your phone. Please refer to page 13, items 10 -12.
AUX INPUT
Touch the AUX icon on the home screen or use the MODE button on the remote to access AUX IN mode. This mode will enable the end user to connect external media sources such as a rear-view camera, video game console, MP3 player, etc.
SYSTEM SETTINGS
Touch the set-up icon to enter the system menu. Here you can customize the interface according to your preferences.Basic System Settings
- Set system region
- Set OSD language
- Activate front camera function (if available)
- Activate rear camera function (if available)
- Activate headlamp detection mode
Audio Settings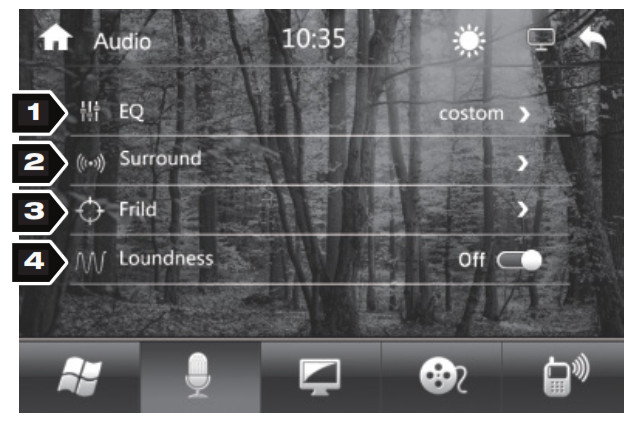
- EQ settings. Select from 6 presets: Standard, Classic, Rock, Pop, Jazz, Electric, and Custom
- Surround sound settings: Concert, Church, Passive, Wide, and Live
- Manually adjust Balance and Fader
- Set loudness On/Off
SYSTEM SETTINGS
Display Settings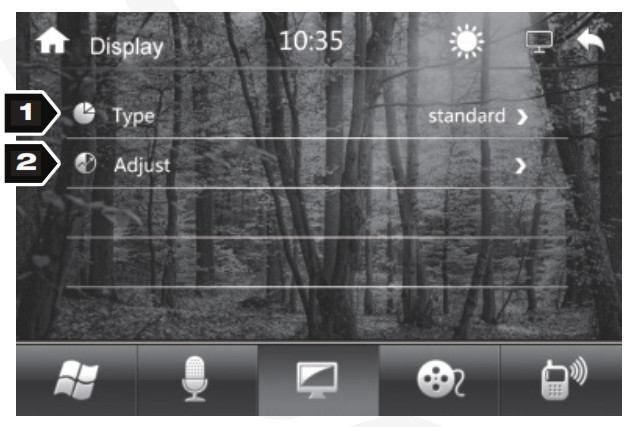
- Type settings: Standard, Light, Soft, Bright, Custom
- Image adjustment settings: Brightness, Contrast, Saturation, Hue, and Sharpness
Media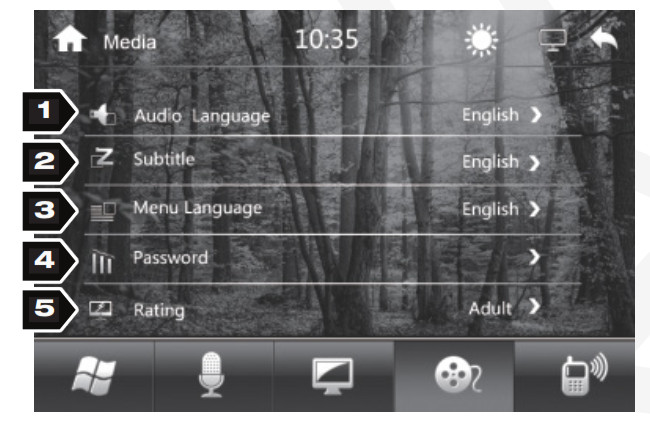
- Set DVD language
- Set subtitle language
- Set menu language
- Set password
- Parental control settings
Bluetooth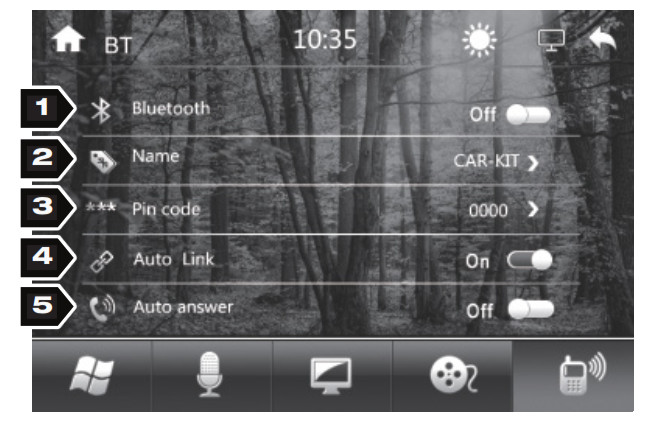
- Set Bluetooth function On/Off
- Set Bluetooth name
- Set Bluetooth pairing PIN code
- Set Auto Link On/Off
- Set Auto Answer On/Off
SYSTEM SETTINGS
Time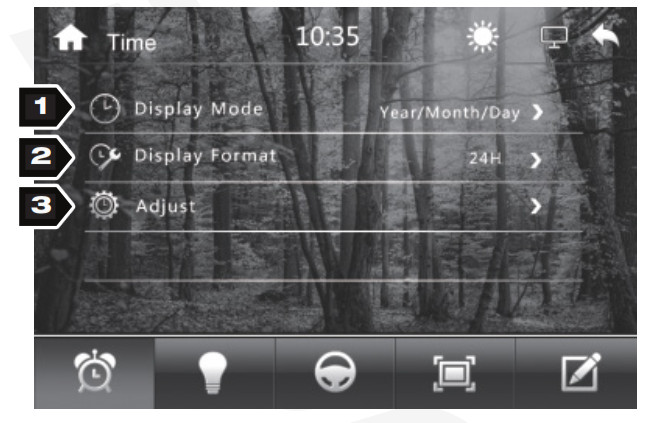
- Set Time display mode
- Set Time display format
- Set day and time
Light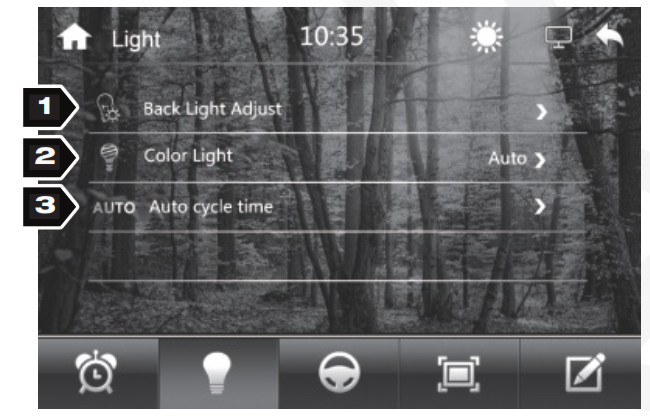
- Adjust back-light brightness
- Select back-light color
- Adjust the automatic back-light color cycle time
Steering Wheel (see page 20 for set-up)
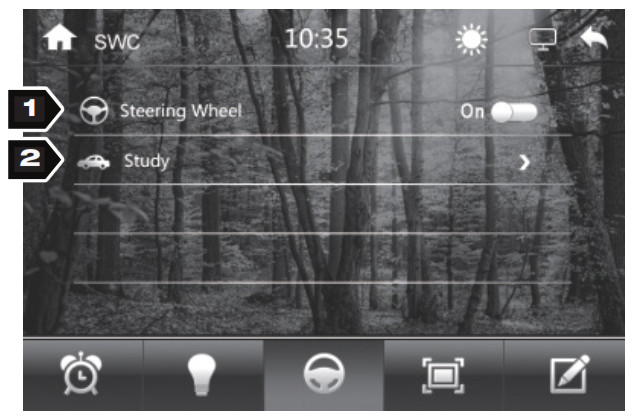
- Steering Wheel function On/Off
- Set steering wheel buttons
Time Using your finger or a stylus, touch the calibration interface symbol and hold until the next symbol appears. Touch the next symbol and continue repeating the above steps. Once the calibration is complete the system will prompt the word OK. Touch it to finalize the settings.
Factory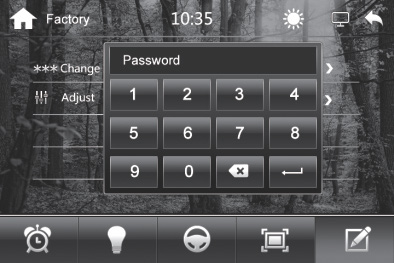 Default password: 123456 Here you can adjust the factory password and change the start-up car logo.
Version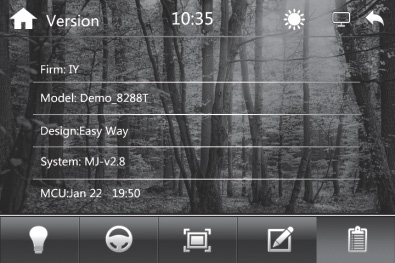 System information overview
STEERING WHEEL CONTROL SET-UP
Perform the following steps to set up the steering wheel controls:
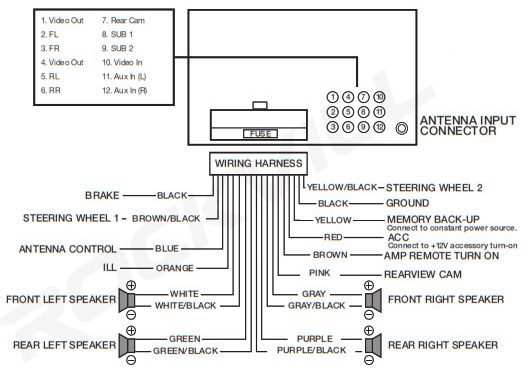
- There are 2 wires for the steering wheel control: Steering Wheel 1 brown/black and Steering Wheel 2 yellow/ black. If the car has two wires from the steering wheel, they can be connected to Steering Wheel 1 and Steering Wheel 2 randomly. If the car has only one wire from the steering wheel, it can be connected with either Steering Wheel 1 or Steering Wheel 2, just be sure to not connect to both at once.
- In the system settings find the Steering Wheel Controls interface (see page 16).
- Press the “Study” tab to enter into set up mode. If any of the function buttons are white, this means that the system has been previously paired. To clear any previous pairings, first press the button and then the button.
- Now press and hold the desired function button on the steering wheel and then press the corresponding function button on the screen. For example, if you press and hold the “Mode” button on the steering wheel, press the “Mode” button on the screen. Once the button is programmed, it will turn white. Repeat this process until all the buttons have been programmed.
WIRING DIAGRAM
TROUBLE SHOOTING
| PROBLEM | SOLUTION |
| No Power | Check fuses. Ensure they are not blown and that they are of the correct amperage and type.Adjust voltage.Reset the system by pressing the reset key. |
| Remote control does not work | Check battery. Ensure that it is the proper battery type and that it is new.Make sure the battery is installed properly. |
| Low or no sound | Check all connections.Check the volume settings. Check the Balance setting. Make sure it is centered.Make sure speakers and cables are in good working order. |
| Inferior sound quality or distortion | Use high quality CDs and DVDs.Check that speaker impedances match those of the head unit.Check speaker connections. |
| Settings reset when unit is powered off | Check and reconnect ACC and B+ cables in wiring harness. |
| Weak radio signal | Check all antenna connections.Check LOC status. Turn off if necessary |
| Improper CD/DVD/USB/SD playback | Check CD/DVD for cracks or scratches.Check USB flash drive/SD card for damage.Media files may be corrupted or may not be in proper format. |
| SD card unreadable | Check SD card for damage.Due to system limitations and compatibility issues, not all SD cards can be read by the system. |
| Bluetooth pairing fails | Check to see that both devices are turned on and that your Bluetooth device is discoverable.Turn both devices off and then on again.Make sure you’ve selected the proper source.Make sure that the Bluetooth device is within 5 feet of the unit.Make sure that the unit is not paired to a previously paired device. |
MAINTENANCE
FUSE REPLACEMENT: If the fuse blows, check the power connection and replace the fuse. If the fuse blows again, there may be an internal malfunction. In this case consult your local installer or call our technical help line at 1-646-758-0144, Monday through Friday, 9am to 5pm EST.
INSTALLATION NOTES
Visit us at:RockvilleAudio.comDue to constant improvements, these specifications are subject to change without notice. Copyright 2019
References
[xyz-ips snippet=”download-snippet”]