
ROCKVILLE 8˝ 400w Slim Under-Seat Active Powered Car/Truck Subwoofer Owner’s Manual
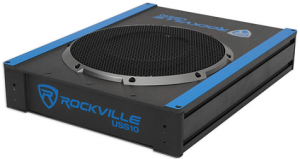
SS8P 8˝ 400W SLIM UNDER-SEAT ACTIVE POWERED CAR/TRUCK SUBWOOFER
Thank you for purchasing this Rockville SS8P underseat active subwoofer.The SS8P is an all in one solution to give you great sounding bass in your vehicle without taking up a lot of space. This sub enclosure is only 2.8˝ thick so that it can easily fit underyour seat. The amplifier is built in, so installation and wiring is clean and simple. This is a true all in one subwoofer solution with the subwoofer built into the enclosure along with a top of the line amplifier built in as well. We focused on making installation a breeze so we designed this unit with you the customer in mind. We added high level inputs so you can install this to an after-market or factory system. The high level input allows you to install this even if you have no preamp outputs available. Please read this installation guide carefully for proper use of your SS8P underseat active subwoofer. Should you need technical assistance please call our technical help line at 1-646-758-0144, Monday through Friday, 9am to 5pm EST.
IMPORTANT SAFETY INSTRUCTIONS
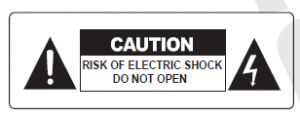
- To reduce risk of electric shock, never open the unit. There are no user serviceable parts, refer service to an authorized Rockville service center.
- Do not expose this unit to any kind of moisture.
- Please ensure that the unit is situated in a properly ventilated area.
Features and Specifications
- 400 Watts Peak / 100 Watts RMS
- Heavy Duty Mounting Feet
- PWM MOSFET Power Supply
- Low Level RCA Input
- High Level Inputs with Auto Turn-On Technology
- Adjustable Input Sensitivity
- Soft Delayed Remote Turn-On
- Thermal Protection Circuit, Short Protection Circuit
- Overload Protection circuit
- Green Power/Red Protect LEDs
- Phase Switch: 0° or 180°
- Low Pass Filter: 50Hz – 150Hz
- Bass Boost: 0 – 12dB @ 45Hz
- Built in Subsonic Filter @ 20Hz
- THD < 0.4%
- Subwoofer Level Remote Control
- Fuse Rating: Single 10A
Specifications
- Impedance: 2 Ohm
- Dimensions: 11.4 x 8.3 x 2.8 (L x W X H) Inches
- Frequency Response: 20Hz – 150Hz
- Signal to Noise Ratio >90dB
- Sensitivity: 90dB @ 1w / 1m
- Input sensitivity, Low level 300mV
- Input sensitivity, High level 1.0V
Features
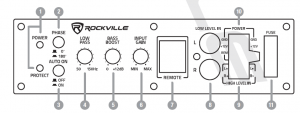
- Power/Protect LEDs: The 2 LED’s located on the side of the amplifier provide indication of the amplifier status, the Power LED will light when the amplifier is receiving properpower, ground and remote voltages. The second LED will light when the amp goes into protection mode.
- Phase Shift: Use this button to help compensate for time alignment problems. Such problems usually result from having the subwoofer positioned at a different distance fromthe listener than the other speakers in the system.
- Auto Power-on: The auto power-on function is for high level (speaker level) connections. When the switch is in the “ON” position, the subwoofer will turn on when there isa signal input. If there is no signal input, the subwoofer will automatically turn off. If you prefer to use the remote turn-on function, leave the witch in the “OFF” position.
- Low Pass Filter: This control permits you to define the frequency range you want the subwoofer amplifier to receive. The subwoofer will reproduce all sound below the frequency you set.
- Bass Boost: This control will increase the sound level of the bass frequencies.
- Input Gain Control: After you’ve installed your system, turn this control to minimum. Turn the headunit on (subwoofer will turn on via the remote connection) and set the volume to 2/3 full level. Slowly turn up the subwoofer input gain control until you hear a small amount of distortion. Now reduce the level until the distortion is completely gone. The input gain control is now set.
- Remote Level Control Port: Plug in the included remote level control to adjust the volume level of the subwoofer independently.
- Low Level RCA Inputs: Low level inputs are the recommended way to introduce an audio signal tot he subwoofer if RCA outputs are present on your headunit or other signalsource (such as a sound processor).
- High Level Input: These inputs, also referred to as speaker level inputs, allow you to connect to the factory speaker wires. They are called High Level inputs because they convert the high voltage running through factory speaker wires to one the amplifier can handle. These inputs will provide the end user with clean, well defined sound for optimal musical enjoyment. Use the supplied cable and wire harness and connect the outputs properly as shown in the connection diagram in this manual.
- Power Input Terminal
- Fuse: Do not use a fuse with a different value than the one provided
WiringLow Level Input
Low-level (RCA) input wiring is preferred for best audio performance. Most trunk and underseat installations will require a 6 – 12 foot RCA cable. Always use a high quality cable.
ATTENTION
Do not connect the high level and low level inputs to the amplifier at the same time!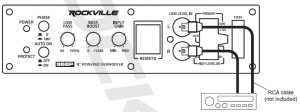
High Level Input
The high level inputs should only be used when your receiver lacks RCA outputs. Splice the high level input leads from the harness directly to your headunit’s speaker-leveloutputs. Be sure to observe polarity to avoid audio phase problems.
ATTENTION
Do not connect the high level and low level inputs to the amplifier at the same time!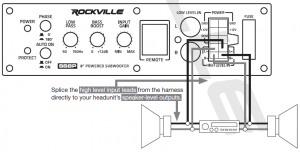
Power Connections
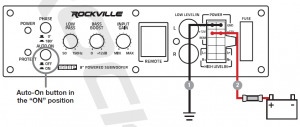
A. In this configuration the Auto Power On switch is in the “ON” position.
- Connect the ground cable (black) of the harness to the closest point on the chassis of the vehicle. Use 8 gauge (or heavier) wire to connect the ground cable.
- Connect the +12V cables from the harness, using 8 gauge wire or heavier, to the positive (+) terminal of the vehicle’s battery.
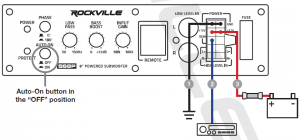
B. In this configuration the Auto Power On switch is in the “OFF” position.
- Connect the ground cable (black) of the harness to the closest point on the chassis of the vehicle. Use 8 gauge (or heavier) wire to connect the ground cable.
- Connect the remote cable (blue) of the harness to the remote output of the headunit using 16 gauge (or heavier) wire.
- Connect the +12V cables from the harness, using 8 gauge wire or heavier, to the positive (+) terminal of the vehicle’s battery
Power Connections
Using the included RJ45 cable, ivnstall the remote control securely under the dash or in a similar location where using it will not distract the driver.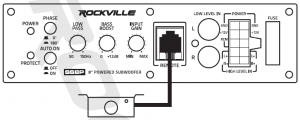
Troubleshooting
PROBLEM |
SOLUTION |
| Unit will not power up | 1. Check your ground connection.
2. Check that the Remote Input Turn-On has at leadst 5V DC. 3. Check that there is battery power going tot he +12V terminal. 4. Check all fuses, replace if necessary. Make sure the protection LED is not on. If it is, shut off the amplifier brief- ly and then turn it back on. |
| Protection LED comes on when amplifier is powered up | Turn down the volume control on the head unit to prevent overdriving. Check that there is good air flow around the amp. |
| No Output | 1. Check that all fuses are OK.
2. Check that the unit is properly grounded. 3. Check that the Remote Input Turn-On has at least 5V DC. 4. Check that the RCA audio cables are plugged into the proper inputs. |
| Low Output | 1. Reset the level control.
2. Check the crossover control settings. |
| High Hiss in the sound | 1. Check that all connections into the SS8P are properly connected.
2. It is best to set the amplifier’s input level control as low as possible. The best subjective signal-to-noise ratio is achieved in this manner. Try to set the headunit’s volume level as high as possible without distortion. |
| Squealing noise is present | Check fro improperly grounded RCA interconnects. |
| Distorted sound | Check that the Input Gain control is set to match the signal level of the head unit. |
| Engine noise: Static type | 1. Route your RCA cables away from the vehicle’s wiring.
2. Use high quality RCA cables. |
| Engine noise: Alternator whine | 1. Check that the RCA grounds are not shorted to the vehicle chassis.
2. Check that the headunit is properly grounded. |
Read More About This Manual & Download PDF:
References
[xyz-ips snippet=”download-snippet”]