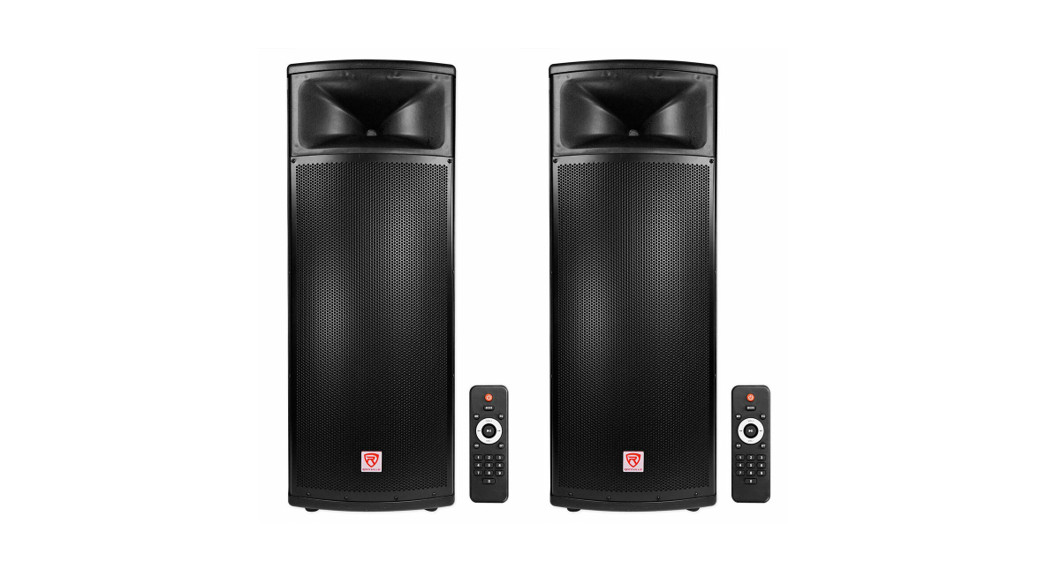
 Owner’s ManualBPA225DUAL 15″ POWERED SPEAKER
Who reads manuals?Instead, go to vimeo.com/340299525 or scan the QR code and watch a short video, which shows you how to set this item up and how to use it. 
Rockville is proud to introduce the all-new BPA225. The BPA225 is a complete all-in-one dual 15″ PA/DJ Speaker with a built-in amplifier and Bluetooth.
Please read this owner’s manual carefully for proper use of your Rockville BPA225. Should you need assistance, please call our technical helpline at 1-646-758-0144, Monday through Friday, 9 am to 5 pm EST.
IMPORTANT SAFETY INSTRUCTIONS

- To reduce the risk of electric shock, never open the unit. There is no user-serviceable Refer service to an authorized Rockville service center.
- Do not expose this unit to any kind of moisture.
- Please ensure that the unit is situated in a properly ventilated area.
- Make sure the unit is placed on a level and stable surface.
Included
- (1) Dual 15–speaker
- (1) 5-foot power cable
- Wireless remote control
- Manual
- Warranty card
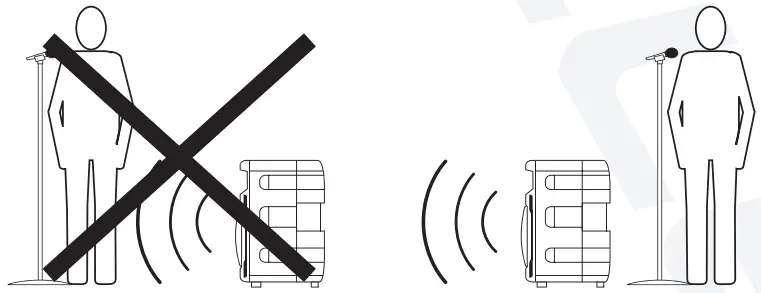
How to Avoid Irritating Feedback
The placement of your microphone is critical in avoiding feedback through your BPA speaker. Never set up your microphone in front of the speaker. Always set up your microphone behind the speaker. When approaching the speaker to make any adjustments, we recommend approaching the speaker from the rear and not walking directly towards the front of the speaker.
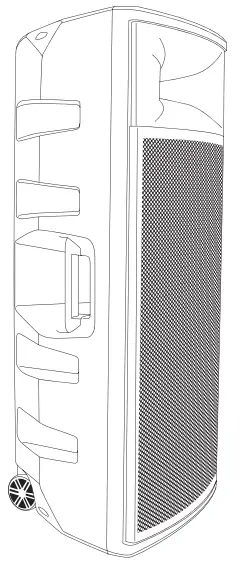
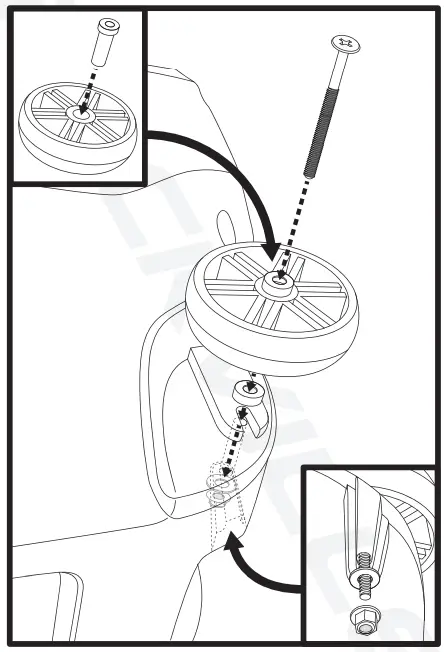
Wheel Assembly
Setting Level Controls
It is best practice to set your input level controls (gains) in this manner:
- Unplug all inputs except for the one you wish to set the gain for. In this instance, the Line In RCA inputs.

- Set the line-level input device volume (smartphone, tablet, MP3 player, etc.) to 60%.

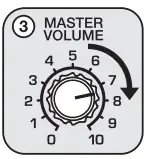
- Set the BPA225 Master Volume to 75%.

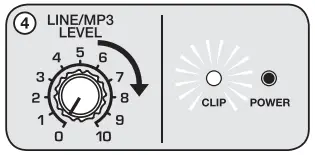
- Slowly turn up the level on the selected input (in this case, the Line/MP3 level). As soon as the clip indicator LED goes on or you hear any distortion – turn it down one or two notches.

Alter you set the levels on all input devices, you can readjust the BPA225 levels as necessary.
![]() PLEASE NOTE
PLEASE NOTE
Because mixers feature two volume controls (channel and master), when connecting one via the XLR line-in port, the procedure is slightly different. The BPA225 master volume should be set to 50% and the Line/MP3 Level control should be set to 50%. Set the mixer master volume to 50% and make the adjustments in step 4 on the mixer channel level control. If after making these adjustments the signal still isn’t strong enough, you can additionally boost the signal by turning up the Line/MP3 Level control.When adjusting the Mic 1 /Mit 2 Level controls, you must speak into the microphone and adjust the level control as needed. This Is because adjustments to the mic input are a matter of mit volume In relation to the music volume and not necessarily a clipping Issue.
APPLICATION USES
Microphone Presentations
Your 6PA225 features ultra-low noise Mic/Line inputs via combo XLR &’ W TRS stereo jacks.
- Make sure the Power switch Is in the OFF position.
- Plug your microphone into either the XLR or W jack input of the combo jack.
- Switch on the BPA unit.
- Refer to the “Setting Level Controls’ section of this manual for instructions on how to properly adjust the Mic Level controls.
If using a second microphone, connect the microphone to the Mic 2 Input and follow the procedure detailed above.Always stand behind the EPA when making your microphone adjustments to avoid feedback distortion.
Line Input
You can use the Line In combo XLR & W input to connect a mixer or the RCA inputs to connect an additional stereo signal source such as a smartphone. tablet. MP3 player. CD player. etc.
- Make sure the Power switch is in the OFF position.
- Connect the mixer to the XLR input or line-level signal source to the RCA Inputs (never use both at once).
- Switch on the BPA unit.
- Refer to the ‘Setting Level Controls’ section of this manual for instructions on how to properly adjust the input level controls (gains).
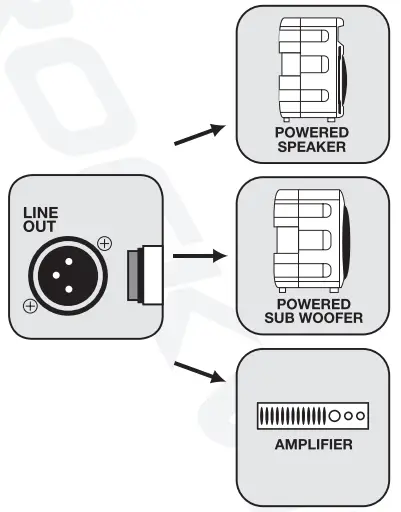
Line Out Balanced Connection
The XLR Line Out allows you to output the amplified signal to a subwoofer, another powered speaker, or an amp, which will, in turn, power other speakers. Simply connect the output device to the BPA225 using an XLR to XLR or XLR to 1/4″TRS cable to share the signal. We recommend you use high-quality cables such as Rockville’s RCXFM20E-B XLR to XLR cable or the RCXMI320-B XLR to 1/4″ cable.
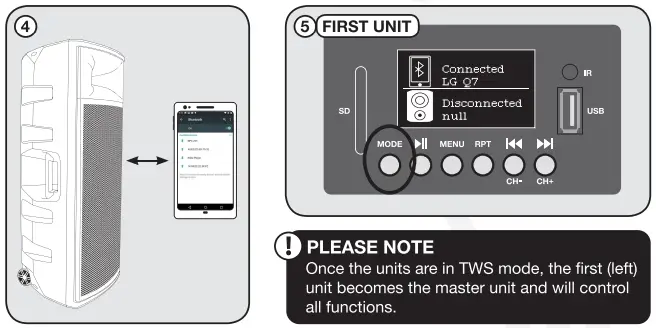
Wireless Speaker Linking
The BPA225 features true wireless stereo (TWS) Bluetooth linking. This means you can purchase 2 of these speakers and link them together to play in stereo wirelessly.
- Make sure both BPA unit’s power switches are in the ON position.
- Press the Mode button on the first (main) unit. The LCD screen should show that the speaker is not connected to Bluetooth or another speaker.
- Press the Mode button (a) on the second unit and then press the Menu button (b). You will hear a voice prompt announcing that the speaker is connected and the LCD screen will read ‘Connected LEFT. On the first unit, the LCD read-out will read “Connected RIGHT”. Please note that the first unit is the master unit. All functions will be controlled by this unit.
- Once connected, go to your phone’s Bluetooth interface and select “BPA225” from the list of available devices.
- If the connection is successful, you will hear an audio prompt, “Bluetooth connected” and the LCD on the master unit will indicate that there is a Bluetooth connection established. You are now ready to enjoy the true wireless stereo sound!

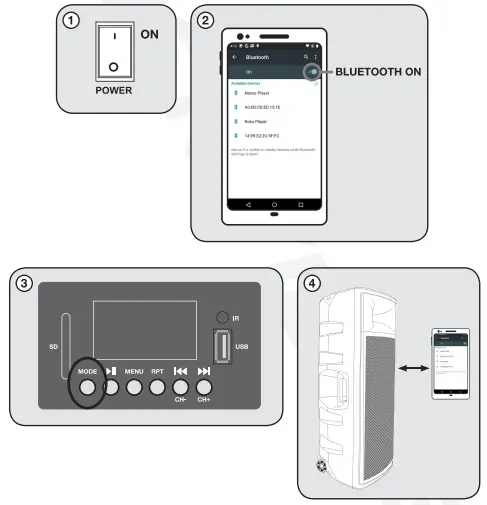
Bluetooth Pairing
To connect your iPod, iPhone, MP3 player, Android phone, or any other Bluetooth-capable device, follow the steps listed below.
- Make sure the BPA unit’s power switch is in the ON position.
- Turn on the Bluetooth feature on your device and ensure that it is discoverable.
- Push the Mode button on your BPA unit until you are in Bluetooth mode.
- Once in Bluetooth mode, the unit should show up on your device as “BPA225”. Select it from your list of available devices and you are ready to go.
Remote Control
|
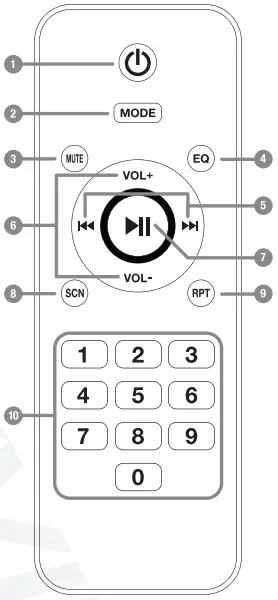 |
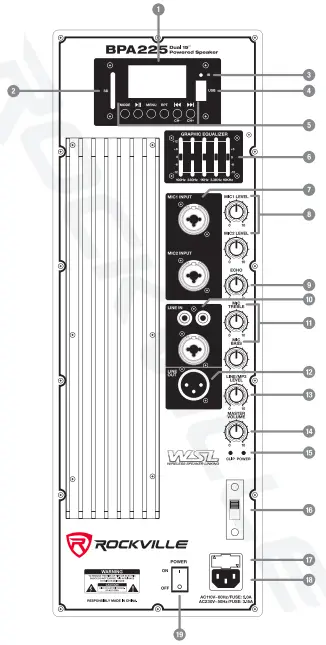
- LCD Display screen
- SD Card input. Please note: inserting an SD card will override Bluetooth playback.
- IR Sensor
- USB input. Please note: inserting a USB thumb drive will override Bluetooth playback.
- MP3 Player controls
 (CH-)/
  (CH+) – In USB/SD/Bluetooth mode press these buttons to skip tracks. In FM mode press these buttons to skip stored stations. Repeat – Press once to repeat the current track, press again to repeat all tracks, press again to exit repeat mode.Menu – In FM radio mode, press this button to enter manual tuning mode. Use the CH+/CH- buttons to navigate stations. Press the button to save desired stations. Press and hold the button for 5 seconds to delete manually saved stations.Play/Pause – Press this button once to start music playback; press again to pause playback. In FM radio mode press and hold for 5 seconds to automatically scan and save all available stations.Mode – press to switch between input modes: FM Radio, Bluetooth, TWS, USB, and SD.
 - 5-band graphic equalizer
- The Mic input panel features a combo XLR & 1/4″ which accepts XLR type connectors and balanced/unbalanced 1/2″TRS plugs. When you use an unbalanced 1/3″TS plug, the line input automatically turns the ring into the ground.
- Mic 1 and Mic 2 Level controls.
- Mic echo level control
- The combo XLR & IA” Line In port accepts signals from a variety of sources such as keyboards, electronic drums, mixers, etc. Use the RCA plugs to connect stereo signal sources such as CD players, DVD music players, MP3 players, etc.
- The Mic Bass and Mic Treble control adjust the low and high-level frequencies of the mic inputs.
- The XLR Line Out sends a signal to a subwoofer, another powered speaker, or to an amp.
- The Line/MP3 Level control adjusts the signal coming from the Line In XLR/RCA inputs as well as input from the MP3 module (USB/SD/Bluetooth/FM Radio).
- Master volume
- Power LED indicator and amplifier clip limit LED indicator.
- Voltage selector switch
- User serviceable fuse
- IEC AC power socket
- Power switch
Specifications
- 375 Watts RMS / 750 Watts Program Power /1500 Watts Peak
- Built-in Class AB amplifier
- Dual High Power 15″ Long-throw Woofers
- 2″ KSV Voice Coils
- 51 Oz Magnets
- 75″ Compression Horn Drivers
- Frequency Response: 45Hz – 20kHz
- Maximum SPL @ 1w/1m: 128dB
- Impedance: 4 Ohm
Features
- True Wireless Stereo (TWS) wireless speaker linking via Bluetooth
- (2) combo XLR & 1/4″ Mic inputs
- Individual Mic volume controls
- Mic echo level control
- Combo XLR & 1/4″ + RCA line input
- Line-level/MP3 volume control
- XLR line output
- Master volume control
- Mic treble control
- Mic bass control
- Power LED
- Clip LED
- USB/SD input (Max capacity: 64 GB)
- Built-in FM radio with manual tuning
- 5-band graphic EQ
- Bluetooth connectivity with 60-foot range
- High quality wireless remote control
- LCD display screen for MP3 player functionality
- Built-in cooling fan
- Built-in wheels for easy transport
- Storage compartment located on the back of the unit
- Rugged high impact ABS enclosure
- 110/220 volt switchable
- User serviceable fuse
Troubleshooting
| PROBLEM | SOLUTION |
| No power | 1. Make sure the unit is plugged in and the power switch is in the ON position.2. Check that the power cable is plugged in tightly to the unit.3. Check and replace the fuse if necessary. See the fuse replacement diagram on the next page.4. If people or equipment tend to step and roll over or stretch your power cable it can get damaged. Always try a second cable to test for shorts in the original cable. Dispose of original damaged power cables immediately. |
| No sound/ distorted sound | 1. Check that all appropriate cables are plugged incorrectly.2. Check the Volume/Levels settings. Refer to the *Setting Level Controls’ section of this manual for instructions on how to properly adjust the input level controls (gains).3. Be sure your microphone is on and plugged into the correct input4. If using a mixing console make sure fader and balance are set to center positions and levels are increased. Make sure the mixer is plugged into the correct input.6. If volume and Treble/Bass settings are maxed out, turn one of them down as you may be overdriving the unit.7. Check volume and gain settings on all input sources. |
| Buzzing sound | Make sure you are using a proper cable. For ¼” cables, there are 3 types: instrument, TS (unbalanced), and TRS (balanced). The BPA225 accepts both TS and TRS ¼” cables. Check the requirements of the connected gear and make sure you are using the appropriate cable. |
| Mic feedback | Point the mics away from the speaker. Make sure the mics are in the back of the speaker, not in front of it. |
| Poor Mic sound | 1. Make sure you are using the Mic In ports.2. If using wireless mics connect them into the Line input of your mixer. |
| Bluetooth/TWS pairing fails | 1. Check to see that both devices are turned on and that your Bluetooth device is discoverable.2. Turn both devices off and then on again.3. Make sure you’ve selected the proper source.4. Make sure that the Bluetooth device is within 5 feet of the unit.5. Move both devices away from other Bluetooth devices, microwaves, wireless routers, and other electronics.6. Make sure that the unit is not paired to a previously paired device or to another speaker. |
| No SD or USB playback | 1. Make sure you’ve selected the proper source.2. Make sure that the SD card and USB drive do not exceed the maximum capacity of 64GB. |
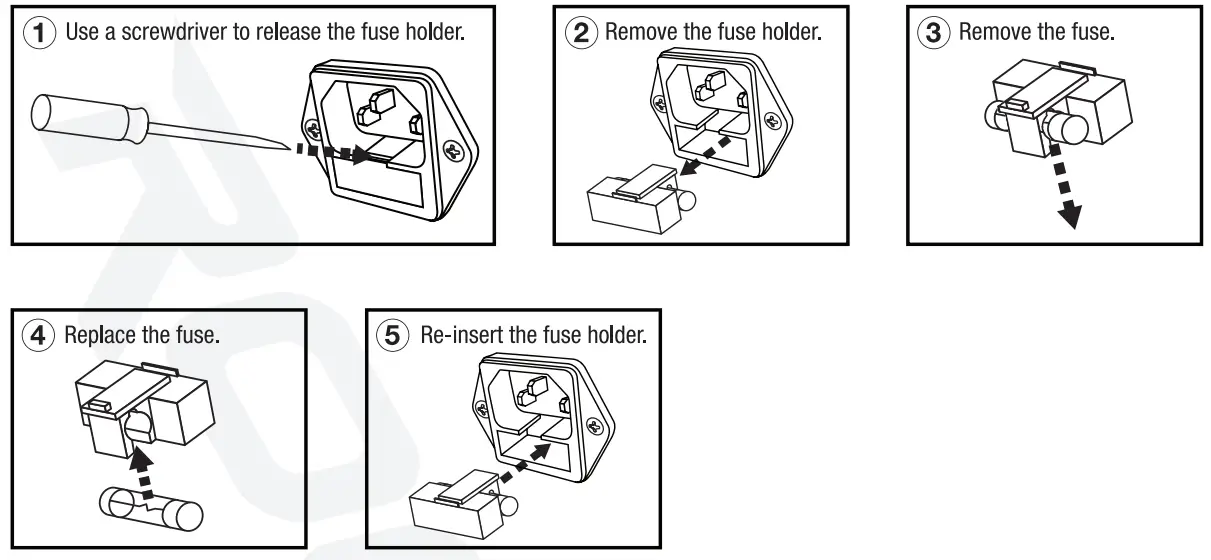
Fuse replacement Diagram
FEDERAL COMMUNICATIONS COMMISSION COMPLIANCE INFORMATION
Responsible party name: RockvilleAddress: 600 Bayview Ave,Entrance A,Inwood, NY 11096
Hereby declares that the product(s) BPA225 pro audio speaker complies with FCC rules as mentioned in the following paragraph:This device complies with Part 15 of the FCC rules. Operation is subject to the following two conditions: (1) this device may not cause harmful interference, and (2) this device must accept any interference received, including interference that may cause undesired operation.
Note: This equipment has been tested and found to comply with the limits for a Class B digital device, pursuant to Part 15 of the FCC rules. These limits are designed to provide reasonable protection against harmful interference in a residential installation. This equipment generates, uses and can radiate radio frequency energy and, if not installed and used in accordance with the instructions, may cause harmful interference to radio communications. However, there is no guarantee that interference will not occur in a particular installation. If this equipment does cause harmful interference to radio or television reception, which can be determined by turning the equipment off and on, the user is encouraged to try to correct the interference by one or more of the following measures:
- Reorient or relocate the receiving antenna.
- Increase the separation between the equipment and receiver.
- Connect the equipment into an outlet on a circuit different from that to which the receiver is connected.
- Consult the dealer or an experienced radio/TV technician for help.

RockvilleAudio.com©2020 ROCKVILLE 1/ Features and specifications are subject to change and or improvement without nonce.
[xyz-ips snippet=”download-snippet”]

