ROCKVILLE Compact 2 Channel DJ Mixer with Bluetooth RDJ3BT Owner’s Manual
Thank you for purchasing this Rockville RDJ3BT Compact 2 Channel DJ Mixer with Bluetooth. Please read this installation guide carefully for proper use of your RDJ3BT mixer. Should you need assistance, please call our technical help line at 1-646-758-0144, Monday through Friday, 9am to 5pm EST.
IMPORTANT SAFETY INSTRUCTIONS
![]() CAUTION: Risk of Electric Shock.
CAUTION: Risk of Electric Shock.![]() Do Not Open!
Do Not Open!
CAUTION
RISK OF ELECTRIC SMOCK. A DO NOT OPEN
- To reduce risk of electric shock, never open the unit. There are no user serviceable parts, refer service to an authorized Rockville service center.
- Do not expose this unit to any kind of moisture.
- Please ensure that the unit is situated in a property ventilated area.
- Make sure the unit Is placed on a level and stable surface.
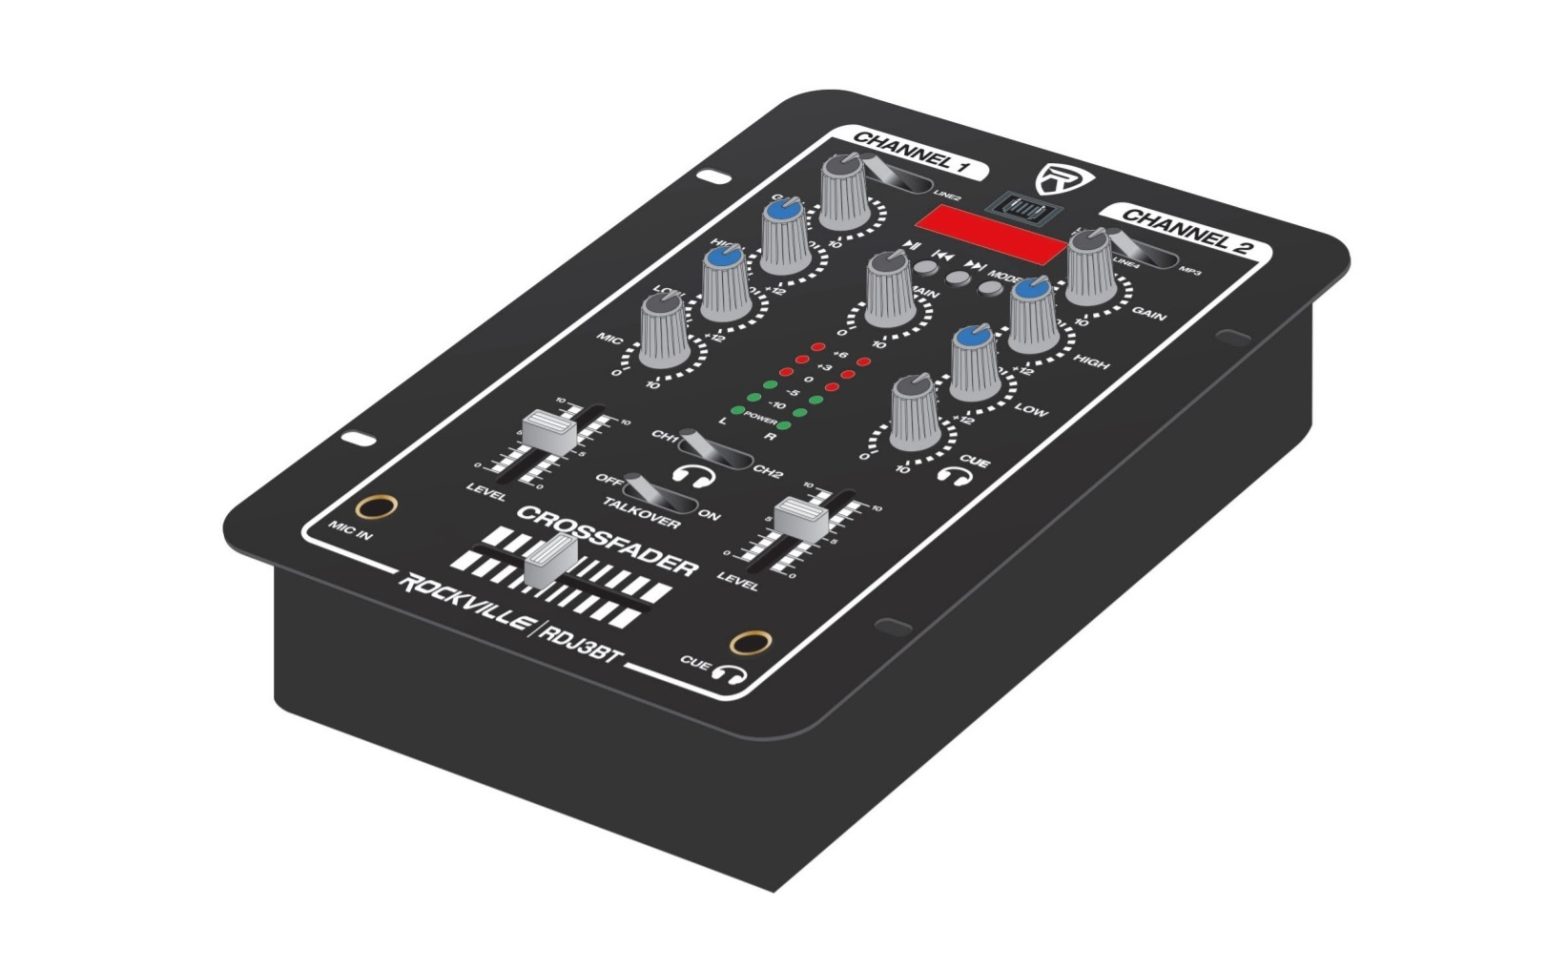
Functions

- Channel 1 input selector switch: Phono/Une I – Line 2
- LCD display screen
- USB input
- MP3 controls: Play/Pause, Previous, Next, Mode (Bluetooth/USB)
- Channel 2 input selector switch: Phono/Line 3 – Line 4 – MP3
- Channel 1:
- a. Gain input control
- b. High tone control: 12KHz ±12dB
- c. Low tone control: 60Hz ±12dB
- d. Microphone level control
- Channel 2:
- a. Gain input control
- b. High tone control: 12KHz *12dB
- c. Low tone control: 60Hz ±12dB
- d. Headphone level control
- Master volume control
- Left/Right Stereo level display
- Headphone source selector switch
- Talk-over On/Off selector switch
- Channel 1 level control
- Channel 2 level control
- W Microphone input jack
- W Headphone input jack
- Crossfade slider
CHANNEL 2:
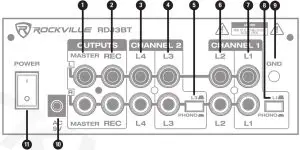
- 3. Line 4 input, Left /Right
- 4. Line 3/Phono input, Left /Right
- 5. Line 3/Phono input mode selector
CHANNEL 1:
- 6. Line 2 input, Left /Right
- 7. Line 1/Phono input, Left /Right
- 8. Line 1/Phono input mode selector
- 9. Ground connector
- 10. AC 9V power input
- 11. Power switch
Operation
BLUETOOTH:
- Press the MODE button until you see “bt” flashing on the display. The unit will automatically enter into pairing mode.
- Ensure that your device is in Bluetooth mode and discoverable.
- Find “ROCKVILLE” on your device’s list of available Bluetooth connections and select it.
- Once successfully paired, the word “bt” will stop flashing and remain solid.
- You can control playback from your device or you can use the MP3 controls.
INPUTS:
LINE INPUT: Use these jacks for connecting stereo audio from any number of sources: mixing consoles, samplers, CD players, cassette decks, DAT machines, and other audio interfaces. Mono audio sources can be connected using an RCA “Y” cable connector.
LINE/PHONO INPUT: Use these jacks for connecting stereo audio from turntables, mixing consoles, samplers, CD players, cassette decks, DAT machines, and other audio interfaces. When connecting a turntable, make sure the input mode selector switch is in the PHONO position.
OUPUTS:
- Master output, Left /Right: use this output to connect to an amplifier or speaker system. The level of this output is controlled by the top panel knob labeled MAIN.
- Record output, Left /Right: This output can be used to record to a computer, CD, MD, and tape recorder.
Features/Specifications
- Selectable Inputs for Channel 1 and Channel 2
- Adjustable high, low, and gain knobs on each channel
- Equalizer: Bass +12dB 60Hz / Treble +12dB 10KHz
- Channel 1/2 Cue monitor control
- Individual volume control
- Mic volume control
- Master volume control
- Channel 1 and 2 fader and cross fader
- Bluetooth connectivity
- Built in USB and MP3 player with LCD to play back tracks
- Talk-over: -16dB
- Distortion: ≤ 0.05%
- Signal/ Noise ratio: > 80dB
- 1 1/4˝ Mic input
- 1 1/4˝ Headphone output
- 4 RCA L/R Line inputs
- 1 RCA L/R Master amp output
- 1 RCA L/R Rec output
- You can ground your turntables to the mixer
Trouble Shooting
NO SOUND:
- Make sure unit is properly plugged into the wall outlet.
- Check that power cable is properly plugged into the unit.
- Ensure that the Channel input selector switch has been properly set.
- Check the input GAINS, CHANNEL 1/CHANNEL 2 levels, and MAIN volume to make sure they are properly set.
NO SOUND – HEADPHONES:
- Be sure your headphones are properly plugged in.
- Check that the headphone level control (CUE), headphone channel selector (
 ), and CHANNEL 1/CHANNEL 2 levels have been properly set.
MIXER NOISE:
- Turn down all Microphone settings if none is in use.
MICROPHONE DOES NOT WORK:
- Be sure your microphone is properly plugged in.
- Make sure the MIC gain is properly set.
LINE INPUT DISTORTION:
- Turn down the input GAIN controls and check EQ settings.
LINE INPUT/PHONO DISTORTION:
- Make sure the LINE INPUT/PHONO selector switch is in the right position (PHONO for turntables, LINE for all other input sources).
- Turn down the input GAIN controls and check EQ settings.
NOISE/HUM:
- Make sure you are using good quality audio cables. We recommend Rockville Pro Audio cables.
- Check the condition of your audio cables.
- Keep cables away from other AC power cables as well as AC transformers.
- Ensure that the unit is not too close to amplifiers, lighting power supplies or ballasts.
- If possible, make sure that your turntables are properly grounded to the back of the mixer (GND).
FEEDBACK:
- If a microphone is being used, make sure you are not too close to the speakers or headphones.
- If there is feedback from the phono input, your turntables may be to the speakers or subwoofer. Make sure the the turntable is on a surface free of vibration when the speakers are turned up.
FEDERAL COMMUNICATIONS COMMISSION COMPLIANCE INFORMATION
Responsible party name: Rockville
Address: 600 Bayview Ave.Entrance AInwood, NY 11096
Hereby declares that the product RDJ3BT mixer complies with FCC rules as mentioned in the following paragraph:
This device complies with Part 15 of the FCC rules. Operation is subject to the following two conditions: (1) this device may not cause harmful interference, and (2) this device must accept any interference received, including interference that may cause undesired operation.
Note: This equipment has been tested and found to comply with the limits for a Class B digital device, pursuant to Part 15 of the FCC rules. These limits are designed to provide reasonable protection against harmful interference in a residential installation. This equipment generates, uses and can radiate radio frequency energy and, if not installed and used in accordance with the instructions, may cause harmful interference to radio communications. However, there is no guarantee that interference will not occur in a particular installation. If this equipment does cause harmful interference to radio or television reception, which can be determined by turning the equipment off and on, the user is encouraged to try to correct the interference by one or more of the following measures:
- Reorient or relocate the receiving antenna.
- Increase the separation between the equipment and receiver.
- Connect the equipment to an outlet on a circuit different from that to which the receiver is connected.
- Consult the dealer or an experienced radio/TV technician for help.

 report this ad
© 2020 ROCKVILLE // Features and specifications are subject to change and or improvement without notice.
References
[xyz-ips snippet=”download-snippet”]