User Manual
![]()
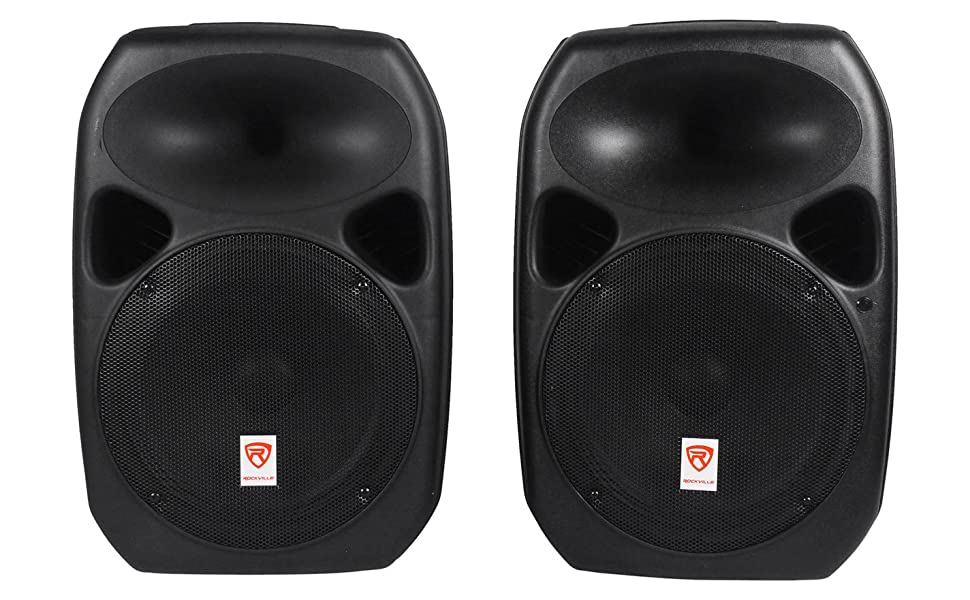
Rockville DJ/PA Speaker RPG122K
Who reads manuals? Instead, go to vimeo.com/487378913 or scan the QR code and watch a short video, which shows you how to set this item up and how to use it.
Thank you for purchasing this Rockville Power Gig RPG122K Bluetooth pro audio speaker system. We are very proud to bring you what we consider to be the absolute best value in pro audio speakers. Our goal to you and to your audience is to hear “live performance sound” the way it was meant to be experienced.
The RPG122K is a complete package all-in-one 12′” PA system. Everything you need in a pro PA system setup is included: You get two 12′” pro audio speakers with 1000 watts of total power. The system includes a master active speaker that features the built in amplifier and a second passive 12′” speaker that is powered from the master speaker/ amp. Rounding off this system are speaker stands so you can mount the speakers, a microphone and all connection cables necessary, so that you can get your party started right out of the box. The RPG122K is perfect for DJ applications, karaoke, and parties or for live music gigs.
Please read this installation guide carefully for proper use of your Power Gig RPG122K Bluetooth pro audio speaker. Should you need technical assistance during or after your installation please call our technical help line at 1-646-758-0144, Monday through Friday, 9am to 5pm EST.
IMPORTANT SAFETY INSTRUCTIONS

- To reduce risk of electric shock, never open the unit. There are no user serviceable parts, refer service to an authorized Rockville service center.
- Do not expose this unit to any kind of moisture.
- Please ensure that the unit is situated in a proper1y ventilated area.
- Make sure the unit is placed on a level and stable surface.
Assembling Your Power Gig Professional Sound System
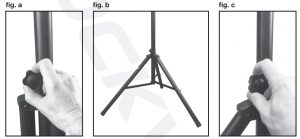
Stands
- Remove the stands from their packaging and examine them to ensure that they are in proper working order.
- Loosen up the adjustment knob (fig. a) and spread the legs to the desired width (fig. b). We recommend spreading the legs to the point that the support bars are parallel with the floor. Re-tighten the leg adjustment knob so that the legs are securely positioned (fig. c). Do not over tighten.
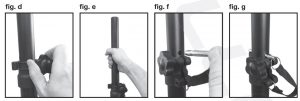
3. Loosen the stand extension by loosening the locking knob (fig. d). Lift the extension to the desired height {fig. e). Now insert the safety detent pin {fig. f). Make sure the pin goes all the way through the extension pole (fig. g). If you retighten the locking knob, do not overtighten it.
Mounting the Speaker
- Unpack the speakers from their packaging. Check for any visible damage.
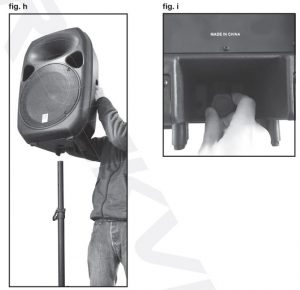
- Carefully lift the speaker above the stand, lining up the extension pole with the mounting hole at the bottom of the speaker {fig. h). This step may require a second person for assistance.
- Once the speaker is mounted on the stand, secure it by tightening the locking knob located behind the pole opening at the bottom the speaker (fig. i).
Connecting the Passive Speaker
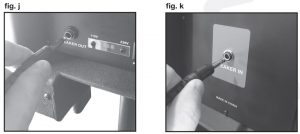
To connect the passive speaker to the active unit, use the included 1µ- to Y.r cable. Connect one end of the cable to the 1µ- port on the active unit marked Speaker Out (fig. D- Now connect the other end to the 1µ- port on the passive unit marked Speaker In (fig. k). Make sure that the power to the active unit is turned off before you connect the passive unit.
Setting Up Your Power Gig Professional Sound System
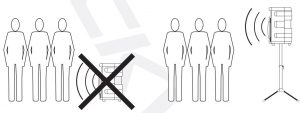
Your Power Gig is set up to produce the full spectrum of sound from its woofer and tweeter horn combination. The lower frequencies seek out the floor of the room that they are playing in and travel along the floor and walls. The tweeter horn is more directional. Hence when setting up your system its more important to make sure that the tweeter horns are not blocked by any furniture and are located I aimed at ear level to the listening audience. Woofer aiming is not as critical as explained previously due to the nature of the woofer sounds able to travel through various paths even when blocked.
It is therefore recommended that when setting up your system you set up your speakers on provided stands so that the tweeter sounds will radiate above the listening crowd. This will guarantee optimum sound dispersion and achieve clear vocal sound reproduction.
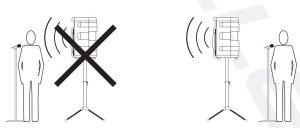
How To Avoid Irritating Feedback
The placement of your microphone is critical in avoiding feedback through your Power Gig system. Never set up your microphone in front of the speaker. Always set up your microphone behind the speaker. When approaching the speaker to make any adjustments, we recommend approaching the speaker from the rear and not walking directly towards the front of the speaker.
Setting Level Controls
It is best practice to set your input level controls (gains) in this manner:
- Unplug all inputs except for the one you wish to set the gain for. In this instance, the Line In RCA inputs.

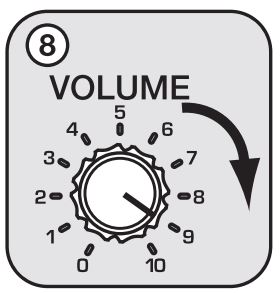
- Set the line level input device volume (smart phone, tablet, MP3 player, etc.) to 60%.
- Set the RPG122K Master Level to 75%.
- Slowly turn up the level on the selected input (in this case, the Line/MP3 leveO . As soon as the clip indicator LED goes on or you hear any distortion – turn it down one or two notches.

APPLICATION USES
Microphone Presentations
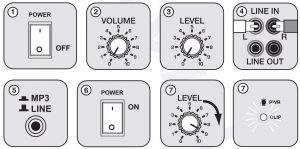
Your Power Gig features two ultra-low noise Mic/Line inputs via XLR & %’TRS stereo jacks.
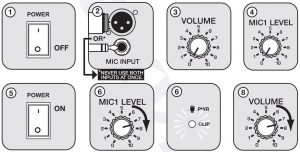
- Make sure the Power Gig is in OFF position.
- Plug your microphone into either the XLR or %’ jack (never use both at once).
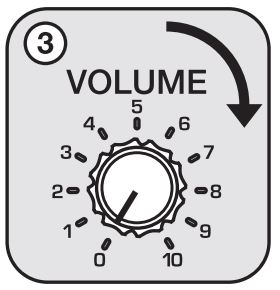
- Keep Volume at O position.
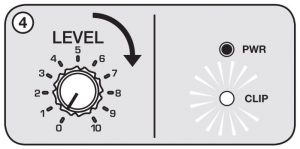
- Turn Mic Level to O position.
- Switch on the Power Gig unit.
- Slowly turn Mic Level clockwise until you achieve appropriate volume setting. This is determined by the CLIP LED indicator light. Proper function is achieved when the CUP indicator lights up at peak levels, it should never be in constant on position.
- The above adjustment matched the microphone preamp to the input volume of the Power Gig unit.
- Now turn up the Volume to necessary loudness by rotating clockwise.
Always stand behind the Power Gig when making your microphone adjustments to avoidfeedback distortion.
Multi-Microphone Hook Up
You can choose to hook up two microphones to your Power Gig in the following manner. Set up microphone #1 as instructed above. Using same set up instructions, insert microphone #2 into the ultra-low noise Mic 2 input which features its own separate Level control. Use this Level control to increase the microphone level and balance the inputs between the two microphones before attempting to adjust the Volume.

Line Input Feature
You can use the Line Input function when you wish to hook up an additional stereo signalsource without the use of a mixer console. CD players, DVD music players, MP3 players,etc can be plugged directly in to the RCA inputs labeled LINE INPUT.
To connect a CD, DVD music player or MP3 player.
- Turn your Power Gig unit to OFF position.
- Turn Master Volume to O position.
- Turn Level control to O position.
- Connect the music source unit to the RCA inputs marked Line In.
- Use the push button {located above the RCA inputs) to select Line input.
- Switch ON your Power Gig unit.
- Slowly turn the Level Volume control clockwise until the CLIP LED indicator begins to blink, then turn it down slightly. T his indicates the maximum input voltage gain is matched and set properly.
- Turn Master Volume up to achieve proper volume.
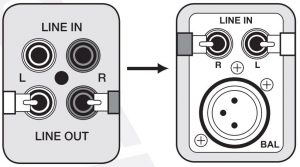
Line Out Balanced Connection.
The RCA jacks marked Line Out allow for daisy chaining of signals from any active speaker to another. Simply connect an RCA to RCA cable from the Line Output of the speaker to the Line Input of the new speaker {Rockville RPG15 featured}. As long as the new speaker has a line output as well, you can continue to add speakers indefinitely.
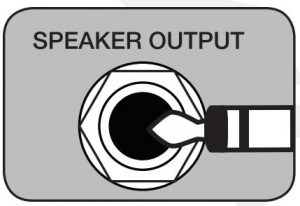
Speaker Output Connection.
The 1/4′ TRS output marked Speaker Output is for connecting the active unit to the passive unit. Passive speaker impedance must always be 8 ohm.
Bluetooth Pairing
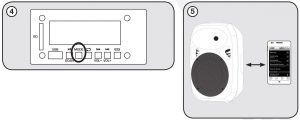
To connect your iPod, iPhone, MP3 player, Android phone or any other Bluetooth capabledevice follow the steps listed below.
- Make sure the Power Gig unit’s power switch is in the ON position .
- Use the push button Oocated above to RCA inputs) and select MP3 input.
- Turn on the Bluetooth feature on your device and ensure that it is in “discoverable” mode.
- Push the Mode button on your Power Gig unit until you are in Bluetooth mode.
- Once in Bluetooth mode, the unit should show up on your device as “RPG122K”. Select it from your list of available devices and you are ready to go.

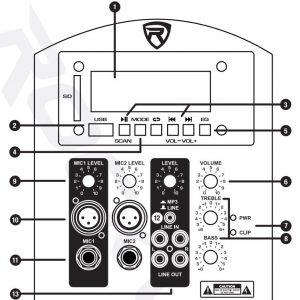
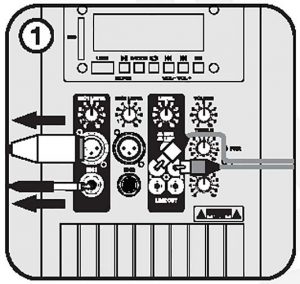
- Display screen.
- use and SD Caret input.
- MP3 Player controls. Previous I Next track buttons also serve as volume controls. For track control quickly press button. For volume control press an hold button. Press Play button once to play track, press again to pause. When in FM radio mode press and hold to scan through.
- Mode control switches between input modes: FM Radio, Bluetooth, USB, and SD/MMC.
- EQ button allows you to toggle between the 5 Presets.
- Master volume
- Power LED indicator and amplifier clip limit LED indicator.
- 2 band equalization control panel.• Bass adjust the low frequencies to +/-6dB.• Treble adjust high frequencies to +/-6dB
- Mic 1 I Mic 2 Level adjustment knobs.
- Mic 1 / Mic 2 line input ports accept XLR connectors.
- Mic 1 / Mic 2 line input ports accept balanced and unbalanced – TRS plugs. When you use an unbalanced- TRS plug, the line input automatically turns the ring into ground.
- Line I MP3 input selector button.
- Pre-Amp RCA input I output jacks.
- Output to passive speaker.
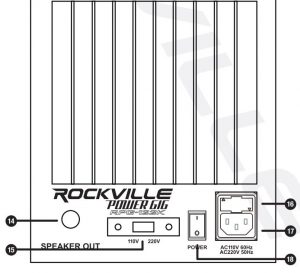
- Voltage selector switch.
- User serviceable fuse.
- IEC AC power socket.
- Power switch.
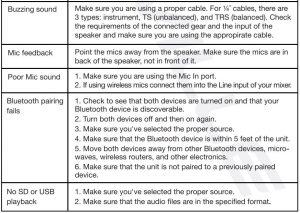
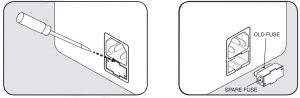
Troubleshooting

Fuse replacement Diagram
FEDERAL COMMUNICATIONS COMMISSION COMPLIANCE INFORMATION
- Responsible party name: Rockville
- Address: 600 Bayview Ave,Entrance A,Inwood, NY 11096
Hereby declares that the product(s) Power Gig RPG122K pro audio speaker system complies with FCC rules as mentioned in the following paragraph:
This device complies with Part 15 of the FCC rules. Operation is subject to the following two conditions: (1) this device may not cause harmful interference, and (2) this device must accept any interference received, including interference that may cause undesired operation.
Note: This equipment has been tested and found to comply with the limits for a Class B digitaldevice, pursuant to Part 15 of the FCC rules. These limits are designed to provide reasonableprotection against hamlful interference in a residential installation. This equipment generates,uses and can radiate radio frequency energy and, if not installed and used in accordance withthe instructions, may cause harmful interference to radio communications. However, there is noguarantee that interference will not occur in a particular installation. If this equipment does causeharmful interference to radio or television reception, which can be determined by turning theequipment off and on, the user is encouraged to try to correct the interference by one or more of the following measures:
- Reorient or relocate the receiving antenna.
- Increase the separation between the equipment and receiver.
- Connect the equipment into an outlet on a circuit different from that to which the receiver is connected.
- Consult the dealer or an experienced radio/Tv technician for help.

RockvilleAudio.comC 2018 ROCKV1UE // Features and specffic:ations are subject to change and or improvement without notice.
Rockville DJ/PA Speaker RPG122K User Manual – Rockville DJ/PA Speaker RPG122K User Manual –
Questions about your Manual? Post in the comments!
[xyz-ips snippet=”download-snippet”]