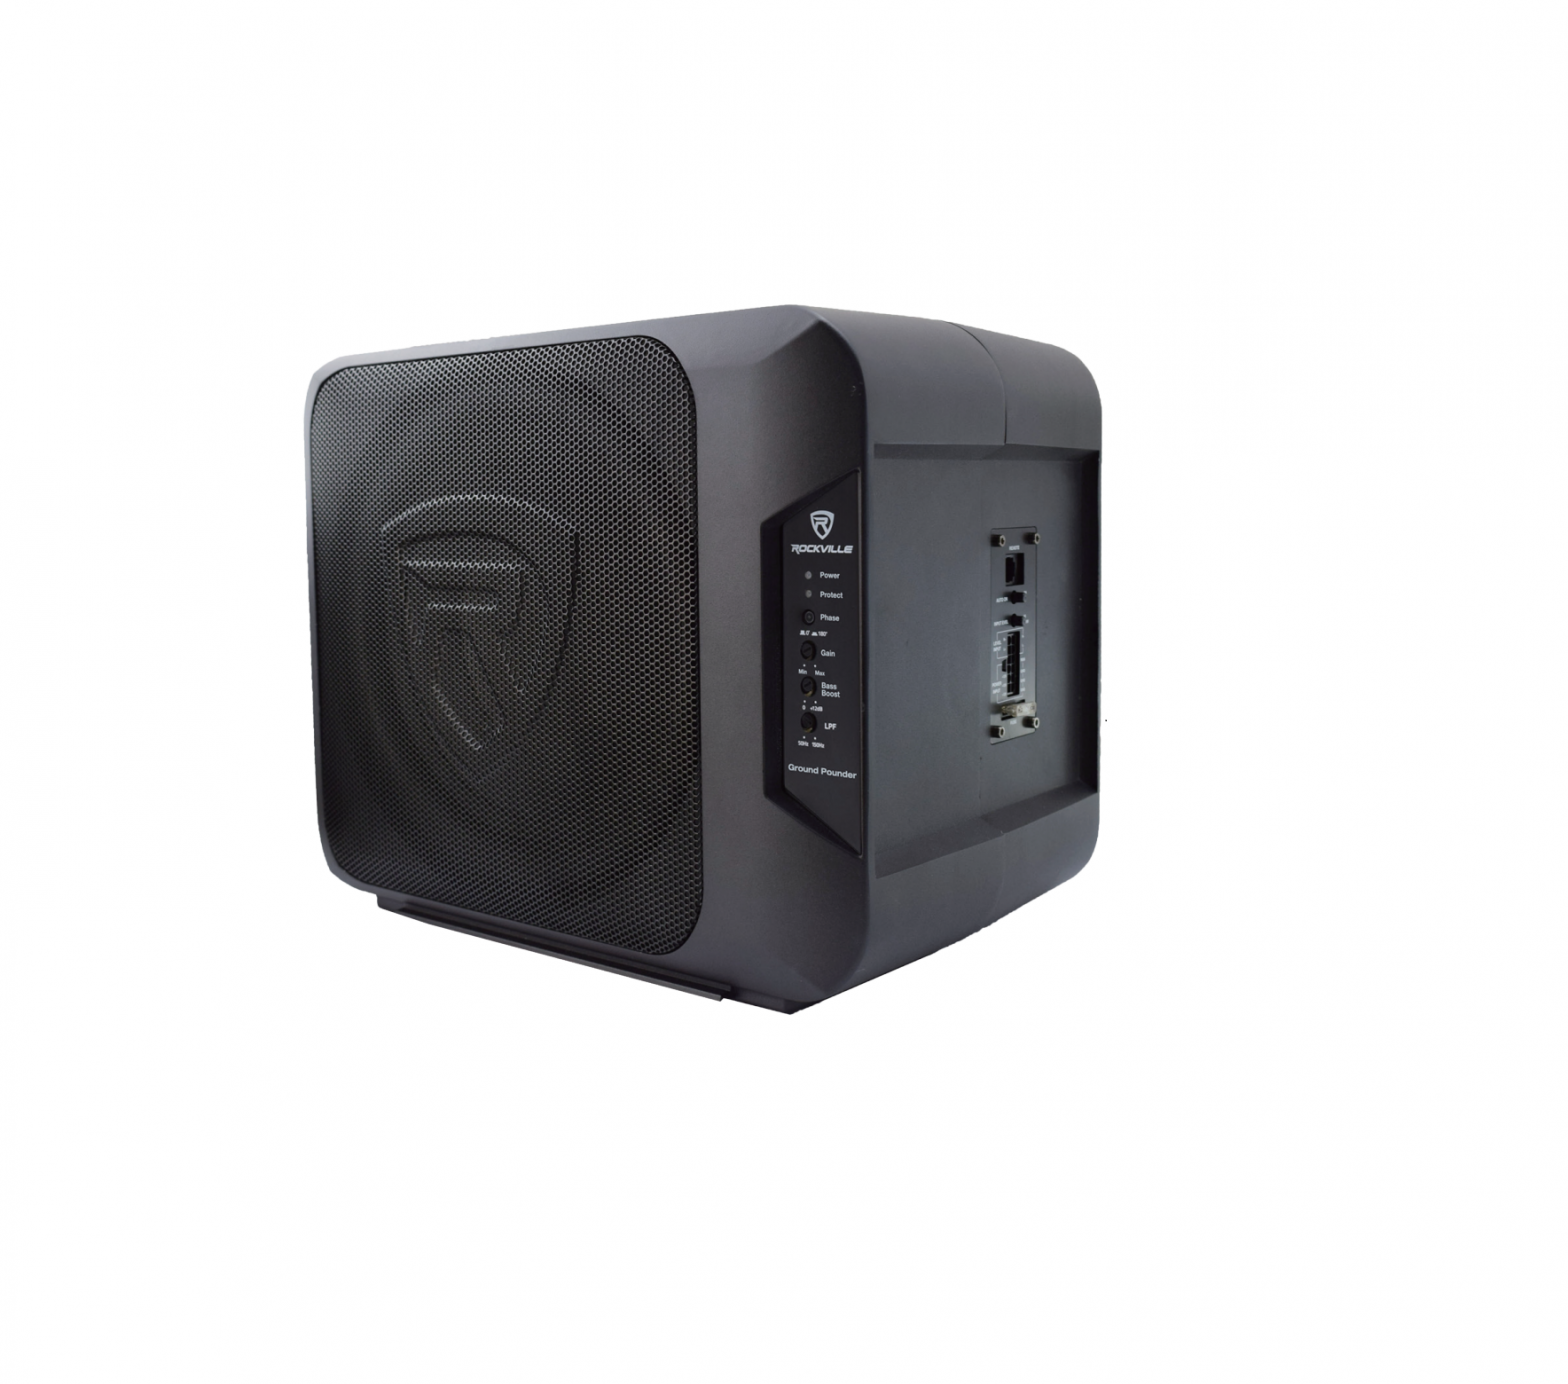
ROCKVILLE Ground Pounder Powered Dual Car Subwoofer
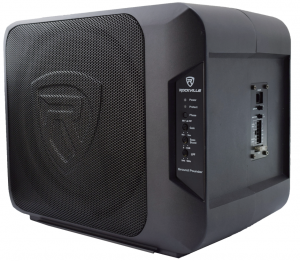
Thank you for purchasing this Rockville Ground Pounder 800W Powered Dual 10″ Car Subwoofer in Aluminum Enclosure. Please read this owner’s manual carefully for proper use of your Ground Pounder. Should you need assistance, please call our technical help line at 1-646-758-0144, Monday through Friday, 9am to 5pm EST.
INCLUDES
- Subwoofer
- Installation mounting bracket
- Warranty card
- Wiring harness
- Hardware connection screws
- Remote w/connector cable
- Manual
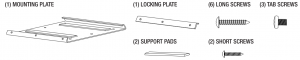
MOUNTING HARDWARE
INSTALLATION
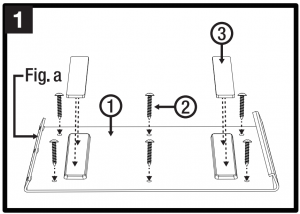
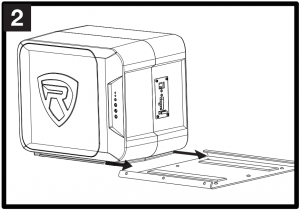
- Choose a convenient location to place the mounting plate (1); preferably the trunk or hatch area of your vehicle. The vertical tab with the screw holes is the front of the plate (fig. a). Keep this in mind when mounting it. Lay down the plate and mark the location of the mounting holes. Remove the plate, drill pilot holes, and secure it to the mounting surface using six long screws (2). Attach the two support pads (3) as indicated. Please note: When mounting the amplifier on the trunk floor, be sure to watch for the gas tank, gas lines, and electrical lines. Do not drill or insert any . screws where they might penetrate the gas tank of your car.

- Slide the enclosure onto the mounting plate and make sure it is properly seated. Remember, the vertical tab with the screw holes represents the front and the enclosure should be placed accordingly.
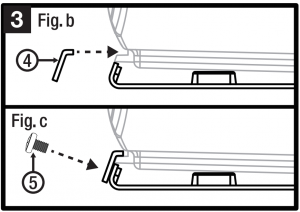
- Use the locking plate (4) to secure the enclosure to the mounting plate. Make sure the horizontal part of the locking plate sits on top of the tab at the bottom of the enclosure (fig. b). Now use the I three tab screws (5) to lock the tab in place and secure the enclosure (fig. c). Do not overtighten the screws.
WIRING HARNESS
A. Right RCA: Gray{+), Grey/Black{-)B. Left RCA: White{+), White/Black{-)C. Power: Red{+ 12)D. Ground: Black {-)E. Remote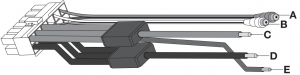
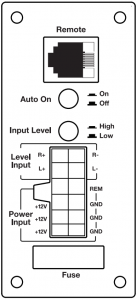
PANEL CONTROLS AND FEATURES
A. Power/Protect LEDs: The 2 LEDs located on the side of the amplifier provide indication of the amplifier status. The blue Power LED will light when the amplifier is receiving proper power, ground, and remote voltage. The red Protect LED will light when the amplifier goes into protection mode.B. Phase Shift: Use this button to help compensate for time alignment issues. These issues usually result from having the subwoofer positioned at a different distance from the listener than the other speakers in the system.C. Input Gain Control: After you’ve installed your system, turn this control to minimum. Turn the headunit on {subwoofer will turn on via the remote connection) and set the volume to 2/3 full level. Slowly turn up the subwoofer input gain control until you hear a small amount of distortion. Now reduce the gain until the distortion is completely gone. The input gain control is now set.D. Bass Boost: This control will increase the sound level of the bass frequencies.E. LPF: This control permits you to define the frequency range you want the subwoofer amplifier to receive. The subwoofer will reproduce all sound below the frequency you set.F. Remote Control Port: Plug in the included remote volume control to independently adjust the subwoofer’s volume level.G. Auto Power-on: The auto power-on function is for high level (speaker level) connections.When the switch is in the “ON” position, the subwoofer will turn on when there is a signal input. If there is no signal input, the subwoofer will automatically turn off. If you prefer to use the remote turn-on function, leave the switch in the “OFF” position.H. Input Level: Use this button to select high level (speaker level) or low level (RCA) input.I. Harness Input Port (audio, remote, and power/ground)J. 25A Fuse: Do not use a fuse with a different value than one provided.
CONNECTIONS
Power Connections
Connect the harness ground wire to the closest point of the vehicle chassis. Make sure that there is no paint or other insulator blocking a good ground connection.Connect the harness power wire to the car battery’s POSITIVE (+) terminal. To protect the battery and electrical systems of your vehicle, add an in-line fuse holder within 1 a~ of the car battery. Runan 8 gauge or heavier cable from the fuse holder to the car battery. This cable should terminate in a large ring terminal connected directly to the POSITIVE(+) terminal.Connect the harness remote wire to the head unit’s remote output using 18 gauge or heavier wire. This connection is responsible for turning the amplifier on and off with the rest of the system. If there is no dedicated remote output, make this connection to the power antenna lead.Should your head unit not have any turn-on leads, you can wire the remote terminal to an accessory lead, which turns the amplifier on with your car’s ignition. Please note, when using this configuration, make sure the AUTO ON button is set to the OFF position (fig. B).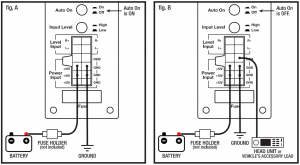
Remote Volume Control
Please note: Install the remote control securely under the dash or in a similar location where using it will not distract the driver.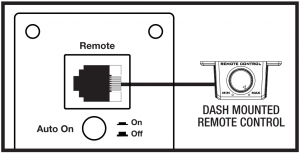
High Level/Low Level Input Wiring
Low Level Input WiringLow-level (RCA) input wiring is preferred for best audio performance. Remote Most trunk or hatchback installations will require a 15-20 feet RCA cable, while pickup trucks and under-seat installations will require a 6-12 feet RCA cable. Always use a high quality cable.
| PLEASE NOTE: In this connection, the Input Level switch is in the LOW position. |
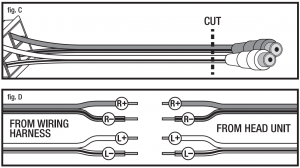
High Level Input WiringThe high level input should only be used when your receiver lacks RCA outputs. If the RCA outputs are not present, begin by cutting the RCA plugs from the wiring harness’ audio input cables (fig. C). Now connect the speaker outputs from the receiver to the harness’ audio input cables (fig. D). Be sure to observe proper polarity to avoid audio phase problems.
| PLEASE NOTE: In this connection, the Input Level switch is in the HIGH position |
FEATURES and SPECIFICATIONS
- Peak Power: 800 Watts
- RMS Power: 200 Watts
- Die-Casting Aluminum Housing
- 10 .5″ Subwoofer
- 10.5″ Passive Radiator Subwoofer
- Single 2 Ohm
- 7 CCAW Voice Coil
- Foam Surround
- Full edge surround gives more surface area to support more excursion and higher SPL
- Subwoofer is integrated into the enclosure rather than being 2 separate units. This is engineered to give you ground pounding bass
- Includes an easy to install bolt-down mounting kit
- Polypropylene Cone
- Polypropylene Dust Cap
- Matte Black Custom Molded Metal Grille
- 55oz Ferrite Magnet
- Class AB Amplifier Produces Amazing Sound Quality
- High Speed MOSFET Power Supply
- Low Level & High Level Inputs
- Auto turn on (on/off selectable)
- Input mode: Select either Low level RCA inputs or High level inputs
- Easily detaches from the mounting kit if you need extra cargo space
- Phase switch: 0 to 180 degrees
- Gain control: 100mV to 4V with line input and 250mV to 10V with speaker level input
- Bass equalizer: from Oto+ 12dB (centered at 50Hz)
- Adjustable crossover frequency: (variable from 50Hz – 12dB/octave)
- Frequency Response: 30Hz – 150Hz
- Sensitivity: 93dB @ 1W 1M
- THD: <1%
- Signal To Noise Ratio: >90dB
- Input sensitivity: Low Level : 0.1 V, High Level: 0.25V
- Power (Blue) & Protect (Red) LED Indicators
- 25A Fuse
- Dimensions (H x W x D): 10. 7· x 13.4″ x 8. 7 4″ (271 x 340 x 222 mm)
TROUBLESHOOTING
| PROBLEM | SOLUTION |
| Unit will not power up |
|
| Protection LED comes on when amplifier is powered up | Turn down the volume control on the head unit to prevent overdriving. Check that there is good air flow around the amp. |
| No Output |
|
| Low Output |
|
| High Hiss in the sound |
|
| Squealing noise is present | Check for improperly grounded RCA interconnects. |
| Distorted sound | Check that the Input Gain control is set to match the signal level of the head unit. |
| Engine noise: Static type |
|
| Engine noise: Alternator whine |
|

RockvilleAudio.com© 2020 ROCKVILLE // Features and specifications are subject to change and or improvement without notice.
[xyz-ips snippet=”download-snippet”]