
ROCKVILLE Guitar Amplifier
Thank you for purchasing this Rockville G-AMP 40 10″ 40-Watt Guitar Amp with Bluetooth. Please read this installation guide carefully for proper use of your G-AMP 40. Should you need assistance, please call our technical help line at 1-646-758-0144, Monday through Thursday, 9am to 10pm EST., and Fridays, 9am to 3pm EST.
Includes
- Guitar amp
- Power cord
- 2-button foot pedal
- Manual
- Warranty card
IMPORTANT SAFETY INSTRUCTIONS
Retain these safety and operating instructions for future reference. Heed all warnings printed here and on the equipment. Follow the operating instructions printed in this owner’s manual.
- Do not open: There are no user-serviceable parts inside. Refer any service work to qualified technical personnel only.
- Power sources: Only connect the unit to mains power of the type described in this user guide or marked on the rear panel. The power source must provide a good ground connection.
- Power cord: Use the power cord with sealed mains plug appropriate for your local main supply as provided with the equipment. If the provided plug does not fit into your outlet, consult your service agent. Route the power cord so that it is not likely to be walked on, stretched, or pinched by items placed on or against it.
- Grounding: Do not defeat the grounding and polarization means of the power cord plug. Do not remove or tamper with the ground connection on the power cord.
- Moisture: To reduce the risk of fire or electrical shock, do not expose the unit to rain or moisture or use in damp or wet conditions. Do not place containers of liquid on it as they may spill into any openings.
- Heat: Do not locate the unit in a place close to excessive heat or direct sunlight as this could be a fire hazard. Locate the unit away from any equipment that produces heat such as power supplies, power amplifiers, and heaters.
- Environment: Protect from excessive dirt, dust, heat, and vibration when operating and storing. Avoid tobacco ash, drink spillage, and smoke especially that associated with smoke machines.
- Handling: Protect the controls from damage during transit. Use adequate padding if you need to ship the unit. To avoid injury to yourself or damage to the equipment, take care when lifting, moving, or carrying the unit.
- Servicing: Switch off the equipment and unplug the power cord immediately if it is exposed to moisture or spilled liquid, if the power cord or plug becomes damaged during a lightning storm, or if smoke odor or noise is noted. Refer servicing to qualified technical personnel only.
Functions
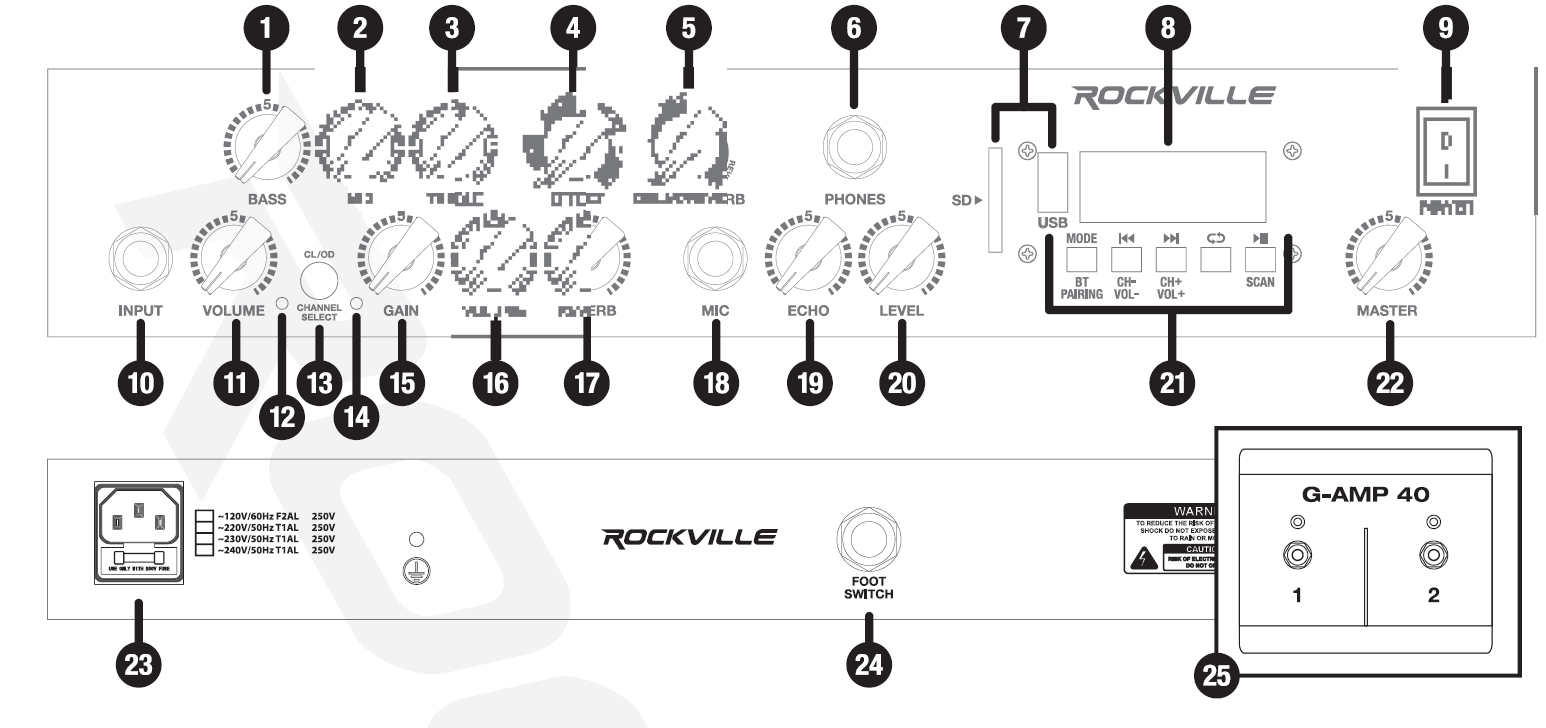
- Bass: Adjusts low frequencies to enhance the instrument’s bass or bottom end tones.
- Mid: Adjusts midrange frequencies to control the instrument’s definition and voice.
- Treble: Adjusts high frequencies to enhance the instrument’s clarity and brightness.
- Effect: There are four effects: chorus, flanger, phaser, and tremolo. Turning the knob clockwise through each effect will increase the speed and depth of the effect.
- Delay/Reverb: use to select and set the level of delay or reverb. When using Delay, turning the knob clockwise will increase the time between repeats of the delay effect. When using the digital reverb, turning the knob clockwise will increase the “size” and “tail” of the reverb effect.
- Phones: Connect headphones with a ¼” jack. Connecting headphones will disable speaker output.
- SD and USB inputs
- Display screen
- Power switch
- Input: ¼” jack used to connect your instrument. Be sure to use a high-quality cable to help prevent noise interference. We recommend the Rockville RCGT series ¼” to ¼” guitar/instrument cables.
- Volume: Controls the volume level of the Clean channel.
- Clean mode indicator LED (green)
- Channel select: Press to select Clean or Drive mode.
- Drive mode indicator LED (red)
- Gain: Adjusts the gain level when Drive mode is selected.
- Volume: Controls the volume level of the Drive channel.
- Reverb: Adjust the spring reverb level for both the clean and overdrive channels.
- Mic: Use this ¼” jack to connect a microphone.
- Echo: Use to set the level of the echo effect applied to the microphone.
- Level: Adjusts the mic volume.
- MP3 module: Mode/BT Pairing: Press to cycle through modes or innitiate BT-pairing. CH-/CH+ – VOL-/VOL+ -◄/►H: In USB/SD and FM radio mode, press to select tracks or saved stations. Press and hold to adjust volume in both modes.Repeat: Press to repeat folder, current track, random, and all tracks.Play/Pause/Scan: Press to play and pause playback in USB/SD and BT modes. In FM mode, press and hold to scan and save all available stations.
- Master volume: Adjusts the output level of both channels.
- IEC power socket with user-serviceable fuse
- Foot switch input
- Foot switch: Use button 1 to switch between Clean and Drive channels. Use button 2 to activate or deactivate Spring Reverb.
Bluetooth
- Press the Mode button to enter Bluetooth-pairing mode.
- Ensure your device is in Bluetooth mode and discoverable.
- Under list of available devices search for and select G-AMP 40.
- The unit will automatically connect to the last paired device.
- Playback can be controlled from your device or the G-AMP 40.
Please note: There are three ways to adjust the volume during BT playback: from your device, using the VOL-NOL+ button on the MP3 module, or using the Master volume knob. If there is no sound during BT playback, be sure to check and adjust all three volume controls accordingly.
FM Radio
- Press the Mode button to enter FM Radio mode.
- Press and hold the Play/Pause button to search for and automatically save all available stations.
- Press the CH-/CH+ buttons to navigate saved stations. This unit does not allow manual tuning.
- Press and hold the VOL-NOL+ buttons to adjust the volume. The volume can also be adjusted via the Master volume knob. If there is no sound, be sure to check and adjust both volume controls accordingly.
Features
- 40 watts RMS power
- 10-speaker
- LED status indicators (green = clean, red = overdrive)
- Built-in Bluetooth so you can play a song and jam along
- USB and SD card playback are also perfect for playing and jamming along
- 2-button footswitch for Clean/Drive selection and Spring Reverb on/off
- Power requirements:120V AC 60Hz
Federal Communications Commission Compliance Information Responsible party name: RockvilleAddress: 600 Bayview Ave.Entrance A Inwood, NY 11096
Hereby declares that the product G-AMP 40 guitar amplifier complies with FCC rules as mentioned in the following paragraph:
This device complies with Part 15 of the FCC rules. Operation is subject to the following two conditions: (1) this device may not cause harmful interference, and (2) this device must accept any interference received, including interference that may cause undesired operation.
Note: This equipment has been tested and found to comply with the limits for a Class B digital device, pursuant to Part 15 of the FCC rules. These limits are designed to provide reasonable protection against harmful interference in a residential installation. This equipment generates, uses, and can radiate radio frequency energy and, if not installed and used in accordance with the instructions, may cause harmful interference to radio communications. However, there is no guarantee that interference will not occur in a particular installation. If this equipment does cause harmful interference to radio or television reception, which can be determined by turning the equipment off and on, the user is encouraged to try to correct the interference by one or more of the following measures:
- Reorient or relocate the receiving antenna.
- Increase the separation between the equipment and receiver.
- Connect the equipment to an outlet on a circuit different from that to which the receiver is connected.
- Consult the dealer or an experienced radio/TV technician for help.
![]()
[xyz-ips snippet=”download-snippet”]