
ROCKVILLE PPA50 Pro 1U Rack Mount Pre-Amplifier Owner’s Manual
PPA5OPRO 1U RACK MOUNT PRE-AMPLIFIERw/BLUETOOTH, USB, & PC INTERFACE
Thank you for purchasing this Rockville PPA50 Rack Mount Pre-Amplifier. Please read this installation guide carefully for proper use of your PPA50. Should you need technical assistance, please call our technical help line at 1-646-758-0144, Monday through Friday, 9am to 5pm EST.
IMPORTANT SAFETY INSTRUCTIONS

- To reduce risk of electric shock, never open the unit. There are no user-serviceable parts; refer service to an authorized service center.
- Do not expose this unit to any kind of moisture.
- Please ensure that the unit is situated in a properly ventilated area.
- Make sure the unit is placed on a level and stable surface.
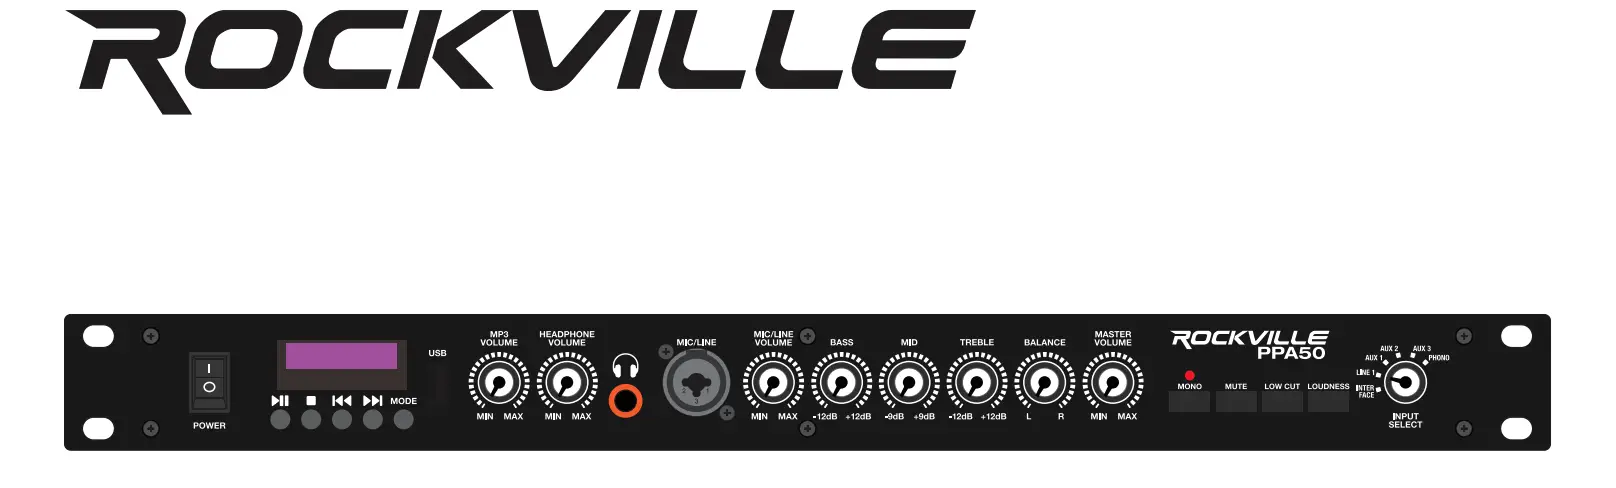
Functions

- Power switch
- MP3 Player:Play/Pause: press to begin audio playback. During playback, press to pause and press again to resume.Stop: press to stop playback.Previous: press to go to the previous track.Next: press to go to the next track.Mode: use to switch between USB and Bluetooth input
- USB input (MP3, WMA, and WAV files. Drives must be formatted as FAT or FAT 32)
- MP3 volume: adjusts volume of USB or Bluetooth input.
- Headphone volume control: adjusts volume of the headphone output.
- 1/4″ Headphone output
- XLR and 1/4″ Combo Mic/Line input
- Mic/Line volume: adjust the volume of the mic/line input.
- 3-band EQ: used to adjust the relative level of low, mid, and high frequencies.
- Balance: adjusts the level of the left and right channels. The 12 o’clock position is the point of equal balance.
- Master volume: controls the overall volume of the unit.
- Mono/Stereo switch: when the unit is in Mono mode (LED will be lit) the two stereo channels are blended together to produce monophonic sound. This blend minimizes rumble and surface noise in old monophonic records. Push the button a second time (LED goes out) to get back to stereo.
- Mute switch: pushing this button reduces the volume of the amplifier output signal by approximately 20 dB. Please note that muting has no effect on the Mic/Line input volume.
- Low cut switch: allows you to cut off frequencies below 40Hz.
- Loudness switch: controls the loudness compensation circuit, which at low-to-medium volume boosts the treble response.
- Input selector switch: allows user to select between INTERFACE, LINE 1, AUX1, AUX2, AUX3, and PHONO inputs.
- Rack ears: allows for unit rack mount using four attaching screws and washers (not included).
- (1) RCA PHONO input
- (3) RCA AUX inputs
- L/R 1/4″ Line inputs
- USB Interface
- L/R XLR outputs
- DC 12V power input
Operation
Bluetooth Pairing and Operation
- Press the MODE button until you see “bt” flashing on the display. The unit will automatically enter into pairing mode.
- Ensure that your device is in Bluetooth mode and discoverable.
- Find “ROCKVILLE” on your device’s list of available Bluetooth connections and select it.
- Once successfully paired, the word “bt” will stop flashing and remain solid.
- You can control playback from your device or you can use the MP3 controls.
Please note: input from the USB port will override Bluetooth input.
USB Interface
The PPA50 features a USB computer interface. It will work with any DAW such as Pro Tools or Ableton live. You can record the final mix into one stereo channel in Pro Tools or any other DAW. Anything being played through the pre-amp will be recorded including the microphone input, as well as any source you are playing. It will be summed to one stereo channel in your DAW. You can also use Ableton live or any other software to play music as an input device on the preamp. So the interface is 2-way and you can use it as an input playback device or as an output recording device.
To engage the interface, set the input selector switch to INTERFACE. If you are doing a live event, you can record the mixed output to your DAW. If you want to record guitar or vocals, you can connect your mic or instrument to the combo jack and then the interface to your computer. There are a couple of options when doing this, depending on what the input selector is set to. When the input is set to the USB interface, the PPA50 will record your instrument/voice in addition to whatever is playing from your DAW. It will be summed to one stereo track. You should note that if you want to monitor your mix, you will need to plug your headphones into your laptop or use external monitors. Alternatively, you can set the input source to an input that is inactive, and you will be able to record your instrument/voice onto its own separate track. Another really cool thing you can do is play a song using aux or Bluetooth and plug a mic or instrument into the combo jack and record the final mixed track into your DAW in real time!
USB Operation
Inserting a USB flash drive into the USB port will set the PPA50 to USB mode and it will automatically begin to play music. The unit accepts MP3, WMA, and WAV files. Drive must be formated as FAT or FAT 32.
Features
- Rockville PPA50 Preamp Pro 1U Rack Pre-Amplifier w/Bluetooth/USB/PC Interface
- Top of the line professional preamp with low noise and high sound quality
- Built-in reliable Bluetooth audio playback with long range
- Built-in USB/computer interface allows you to record the master output to your DAW or to play songs from your favorite software on your computer
- Built-in USB MP3 player (accepts MP3, WMA, and WAV files. USB drive must be formatted as FAT or FAT32)
- (3) RCA aux inputs
- (1) RCA Phono Input
- (1) XLR and 1/4″ Combo jack front mic/line input
- (2) Inputs (mono or stereo)
- (2) XLR outputs (stereo or mono)
- 1U rack mount size
- Built-in 3-band equalizer (bass, mid, treble)
- Left/Right balance adjustment
- Mono/Stereo selectable
- Mute
- Low-cut crossover filter: cuts off frequencies below 40Hz.
- Headphone output for listening or monitoring
- Loudness compensation circuit which boosts the bass and treble response at low-to-medium volume
- 100-240V worldwide voltage power adaptor
Specifications
General
- Frequency Response: 5Hz – 30kHz +0, -3dB
- Bass: ±12dB at 100Hz
- Midrange: ±9dB at 1 Hz
- Treble: ±12dB at 10kHz
- Mute: -20dB
- Power: 100V/240V, 50/60Hz Worldwide voltage power adapter
- Power Consumption: 15W
Impedance
- Mic: 1mV/3Kohms
- PHONO: 3mV/47K ohms
- Pre Output: 150mV/22K ohms
Total Harmonic Distortion
- Mic: <0.02%
- PHONO: <0.04%
- RCA Aux: <0.01%
Signal to Noise Ratio
- Mic: >70dB
- PHONO: >90dB
- RCA Aux: >100dB
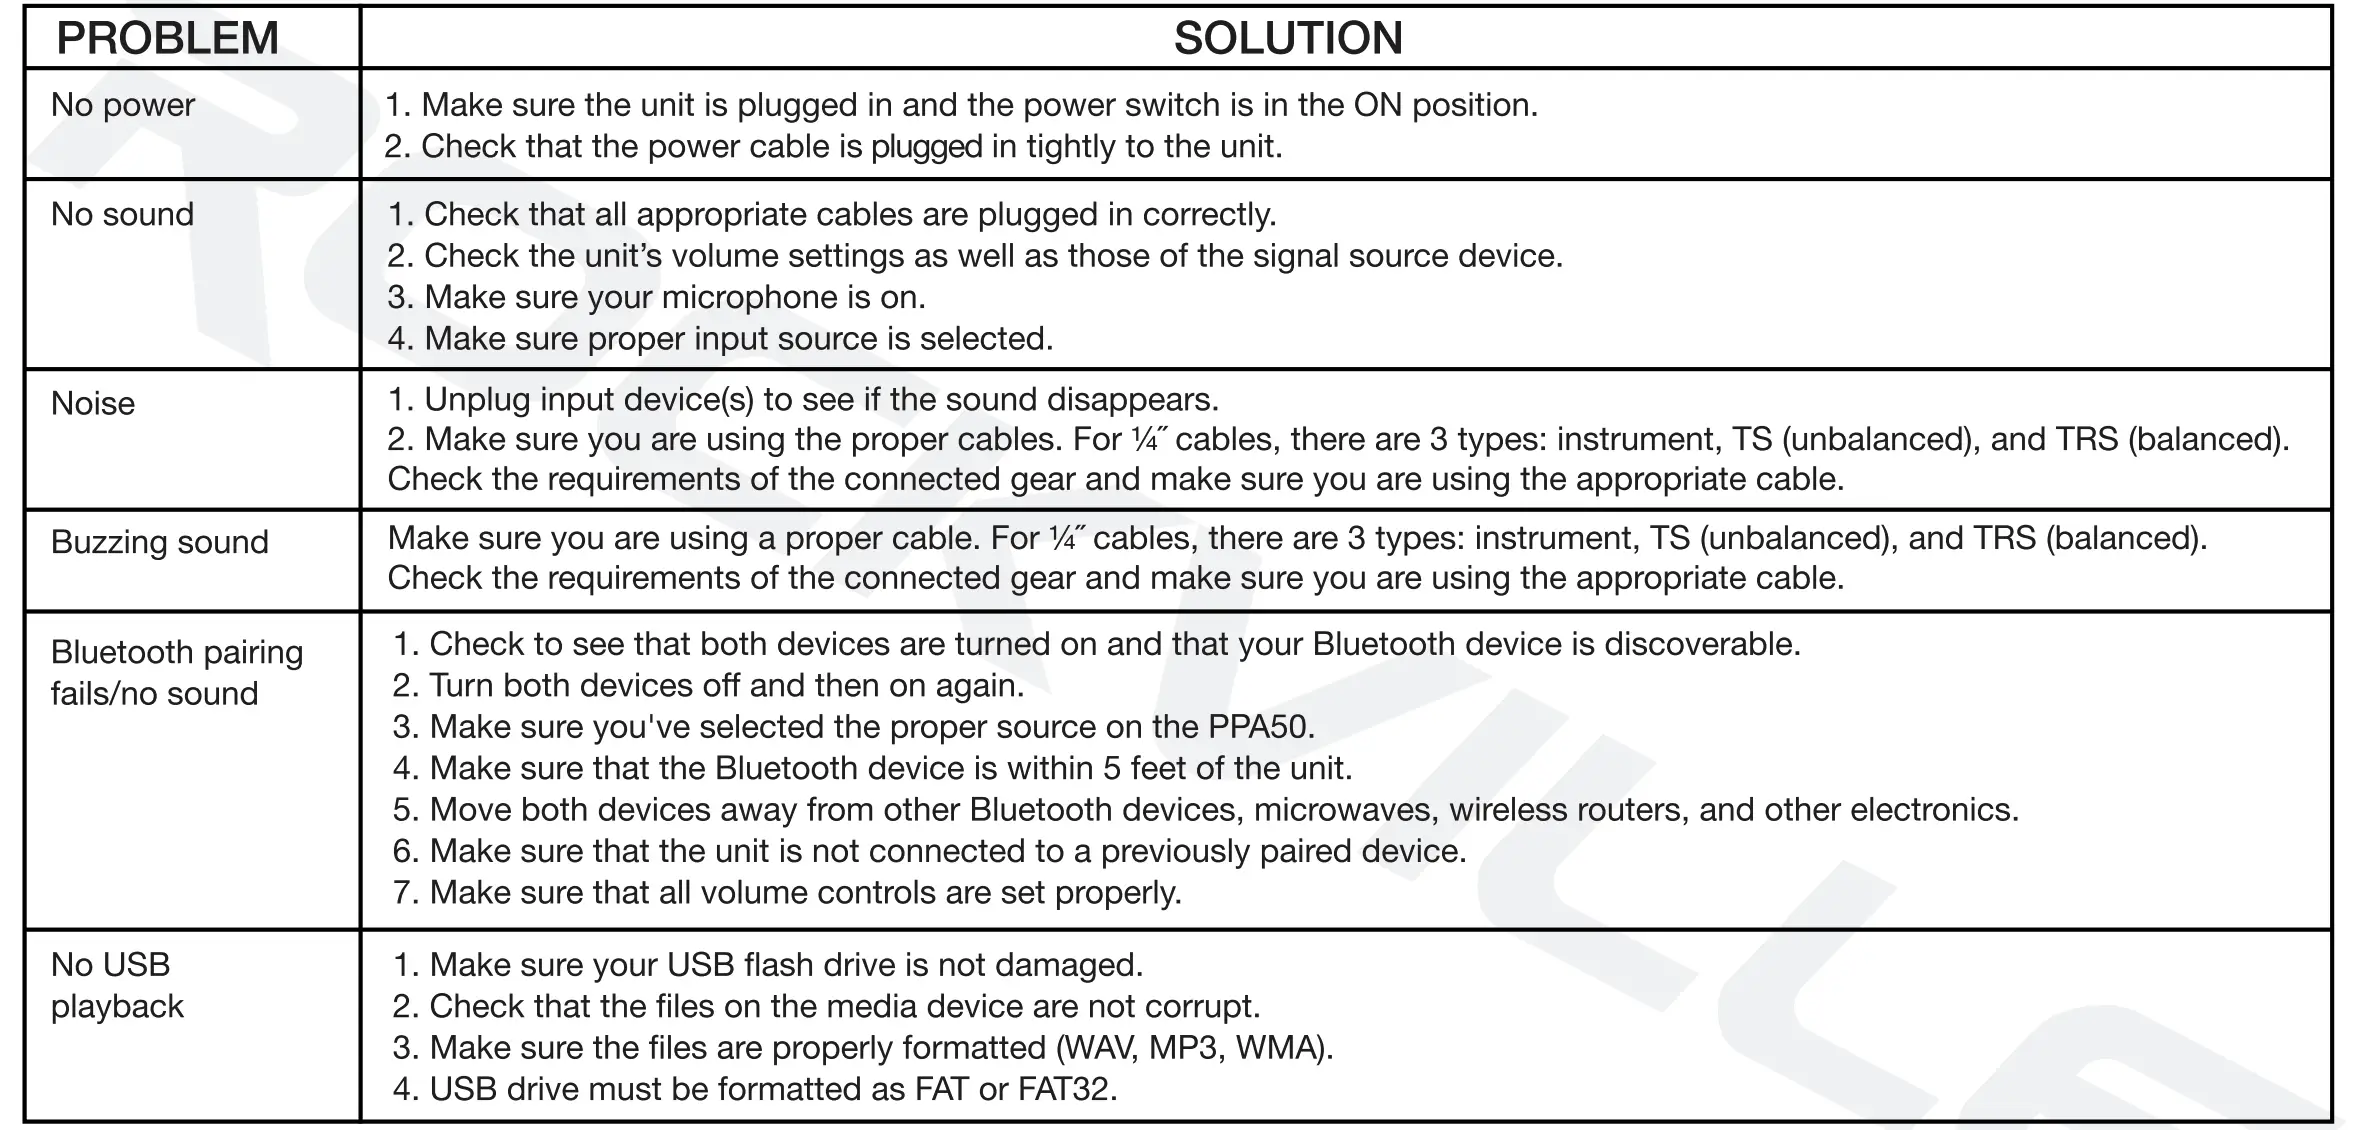
Troubleshooting
FEDERAL COMMUNICATIONS COMMISSION COMPLIANCE INFORMATION
Responsible party name: Rockville
Address: 600 Bayview Ave. Entrance A Inwood, NY 11096
Hereby declares that the product PPA50 Rack Mount Pre-Amplifier complies with FCC rules as mentioned in the following paragraph:
This device complies with Part 15 of the FCC rules. Operation is subject to the following two conditions: (1) this device may not cause harmful interference, and (2) this device must accept any interference received, including interference that may cause undesired operation.
Note: This equipment has been tested and found to comply with the limits for a Class B digital device, pursuant to Part 15 of the FCC rules. These limits are designed to provide reasonable protection against harmful interference in a residential installation. This equipment generates, uses, and can radiate radio frequency energy and, if not installed and used in accordance with the instructions, may cause harmful interference to radio communications. However, there is no guarantee that interference will not occur in a particular installation. If this equipment does cause harmful interference to radio or television reception, which can be determined by turning the equipment off and on, the user is encouraged to try to correct the interference by one or more of the following measures:
- Reorient or relocate the receiving antenna.
- Increase the separation between the equipment and receiver.
- Connect the equipment to an outlet on a circuit different from that to which the receiver is connected.
- Consult the dealer or an experienced radio/TV technician for help.
![]()
RockvilleAudio.com
 report this ad
© 2020 ROCKVILLE // Features and specifications are subject to change and or improvement without notice.
[xyz-ips snippet=”download-snippet”]