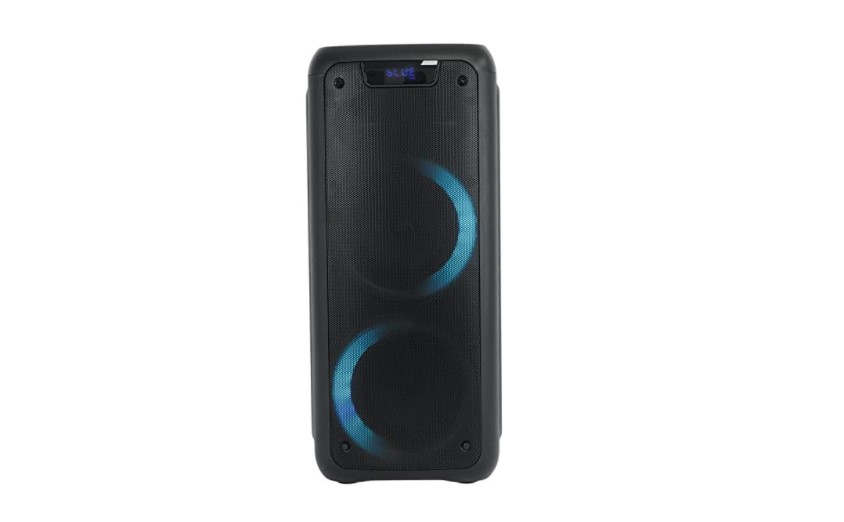
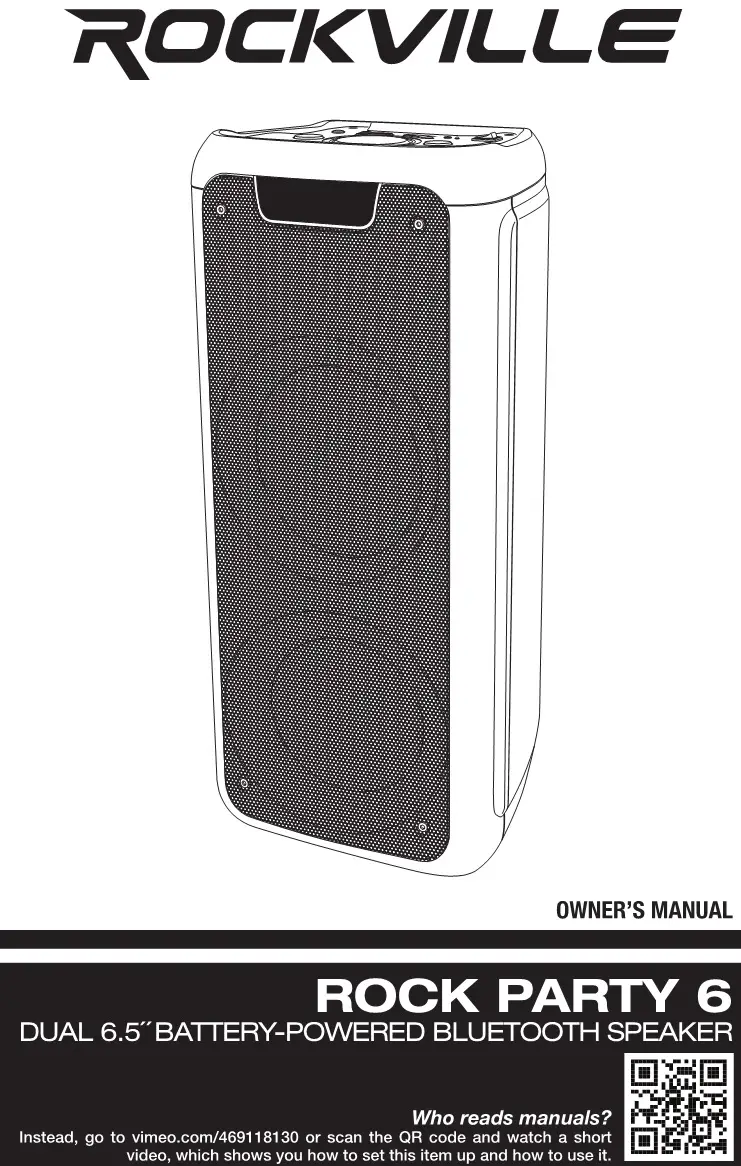
ROCKVILLE Rck Party 6 Dual 6.5 Battery-Powered
Bluetooth Speaker Owner's Manual
![]()
Thank you for purchasing this Rockville ROCK PARTY 6 6.5″ Battery-Powered Bluetooth Speaker. Please read this owner’s manual carefully for proper use of your ROCK PARTY 6. Should you need assistance, please call our technical help line at 1-646-758-0144, Monday through Friday, 9am to 5pm EST.
Included
- (1) Dual 6.S- Battery-Powered Bluetooth Speaker
- Remote control
- Power Adapter
- Owner’s Manual
- Warranty
IMPORTANT SAFETY INSTRUCTIONS

- To reduce risk of electric shock, never open the unit. There are no user-serviceable parts, refer service to an authorized Rockville service center.
- Do not expose this unit to any kind of moisture.
- Make sure the unit is placed on a level and stable surface.
How to Avoid Irritating Feedback
The placement of your microphone is critical in avoiding feedback through your Rock Party 6 speaker. Never set up your microphone in front of the speaker. Always set up your microphone behind the speaker. When approaching the speaker to make any adjustments, we recommend approaching the speaker from the rear and not walking directly toward the front of the speaker.

Functions
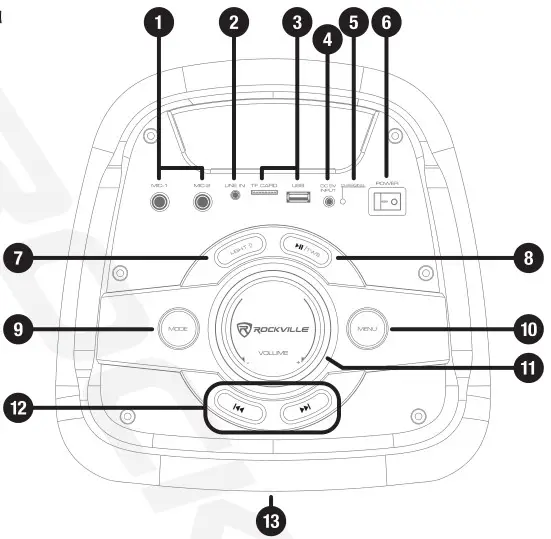
- ¼- Unbalanced microphone inputs. Please note: We recommend using professional unbalanced dynamic mics as they are least likely to be affected by interference. Low cost, high impedance mics can be used, however the level of background noise is higher since an unbalanced circuit is far more susceptible to interference.
- 3.5mm AUX input
- USB/SD input ports
- DC 9V power input
- Charge indicator LED
- Power button
- Light: Press the button to turn on the LEDs. Press the button again to cycle through the 7 LED colors. Press and hold to cycle through the available modes (see page 6). After selecting your mode, pressing the button again will turn off the LEDs.
- Play/Pause button: Press the button to pause or resume audio playback in USB/SD and Bluetooth mode. Press and hold to activate TWS function (see page 3) .
- Mode button: Press to switch between input modes: Bluetooth, USB/SD, and AUX input.
- Menu button: Press to access bass, treble, and mic volume controls.
- Master volume
- Previous/Next buttons: During USB/SD and Bluetooth playback, use these buttons to move to the previous or next track.
- LED display (on the front of the unit)Remote Control
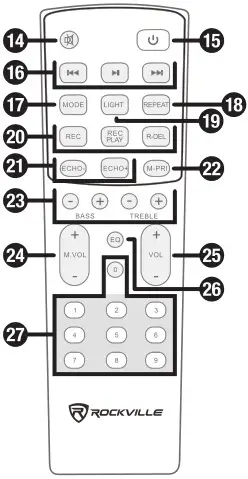
- Mute
- Stand-by
- Playback controls: I◄◄ – press to select previous track, ►II – press to start or pause playback, ►►I – press to select next track.
- Mode (see item 9 on page 2)
- Repeat: Press once to repeat single song, press twice to repeat all songs.
- Light (see item 7 on page 2)
- Record functions: REC – allows for recording of input from wired mics connected to the speaker.REC PLAY – use this button to play back any recordings made using the record button.R-DEL – press this button to delete recordings.Please note: Recordings are saved to USB drive or SD card connected to the unit.
- Echo-/Echo+: Use these buttons to adjust the mic echo effect.
- M-PRI: Press this button to activate or deactivate mic priority function. When activated, this function will lower the music level while the mic is being used.
- Bass/Treble +/- : Use these buttons to adjust bass and treble levels.
- Mic Vol+ Vol-: Use to adjust the mic input volume.
- Vol+ Vol-: Use to adjust the speaker’s volume.
- EQ : Press to select preset EQ curves: Pop, rock, jazz, classic, flat.
- Number pad: Use the number pad to directly select tracks in USB or SD mode.
Operation
TWS
The Rock Party 6 features true wireless stereo (TWS) Bluetooth linking. This means you can purchase two of these speakers and link them together to play in stereo wirelessly.
- Make sure both speakers are within 50 feet (15m) of each other. Turn both speakers ON. Press the Pause/Play/TWS button on both of the speakers. The word “SLAU” should appear on the LED screens and they should connect automatically.
- Go to your phone’s Bluetooth interface and select “Rock Party 6” from the list of available devices. The unit that your device connects to will be the primary unit (left speaker). The other speaker will be the secondary (right speaker).
- The primary unit will control all playback functions.
- To terminate TWS mode, press and hold the Pause/Play/TWS button on both units. Please note: in TWS mode, mic priority will not work and each speaker’s light mode must be set separately.
Bluetooth
To connect your iPod, iPad, iPhone, MP3 player, Android phone or tablet, or any other Bluetooth-capable device, follow the steps listed below.
- Make sure the speaker is ON.
- Press the MODE button on the unit or the remote control until you are in Bluetooth mode. The word “bLUE” will appear on the LED readout and will flash intermittently.
- Turn on the Bluetooth feature on your device and ensure that it is discoverable. Look for and select “Rock Party 6” from the list of available devices.
- Upon successful pairing, the word bLUE will stop flashing.
- Use the PLAY/PAUSE button to pause and resume playback.
- Use the PREVIOUS/NEXT buttons for track selection.
- Use the master VOLUME knob to set the volume level.
Microphone
You can connect two wired mics (not included) via the¼ ” unbalanced MIC IN ports located on the top of the unit. There is an independent mic volume control and an echo effect control on the remote. To connect wired mics, follow the procedure below.
- Make sure the speaker is OFF.
- Plug your microphone(s) into either of the ¼” mic inputs (MIC 1 or MIC 2) .
- Set the MIC VOL to the lowest setting.
- Set the master VOLUME to the lowest setting.
- Turn the speaker ON .
- Slowly adjust the MIC VOL until you’ve reached the desired level.
- Adjust the master VOLUME as needed.
Always stand behind the unit when using microphones so as to avoid feedback.
Recording Microphone Input
The Rock Party 6 can record all microphone input to a USB drive. Simply press the REC button on the remote control while using the microphone(s). To play back your recording, press the REC PLAY button on the remote control. To delete the recording, press the R-DEL button.
USB/SD
The built-in media player allows you to play MP3 files. To access this function, follow the steps below. USB drive or SD card input will override AUX input.
- Make sure the speaker is ON .
- Insert a USB flash drive or SD card into the corresponding port. Music should begin playing automatically.
- Use the PLAY/PAUSE button to pause and resume playback.
- Use the PREVIOUS/NEXT buttons for track selection.
- Use the master VOLUME knob to set the volume level.
Please note: the unit can accept SD cards and USB drives with a max capacity of 32GB. Accepted formats are MP3, WMA , WAV, and FLAC.
AUX
This 3.5mm jack allows for input from smartphones, MP3 players, CD players, or any other signal source with a 3.5mm jack or RCA outputs. Please note: you will need a 3.5mm-to-3 .5mm cable or an RCA-to-3.5mm cable (not included).
- Make sure the speaker is OFF.
- Set the master VOLUME to the lowest setting.
- Connect signal source to the 3.5mm AUX input.
- Turn the speaker ON .
- Set the master VOLUME to the desired level.
Battery Operation and ChargingTo use the internal battery, first ensure that the battery is fully charged (see the charging procedure below).
To charge the battery:
- Turn the speaker off.
- Plug in the external power supply to the charging port located at the top of the unit.
- The battery will begin to charge automatically and the LED indicator next to the charging port will be orange.
- Once the battery is fully charged, the LED indicator will be green.
Please note: You can use the speaker while it is charging. Charging time is 5 hours. The battery will last 3 hours at high volume and 8 hours at low volume.
Features and Specifications
- 200W Peak power
- 1 DOW Program power
- 50W Continuous RMS power
- Rechargeable speaker can last 3-8 hours per charge depending on volume
- Built-in Bluetooth 5.0 audio streaming (up to 66 feet)
- Built-in TWS (true wireless stereo) technology for linking of two speakers
- USB input (32GB)
- TF card input (32GB)
- Two high-power, long-throw dual 6S woofers with 1″ tweeter
- 7.4V/3600mAh Lithium battery
- Rechargeable battery lasts about 8 hours on low volume, about 3 hours on high volume
- Two ¼” mic inputs with mic volume control
- 3.5mm aux input
- Rotary volume control
- Echo control, bass control, treble control
- Ported enclosure for enhanced bass response
- Carry handle for easy portability
- Preset equalizer curves (Pop, Rock, Jazz, Classic, Flat)
- Light modes: off, rotate to the beat, blinking to the beat, spectrum analyzing to the beat
- Selectable colors in each mode: Red, yellow, green, light blue, dark blue, purple, pink, and white.
- LED display
- Class D amplifier
- Record function: Record microphone output onto a USB drive or an SD card
- Unit weight: 11.79Ibs.
- Unit dimensions: 9.84″ x 9.52″ x 22.83″
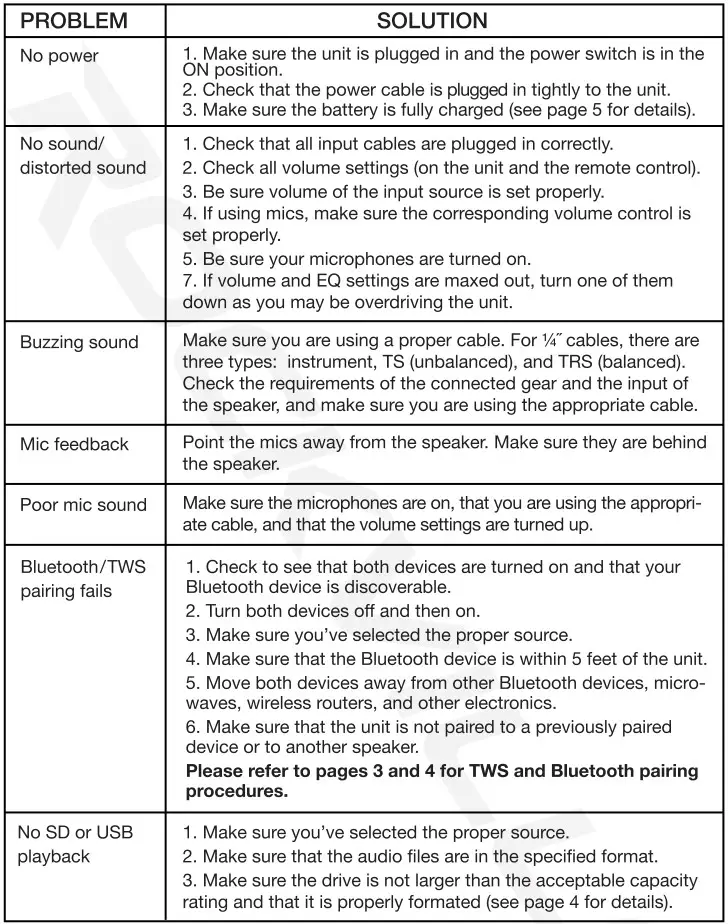
Troubleshooting
FEDERAL COMMUNICATIONS COMMISSION COMPLIANCE INFORMATION
Responsible party name: Rockville
Address: 600 Bayview Ave. Entrance A, Inwood, NY 11096
Hereby declares that the product Rock Party 6 complies with FCC rules as mentioned in the following paragraph:
This device complies with Part 15 of the FCC rules. Operation is subject to the following two conditions: (1) this device may not cause harmful interference, and (2) this device must accept any interference received, including interference that may cause undesired operation.
Note: This equipment has been tested and found to comply with the limits for a Class B digital device, pursuant to Part 15 of the FCC rules. These limits are designed to provide reasonable protection against harmful interference in a residential installation. This equipment generates, uses and can radiate radio frequency energy and, if not installed and used in accordance with the instructions, may cause harmful interference to radio communications. However, there is no guarantee that interference will not occur in a particular installation. If this equipment does cause harmful interference to radio or television reception, which can be determined by turning the equipment off and on, the user is encouraged to try to correct the interference by one or more of the following measures
- Reorient or relocate the receiving antenna.
- Increase the separation between the equipment and receiver.
- Connect the equipment into an outlet on a circuit different from that to which the receiver is connected.
- Consult the dealer or an experienced radio/TV technician for help.

© 2020 ROCKVILLE // Features and specifications are subject to change and/or improvement without notice.
[xyz-ips snippet=”download-snippet”]

