![]()
![]()
RCS350-619″ RACK MOUNTABLE 350 WATTCOMMERCIAL AMPLIFIER/RECEIVEROWNER’S MANUAL
WHO READS MANUALS?Instead, go to vimeo.com/342145237 or scan the QR code and watch a short video, which shows you how to set this item up and how to use it.
If you prefer written instructions please read ahead!With Rockville we offer many options. https://vimeo.com/342145237
Missing items? If you ordered a bundle that includes more than one product and you are missing part of your bundle then it just means your order shipped from two different warehouses. You will receive the remaining items very soon. If you have any concerns or inquiries, feel free to call our customer support center at 646-758-0144, Monday through Thursday, 9am to 10pm EST, and Fridays, 9am to 3pm EST.
Thank you for purchasing this Rockville product. Please read this installation guide carefully for proper use of your Rockville RCS350-6 Rack Mountable Commercial Amplifier/Receiver. Should you need tassistance please call our technical help line at 1-646-758-0144, Monday through Thursday, 9am to 10pm EST., and Fridays, 9am to 3pm EST.
IMPORTANT SAFETY INSTRUCTIONS

TO REDUCE THE RISK OF ELECTRICAL SHOCK, NEVER OPEN THE UNIT. NO USER SERVICEABLE PARTS INSIDE. WE RECOMMEND TAKING THE UNIT TO A QUALIFIED SERVICE TECHNICIAN FOR ANY REPAIRS.
- Do not expose this unit to any kind of moisture.
- Please ensure that the unit is situated in a properly ventilated area.
- Do not attempt to operate this unit if the power cord has been frayed or broken.
- Do not attempt to break off or remove the ground prong. This prong is used to reduce the risk of electrical shock and fire in case of an internal short.
- Do not operate this unit if it is damaged.
- This unit is intended for indoor use only.
- During long periods of non-use, disconnect the unit from power source.
- Always mount this unit in a safe and stable manner.
- Power supply cords should be routed so that they are not likely to be walked on or pinched by items placed upon or against them, paying particular attention to the point of exit from the unit.
- To avoid unnecessary wear and to improve the unit’s lifespan, unplug the unit when not in use for extended periods of time.
Introduction
Rockville is proud to introduce our new RCS series of products. The RCS350-6 is a 350-Watt 6-zone rack mountable digital hybrid amplifier/receiver. This amplifier is capable of 70-volt, 100-volt, 8-ohm, and 4-ohm applications. This makes it perfect for use in a restaurant/bar/café/lounge/ school/conference room or any other setting where many speakers are needed.This model offers 350 watts at 70-volt or 100-volt and the power can be split up into 6 zones. (Most professionals recommend you not exceed 80% of the amp power, so we recommend your speakers’ watts not to be more than 270 280 in total on the taps.) Each zone can have the power split as you please. For example, you can put all 270 280 watts into one zone with one volume control. You can also have zone 1 with 100 watts, zone 2 with 60 watts, and the rest of the zones with 120 watts. Just add the total watts up to be under 270 280 and you are OK. No complex wiring required like with 8-ohm systems.With 3 mic inputs; 2 of which have echo control (Mic 2 and Mic 3), you can use this amplifier for announcements, speeches, or even Karaoke night! This model also includes a chime button so you can create a chime sound before making announcements. The RCS series features Bluetooth audio streaming so you can play your favorite music or access a playlist right from your phone! This amp also features both USB and SD inputs, allowing you to play audio stored on a USB thumb drive or SD Card. There are also 2-line inputs that allow you to plug in another audio device such as an MP3 player, CD player, TV, etc.Individual volume knobs for each of the 6 zones and volume knobs for each of the 3 mic inputs gives you full control over your system.The built-in clipping limiter function protects your speakers and the amp from overheating. For further protection there is also a cooling system in this amplifier that will keep the components running cool, making the amplifier durable and reliable.Our goal with the RCS series was to make it possible for anyone to install 70-volt systems on their own without spending thousands of dollars on a contractor. This model makes it a breeze to connect many speakers and multiple external sources. We intentionally use common plugs like RCA and ¼ on our model to make this more universal and user friendly. With our unique design you can feel confident in your DIY ability when installing our commercial system!
What is 70 Volt?
70-volt systems are the number one choice for any application where you want to install multiple speakers. With 70 volt there are a lot of advantages over 8-ohm systems. One of the main advantages is the simplicity of the wiring as well as how easy it is to match up speakers with the amplifier. For example, with this 350-watt /70-volt amplifier, you can install speakers that total close to 280 watts. It does not matter if it is 12 speakers that are 20 watts each or 25 speakers that are tapped at 10 watts each. You always want your 70 volt amp to have at least 15 or 20% more power than the combined watts your speakers are tapped at. When we say the word tap, what we are referring to are the selectors that many speakers in 70 volt have on them. For example, some speakers might have selectable options of 1.5w, 3w, 5w, 10w. What this does is limit how many watts the builtin transformer on the speaker will allow the speaker to get from the amplifier. What this allows for is full customization of your sound for your space. In a restaurant, for example, you can tap your dining room speakers at 5 watts, the speakers by the bar area at 10 watts, the ones in the hallway at 3 watts, and the speakers in the bathrooms at 1.5 watts. Another great feature with 70 volt is you can mix and match any 70-volt speakers whether they are ceiling speakers, wall mounted speakers, subwoofers, etc.
70-volt systems allow you to run very long lines of speaker wire without signal loss. This makes it ideal when running long speaker leads. The wiring is simple. You just wire all the positive terminals of the speakers to the positive 70-volt terminals of the amplifier. The negative terminals on the speaker simply get wired to the negative terminals on the amp. You do not have to worry about impedance. The power is constant.
Functions
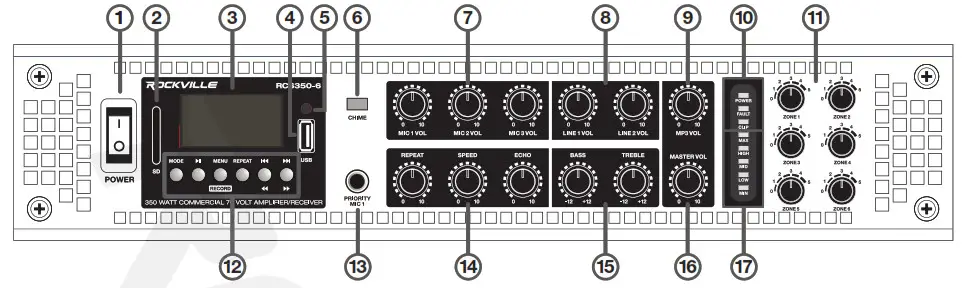
- Power switch
- SD card input slot (32GB max)
- LCD display
- USB input port (32GB max)
- Remote control IR Sensor
- Chime button: for making announcements via Mic 1 input
- Independent mic volume controls
- Line input volume controls
- MP3 module volume control (SD/USB/Bluetooth/FM radio)
- Status indicator LEDs:Power – Indicates that the unit is powered on.Fault – Indicates that the amplifier has encountered a fault due to overheating or overload.Clip – Indicates that the output signal is exceeding the supply voltage.
- Zone volume detented knobs
- MP3 module:Mode – Switch between SD, USB, Bluetooth, and FM radio. Press and hold to enter standby mode. Press and hold to exit standby mode.Play/Pause – Press to play or pause playback. Press to autoscan and save stations in FM radio mode.Menu/Record – (USB/SD only) Press the button to enter folders. Press and hold to begin recording. Press again to stop recording.Repeat – (USB/SD only) Press once to repeat single track. Press twice to repeat all tracks. Press three times to repeat all files within a folder. Press four times to enter random mode.
 (Previous/Rewind) – Press this key to return to the previous track. Press and hold to rewind current track (USB/SD only). Press and hold to decrease volume (Bluetooth only). Press to move back through saved stations (Radio only). (Next/Fast-Forward) – Press this key to proceed to the next track. Press and hold to fast-forward current track (USB/SD only). Press and hold to increase volume (Bluetooth only). Press to move forward through saved stations (Radio only).
 - Priority mic 1 ¼ TRS input: Input signal detected from this port will override all other input signals. Works in conjunction with the Chime (see item 6) and Mute features (see item 23).
- Mic echo controls (Please note, echo effect will only affect Mic 2 and Mic 3 inputs):Repeat – Sets the number of times the echo is repeated.Speed – Controls the speed at which the repetitions occur.Echo – Controls the volume of the echo effect.
- 2 Band EQ controls: Adjust the bass and treble levels of all output.
- Master volume control
- Signal input level indicator LEDs
- FM antenna port
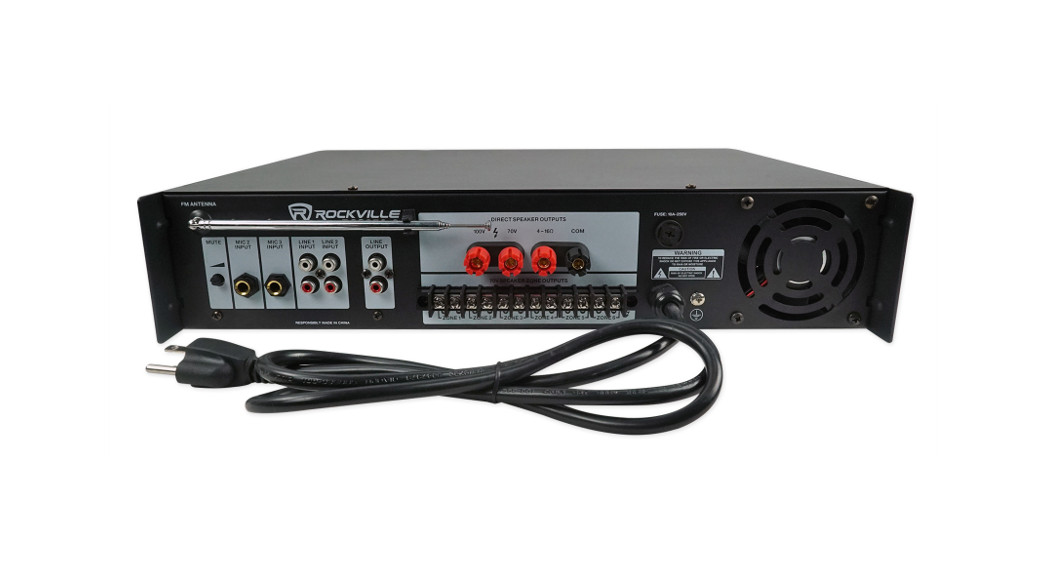
- 70V/100V direct speaker output binding posts
- 4 to 16-ohm direct speaker output binding post
- COM post: Speaker common (negative) binding post
- User serviceable fuse compartment: 7A-250V
- Mute: Adjusts the mute level during signal override of all channels by Mic 1 input
- ¼ TRS Mic inputs
- RCA line inputs
- RCA line output
- 70V Zone outputs
- AC 110V/60Hz power input
- Ground terminal
- Cooling fan
Remote Control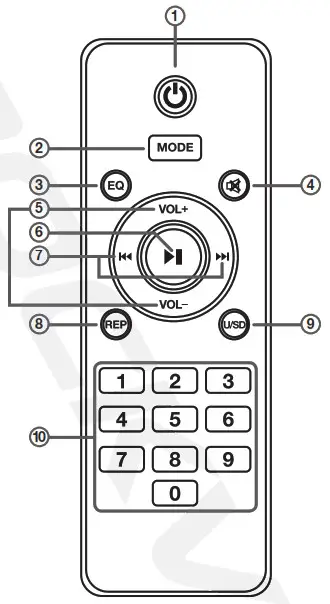
- ON/OFF
- Mode: Switch between SD, USB, Bluetooth, and FM radio.
- Change preset EQ: Normal, rock, pop, classic, jazz, and country.
- Mute
- VOL-/ VOL+: Increase or decrease the volume.
- Play/Pause: Press to play or pause playback. Press to for two seconds auto-scan and save stations in FM radio mode.
- : Previous/Next song
- REP: Press once to repeat single track. Press twice to repeat all tracks. Press three times to repeat all files within a folder. Press four times to enter random mode.
- U/SD: Press ot switch between USB and SD input.
- Number Pad: Select music files by number.
Setup
Selecting Output Wire and ConnectorsIt is recommended you use high quality 16 AWG, 2 or 4 conductor, heavy gauge, CL2 or CL3 rated, 100% Oxygen-Free Copper (OFC) speaker wire. CL2 and CL3 ratings refer to the cable jacket’s fire resistance and the voltage capacity of the wire. While both cables have the same flame resistance capability, the CL2 cable can handle voltage spikes of up to 150 volts while the CL3 can handle up to 300 volts. When using the 70V/100V speaker zone output screw connectors, use terminal forks up to 10 AWG (recommended) or bare wire. Below is a chart to help you select the appropriate size wire based on the amp to speaker distance.
| WIRE SIZE | 4 OHM LOAD | 8 OHM LOAD | 16 OHM LOAD |
| 10 AWG | 100 FEET | 200 FEET | 400 FEET |
| 12 AWG | 60 FEET | 120 FEET | 240 FEET |
| 14 AWG | 40 FEET | 80 FEET | 160 FEET |
| 16 AWG | 24 FEET | 48 FEET | 96 FEET |
![]() ATTENTION: Check local code requirements before installing in-ceiling or in-wall speaker wires. We recommend you use CL2 or CL3 rated, OxygenFree Copper (OFC) speaker wire.
ATTENTION: Check local code requirements before installing in-ceiling or in-wall speaker wires. We recommend you use CL2 or CL3 rated, OxygenFree Copper (OFC) speaker wire.
![]() CAUTION: Never use shielded cable for output wiring.
CAUTION: Never use shielded cable for output wiring.![]() WARNING: For low impedance loads only.The RCS350-6 features one RCA line output. We recommend you use high quality RCA cables such as Rockville’s RNRTR, RNRMR, or RCDR series.
WARNING: For low impedance loads only.The RCS350-6 features one RCA line output. We recommend you use high quality RCA cables such as Rockville’s RNRTR, RNRMR, or RCDR series.
Selecting Input cablesThere are three ¼ balanced TRS mic inputs and two RCA inputs on the RCS350-6. We recommend you use high quality Rockville cables like the RCXMB, RCXFB, or RCTR series ¼ TRS cables and the RNRTR, RNRMR, or RCDR series RCA cbales.
Rack MountingThis unit should be on the bottom of the rack or above any equipment that does not produce heat. Be sure to provide at least 1 RU (Rack Unit, 1.75) of space above and below. Preferably, the side wall should be at least 2 from the sides of the amplifier and the back of the rack should be open. This will ensure a source of cool air to all sides of the amplifier.
Connections
The RCS350-6’s 70V and 100V connections can be set up in a variety of ways. Please note that utilizing direct speaker connections and speaker zone connections simultaneously is not recommended and will cause damage to the amplifier and the speakers.
Multi-Zone 70V Speaker Output (Screw Connectors)You may connect any number of 70-volt speakers to each zone as long as the total output for any one zone does not exceed 100 watts and the overall total output of the zones does not exceed 350 watts. As with the direct outputs, best practice is to allow for about 10 20% “head room” or extra power. So, the total output power of the speakers connected to any one zone should not exceed 80 90 watts, and the total power output of all the zones combined should not exceed 270 280 watts.
![]() WARNING: Do not use Direct Output (binding post) and Zone Output (screw connector) at the same time. Doing so will cause permanent damage to the amp.
WARNING: Do not use Direct Output (binding post) and Zone Output (screw connector) at the same time. Doing so will cause permanent damage to the amp.
![]() WARNING: Do not use 8-ohm or 4-ohm speakers. Only use speakers with built in 70-volt transformers.
WARNING: Do not use 8-ohm or 4-ohm speakers. Only use speakers with built in 70-volt transformers.
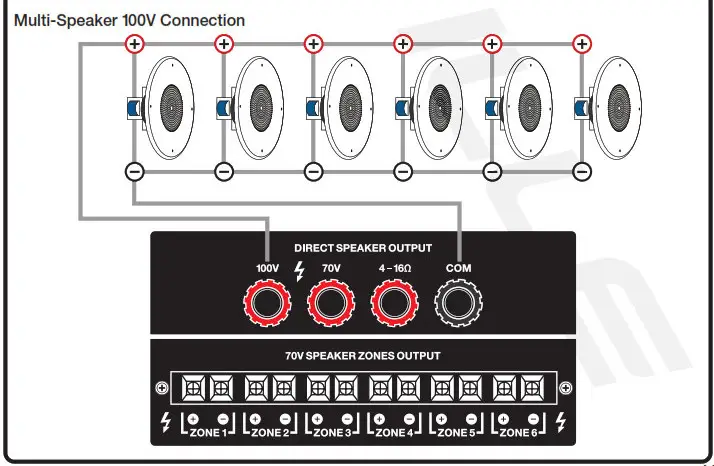
Multi-Zone Connection ExampleIn this example we have various speaker combinations (totaling 17 speakers) connected to various zones, none exceeding more than 80 watts per zone and with a total overall zone power rating of 215 watts, well below the maximum total zone power output of 350 watts.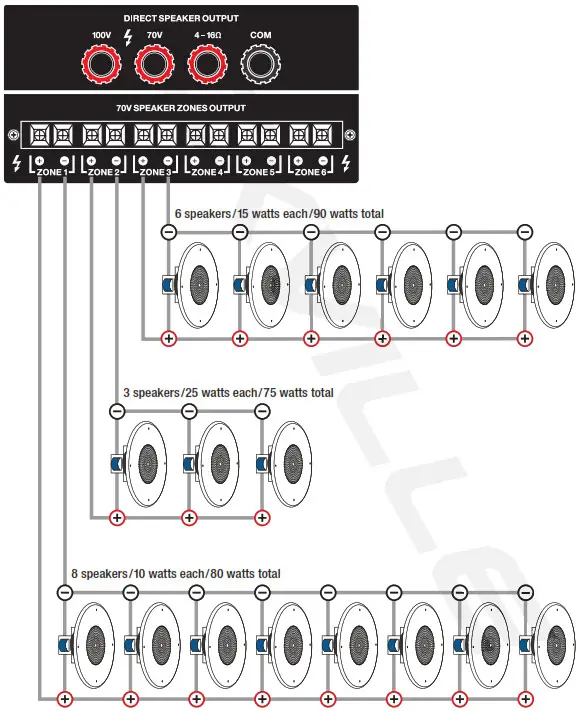 70V/100V Direct Speaker (Binding Post Terminals)You may connect any number of speakers to the 70 or 100-volt direct speaker output binding posts as long as the total wattage does not exceed 350 watts. Best practice is to allow for about 10 20% “head room” or extra power to handle any unusual amp requirements such as a deep bass note or a booming finale.
![]() WARNING: Do not use 70-volt and 100-volt connections at the same time. Doing so will cause permanent damage to the amp.
WARNING: Do not use 70-volt and 100-volt connections at the same time. Doing so will cause permanent damage to the amp.
![]() WARNING: Do not use 8-ohm or 4-ohm speakers. Only use speakers with built in 70-volt or 100-volt transformers.
WARNING: Do not use 8-ohm or 4-ohm speakers. Only use speakers with built in 70-volt or 100-volt transformers.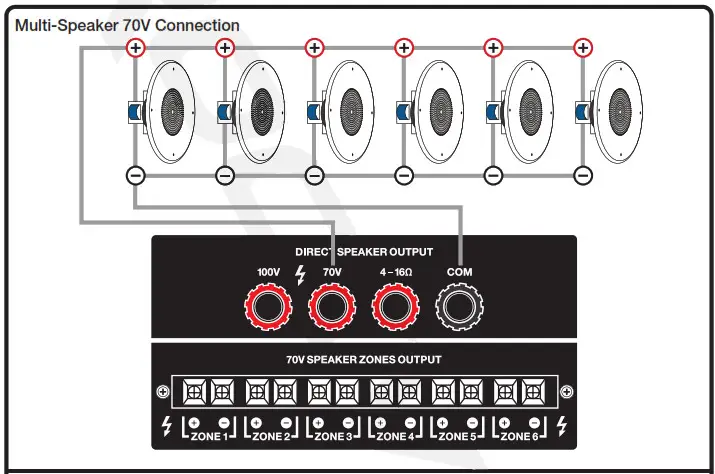
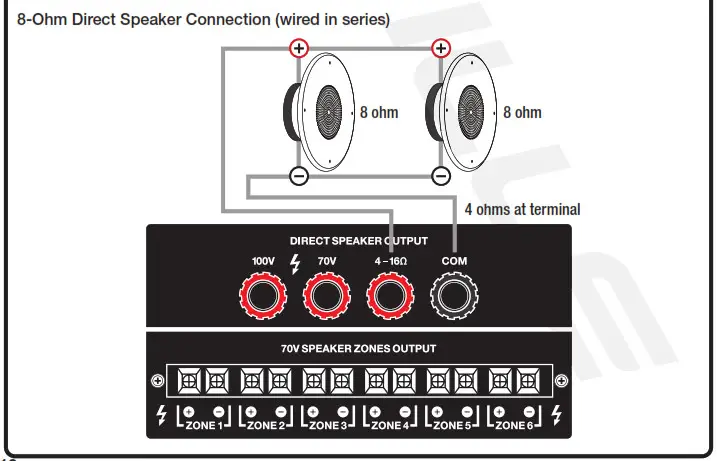
 4 to 16-Ohm Direct Speaker Output (Binding Post Terminals)You can connect two speakers to this terminal as long as the final impedance does not fall below 4 ohms. Although it is possible to connect more than two speakers to these terminals, it is not recommended. Please consult a professional if you intend to do so as incorrect installation could lead to irreparable damage to your amp and speakers.
![]() WARNING: Total impedance of your speakers must not be less than 4 ohms.
WARNING: Total impedance of your speakers must not be less than 4 ohms.![]() CAUTION: We recommend you consult a professional if you plan on wiring more than 2 speakers to the 4 to 16-ohm output.
CAUTION: We recommend you consult a professional if you plan on wiring more than 2 speakers to the 4 to 16-ohm output.![]() WARNING: Do not use Direct Output (binding posts) and Zone Output (screw connectors) at the same time. Doing so will cause permanent damage to the amp.
WARNING: Do not use Direct Output (binding posts) and Zone Output (screw connectors) at the same time. Doing so will cause permanent damage to the amp.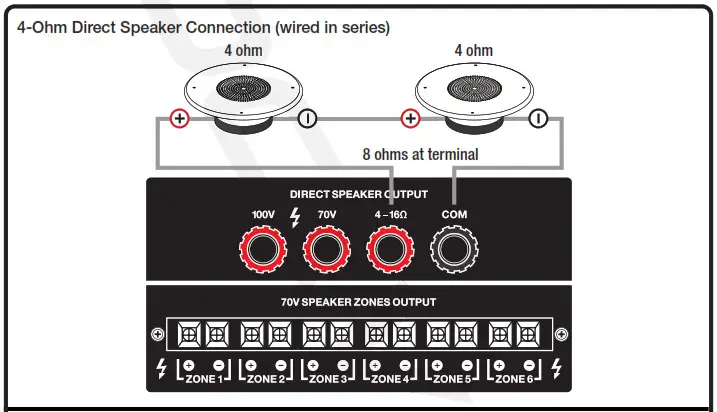
In-Wall Volume ControlsAlthough the RCS350-6 offers individual zone volume controls, there may be occasions when you may want to adjust the volume of a specific zone without having to return to the amplifier. In-wall volume controls are the perfect solution and they are relatively easy to set up. Below is a general wiring guide to assist you in the installation of in-wall volume controls. As with any installation that requires running wires through your walls, be sure to check local code requirements.A typical in-wall volume control consists of a face plate with a volume control knob on the front side and a step down transformer with in/out connections on the back side. Keep in mind that these volume controls come in a range of wattage ratings. The control you use must match the wattage of your speakers. You can use a higher rated control for lower wattage speakers, but you cannot use a lower rated control for higher wattage speakers.![]() ATTENTION: Check local code requirements before installing in-ceiling or in-wall speaker wires. We recommend you use CL2 or CL3 rated, Oxygen-Free Copper (OFC) speaker wire.
ATTENTION: Check local code requirements before installing in-ceiling or in-wall speaker wires. We recommend you use CL2 or CL3 rated, Oxygen-Free Copper (OFC) speaker wire.
In-Wall Volume Control Installation
This example shows connections for one zone. You can connect volume controls to any of the 6 zones.Using high quality 16 AWG, 2 or 4 conductor, heavy gauge, CL2 or CL3 rated, 100% Oxygen-Free Copper (OFC) speaker wire, connect the desired zone output’s +/- screw terminals to the IN+ and IN- terminals on the volume control. Next, connect the +/speaker wires from your speakers to the SPand SP+ terminals on the volume control. Make sure to observe proper polarity on all connections.Please note, wall controller wattage rating must match the wattage of the connected speakers.
Operation
Bluetooth PairingTo connect your iPod, iPhone, MP3 player, Android phone, or any other Bluetooth-capable device, follow the steps listed below.
- Make sure the RCS350-6 unit’s power switch is in the ON position.
- Turn on the Bluetooth feature on your device and ensure that it is in “discoverable” mode.
- Push the Mode button on the unit until you are in Bluetooth mode (LCD screen will display the word “Bluetooth”).
- Once in Bluetooth mode, the unit should automatically pair with your device and you will hear a voice prompt. If not, look for “RCS350-6” on your device and select it.
- Once connected, the LCD screen will display the word “Connected”. Please note, the unit will remember the last paired device.
Bluetooth PlaybackYou can control playback from your device or from the MP3 control panel on the RCS350-6:
- Press Play/Pause to begin or pause music playback.
- To skip songs, press the buttons.
- Volume can be controlled from your device as well as the RCS350-6. Please note, there are three volume controls on the amplifier which can affect Bluetooth playback, the buttons (see item 12 in the Functions section; default setting for these controls is max volume), the MP3 volume knob, and the Master volume knob. These controls must be set separately as they work independently of each other.
USB/SD
- Inserting a USB flash drive or an SD card into the corresponding port/slot will set the RCS350-6 to USB/SD mode and it will automatically begin to play music.
- To skip songs, press the buttons. Press and hold to rewind or fast forward (). Please note, this function is not available in Bluetooth mode.
- To access files and folders within a USB drive or SD card, press the Menu button and use the buttons to navigate the files and folders.
- Volume is controlled via the MP3 volume knob and the Master volume knob. Please note, these controls must be set separately as they work independently of each other.
FM Radio
- Press the Mode button until the LCD display indicates you are in radio mode.
- Make sure the antenna is up and fully extended.
- Press the Play/Pause button to automatically scan and save all available stations.
- Use the buttons to navigate through saved stations.
- Volume is controlled via the MP3 volume knob and the Master volume knob. Please note, these controls must be set separately as they work independently of each other.
Record FunctionWhile in USB/SD mode, you can record to a USB or SD card. Simply press and hold the record button for 3 seconds to begin recording. Press again to stop recording.
Features
- Rockville RCS350-6 350-Watt 19 Rack Mountable Commercial Amplifier/Receiver
- Capable of 70 volt, 100 volt, 8 ohm, and 4 ohm
- 70/100-volt RMS Power: 352 Watts
- 6 Zones each zone has a separate volume control
- Built-in Bluetooth audio streaming
- FM radio tuner
- USB input (32GB max,)
- SD card slot (32GB max)
- USB/SD supported file formats: MP3, WAV
- Separate volume control for MIC1, MIC2, MIC3, MP3, LINE1, and LINE2
- Echo control for the mic inputs 2 and 3 with speed and repeat adjustments
- Built-in clipping limiter to protect the amp and speakers
- Bass and Treble control
- Built-in EQ presets (via remote): Normal, rock, pop, classic, jazz, and country.
- Chime button for making announcements
- Top quality aluminum panel with industrial-grade knobs
- 5-segment signal level indication
- Multi function remote control
- Built-in cooling system keeps component cool at all times
Specifications
- Power Requirements: 110V/60Hz
- A Weighted Signal to Noise (@ 1W) -57.0dBA
- A Weighted Signal to Noise (referenced to full 4-ohm power) -81.6dBA
- Frequency Response: 58Hz 20Khz
- Frequency Response VS THD+M 1W @ 8 Ohms: 0.89%
- Weight: 30.9 lbs
- Dimensions: 19 x 16 x 4 inches
Inputs and Outputs
- (2) Sets RCA Line inputs
- (3) Mic inputs
- RCA Line output
- 100V speaker red positive speaker output terminal
- 70V speaker red positive speaker output terminal
- 8-ohm red positive speaker output terminal
- Shared negative speaker output terminal
Troubleshooting
| PROBLEM | SOLUTION |
| No power | 1. Make sure the unit is plugged in and the power switch is in the ON position.2. Check that the power cable is property plugged into the wall socket3. Check and replace the fuse if necessary.4. If people or equipment tend to step and roll over or stretch your power cable it can get damaged. Check the power cable for damage. If the cable is damaged. discontinue using the unit until the cable can be repaired. |
| No sound/low sound/distorted sound | 1. Check that al appropriate cables and wires are plugged in correctly.2. Check the Master Volume and Zone volume settings.3. Check the Microphone, Line input, and MP3 volume settings.4. Check the volume settings on your input devices.5. If using wall volume controls, be sure the volume is set properly.6. Make sure the proper input source is selected.7. Make sure your are using the proper type of speakers.9. Make sure speakers are wired correctly (plus to plus, minus to minus; not plus to minus or vice versa).10. Make sure the speakers are wired to the correct outputs (no 4 to 16-ohm speakers should be wired to the 70/100-volt direct outputs or zoner outputs).11. Make sure speaker transformer taps are set properly.12. Make sure speakers’ power ratings match the amplifier’s. |
| Buzzing sound | Make sure you are using the proper cable. Check the requirements of the connected gear and the inputs on the amplifier and make sure you are using the appropriate cable. This unit’s W mic outputs are TRS (balanced) so you will need a TRS mic cable. For line, inputs be sure to use high-quality RCA cables. |
| Mic feedback or poor sound | 1. Point mics away from any nearby speakers.2. Make sure the microphones are on and the volume controls are properly set.3. Make sure the microphone cables are properly connected and that you are using good quality TRS mic-specific cables |
| Bluetooth pairing fails | 1. Check to see that both devices are turned on and that your Bluetooth device is discoverable.2. Turn both devices off and then on again.3. Make sure you’ve selected the proper source.4. Make sure that the Bluetooth device is within 5 feet of the unit.5. Move both devices away from other Bluetooth devices.6. Make sure that the unit is not paired to a previously paired device. |
| No SD or USB playback | 1. Make sure you’ve selected the proper source.2. Make sure that the audio files are in the specified format: MP3. WAV.3. Make sure the USB drive’s/SD card’s capacity is not more than 32GB. |
 report this ad
FEDERAL COMMUNICATIONS COMMISSION COMPLIANCE INFORMATIONResponsible party name: RockvilleAddress: 600 Bayview Ave.Entrance AInwood, NY 11096
Hereby declares that the product(s) RCS350-6 complies with FCC rules as mentioned in the following paragraph:
This device complies with Part 15 of the FCC rules. Operation is subject to the following two conditions: (1) this device may not cause harmful interference, and (2) this device must accept any interference received, including interference that may cause undesired operation.
Note: This equipment has been tested and found to comply with the limits for a Class B digital device, pursuant to Part 15 of the FCC rules. These limits are designed to provide reasonable protection against harmful interference in a residential installation. This equipment generates, uses, and can radiate radio frequency energy and, if not installed and used in accordance with the instructions, may cause harmful interference to radio communications. However, there is no guarantee that interference will not occur in a particular installation. If this equipment does cause harmful interference to radio or television reception, which can be determined by turning the equipment off and on, the user is encouraged to try to correct the interference by one or more of the following measures:
- Reorient or relocate the receiving antenna.
- Increase the separation between the equipment and receiver.
- Connect the equipment to an outlet on a circuit different from that to which the receiver is connected.
- Consult the dealer or an experienced radio/TV technician for help.
![]() RockvilleAudio.com©2021 ROCKVILLE // Features and specifications are subject to change and or improvement without notice.
RockvilleAudio.com©2021 ROCKVILLE // Features and specifications are subject to change and or improvement without notice.
References
[xyz-ips snippet=”download-snippet”]