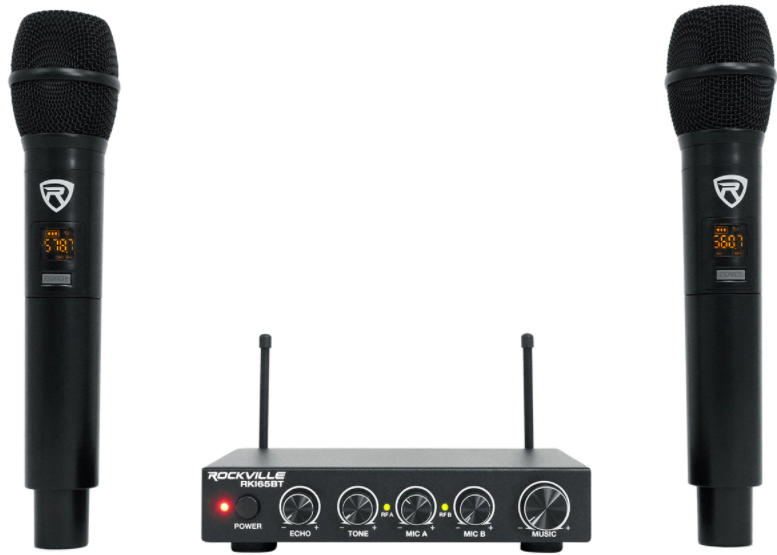
Rockville RK65BT / RKI65BT Karaoke System
Thank you for purchasing this Rockville RKl65BT Karaoke Interface. Please read this guide carefully for proper use of your RKl65BT. Should you need assistance, please call our technical help line at 1-646-758-0144, Monday through Thursday, 9am to 10pm EST., and Fridays, 9am to 3pm EST.
INCLUDES
- Mic receiver/mixer
- (2) UHF wireless microphones
- Power adapter
- (1) 3.5mm to 3.5mm AUX cable, 5 ft
- (1) 3.5mm to RCA cable, 5 ft
- (1) ¼-Ts to WTS cable, 3.2 ft
- (1) optical cable, 5 ft
- Manual
- Warranty card
IMPORTANT SAFETY INSTRUCTIONS

- To reduce risk of electric shock, never open the unit. There are no user serviceable parts, refer service to an authorized Rockville service center.
- Do not expose this unit water.
- Do not install near any heat sources such as radiators, heat registers, stoves, or other devices that produce heat.
- Do not defy the safety purpose of the polarized grounding-type plug. A polarized plug has two blades with one wider than the other. A grounding-type plug has two blades and a third grounding prong. The wide blade or third prong is provided for your safety.If the provided prong does not fit your outlet, consult an electrician for possible re placement of an obsolete outlet.
- Protect the power cord from being walked on or pinched, particularly at plugs, receptacles and/or the point where they exit from the device.
- Only use attachments/accessories specified or included with this unit.
- Unplug this device during lightning storms or when not in use for prolonged periods.
FUNCTIONS
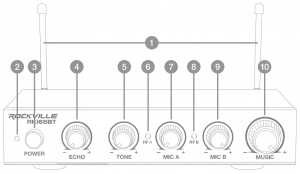
- Antenna
- Power LED Indicator
- Power button
- Echo knob: sets the number of repetitions of the echo effect.
- Tone knob: adjusts the high frequency levels.
- Mic A RF indicator LED: will light when Mic A is connected.
- Mic A knob: sets the volume level for Mic A
- Mic B RF indicator LED: will light when Mic B is connected.
- Mic B knob: sets the volume level for Mic B.
- Music knob: sets the volume level for any audio source connected to any of the inputs on the rear panel.

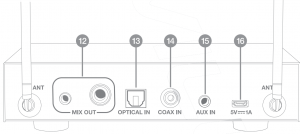
- 3.5mm and ¼- outputs: output a mix of the audio source and the mic signal.
- Optical input: carries a digital audio stream from components such as TVs, CD players, DVD players, and computers.
- Coaxial input
- 3.5mm AUX input
- DC Power in 5V/1A

- Windscreen
- Battery status indicator
- Signal strength
- Frequency
- Mic channel
- Power button/frequency adjustment button
- Battery compartment (uses 2x AA alkaline batteries)
- Antenna

OPERATION
- Connect the receiver to a power outlet and turn it on.
- Put two AA alkaline batteries into the battery compartment of the microphone. Please make sure to observe proper polarity.
- Power on the microphone(s). In case of any frequency interference, quickly press the power button on the microphone to change the frequency. There are up to 8 frequencies available. Please note that it will take a few seconds for the receiver to automatically sync with the mic whenever the mic frequency is changed.
- When first used, the receiver and mics are not matched. The receiver and mics can be used interchangeably, but if more than 1 set of mics and receivers is being used, each set of mics must be specifically matched to the corresponding receiver. Otherwise, you cannot use more than one set in a location.Please note: If there is no sound input to the mics for more than 5 minutes, they will automatically shut down in order to conserve battery life.
Matching the Receiver and Mics
1. Connect the receiver to a power outlet and turn it off2. Turn the mic off. Hold the power button until the numbers flash. Press the power button again. The ![]() icon should also begin to flash.3. Quickly turn on the receiver (within 2 seconds). The RF A LED will light. That mic is now matched to channel A. Repeat these steps for the other microphone.Please note: Even though the mics are matched to a specific channel, you cannot use the same frequency on both mics .
icon should also begin to flash.3. Quickly turn on the receiver (within 2 seconds). The RF A LED will light. That mic is now matched to channel A. Repeat these steps for the other microphone.Please note: Even though the mics are matched to a specific channel, you cannot use the same frequency on both mics .

COMPUTER CONNECTION
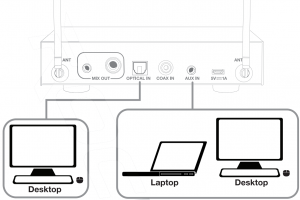
PLEASE NOTE: Some computers feature Bluetooth connectivity. If your computer is Bluetooth capable, please see the pairing instructions down below.
DVD PLAYER, BLU-RAY PLAYER, TV CONNECTION
PLEASE NOTE: OPTICAL IN port does not support TV PCM Dolby 5.1 output. Some TVs and receivers feature Bluetooth connectivity. If your device is Bluetooth capable, please see the pairing instructions down below.
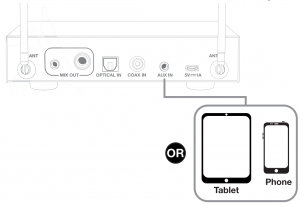
MOBILE DEVICE CONNECTION
The RKl65BT features mobile device connection via Bluetooth or a 3.5mm AUX input.
BLUETOOTH CONNECTION
- Power on the RKl65BT. It will! automatically enter into pairing mode.
- Ensure that your device is in Bluetooth mode and discoverable.
- Find “RKl65BT” on your device’s list of available Bluetooth connections and select it.
- If paring is successful, you will hear audio though the connected speakers.
- Playback is controlled by your Bluetooth device.
SPEAKER CONFIGURATIONS

FEATURES
- Rockville RKl65BT Dual UHF Wireless Microphone System w/Bluetooth, Karaoke Interface, and Mic Mixer
- Connects to any home audio receiver, television, iPad, computers, and more
- Bluetooth input
- 3.5mm aux input
- Optical input
- Coaxial input
- ¼” TS mix output passes through the signal of all the mics, as well as any input device
- 3.5MM aux output passes through the signal of all the mics, as well as any input device
- 2 UHF wireless microphones with 8 switchable frequencies
- Each mic has a nice heavy feel and has a digital display making it easy to switch frequencies
- Adjustable echo
- Adjustable tone control
- Adjustable music input volume
- Independently adjustable mic levels
- Wireless frequency range:Mic A: 556.1, 558.4, 560.7, 562.2, 564.5, 566.8, 568.3, 570.6Mic B: 574.1, 576.4, 578.7, 580.2, 582.5, 584.8, 586.3, 588.6
- Number of channels: 8
- THO: 0.5%
- Signal/Noise ratio: 90dB
- Frequency response : 30Hz – 18kHz ±3dB
- Operating range: 200 Feet
- Transmitting power: 10dBmPower supply: 3V (2 AA Batteries)
- 100-240V compatible with included micro USB power cable (5 feet)
TROUBLESHOOTING
| No power |
|
| Unit has power, but no sound |
|
| Mics not working |
|
| Bluetooth pairing fails |
|
| Sound is poor or distorted |
|
FEDERAL COMMUNICATIONS COMMISSION COMPLIANCE INFORMATION
Responsible party name: Rockville
Address: 600 Bayview Ave,Entrance A,Inwood, NY 11096
Hereby declares that the product RKl65BT dual UHF wireless microphone system w/ mic mixer and karaoke interface complies with FCC rules as mentioned in the following paragraph:
This device complies with Part 15 of the FCC rules. Operation is subject to the following two conditions: (1) this device may not cause harmful interference, and (2) this device must accept any interference received, including interference that may cause undesired operation.
Note: This equipment has been tested and found to comply with the limits for a Class B digital device, pursuant to Part 15 of the FCC rules. These limits are designed to provide reasonable protection against harmful interference in a residential installation. This equipment generates, uses and can radiate radio frequency energy and, if not installed and used in accordance with the instructions, may cause harmful interference to radio communications. However, there is no guarantee that interference will not occur in a particular installation. If this equipment does cause harmful interference to radio or television reception, which can be determined by turning the equipment off and on, the user is encouraged to try to correct the interference by one or more of the following measures:
- Reorient or relocate the receiving antenna.
- Increase the separation between the equipment and receiver.
- Connect the equipment to an outlet on a circuit different from that to which the receiver is connected.
- Consult the dealer or an experienced radio/TV technician for help.
Visit us at:RockvilleAudio.com
[xyz-ips snippet=”download-snippet”]

