![]()
RPA60BT V2PROFESSIONAL MIXING KARAOKE AMPLIFIERw/FM DIGITAL TUNER, BLUETOOTH, and USBOWNER’S MANUAL
WHO READS MANUALS?
 Instead, go to vimeo.com/517203533 or scan the QR code and watch a short video that shows you how to set this item up and how to use it.If you prefer written instructions, please read ahead! With Rockville, you get many options.https://vimeo.com/517203533
Missing items? If you ordered a bundle that includes more than one product and you are missing part of your bundle then it just means your order shipped from two different warehouses. You will receive the remaining items very soon. If you have any concerns or inquiries, feel free to call our customer support center at 1-646-758-0144, Monday through Thursday, 9 am to 10 pm EST, and Fridays, 9 am to 3 pm EST.
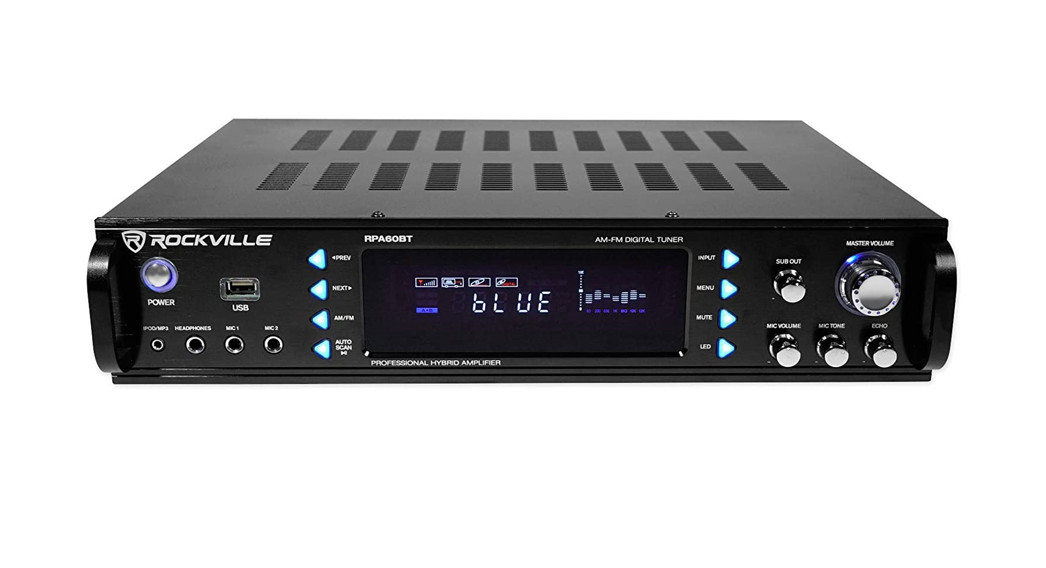
Thank you for purchasing this Rockville RPA60BT V2 Professional Mixing Karaoke Amplifier with Bluetooth, AM/FM Digital Tuner, USB, and 2 Wireless Microphones. Please read this owner’s manual carefully for proper use of your Rockville RPA60BT. Should you need assistance please call our technical helpline at 1-646-758-0144, Monday through Thursday, 9 am to 10 pm EST, and Fridays, 9 am to 3 pm EST.
IMPORTANT SAFETY INSTRUCTIONS

- To reduce risk of electric shock, never open the unit. There are no user-serviceable parts, for service to an authorized Rockville service center.
- Do not expose this unit to any kind of moisture.
- Do not place this unit near heat sources or expose to direct sunlight.
- Do not place anything on top of unit. Doing so will block vents and cause the unit to overheat.
- Please ensure that the unit is situated in a properly ventilated area.
Functions
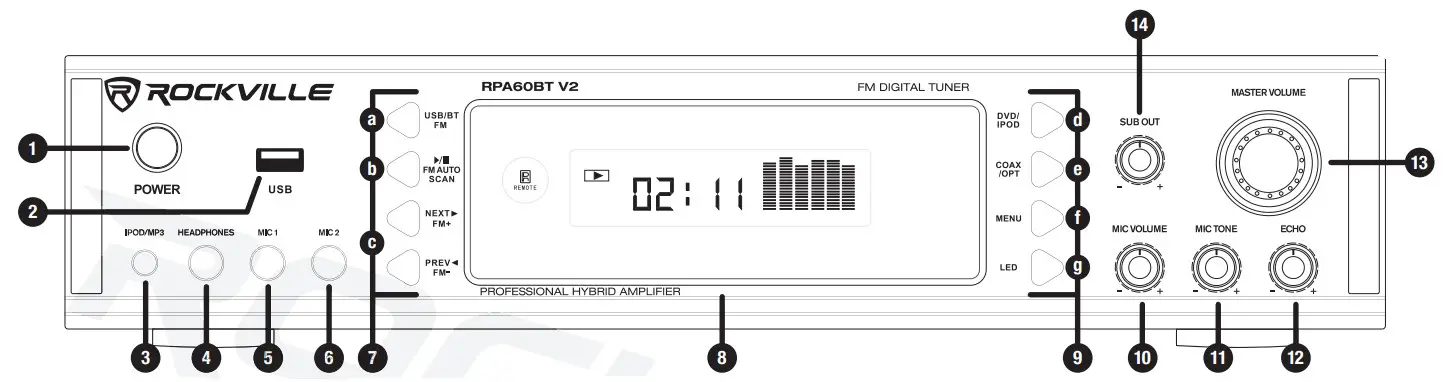
- Power Button
- USB input
- 3.5mm TRS iPod/MP3 input
- ¼˝ TRS headphone output
- ¼˝ TS Microphone 1 input
- ¼˝ TS Microphone 2 input
- Functions 1:a. USB/BT/FM: Toggles between USB, Bluetooth, and FM input.b. Play/Pause, FM Auto Scan: In USB mode, use the button to play or pause the current track. In Tuner mode, use to scan between stations. Press and hold for several seconds to store a station. This unit can store up to 50 stations.c. Previous/Next buttons: In USB mode, use these buttons to go to the previous or next track. In Tuner mode, use these buttons to go to the previous or next station.
- Vacuum Fluorescent Display
- Functions 2:d. DVD/IPOD: Toggles between DVD and iPod input.e. COAX/OPT: Toggles between Coaxial and Optical input.f. Menu: Press this button repeatedly to toggle between options in the settings menu (Bass, Treble, Balance. Use the Master Volume knob to make adjustments to the desired setting.g. LED: Dims LED illumination.
- Microphone Volume
- Microphone Tone
- Microphone Echo
- Master Volume: Controls overall output volume. If you are in the settings menu mode, this knob can be used to adjust Bass, Treble, and Balance. In FM mode, it can be used to move to navigate preset stations.
- Subwoofer Output Volume control.
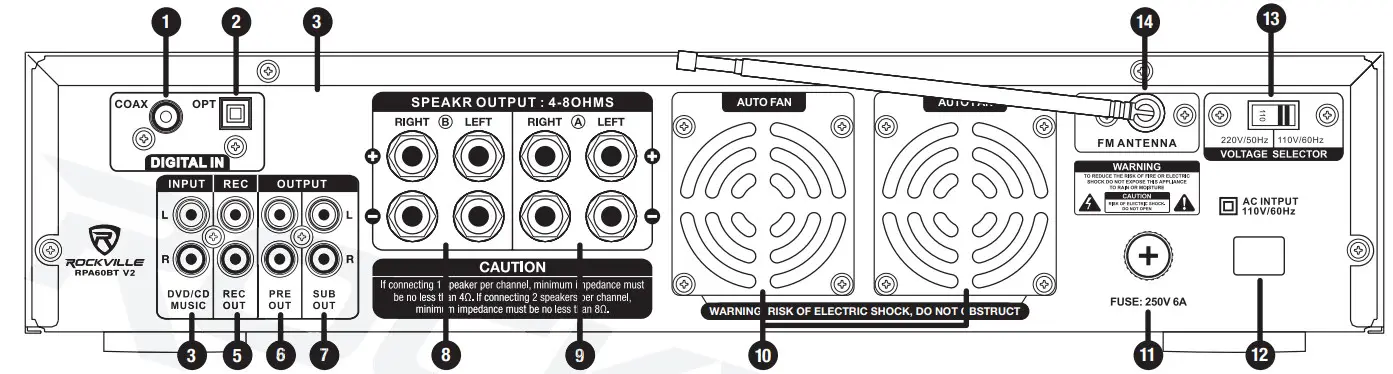 Coaxial input
- Optical input
- Telescoping Fixed Wireless Microphone Antenna
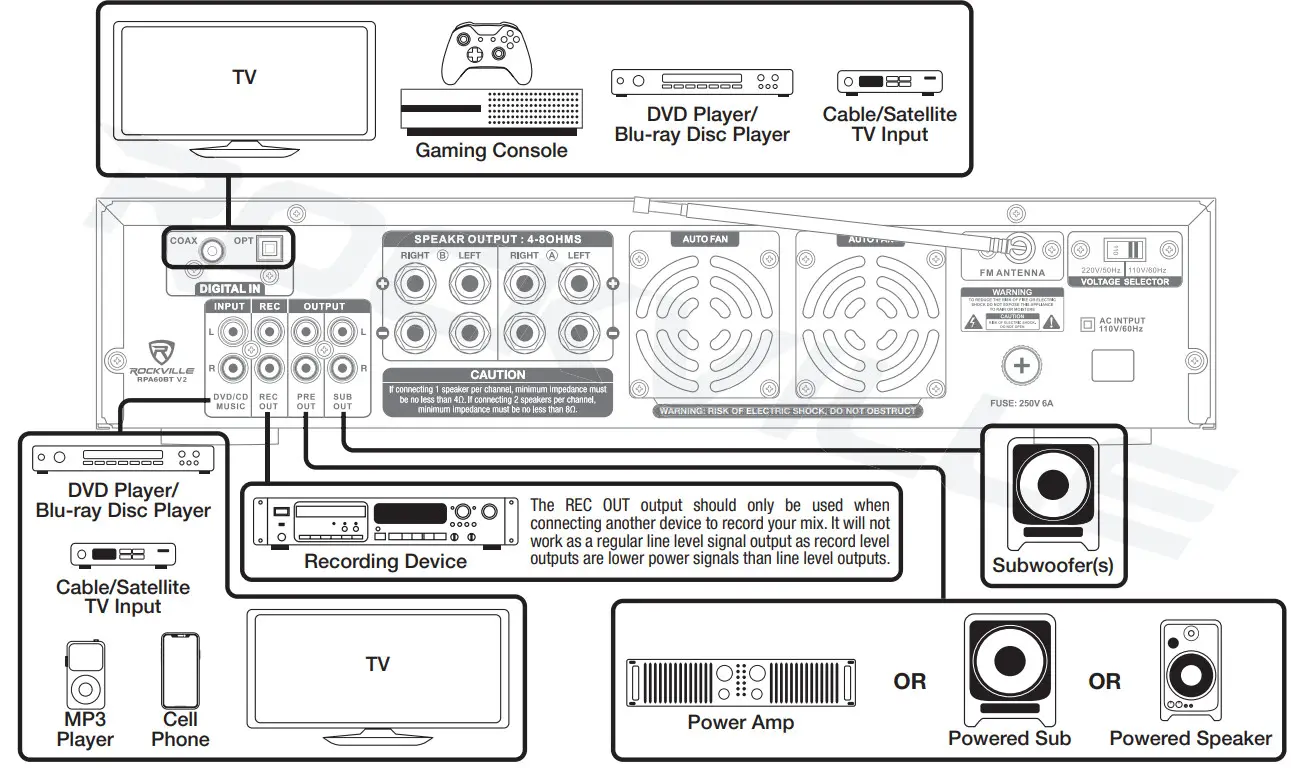
- Pre Amp Audio signal in
- Pre Amp Audio Record signal output A (non-mixed music output only)
- Pre Amp Audio signal output B (mixed output including wireless microphones)

- Subwoofer output
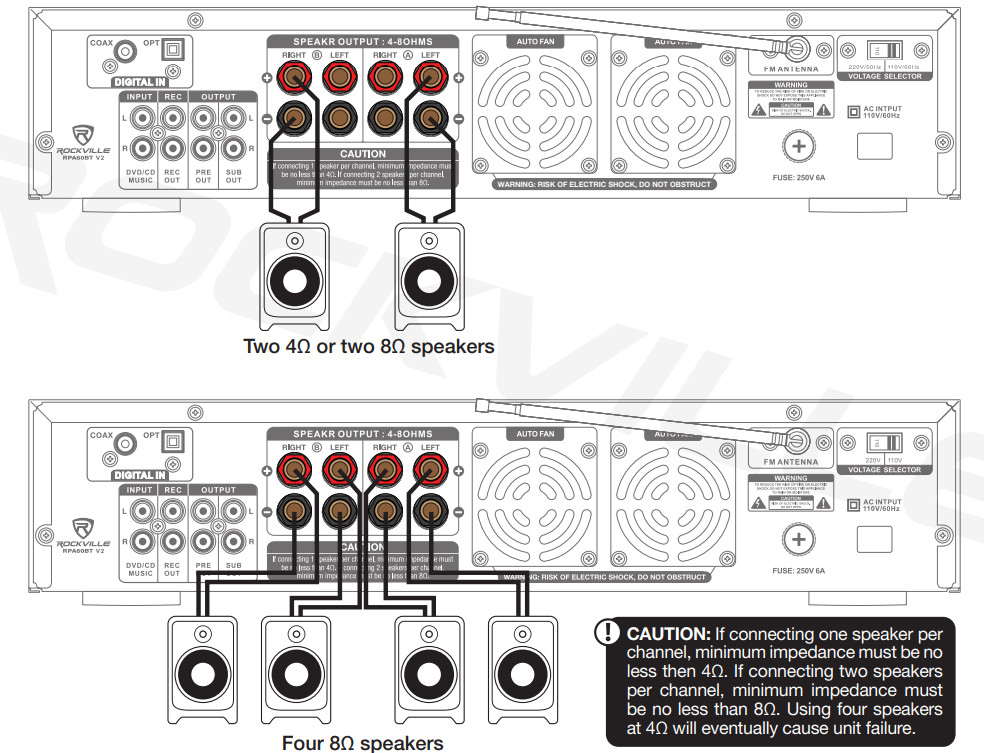
- Speaker output A
- Speaker output B
- Cooling fans
- User serviceable fuse
- AC power cord
- Voltage selector switch (110/220V)
- Telescoping Fixed FM Antenna
Setup
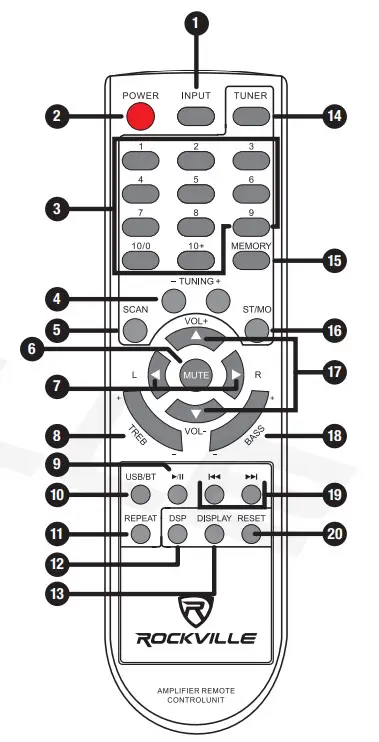
Remote Control
|
 |
Bluetooth Function
- Press the INPUT button located on the front panel select Bluetooth mode. You will hear a tone and see the word “blue” on the screen.
- Turn on the Bluetooth feature on your device and ensure that it is in “discoverable” mode. Search for “RPA60BT V2” on your list of available devices and select it. If pairing is successful you will hear a tone. You can control all features (play/pause, next, previous, volume) via the unit or the included remote control.
- After the initial pairing, the RPA60BT V2 will pair with your device automatically.
- To un-pair simply disconnect the RPA60BT V2 via your device. If un-pairing is successful, you will hear a tone.
USB Function
- Connect a USB drive to the USB port on the front panel. The unit will automatically begin playing music.
- You can control all features (play/pause, next/previous, volume) via the unit or the included remote control.
Please note:
- Accepted file formats are MP3 and WAV. Files must be properly formatted, simply changing the file extension to one of the specified formats will not work.
- The maximum capacity of the drive must not exceed 64Gb.
- The USB drive will charge an iPod but does not offer playback functionality.
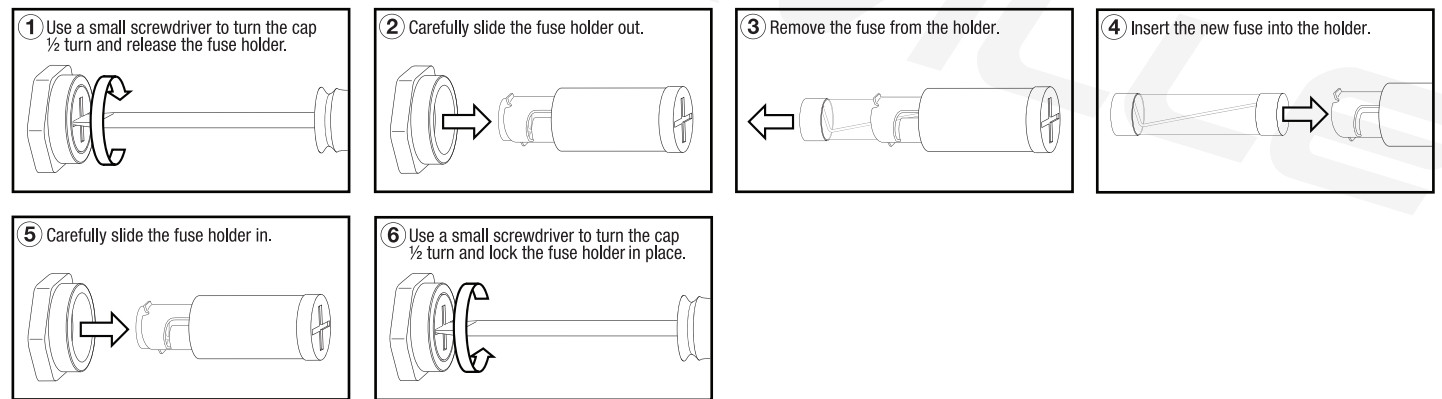
Fuse replacement Diagram
Features/Specifications
|
|
Troubleshooting
| PROBLEM | SOLUTION |
| No power | 1. Make sure the unit is plugged in and the power button is in the ON position.2. Check that the power cable is plugged in tightly to the unit.3. Check and replace the fuse if necessary. See fuse replacement diagram on page 8.4. If people or equipment tend to step on and roll over or stretch your power cable it can get damaged. Always try a second cable to test for shorts in the original cable. Dispose of original damaged power cables immediately. |
| No sound | 1. Check that all appropriate cables are plugged incorrectly.2. Check the Volume settings of the unit as well as any external input devices.3. Be sure your microphones are on. that you are using the proper type of cable, that they are properly connected, and that they are dynamic microphones.4. Check all output connections. |
| Bluetooth pairing fails | 1. Check to see that both devices are turned on and that your Bluetooth device is discoverable.2. Turn both devices off and then on again.3. Make sure you’ve selected the proper source.4. Make sure that the Bluetooth device is within 5 feet of the unit.5. Move both devices away from other Bluetooth devices. microwaves, wireless routers. and other electronics.6. Make sure that the unit is not paired to a previously paired device. |
| Mic feedback | Point the mics away from the speaker. Make sure the mics are in the back of the speaker, not in front of it. |
| No mic sound/ poor mic sound | ‘I. Make sure the mics are turned on.2. Make sure you are using the appropriate cables.3. Check the mic volume control. |
| Buzzing sound | Be sure you are using the correct type of cable. Check the requirements of the connected gear for appropriate cable types. |
| No 115B playback | 1. Make sure you’ve selected the proper source.2. Make sure that the USB drive and the audio files are properly formatted (MP3 or WAV).3. Make sure the drive capacity does not exceed 64Gb.3. Make sure that the USB drive is properly plugged in.4. Check USB drive for damage. |
FEDERAL COMMUNICATIONS COMMISSION COMPLIANCE INFORMATION
Responsible party name: RockvilleAddress: 600 Bayview Ave.Entrance AInwood, NY 11096
Hereby declares that the product(s) RPA60BT V2 Professional Mixing Karaoke Amplifier with AM/FM Digital Tuner complies with FCC rules as mentioned in the following paragraph:This device complies with Part 15 of the FCC rules. Operation is subject to the following two conditions: (1) this device may not cause harmful interference, and (2) this device must accept any interference received, including interference that may cause undesired operation.Note: This equipment has been tested and found to comply with the limits for a Class B digital device, pursuant to Part 15 of the FCC rules. These limits are designed to provide reasonable protection against harmful interference in a residential installation. This equipment generates, uses, and can radiate radio frequency energy and, if not installed and used in accordance with the instructions, may cause harmful interference to radio communications. However, there is no guarantee that interference will not occur in a particular installation. If this equipment does cause harmful interference to radio or television reception, which can be determined by turning the equipment off and on, the user is encouraged to try to correct the interference by one or more of the following measures:
- Reorient or relocate the receiving antenna.
- Increase the separation between the equipment and receiver.
- Connect the equipment to an outlet on a circuit different from that to which the receiver is connected.
- Consult the dealer or an experienced radio/TV technician for help.
![]()
RockvilleAudio.com© 2021 ROCKVILLE // Features and specifications are subject to change and/or improvement without notice.
References
[xyz-ips snippet=”download-snippet”]