
SOIO-CãMt SeriesUSB CONDENSER MICROPHONEOWNER’S MANUAL
Thank you for purchasing the Rockville Solo-Cast or Solo-Cast Pro USB Condenser Microphone. Please read this owner’s manual carefully for proper use of your Solo-Cast series USB mic. Should you need technical assistance, please call our technical helpline at 1-646-758-0144, Monday through Friday, 9am to Spm EST.
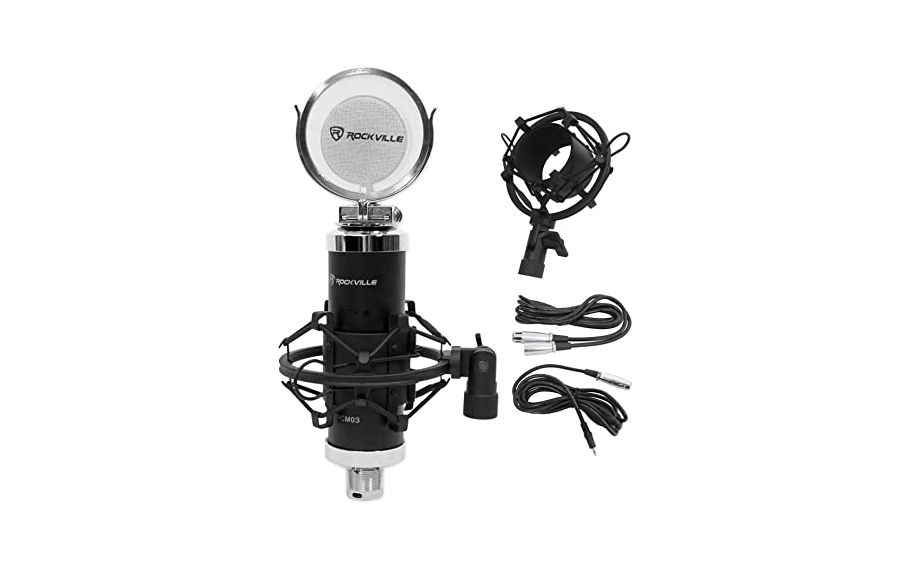
What’s Inside
Solo-Cast/Solo-Cast Pro
- Microphone
- 6-foot USB cable
- Metal shock mount Gold pop filter
- Metal tabletop stand
- Owner’s manual
- Warranty
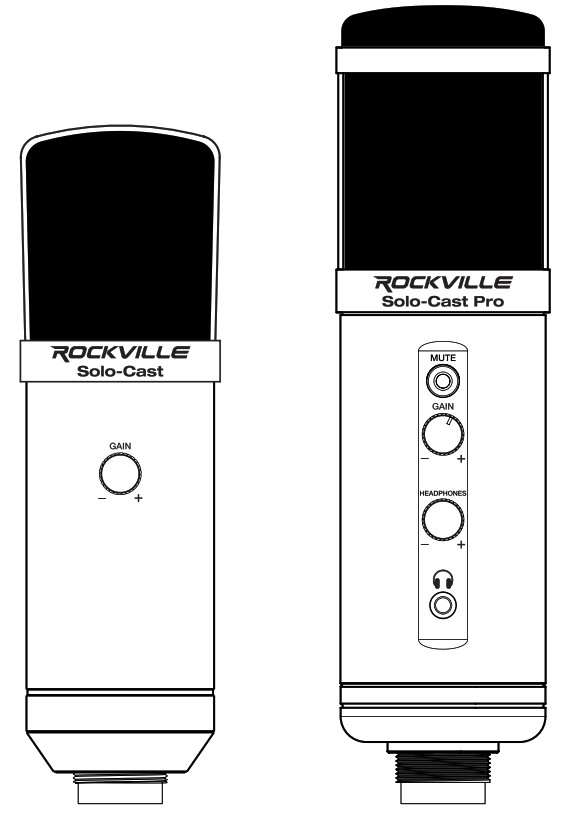
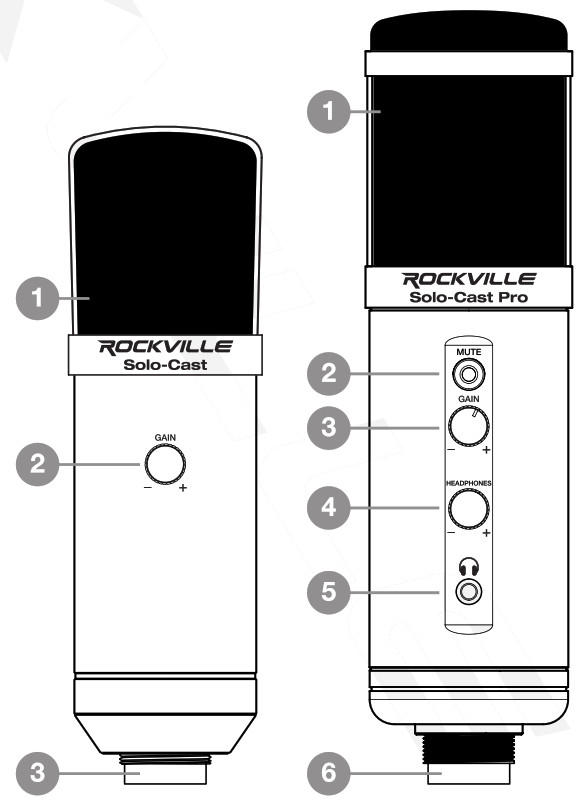
Functions
Solo-Cast
- Windscreen
- Gain I
- USB Type B port
Solo-Cast Pro
- Windscreen
- Mute button: Mutes mic input
- Gain
- Headphone output volume
- 3.5mm headphone jack
- USB Type B port

Setting Up
The Solo-Cast and Solo-Cast Pro microphones connect to your computer via the included USB Type A to Type B cable and are compatible with computers running Windows 7 and later or Mac OS X 10.9 and later (OS X requires DAW software). Follow the steps below to set up your mic.
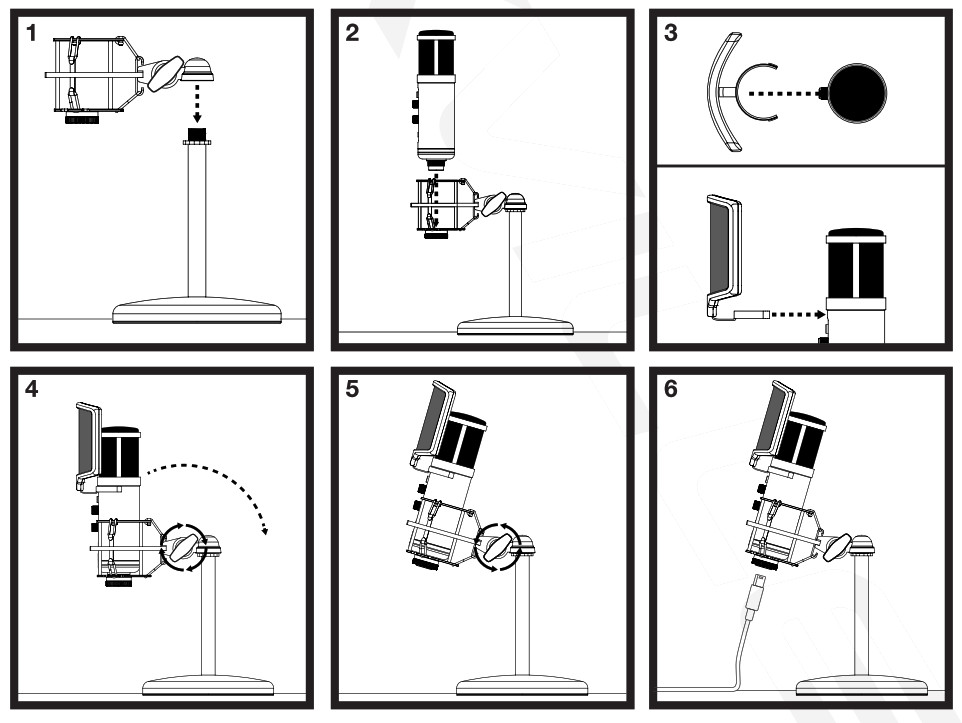
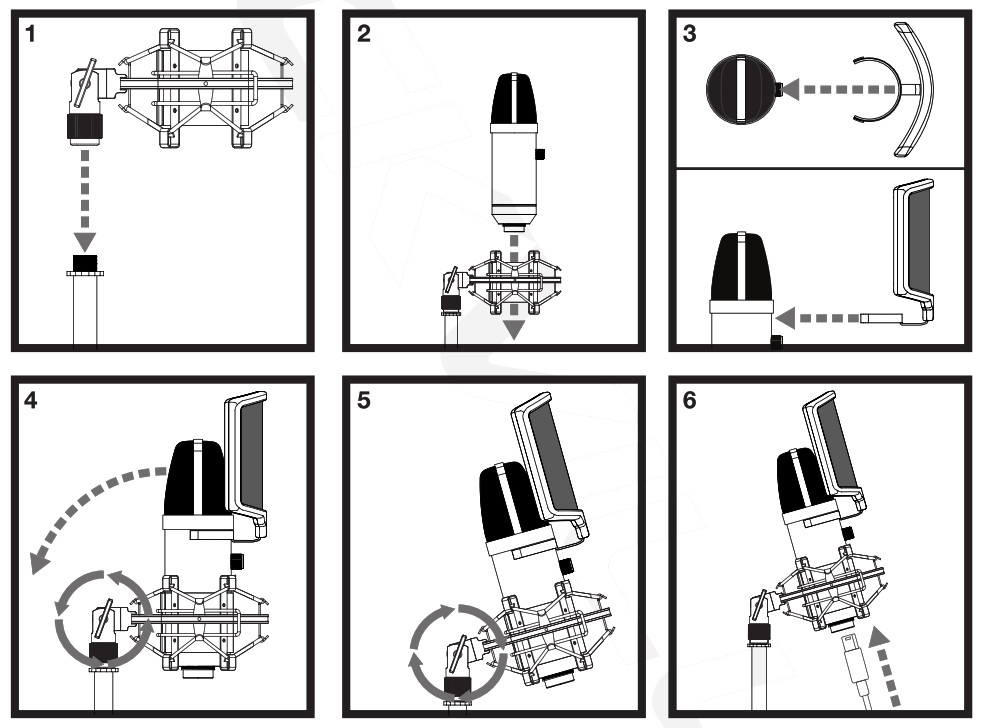
Solo-Cast Pro
- Attach the shock mount to the tabletop stand by screwing it onto the 5/8” threaded Do not over-tighten.
- Insert the mic into the shock mount and screw it onto the threaded collar at the bottom of the Ensure that the front of the mic (indicated by the location of the level knobs) is facing the sound source.
- Clip the pop filter onto the
- Loosen the shock mount’s locking knob and adjust the mic’s angle to the desired
- Tighten the locking knob to secure the mic at the current
- Plug the Type B end of the USB cable to the USB output located at the base of the Plug the other end of the cable to a USB port on your computer.
Solo-Cast
- Attach the shock mount to the tabletop stand by screwing it onto the 5/8” threaded Do not over-tighten.
- Insert the mic into the shock Ensure that the front of the mic (indicated by the location of the level knob) is facing the sound source.
- Clip the pop filter onto the
- Loosen the shock mount’s locking knob and adjust the mic’s angle to the desired
- Tighten the locking knob to secure the mic at the current
- Plug the Type B end of the USB cable to the USB output located at the base of the Plug the other end of the cable to a USB port on your computer.
Operation
Windows
Solo-Cast series mics are compatible with computers running Windows 7 and later. DAW software such as Audacity, Ableton Live, Logic, ProTools, Reason, etc. is required. Follow the steps below to install the microphone and adjust it’s input level via the computer’s system settings.
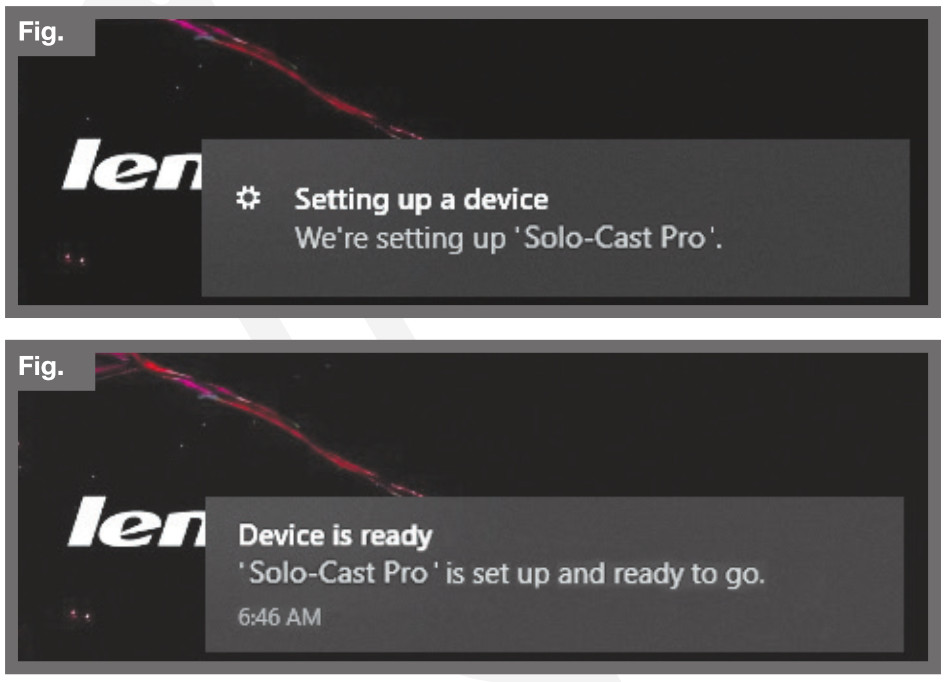
- Plug the USB cable to a USB port on your PC. The computer will recognize the mic and in the lower right-hand corner, you should see the message “Setting up a device” (Fig a). Once the mic is set up, you should see the message “Device is ready” (fig b).
- Click on the WINDOWS icon in the lower left-hand corner of the screen to bring up the START menu.
- In the START menu, click on the SETTINGS
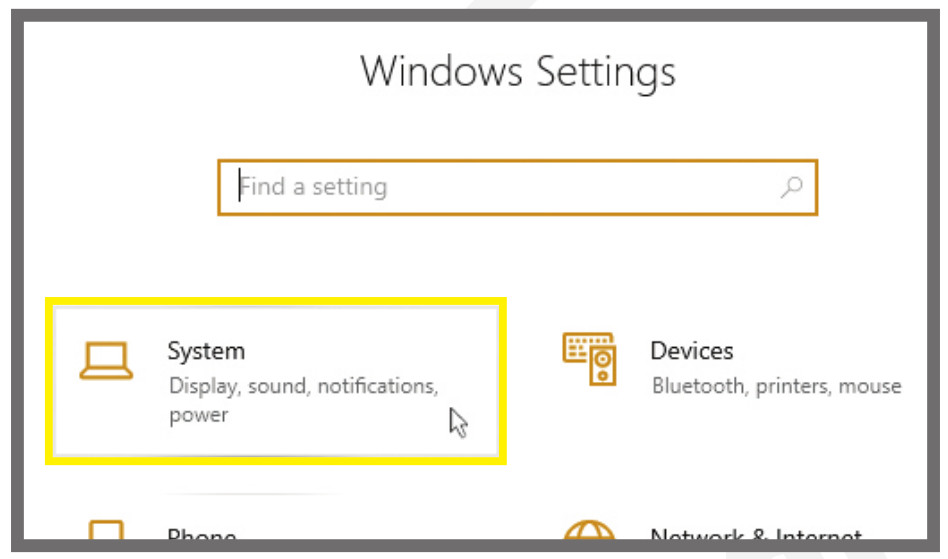
- In the SETTINGS menu, click on
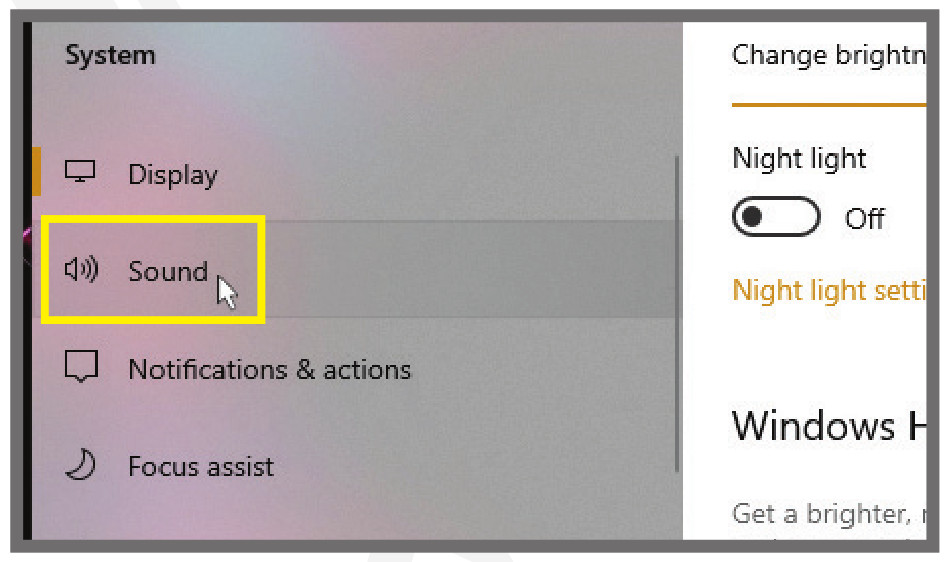
- In the SYSTEM menu, click on
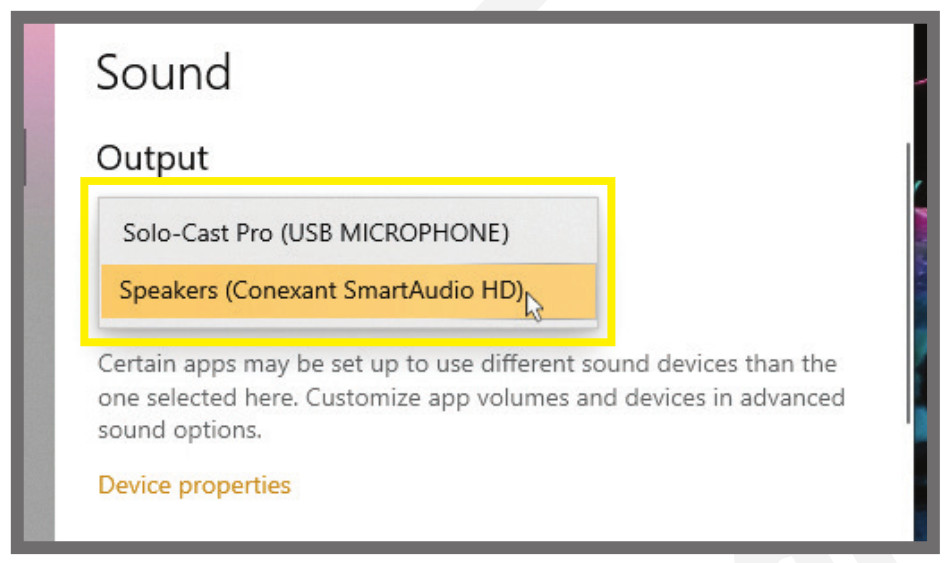
- In the SOUND menu, select your output device i.e. speakers; either internal or external.
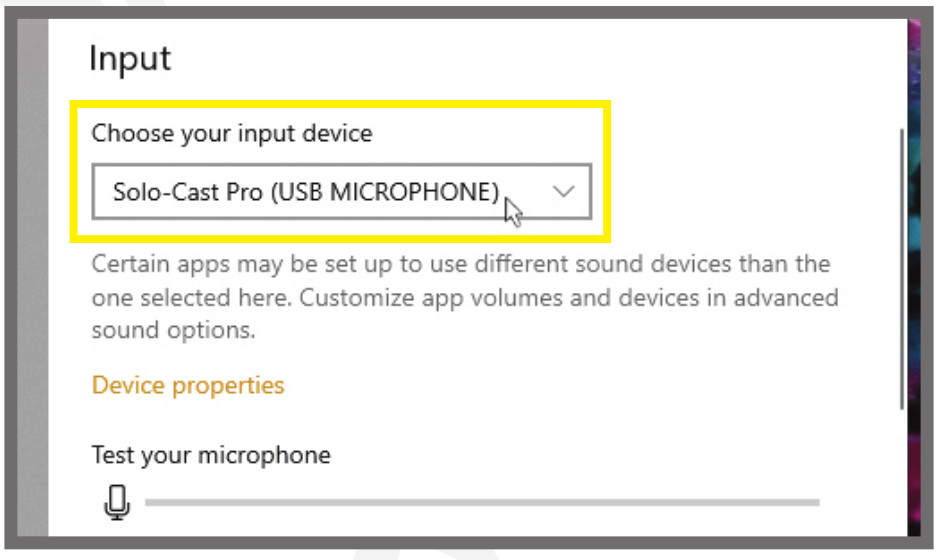
- Scroll down and select Solo-Cast or Solo-Cast Pro as your input device.
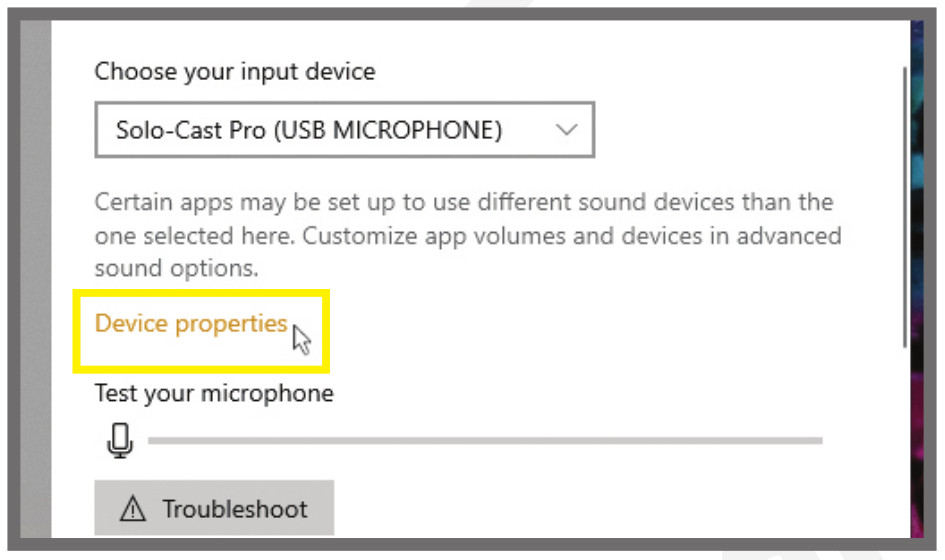
- Now click on the device.
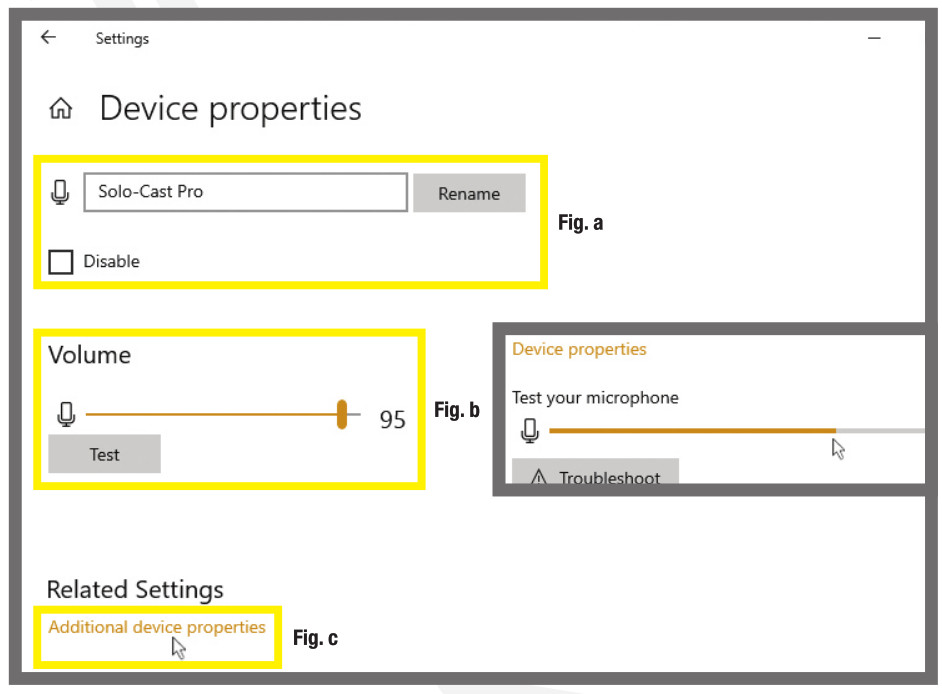
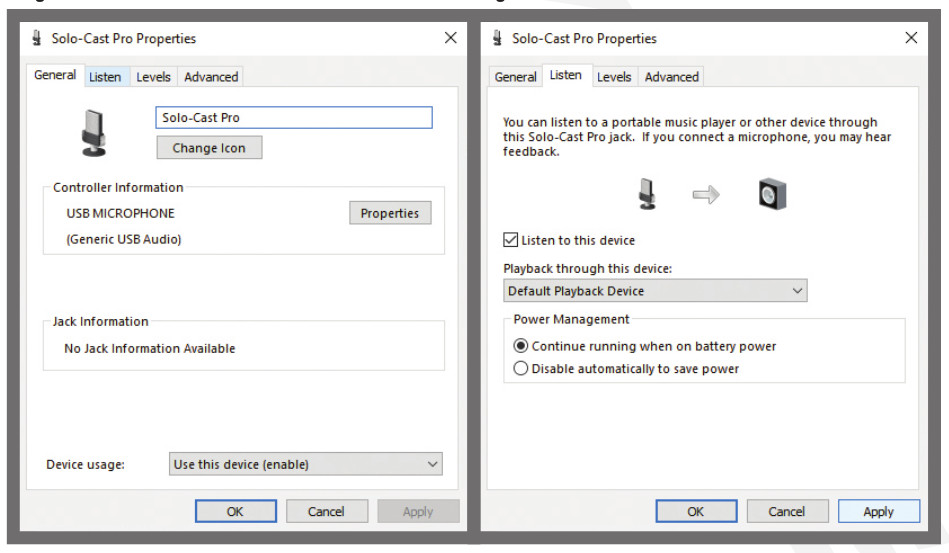
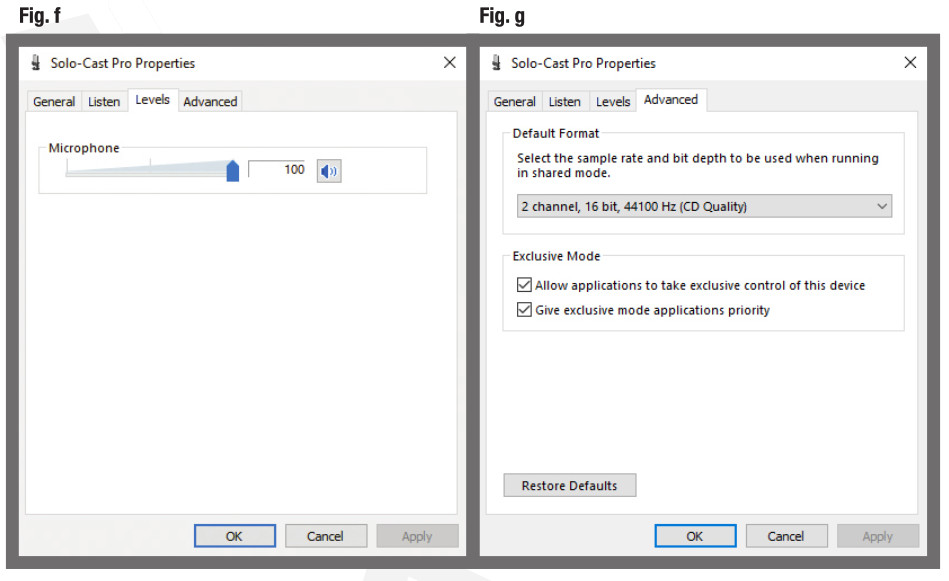
- In the DEVICE SETTINGS menu, you can change the device name and disable the microphone if necessary (fig. a). You can also adjust and test the microphone’s volume level (fig. b). Alternately, you can adjust and test the volume in the SOUND menu (see inset). Additional changes to the microphone’s settings can be made by clicking onADDITIONAL DEVICE PROPERTIES (fig. c). There are four options available: GENERAL (Fig. d), LISTEN (fig. e), LEVELS (fig. §, and ADVANCED (fig. g).If you make any changes, click on APPLY to save those changes. Then click OK to exit the additional properties menu and return to the SETTINGS menu. Close the settings menu and return to the desktop.
- Now launch your DAW Refer to the software’s instruction manual for Directions on using external input devices.
 If you make any changes, click on APPLY to save those changes. Then click OK to exit the additional properties menu and return to the SETTINGS menu. Close the settings menu and return to the desktop.
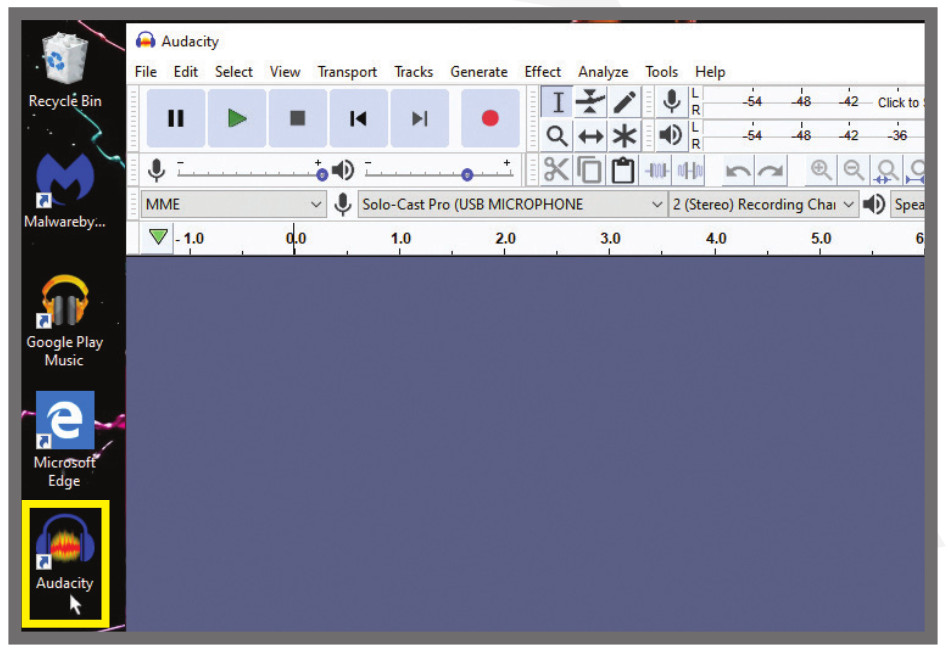
Mac OS XSolo-Cast series mics are compatible with computers running Mac OS x 10.9 and later. DAW software such as Garage Band, Ableton Live, Logic, ProTools, Reason, etc. is required. Follow the steps below to adjust the mic’s input level via the computer’s system preferences.
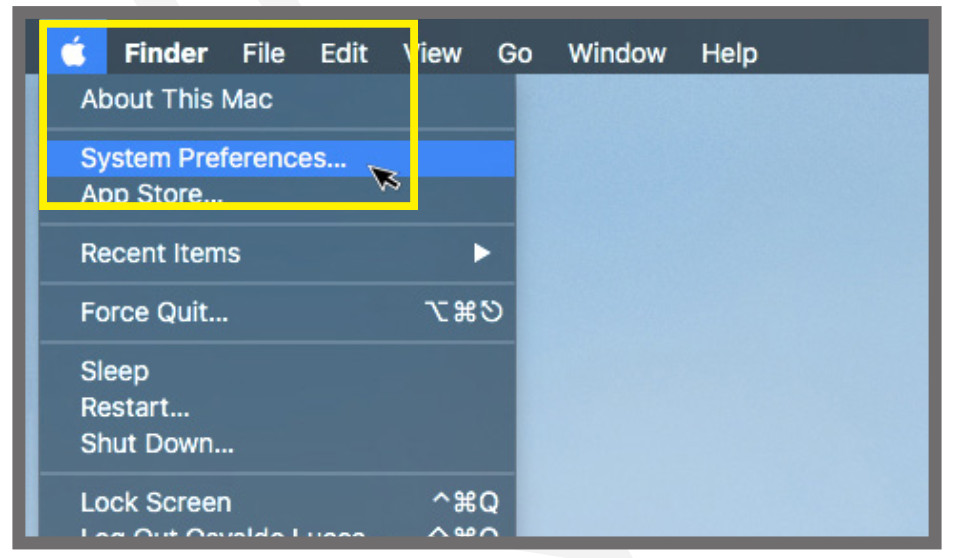
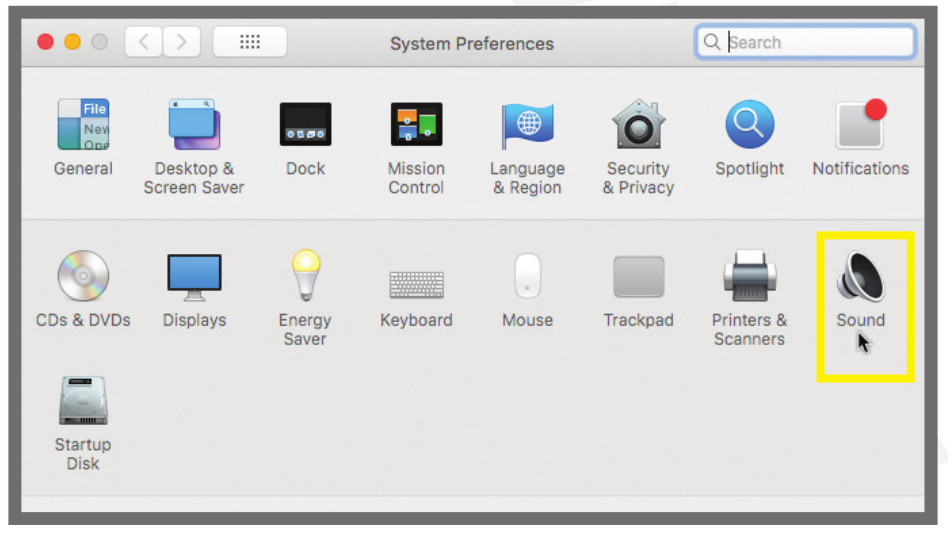
- Plug the USB cable into a USB port on your Mac. Click on the APPLE icon on the top left-hand corner of the desktop. In the drop-down menu click on SYSTEM PREFERENCES.
- In the SYSTEM PREFERENCES menu click on the speaker icon labeled SOUND.
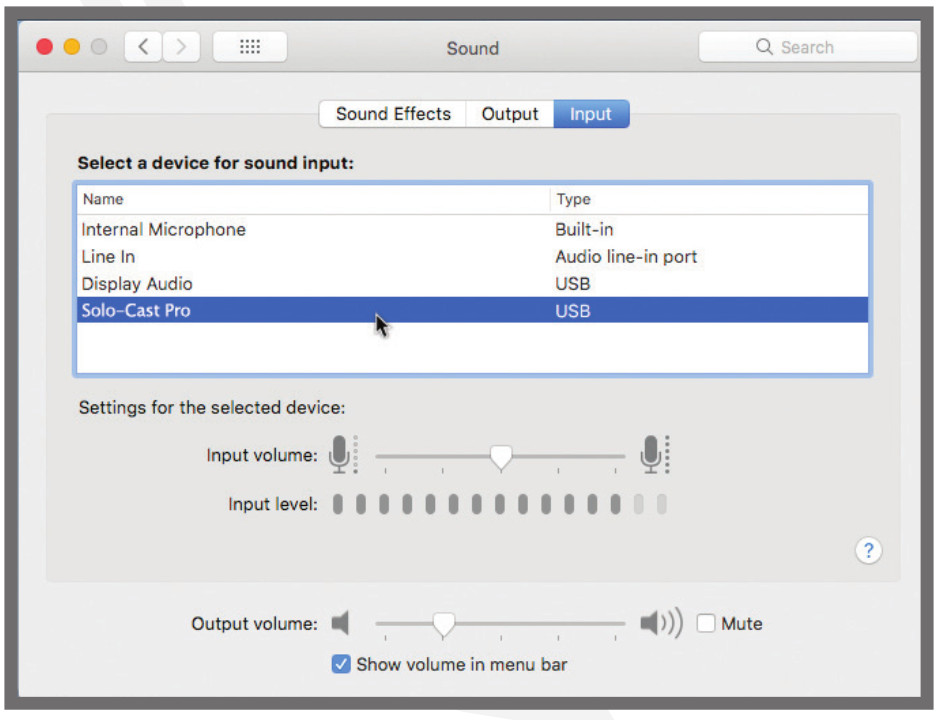
- In the SOUND menu click on the INPUT tab. Select Solo-Cast or Solo-Cast Pro as your input device. Now you can adjust the input volume and check the input level.
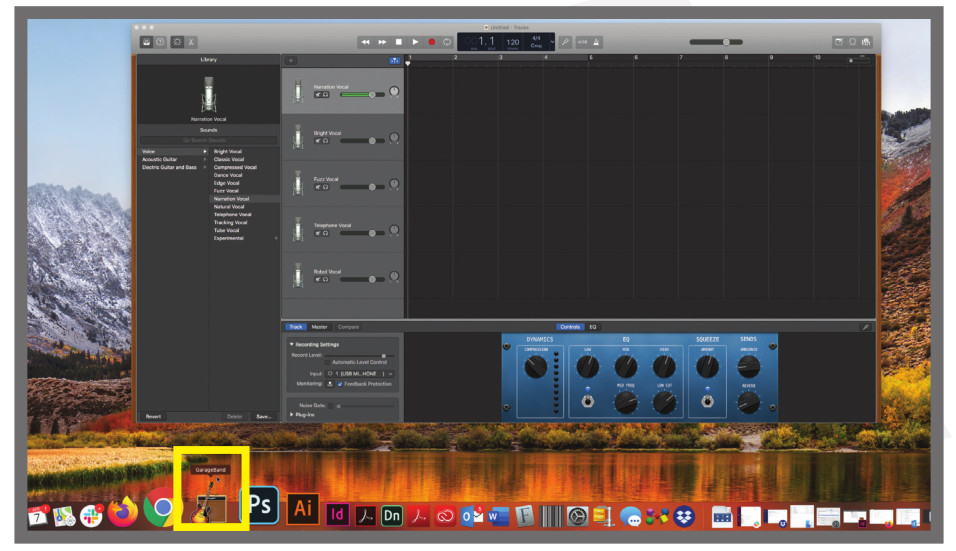
- Now launch your DAW software. Refer to the software’s instruction manual for directions on using external input devices.
Features and Specifications
Solo-Cast
- Perfect for Podcasting, Streaming, recording, and more
- High rate AD/DA conversion technology
- Sampling rate: 24BiV192kHz
- Gain knob controls the overall volume/sensitivity
- High-quality capsule provides smooth and clear sound
- No distortion on microphone or headphone sound
- Low power consumption
- No drivers needed
- Compatible with Windows 7 or later/MAC OSX 9 or later
- No driver downloads required
- Element: High quality condenser capsule
- Polar Pattern: Uni-directional
- Frequency Response: 30Hz – 18kHz
- Sensitivity: -36dB (0dB = 1V/Pa 6 1kHz)
- Input SPL: 130dB (O 1kHz 1% T.H.D)
- Bit Depth: 24Bit
- ADC: 8, 025, 16, 22.05, 32, 44.1, 48kHz
- DAC: 32, 1, 48kHz
- THD+N = 5%
- SNR = 89dB
- Dynamic Range: 89dB
- Stereo output power: 105mW
Solo-Cast Pro
- Perfect for Podcasting, Streaming, recording, and more
- High rate AD/DA conversion technology
- Sampling rate:
- 1/8 headphone out with zero delay
- High-quality capsule provides smooth and clear sound
- Gain knob controls the overall volume/sensitivity
- Mute button
- Built-in headphone jack with built-in headphone amplification and zero latency
- No distortion on microphone or headphone sound
- Low power consumption
- No drivers needed
- Compatible with Windows 7 and later or MAC OSX 10.9 and later (No driver downloads required)
- Element: High quality condenser capsule
- Polar Pattern: Uni-directional
- Frequency Response: 30Hz – 18kHz
- Sensitivity: -36dB (0dB = 1V/Pa 6 1kHz)
Features and Specificatmions
- Max. Input SPL: 130dB (@ 1kHz 1% T.H.D)
- Bit Depth: 24Bit ADC: 8, 11.025, 16, 22.05, 32, 44.1, 48kHz DAC: 32, 44.1, 48kHz
- THD + N = 0.05% S/N Ratio: 96dB Dynamic Range: 93dB
- Stereo output power: 105mW
Troubleshooting
| PROBLEM | SOLUTION |
| NO SOUND | 1. Make sure the microphone is on. volume is properly set.3. Check all connections to ensure everything is properly connected.4. Check the computer’s volume settings.5. Check the computers’ input settings (see page 5 for Windows OS and page 8 for Mac OS X).6. Make sure the Solo-Cast microphone is selected as your audio source within your DAW as well as your input selection on the recording channel in your DAW. |
| Distortion | 1. Gains are not set properly.2. Mixer input sensitivity is too high. |
| Dull Sound | Clean internal and external windscreens. |
Visit us at:RockvilleAuéio.comDue to constant improvements, these specifications are subject to change without notice.Copyright 2020
[xyz-ips snippet=”download-snippet”]