![]()
OWNER’S MANUAL
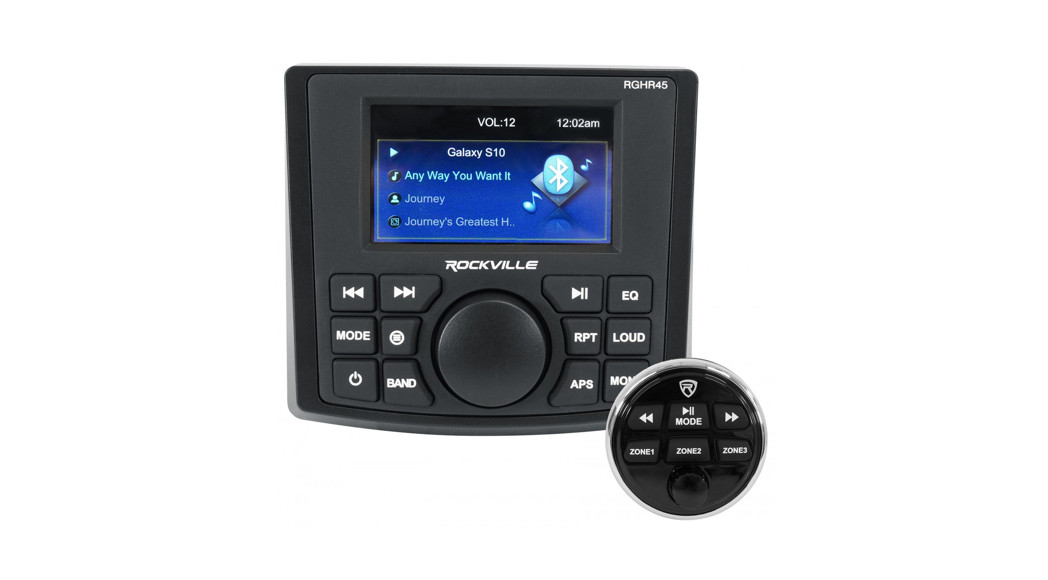
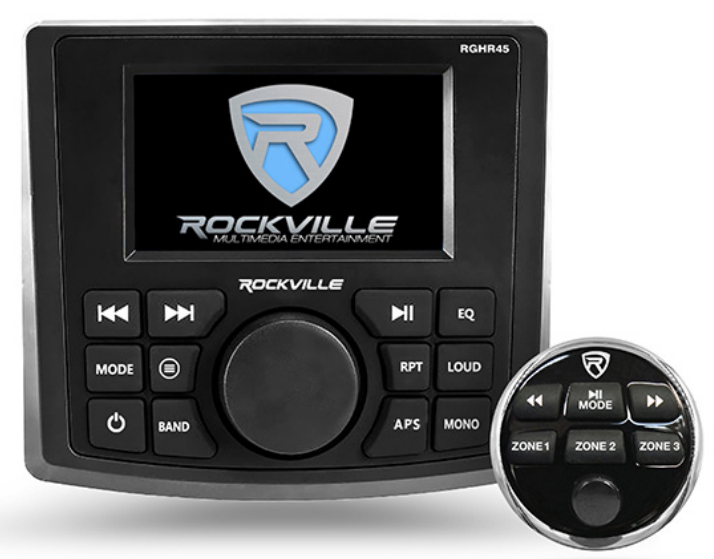
RGHR454-ZONE MARINE GAUGE-HOLE RECEIVER w/BLUETOOTH, USB, AM/FM RADIO, and WIRED REMOTE
Who reads manuals?Instead, go to vimeo.com/474031278 or scan the QR code and watch a short video, which shows you how to set this item up and how to use it.

Thank you for purchasing this Rockville RGHR45 water-resistant gauge-hole digital media receiver with Bluetooth, USB, and AM/FM radio. Please read this guide carefully for proper use of your RGHR45. Should you need assistance, please call our technical help line at 1-646-758-0144, Monday through Friday, 9 am to 5 pm EST.
IMPORTANT SAFETY INSTRUCTIONS
![]()
- To reduce risk of electric shock, never open the unit. There are no user-serviceable parts; refer service to an authorized Rockville service center.
INCLUDED
- Marine digital media receiver
- Wired remote with zone controls
- 40″ USB extension cable
- Mounting screws
- Waterproof wiring harness
- Owner’s manual and warranty card
DIMENSIONS REMOTE
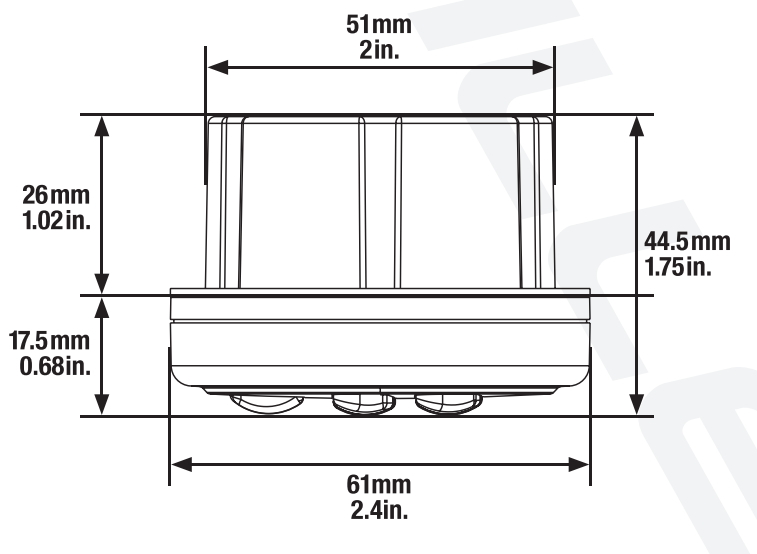
DIMENSIONS REMOTE

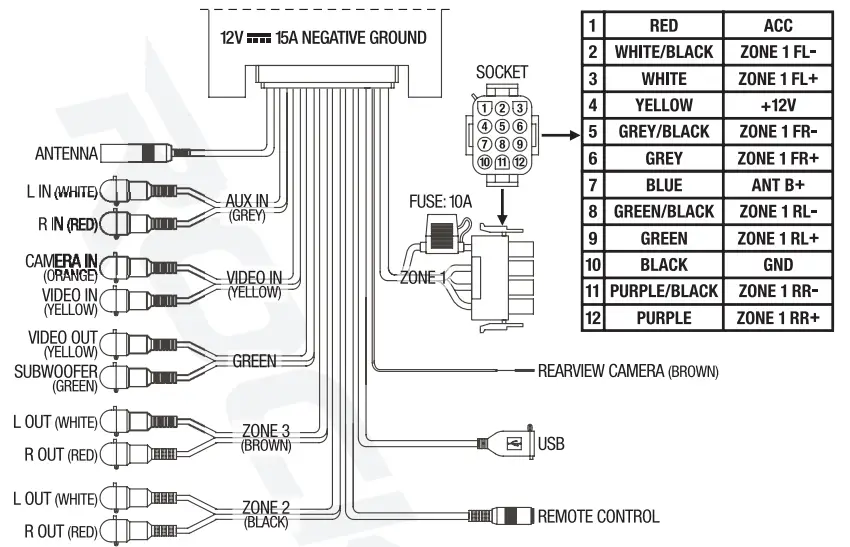
WIRING DIAGRAM
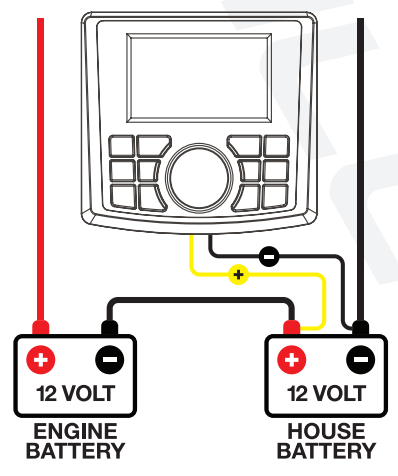
Please note:Most boats run on two batteries, every 12 volts, combined in series to provide 24 volts of power. In the diagram below, the battery on the left is the ENGINE battery. Its positive lead goes to the engine, and its negative lead is tied to the positive lead of the HOUSE battery on the right. The HOUSE battery’s negative terminal provides the common ground for the boat’s electrical system. The RGHR45 runs on 12 volts. Hence, for trouble-free performance, connect the black ground wire and yellow power wire of the RGHR45 to the corresponding terminals on the HOUSE battery only. If the black ground wire does not reach the battery, it can be connected elsewhere, but it may cause intermittent issues. The safest bet is to connect the ground wire directly to the negative (black) terminal of the HOUSE battery.
FUNCTIONS

RECEIVER
 (PREVIOUS/NEXT): Press to select the previous or next track. Press and hold to rewind or fast-forward.
- MODE: Use the MODE button to reach the desired mode setting (BT/USB/RADIO). The MODE button can also be used to enter the unit settings menu.
- POWER: Press to turn the unit on. Press and hold for 2 seconds to turn the unit off..
- BAND: Press repeatedly to switch between AM and FM bands.
- (MENU): Press to enter the settings menu.
- VOL -/VOL+: Turn counterclockwise to decrease the volume or clockwise to increase the volume. Press the button to enter the audio settings. Continue pressing to move forward through the audio settings. Turn clockwise or counterclockwise to adjust the selected setting.
- RPT: Press once to repeat the current track. Press again to repeat all tracks. Press a third time to turn the repeat function off.
- APS: Press and hold the APS button to automatically program AM/FM stations. Short press the APS button to search through the programmed stations.
- MONO: Press to turn the mono setting on or off.
- LOUD: Press to turn the loud setting on or off.
- EQ: Press to select preset EQ curves: Pop, Classical, Rock, and Flat.
- Press once to play the current track; press again to pause.
- LCD screen
REMOTE
- (PREVIOUS): Press to move backward through tracks.
- (PLAY/PAUSE)/MODE: Use the MODE button to reach the desired mode setting (BT/USB/RADIO). The mode button can also be used to enter the unit settings menu.
- (NEXT): Press to move forward through tracks.
- SPEAKER ZONES: Press any one of these buttons to select the desired zone.
- VOL -/VOL+: Turn counterclockwise to decrease the volume or clockwise to increase the volume.
BLUETOOTH
Pairing:
- When “BT MUSIC” is flashing on the screen, the unit is in pairing mode.
- Ensure your device is in Bluetooth mode and discoverable.
- Under the list of available devices, search for and select RGHR45.
- To disconnect a paired device, simply press the APS button.
Bluetooth Music:
- Press the Play/Pause buttons to start and stop music playback.
- Press the Previous/Next buttons to navigate through tracks.
- Press and hold the Previous/Next buttons to rewind or fast-forward.
- Turn VOL-/VOL+ knob to decrease or increase the volume.
USB
- Press the Play/Pause button to start and stop music playback.
- Press the Previous/Next buttons to navigate through tracks.
- Press and hold the Previous/Next buttons to rewind or fast forward.
- Turn VOL-/VOL+ knob to decrease or increase the volume.
The following file formats are supported:AUDIO
| Format | Profile | Max Bit Rate | Max Sample Rate |
| M P3 | All | 320kbps | 48000 |
| WMA | Standard/Pro | 384kbps | 48000 |
| OGG | Ql, Q10 | 500kbps | 48000 |
| FLAC | Level 0.8 | 1.60Mbps | 48000 |
| n/a | |||
| APE | n/a | 950kbps | 48000 |
| AAC | n/a | 448kbps | 48000 |
| AC3 | AC3 only | 640kbps | 48000 |
| ATRA | n/a | 132kbps | 44100 |
| DTS | DTS only | 3.84Mbps | 48000 |
VIDEO
| Video Format | Resolution | Video Decode |
| MKV | 1280 x 720 | MPEG4/XVID. DIVX4/DIVX5/MS MPEG4 V3, MPEG2, RV1/RV2/RVG2, RV3/RV4/RV8 |
| 720 x 480 | H264/AVC | |
| 640 x 480 | DIVX3 | |
| AVI | 1280 x 720 | MPEG4/XVID, DIVX4/DIVX5/MS MPEG4 V3, H263, MJPEG |
| 720 x 480 | H264/AVC | |
| 640 x 480 | DIVX3 | |
| TS | 1280 x 720 | MPEG2 |
| 720 x 480 | H264/AVC | |
| ASF | 1280 x 720 | MPEG4/XVID, DIVX4/DIVX5/MS MPEG4 V3, MPEG2, MPEG1, H263, MJPEG |
| 720 x 480 | H264/AVC | |
| 640 x 480 | DIVX3 | |
| FLV | 1280 x 720 | H263 |
| 720 x 480 | H264/AVC | |
| PMP | 1280 x 720 | MPEG4/XVID |
| 720 x 480 | H264/AVC | |
| RMVB | 1280 x 720 | RV1/RV2/RVG2, RV3/RV4/RV8/RV9 |
| MPGNOB | 1280 x 720 | MPEG2. MPEG1 |
| WMV | 1280 x 720 | MPEG4/XVID |
| 720 x 480 | DVIX4/DVIX5/MS MPEG4 V3, MPEG3 |
The video decoder does not support the following formats: WMV1, WMV2, WMV3, VC1, VP6, MS MPEG4 V1, and MS MPEG4 V2.
VIDEO
| Photo Format | Max Resolution | Profile |
| JPEG | Unlimited | Baseline |
| BMP | 2.5M Pixels | All |
| GIF | 2.5M Pixels | 89A/87A |
| PNG | 2.5M Pixels | All |
SPEAKER ZONES
This marine receiver has 4 zones, each with independent volume control. There are 3 zones for the full range and the 4th zone for a subwoofer. Here is how it works: Zone 1 is the powerful built-in 4-channel amplifier to which you connect your main speakers. Zones 2 and 3 allow you to connect up to 6 additional channels using one or more external amplifiers. You can then control the volume for each of the zones from the unit as well as from the included wired remote.
AM/FM RADIO
- To scan through stations, press the APS button once.
- To manually move backward through stations, hold the Previous button for 1 second, release, then press again.
- To manually move forwards through stations, hold the Next button for 1 second, release, then press again.
- To mute radio mode, press the power button.
- To program presets, press and hold the APS button. Pressing the Previous/Next buttons will change the preset stations. To set a custom preset, press the Next button to reach the desired preset. Once you’ve reached the desired preset, use the Previous/ Next buttons to change the station. Press Play/Pause to set the new preset.
SETTINGS
- Press and hold the MODE button to enter the Settings Menu.
- Press and release the MODE button to change menu items.
- Adjustable settings are: Bass, Treble, Balance, Fader, Beep, EQ, Loud, and Tuner region.
- To adjust the settings, press the VOL-/VOL+ knob to select the desired setting, turn the knob to make adjustments, then press the knob to exit.
FEATURES
- Includes wired remote with the ability to control the volume in each zone
- 3° TFT color display
- Built-in Bluetooth/USB/AM/FM playback
- Fits into a standard gauge-hole (tachometer) opening
- Built-in 72 x 4-watt peak high powered amplifier (28 x 4 RMS)
- 3 pairs of pre-amp outputs
- 4 zones each with volume controlzone 1: built-in amplifierzone 2 and 3: are RCA outputs,zone 4: subwoofer output
- Built-in EQ with preset curves (Pop, Classical, Rock, Flat)
- IP66 waterproof certification
- USB input plays video, supports charging (500mA/5V), accepts thumb drives up to 16GB max, and supports
- variety of file formats (see page 7)
- RCA A/V input to playback a video source
- Rear camera input
- RCA Aux Input
- Built-in AM/FM radio with 18 FM and 12 AM presets + US and European tuning
- Built-in Bluetooth to stream audio from any Bluetooth enabled device
- Big easy-to-use buttons
- Meets ASTM B117 and ASTM D4329 standards
- HumiSeal-coated PCB board for waterproofing and protection from the elements
- Highly efficient even when running at 2 ohms
- Low distortion even at top volumes
AMP SPECS
- TDA7851L quad bridge power amplifier
- 4x 72 watts peak @ 2 ohm
- 4x 48 watts peak @ 4 ohms
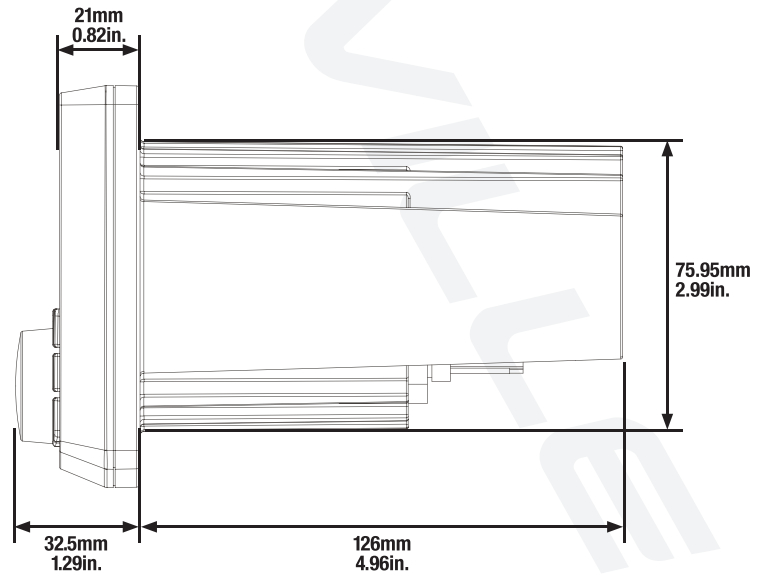
DIMENSIONS
- 2.99″ cutout mounting diameter
- 4.53″ diameter top plate
- 4,96″ mounting depth (not including the top plate)
- 6.25″ depth including the top plate
Troubleshooting
| PROBLEM | SOLUTION |
| No power | 1. Check power connections: Yellow wire goes to battery, red wire goes to ACC, the black wire must be grounded securely. Make sure all three wires are connected, otherwise the unit will not receive power on. |
| Poor or no radio reception | 1. Make sure antenna cables are properly connected. |
| Bluetooth pairing fails | 1. Check to see that both devices are turned on and that your Bluetooth device is discoverable.2. Turn both devices off and then on again.3. Make sure you’ve selected the proper source.4. Make sure that the Bluetooth device is within 5 feet of the unit.5. Move both devices away from other Bluetooth devices and other electronics.6. Make sure that the unit is not paired to a previously paired device. |
| Files on USB memory device will not playback | 1. Make sure you’ve selected the proper source.2. Make sure that the audio files are properly formatted (see page 7).3. Make sure that the USB drive is properly plugged in.4. Check the USB drive for damage.5. Make sure the USB drive’s capacity does not exceed the 16GB limit. |
FEDERAL COMMUNICATIONS COMMISSION COMPLIANCE INFORMATION
Responsible party name: RockvilleAddress: 600 Bayview Ave, Entrance A, Inwood, NY 11096
Hereby declares that the product Rockville RGHR45 Water-Resistant Gauge-Hole Digital Media Receiver complies with FCC rules as mentioned in the following paragraph: This device complies with Part 15 of the FCC rules. Operation is subject to the following two conditions: (1) this device may not cause harmful interference, and (2) this device must accept any interference received, including interference that may cause undesired operation.Note: This equipment has been tested and found to comply with the limits for a Class B digital device, pursuant to Part 15 of the FCC rules. These limits are designed to provide reasonable pro- protection against harmful interference in a residential installation. This equipment generates, uses, and can radiate radio frequency energy and, if not installed and used in accordance with the instructions, may cause harmful interference to radio communications. However, there is no guarantee that inter- ference will not occur in a particular installation. If this equipment does cause harmful interference to radio or television reception, which can be determined by turning the equipment off and on, the user is encouraged to try to correct the interference by one or more of the following measures:
- Reorient or relocate the receiving antenna. Increase the separation between the equipment and receiver.
- Connect the equipment to an outlet on a circuit different from that to which the receiver is connected.
- Consult the dealer or an experienced radio/TV technician for help.
 report this ad
![]()
RockvilleAudio.com2020 ROCKVILLE // Features and specifications are subject to change and or improvement without notice.
[xyz-ips snippet=”download-snippet”]