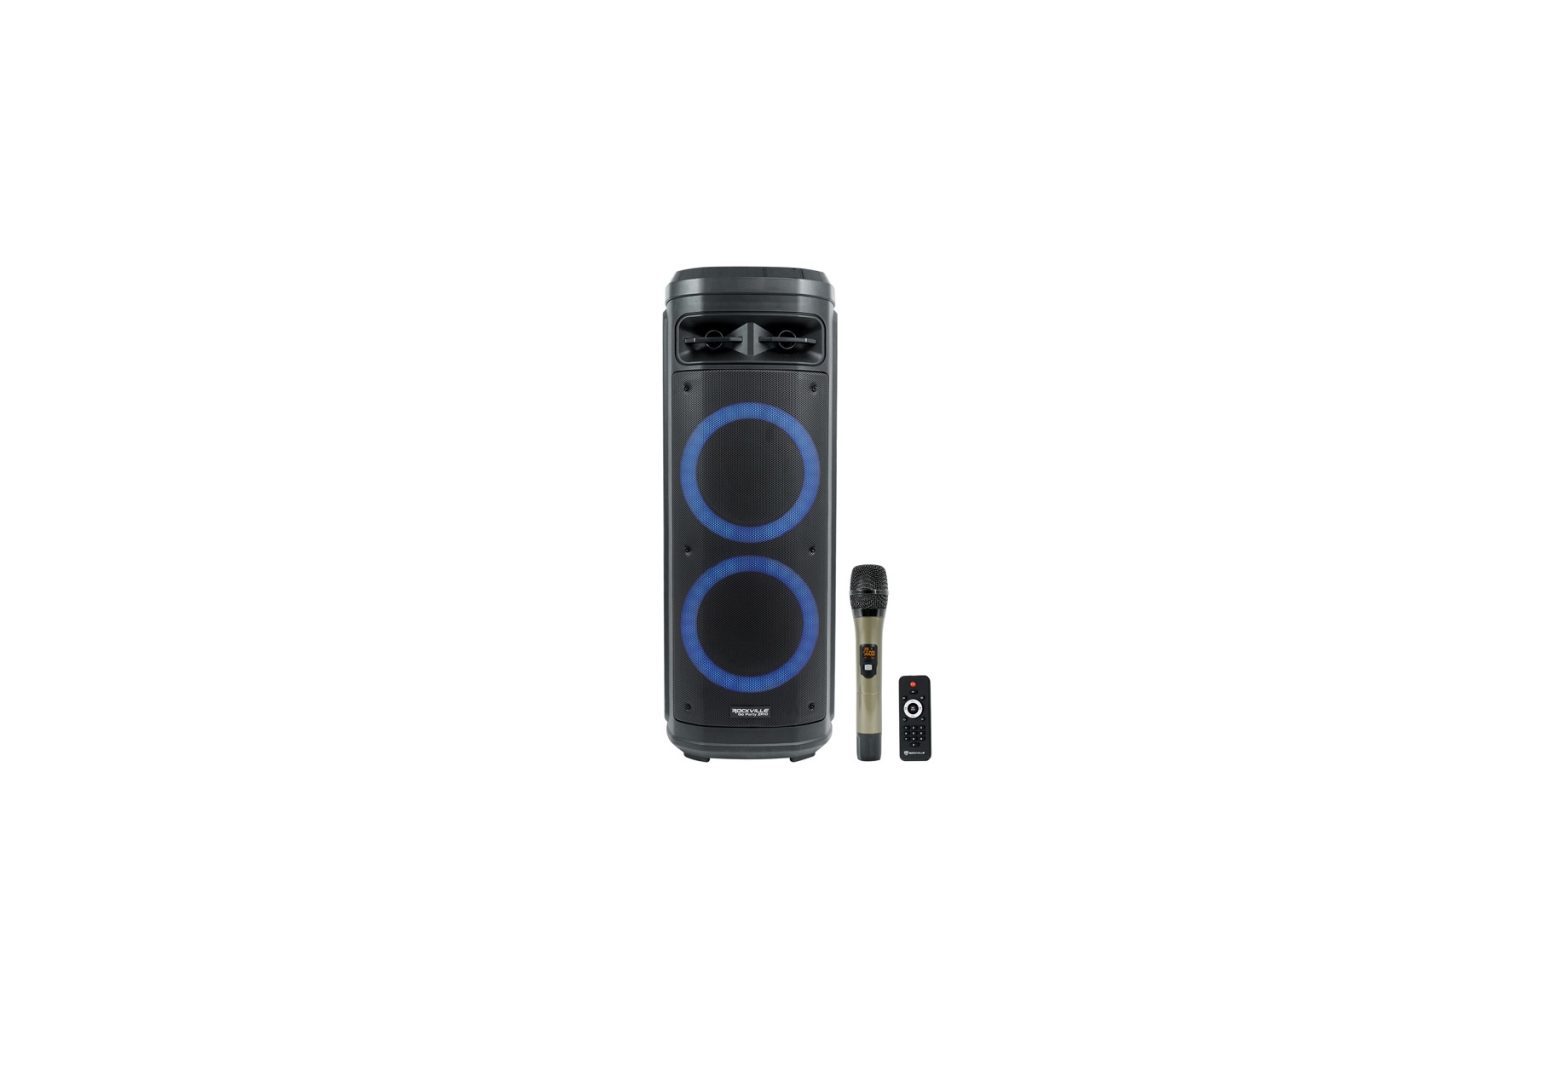
ROCKVILLE ZR10 10-Inch Portable Wireless LED Bluetooth Speaker Owner’s Manual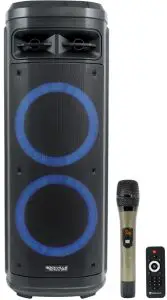
Thank you for purchasing this Rockville Go Party ZR1 0 10- Battery Powered Blue-tooth Party Speaker + UHF Microphone. Please read this owner’s manual carefully for proper use of your Rockville Go Party ZR10. Should you need technical assis-tance, please call our technical help line at 1-646-758-0144, Monday through Friday, 9am to 5pm EST.
Included
- (1) Dual 10- Powered 1000 Watt Bluetooth Speaker
- Remote control
- Power Adapter
- Metal UHF Wireless Microphone
- Owner’ s manual
- Warranty
IMPORTANT SAFETY INSTRUCTIONS
Caution
![]()
![]() RISK OF ELECTRIC SHOCK DO NOT OPEN
RISK OF ELECTRIC SHOCK DO NOT OPEN
- To reduce risk of electric shock, never open the There are no user serviceable parts, refer service to an authorized Rockville service center.
- Do not expose this unit to any kind of
- Make sure the unit is placed on a level and stable surface
How to Avoid Irritating Feedback
The placement of your microphone is critical in avoiding feedback through your Go Party ZR10 speaker. Never set up your microphone in front of the speaker. Always set up your microphone behind the speaker. When approaching the speaker to make any adjust ments, we recommend approaching the speaker from the rear and not walking directly towards the front of the speaker.
Functions
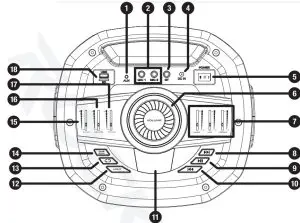
- 3.5mm AUX input
- 1/‹““ unbalanced microphone inputs. Please note: We recommend using professional unbalanced dynamic mics as they are least likely to be affected by interference. Low cost, high impedance mics can be used, however the level of background noise is higher since an unbalanced circuit is far more susceptible to interference.
- ‘/4″ unbalanced guitar input
- DC 15V power input
- Three position power button: Press the button to the left for battery operation (I). Press the button to the right for external power operation (II). Set the button to the center to turn the unit off (O).
- Master volume
- Three Band EQ: Use the sliders to adjusts high (treble), mid, and low (bass)
- Next button: During USB/SD and Bluetooth playback, use this button to move to the next
- Play/Pause button: Press the button to pause or resume audio playback in USB/SD and Bluetooth
- Previous button: During USB/SD and Bluetooth playback, use this button to move to the previous
- LCD display
- Light button: The speaker features a multicolor cicular LED array around each There are three modes to choose from. Press the button once to turn on the lights. The default mode shows the LEDs moving in a circular motion. Press the button again for the second mode which shows portions of the circles randomly lighting up. Press the button a third time for the last mode which shows the circles acting as spectrum analyzers. Press the button a fourth time to turn off the lights. The rate of color change and the speed of the LEDs will change based on the tempo of the music
- Repeat and Mic Priority button: Press once to repeat single song, press twice to repeat all songs. Press and hold to activate or deactivate mic priority function. When activated, this function will lower the music level while the mic is being used.Press again to exit repeat mode.
- Mode/TWS button: Press to switch between input modes: Bluetooth, USB/SD, and AUX This button is also used to activate TWS (see instrucitons below).
- Echo slider: Used to adjust echo effect.
- Mic volume: Use this slider to adjust the volume level of all mic
- GT volume: Use this slider to adjust the volume level of guitar input.
- USB/SD input
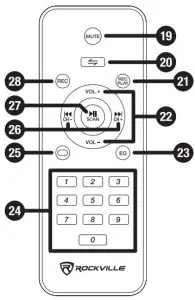
- Mute
- Mode button (see item 14 above)
- Rec Play button: Use this button to play back any recordings made using the record
- Vol+/VoI-: Use to adjust the speakers
- EQ button
- Number pad In USB/SD mode, use the number pad to direct select tracks.
- Repeat button (see item 12 on page 2)
- Previous/CH- and Next/CH+ (see items 8 and 10 on page 2)
- Play/Pause/Scan button (see item 9 on page 2)
- Rec button: allows for recording of input from the wireless mic as well as any wired mics connected to the speaker
Operation
TWS
The Go Party ZR10 features true wireless stereo (TWS) Bluetooth linking. This means you can purchase 2 of these speakers and link them together to play in stereo wirelessly.
- Make sure both speakers are
- Go to your phone’s Bluetooth interface and make sure that it is not connected to either of the If your phone is connected, choose to forget or remove the speakers from the list of available devices.
- Turn both speakers ON. Press the MODE
 button on both speakers. The word “bLUE” should appear on both LCD screens and flash
 - Press the NEXT button on either one of the speakers for 5 seconds. Both units will enter pairing
- One of the units will show the word “bLUE” on the LCD display. This is the primary unit and will act as the left channel. The other unit will show the word “tOt.” This will be the secondary unit and will act as the right
- Go to your phone’s Bluetooth interface and select “Go Party ZR10” from the list of available devices. If pairing is successful, the word bLUE on the primary unit will stop flashing.
- To disconnect the speakers, select any other mode on either one of the speakers.Please note, in TWS mode, both units will operate independently. For example, if you turn down the volume on the primary unit, it will not affect the secondary unit.
 button on both speakers. The word “bLUE” should appear on both LCD screens and flash
 button on either one of the speakers for 5 seconds. Both units will enter pairing
Bluetooth
To connect your iPod, iPad, iPhone, MP3 player, Android phone or tablet or any other Blue- tooth capable device follow the steps listed below.
- Make sure the speaker is
- Press the mode button until you are in Bluetooth The word “bLUE” will appear on the LCD readout and will flash intermittently.
- Turn on the Bluetooth feature on your device and ensure that it is discoverable. Look for and select “Go Party ZR10” from the list of available
- Upon successful pairing, the word bLUE will stop
- Use the PLAY/PAUSE button to pause and resume
- Use the PREVIOUS/NEXT buttons for track
- Use the master VOLUME knob to set the volume
Microphone
The Go Party ZR10 includes a wireless mic. It also features two ‘/4” unbalanced MIC IN ports (located on the top of the unit) to connect wired mics (not included). There is an inde- pendent mic volume control and an echo effect control.
To use the included wireless mic, simply turn the microphone on. It will automatically con- nect with the speaker.
To connect wired mics, follow the procedure below.
- Make sure the speaker is
- Plug your microphone(s) into either of the ‘/4” mic inputs (MIC 1 or MIC 2).
- Set the MIC VOL slider to the lowest setting.
- Set the master VOLUME to the lowest setting
- Turn the speaker ON
- Slowly adjust the MIC VOL slider until you’ve reached the desired
- Adjust the master VOLUME as
Always stand behind the unit when using microphones so as to avoid feedback.
Recording Microphone Input
The Go Party ZR10 can record all microphone input to an SD card or USB drive. Simply press the REC button on the remote control while using the microphone(s). To play back your recording, press the REC PLAY button on the remote control.
Guitar
Always stand behind the unit when using a guitar so as to avoid feedback.
The Go Party ZR10 features one ‘/4” unbalanced guitar input port (labeled GT and located on the top of the unit) with independent volume control.
- Make sure the speaker is OFF.
- Plug your guitar into the ‘/4″ input marked
- Set the GT VOL slider to the lowest
- Set the master VOLUME to the lowest setting.
- Set the master VOLUME to the lowest setting
- Slowly adjust the GT VOL slider until you’ve reached the desired
- Adjust the master VOLUME as needed.
USB/SD
The built-in media player allows you to play MP3 files. To access this function follow the steps below
- Make sure the speaker is
- Insert a USB flash drive or SD card into the corresponding Music should begin playing automatically.
- Use the PLAY/PAUSE button to pause and resume
- Use the PREVIOUS/NEXT buttons for track
- Use the master VOLUME knob to set the volume
Please note, the unit can accept SD cards and USB drives with a max capacity of 32GB. USB drive must be formatted as FAT32 and files must be in the MP3 format.
AUX
The 3.5mm AUX jack allows for input from smart phones, MP3 players, CD players, or any other external signal source with a 3.5mm jack or RCA outputs. Please note you will need either a 3.5mm to 3.5mm cable or an RCA to 3.5mm cable (not included).
- Make sure the speaker is
- Set the master VOLUME to the lowest
- Connect signal source to the 5mm AUX input.
- Turn the speaker
- Set the master VOLUME to the desired
Please note, inserting a USB drive or SD card will override AUX input.
Battery Operation and Charging
To use the internal battery, firstly ensure that the battery is fully charged (see the charging procedure below.) Press the speaker’s power button to the right for battery operation.
To charge the battery:
- Turn the speaker
- Plug in the external power
- Battery will begin to charge automatically and the LED indicator (in the LCD display) will be
- Once the battery is fully charged, LED indicator will be green.
Please note: Charging time is 8 hours. The battery will last 14 hours at 25% volume, 7.3 hours at 50%, and 4.5 hours at 90%. The speaker features a charging protection circuit to prevent the battery from overcharging.
Battery Replacement
Read these instructions carefully for proper replacement of speaker’s battery. Please note, although it is possible for you to remove and replace the battery, we recommend you contact our customer support service department before doing so.
- Turn the speaker off and unplug the external power
- Using a Phillips head screwdriver, remove the six screws that hold the battery cover in place and pull it away from the
- Slowly and carefully pull the battery
- Disconnect the wire leads from the
- Connect the wire leads to the new battery and place the battery into the
- Replace the battery cover. Use the six screws the were removed in step 1 to securely fasten it to the speaker.
Features and Specifications
- 1000 Watts Peak/200 Watts RMS
- Bluetooth music streaming with any smartphone, tablet, Alexa device, etc
- TWS — True Wireless Stereo – Wirelessly link 2 speakers
- 12V 9A Rechargeable battery lasts 14 hours at 25% volume, 3 hours at 50%, and 4.5 hours at 90%.
- Built-in Bluetooth, USB, and SD
- Built-in party LED lights with 3 modes that spectrum analyze to the music and have multiple colors
- Perfect for house party’s, Home use, DJ, tailgating, camping, and other applications
- (2) High power long-throw 10” woofers with 5” voice coils
- (2) 1/x“ mic inputs with level control and echo control
- ‘/4” Guitar input with level control
- 5mm AUX input with level control
- 50 foot Bluetooth range
- Large master volume control jog wheel
- Built-in wheels and handle for increased portability and transport convenience
- 3 band graphic equalizer built in
- High-quality ABS enclosure
- LED screen displays track info as well as battery life indicator
- Rear subwoofer port for deep pounding bass
- Built-in UHF mic transmitter + includes high quality microphone
- Mic priority function can be turned on or off (When on; it lowers the music while talking into the mic).
- Class D amplifier built-in
- Frequency Response: 40Hz —20KHz
- Maximum SPL @1w/1m: 105dB peak/100dB continuous
- Microphone with digital display and battery life indicator (uses 2x AA batteries)
- 110/220V Auto-switching power supply
- Speaker dimensions in inches: 59” x 13.77” x 37.79”
- Weight: 66 Lbs.
Troubleshooting
|
PROBLEM |
SOLUTION |
| No power |
|
| No sound/ distorted sound |
|
|
Buzzing sound |
Make sure you are using a proper cable. For 1/” cables, there are 3 types: instrument, TS (unbalanced), and TRS (balanced). Check the requirements of the connected gear and the input of the speaker and make sure you are using the appropriate cable. |
|
Mic/Guitar feedback |
Point the mics and/or guitar away from the speaker. Make sure |
|
Poor Mic sound |
|
|
Bluetooth/TWS pairing fails |
Check to see that both the devices are turned on and that your
Please refer to pages 3 and 4 for TWS and Bluetooth pairing procedures. |
|
No SD or USB playback |
|
FEDERAL COMMUNICATIONS COMMISSION COMPLIANCE INFORMATION
Responsible party name: RockvilleAddress: 600 Bayview Ave.Entrance AInwood, NY 11096
Hereby declares that the product(s) Go Party ZR10 speaker complies with FCC rules as mentioned in the following paragraph:
This device complies with Part 15 of the FCC rules. Operation is subject to the following two conditions: (1) this device may not cause harmful interference, and (2) this device must accept any interference received, including interference that may cause undesired operation.
Note: This equipment has been tested and found to comply with the limits for a Class B digital device, pursuant to Part 15 of the FCC rules. These limits are designed to provide reasonable protection against harmful interference in a residential installation. This equipment generates, uses and can radiate radio frequency energy and, if not installed and used in accordance with the instructions, may cause harmful interference to radio communications. However, there is no guarantee that interference will not occur in a particular installation. If this equipment does cause harmful interference to radio or television reception, which can be determined by turning the equipment off and on, the user is encouraged to try to correct the interference by one or more of the following measures:
- Reorient or relocate the receiving
- Increase the separation between the equipment and
- Connect the equipment to an outlet on a circuit different from that to which the receiver is
- Consult the dealer or an experienced radio/TV technician for help.

 report this ad
[xyz-ips snippet=”download-snippet”]