
Roland Matrix Switcher Video Processor Owner’s Manual
Rack-Mounting
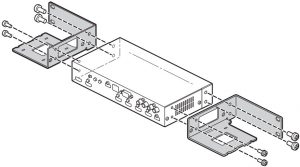
Attaching the rack-mount angles
By attaching the included rack-mount angles to this unit, you can mount it in a rack.
- Remove the screws from the side panels. Using the screws that you removed, attach the rackmount angles as shown in the illustration.
Important notes on rack mounting
 Install in a well-ventilated location.
- Do not block the cooling vents located on the unit’s top panel and side panels.
- Avoid mounting the unit in a sealed-type rack. Warm air within the rack cannot escape and is sucked into the unit, making efficient cooling impossible.
- If the back of the rack cannot be opened, install an exhaust port or ventilation fan at the top back surface of the rack, where warm air collects.
- When using the unit while mounted in a movable case (portable rack), remove the front and rear rack covers so that the front and back of the unit are not obstructed.
- Take care not to pinch your fingers etc. while mounting the unit in a rack.
Free-Standing Use
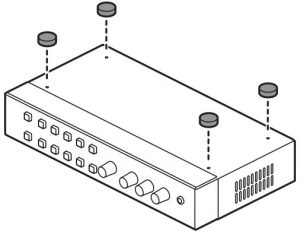
Attaching the rubber feet
If you will be placing this unit on a desk or shelf for use, attach the included rubber feet (4 pcs.). This prevents the unit from slipping or from scratching the surface on which it is placed.
- Remove the rubber feet from the sheet.
- Peel the double-sided tape off the rubber feet, and affix the feet so that they cover the four guide holes on the bottom of the unit.
PDF Manual (download from the Web)
Details on operations, menu lists, and a list of RS-232 commands are provided in “Reference Manual” (PDF).
Downloading
- Access the Roland website. https://proav.roland.com/
- Move to the product pageclick “Support”download the applicable PDF file.

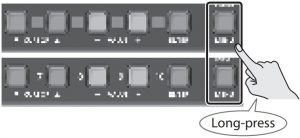
Before using the unit, ensure that its system program is at the most recent version. For information on available upgrades for the system program, see the Roland website (https://proav.roland.com/).You can check the system program version by Long-pressing the [MENU] button![]() “System”
“System”![]() 0“Version.”
0“Version.”
Before using this unit, carefully read “USING THE UNIT SAFELY” and “IMPORTANT NOTES” (the leaflet “USING THE UNIT SAFELY” and the Owner’s Manual. After reading, keep the document(s) where it will be available for immediate reference.
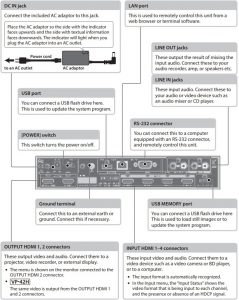
Panel Descriptions
Front Panel
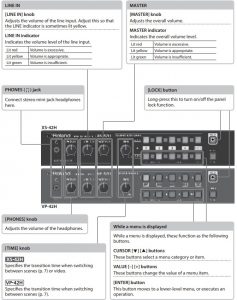
Rear Panel
To prevent malfunction and equipment failure, always turn down the volume, and turn off all the units before making any connections.
Basic Operation
Turning the Power On/Off
- Before turning the unit on/off, always be sure to turn the volume down. Even with the volume turned down, you might hear some sound when switching the unit on/off. However, this is normal and does not indicate a malfunction
Turning the power on
- Make sure that all devices are powered-off.
- To turn on the power, slide this unit’s [POWER] switch to the ON position.
- Turn on the power in the order of source devicesoutput devices.

Turning the power off
- Turn off the power in the order of output devicessource devices.
- To turn off the power, slide this unit’s [POWER] switch to the OFF position.
About the Auto Off functionThe power to the unit turns off automatically when all of the following states persist for 240 minutes (Auto Off function).
- No operation performed on the unit
- No audio or video input
- No equipment is connected to the OUTPUT HDMI connectors
If you do not want the power to be turned off automatically, disengage the Auto Off function. Long-press the [MENU] button![]() “System”
“System”![]() set “Auto Power Off” to “Disabled.”
set “Auto Power Off” to “Disabled.”
NOTE
- Unsaved data is lost when the power turns off. Before turning the power off, save the data that you want to keep.
- To restore power, turn the power on again.
Here’s how to access the menu, and make video/ audio settings and settings for this unit.
- The menu is shown only on the monitor that’s connected to the OUTPUT HDMI 2 connector.
- The contents of the menu settings are saved in the unit when you close the menu.
- Long-press the [MENU] button to display the menu.The [MENU] button is lit red, and the menu categories are displayed.
- Press the CURSOR [] [] buttons to select a category, then press the [ENTER] button to confirm the selection.The menu items of the selected category are displayed.
- Press the CURSOR [] [] buttons to select a menu item.
- If the value area indicates “Enter,” you can press the [ENTER] button to proceed to a lower level. Alternatively, pressing the [ENTER] button executes an operation.
- Pressing the [MENU] button moves you back one level higher.
- Press the VALUE [–] [+] buttons to change the value of the setting.
- By holding down the [ENTER] button and longpressing the VALUE [–] or [+] button you can change the value of the setting more greatly.
- If you press the VALUE [–] and [+] buttons simultaneously, the selected menu item returns to its default setting.
- Press the [MENU] button several times to close the menu.
 The [MENU] button is lit red, and the menu categories are displayed.
 The menu items of the selected category are displayed.
Compositing Video
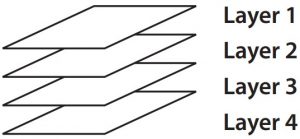
Up to four screens of the video inputs can be composited as layers and output.
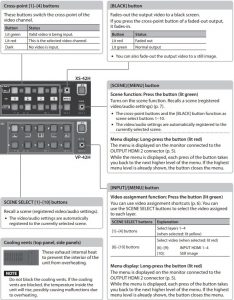
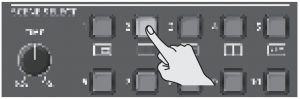
- Press the [INPUT] button to make it light green.Now you can use the SCENE SELECT buttons to select the video that’s assigned to each layer.
- This is a shortcut for Composition menu“Layer 1” “Layer 4”“Source.”
- This is a shortcut for Composition menu
- Use the SCENE SELECT buttons to select the video that’s assigned to each layer.
- For details on how to load a still image, refer to “Reference Manual” (PDF).
- Long-press the [MENU] button0 “Composition”“Layer 1”–“Layer 4”adjust each of the Window items.For each layer, adjust the position and size of the video.
 Now you can use the SCENE SELECT buttons to select the video that’s assigned to each layer.

Hiding the layers
- 1. Long-press the [MENU] button “Composition” “Layer 1”–“Layer 4”set “Layer” to “Disabled.”
MEMO
- The order in which layers are overlaid is fixed.
- The video that’s assigned to layer 1 can also be keycomposited.
- The screen pattern setting is automatically registered in the currently-selected scene.
- The same video is output from the OUTPUT HDMI 1 and 2 connectors.
Switching the Video
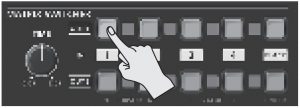
Use the cross-point buttons to switch the combination of four inputs and two outputs, and output the video. The internal frame synchronizer allows seamless video switching.
- Video and audio are switched in tandem.
- Make sure that the [SCENE]/[MENU] button is unlit.
- Use the [TIME] knob to specify the video transition time.
- Press a cross-point button.The horizontal direction of the cross-point buttons is the input channel, and the vertical direction is the output channel.The output video is switched.

 The output video is switched.
MEMO
You can individually specify the scaling for each video output.Long-press the [MENU] button![]() “Output”
“Output”![]() “Output 1”–“Output 2”
“Output 1”–“Output 2”![]() adjust each of the Scaling items.
adjust each of the Scaling items.
Recalling Video/Audio Settings(Scenes)
Video/audio settings can be registered as “scenes” and recalled for use when necessary. This unit provides ten scenes.
Registering to a sceneVideo/audio settings are automatically registered in the currently selected scene. You don’t need to perform any operation to register them.The following settings are registered in a scene.
- Output menu
- Except for “Color Space” and “Signal Type”
- Input menu
- Composition menu (VP-42H)
- Audio menu
- Cross-point (XS-42H)
VP-42H
- Make sure that the [INPUT]/[MENU] button is unlit.
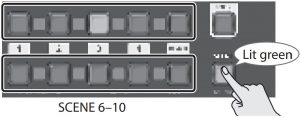
- Press the SCENE SELECT button of the scene number that you want to recall.The settings are recalled. The currently selected button is lit yellow.
 The settings are recalled. The currently selected button is lit yellow.
XS-42H
- Press the [SCENE] button to make it light green.SCENE 1–5Now you can use the cross-point buttons and the [BLACK] button to select a scene. The currently selected button is lit yellow.
- Press the cross-point button or [BLACK] button of the scene number that you want to recall.The settings are recalled.
 Now you can use the cross-point buttons and the [BLACK] button to select a scene. The currently selected button is lit yellow.
USING THE UNIT SAFELY
![]() WARNING
WARNING
![]() Concerning the Auto Off functionThe power to this unit will be turned off automatically after a predetermined amount of time has passed since it was last used for playing music, or its buttons or controls were operated (Auto Off function). If you do not want the power to be turned off automatically, disengage the Auto Off function.
Concerning the Auto Off functionThe power to this unit will be turned off automatically after a predetermined amount of time has passed since it was last used for playing music, or its buttons or controls were operated (Auto Off function). If you do not want the power to be turned off automatically, disengage the Auto Off function.
![]() Secure a sufficient amount of space at the setup locationSince this unit normally emits a slight amount of heat, make sure to secure sufficient space around it, as shown below.
Secure a sufficient amount of space at the setup locationSince this unit normally emits a slight amount of heat, make sure to secure sufficient space around it, as shown below.

![]() Use only the supplied AC adaptor and the correct voltageBe sure to use only the AC adaptor supplied with the unit. Also, make sure the line voltage at the installation matches the input voltage specified on the AC adaptor’s body. Other AC adaptors may use a different polarity, or be designed for a different voltage, so their use could result in damage, malfunction, or electric shock.
Use only the supplied AC adaptor and the correct voltageBe sure to use only the AC adaptor supplied with the unit. Also, make sure the line voltage at the installation matches the input voltage specified on the AC adaptor’s body. Other AC adaptors may use a different polarity, or be designed for a different voltage, so their use could result in damage, malfunction, or electric shock.
![]() Use only the supplied power cordUse only the attached power cord. Also, the supplied power cord must not be used with any other device.
Use only the supplied power cordUse only the attached power cord. Also, the supplied power cord must not be used with any other device.
![]() Important notes on rack mountingTake care not to pinch your fingers etc. while mounting this unit in a rack.
Important notes on rack mountingTake care not to pinch your fingers etc. while mounting this unit in a rack.
![]() CAUTION
CAUTION![]() Keep small items out of the reach of childrenTo prevent accidental ingestion of the parts listed below, always keep them out of the reach of small children.
Keep small items out of the reach of childrenTo prevent accidental ingestion of the parts listed below, always keep them out of the reach of small children.
- Included Parts: Rubber feet
- Removable Parts: Screws
![]() Handle the ground terminal carefullyIf you remove the screw from the ground terminal, be sure to replace it; don’t leave it lying around where it could accidentally be swallowed by small children. When refastening the screw, make that it is firmly fastened, so it won’t come loose.
Handle the ground terminal carefullyIf you remove the screw from the ground terminal, be sure to replace it; don’t leave it lying around where it could accidentally be swallowed by small children. When refastening the screw, make that it is firmly fastened, so it won’t come loose.
![]() Take care not to get burnedDepending on the conditions of use, this unit might become hot, so take care not to be burned.
Take care not to get burnedDepending on the conditions of use, this unit might become hot, so take care not to be burned.
IMPORTANT NOTES
Placement
- Depending on the material and temperature of the surface on which you place the unit, its rubber feet may discolor or mar the surface.
Repairs and Data
- Before sending the unit away for repairs, be sure to make a backup of the data stored within it; or you may prefer to write down the needed information. Although we will do our utmost to preserve the data stored in your unit when we carry out repairs, in some cases, such as when the memory section is physically damaged, restoration of the stored content may be impossible. Roland assumes no liability concerning the restoration of any stored content that has been lost.
Additional Precautions
- Any data stored within the unit can be lost as the result of equipment failure, incorrect operation, etc. To protect yourself against the irretrievable loss of data, try to make a habit of creating regular backups of the data you’ve stored in the unit.
- Roland assumes no liability concerning the restoration of any stored content that has been lost.
- This unit allows you to switch images at high speed. For some people, viewing such images can cause headache, nausea, or other discomfort. Do not use this unit to create video that might cause these types of health problems. Roland Corporation will accept no responsibility for any such health problems that may occur in yourself or in viewers.
- Do not use connection cables that contain a built-in resistor.
- This document explains the specifications of the product at the time that the document was issued. For the latest information, refer to the Roland website.
Using External Memories
- Please observe the following precautions when handling external memory devices. Also, make sure to carefully observe all the precautions that were supplied with the external memory device.
- Do not remove the device while reading/writing is in progress.
- To prevent damage from static electricity, discharge all static electricity from your person before handling the device.
Intellectual Property Right
- It is forbidden by law to make an audio recording, video recording, copy or revision of a third party’s copyrighted work (musical work, video work, broadcast, live performance, or other work), whether in whole or in part, and distribute, sell, lease, perform or broadcast it without the permission of the copyright owner.
- Do not use this product for purposes that could infringe on a copyright held by a third party. We assume no responsibility whatsoever with regard to any infringements of third-party copyrights arising through your use of this product.
- This product contains eParts integrated software platform of eSOL Co.,Ltd. eParts is a trademark of eSOL Co., Ltd. in Japan.
- Roland is an either registered trademark or trademark of Roland Corporation in the United States and/or other countries.
- Company names and product names appearing in this document are registered trademarks or trademarks of their respective owners.
[xyz-ips snippet=”download-snippet”]