Digital V-Hi-Hat VH-14DOwner’s Manual
V-Drums
Before using this unit, carefully read “USING THE UNIT SAFELY” (p. 2) and “IMPORTANT NOTES” (p. 2).After reading, keep the document(s) where it will be available for immediate reference.© 2021 Roland Corporation
USING THE UNIT SAFELY
INSTRUCTIONS FOR THE PREVENTION OF FIRE, ELECTRIC SHOCK, OR INJURYTO PERSONSAbout A WARNING and ACAUTION Notices
| Used for instructions intended to alert the user to the risk of death or severe injury should the unit be used improperly. | |
| Used for instructions intended to alert the user to the risk of injury or material damage should the unit be used improperly.* Material damage refers to damage or other adverse effects caused with respect to the home and all its furnishings, as well to domestic animals or pets. |
About the Symbols
| The |
|
| The |
|
 |
The |
ALWAYS OBSERVE THE FOLLOWING WARNING
![]() Do not disassemble or modify by yourselfDo not carry out anything unless you are instructed to do so in the owner’s manual. Otherwise, you risk causing malfunction.
Do not disassemble or modify by yourselfDo not carry out anything unless you are instructed to do so in the owner’s manual. Otherwise, you risk causing malfunction.![]() Do not repair or replace parts by yourselfBe sure to contact your dealer, a Roland service center, or an official Roland dealer. For a list of Roland service centers and official Roland dealers, refer to the Roland website.
Do not repair or replace parts by yourselfBe sure to contact your dealer, a Roland service center, or an official Roland dealer. For a list of Roland service centers and official Roland dealers, refer to the Roland website.
Do not use or store in the following types of locations
- Subject to temperature extremes (e.g., direct sunlight in an enclosed vehicle, near a heating duct, on top of heat-generating equipment); or are

- Damp (e.g., baths, washrooms, on wet floors); or are
- Exposed to steam or smoke; or are
- Subject to salt exposure; or are
- Exposed to rain; or are
- Dusty or sandy; or are
- Subject to high levels of vibration and shakiness; or are
- Placed in a poorly ventilated location.

Use only the stand that is recommended Use a hi-hat stand that satisfies the specifications listed in “Compatible Stand” (p. 8) when setting up this product.
WARNING
![]() Do not place in a location that is unstableDo not place this product on a wobbly platform or on a sloped surface. Be sure to set up the product on a stable, flat surface.
Do not place in a location that is unstableDo not place this product on a wobbly platform or on a sloped surface. Be sure to set up the product on a stable, flat surface.
![]() Precautions regarding placement of this unit on a standBe sure to follow the instructions in the Owner’s Manual carefully when placing this unit on a stand (p. 4–p. 7). If it is not set up properly, you risk creating an unstable situation which could lead to the unit falling or the stand toppling, and may result in injury.
Precautions regarding placement of this unit on a standBe sure to follow the instructions in the Owner’s Manual carefully when placing this unit on a stand (p. 4–p. 7). If it is not set up properly, you risk creating an unstable situation which could lead to the unit falling or the stand toppling, and may result in injury.
![]() Do not allow foreign objects or liquids to enter unit; never place containers with liquid on unit
Do not allow foreign objects or liquids to enter unit; never place containers with liquid on unit
![]()
Do not place containers containing liquid (e.g., flower vases) on this product. Never allow foreign objects (e.g., flammable objects, coins, wires) or liquids (e.g., water or juice) to enter this product. Doing so may cause short circuits, faulty operation, or other malfunctions.
WARNINGTurn off the unit if an abnormality or malfunction occursIn the following cases, immediately turn off the power and contact your dealer, a Roland service center, or an official Roland dealer for service.
- If smoke or unusual odor occurs; or
- Objects have fallen into, or liquid has been spilled onto the unit; or
- The unit has been exposed to rain (or otherwise has become wet); or
- The unit does not appear to operate normally or exhibits a marked change in performance.For a list of Roland service centers and official Roland dealers, refer to the Roland website.
Be cautious to protect children from injuryAlways make sure that an adult is on hand to provide supervision and guidance when using the unit in places where children are present, or when a child will be using the unit.
![]() Do not drop or subject to strong impactOtherwise, you risk causing damage or malfunction.
Do not drop or subject to strong impactOtherwise, you risk causing damage or malfunction.
CAUTION
Use only the specified stand(s)This product is designed to only be used with hi-hat stands that satisfy the specifications listed in “Compatible Stand” (p. 8). Using this product with other stands may cause it to become unstable and fall down or topple, injuring people nearby.
Evaluate safety issues before using standsEven if you observe the cautions given in the owner’s manual, certain types of handling may allow this product to fall from the stand, or cause the stand to overturn. Please be mindful of any safety issues before using this product.
CAUTION
![]() Avoid climbing on top of the unit, or placing heavy objects on itOtherwise, you risk injury as the result of the unit toppling over or dropping down.
Avoid climbing on top of the unit, or placing heavy objects on itOtherwise, you risk injury as the result of the unit toppling over or dropping down.
Disconnect all cords/cables before moving the unit![]() Damage or malfunction may result if you fail to disconnect all cables before moving the unit.
Damage or malfunction may result if you fail to disconnect all cables before moving the unit.
 Take care so as not to get fingers pinchedWhen handling the following moving parts, take care so as not to get fingers, toes, etc., pinched. Whenever a child uses the unit, an adult should be on hand to provide supervision and guidance.• Between the top and bottom cymbal
![]() Keep small items out of the reach of childrenTo prevent accidental ingestion of the parts listed below, always keep them out of the reach of small children.
Keep small items out of the reach of childrenTo prevent accidental ingestion of the parts listed below, always keep them out of the reach of small children.
- Removable PartsClutch screwsClamp screwsClamp bushes
IMPORTANT NOTES
Placement
- This unit may interfere with radio and television reception. Do not use this unit in the vicinity of such receivers.
- When moved from one location to another where the temperature and/or humidity is very different, water droplets (condensation) may form inside the unit. Damage or malfunction may result if you attempt to use the unit in this condition. Therefore, before using the unit, you must allow it to stand for several hours, until the condensation has completely evaporated.
- Do not place containers or anything else containing liquid on top of this unit. Also, whenever any liquid has been spilled on the surface of this unit, be sure to promptly wipe it away using a soft, dry cloth.
Maintenance
- Never use benzine, thinners, alcohol or solvents of any kind, to avoid the possibility of discoloration and/or deformation.
Additional Precautions
- Use a reasonable amount of care when using the unit’s buttons, sliders, or other controls; and when using its jacks and connectors. Rough handling can lead to malfunctions.
- When disconnecting all cables, grasp the connector itself—never pull on the cable. This way you will avoid causing shorts, or damage to the cable’s internal elements.
- This instrument is designed to minimize the extraneous sounds produced when it’s played. However, since sound vibrations can be transmitted through floors and walls to a greater degree than expected, take care not to allow these sounds to become a nuisance others nearby.
- When disposing of the packing carton or cushioning material in which this unit was packed, you must observe the waste disposal regulations that apply to your locality.
- The rubber portion of the striking surface is treated with a preservative to maintain its performance. With the passage of time, this preservative may appear on the surface as a white stain, or reveal how the pads were struck during product testing. This does not affect the performance or functionality of the product, and you may continue using it with confidence.
- Continuous playing may cause discoloration of the pad, but this will not affect the pad’s function.
Intellectual Property Right
- Roland and V-Drums are either registered trademarks or trademarks of Roland Corporation in the United States and/or other countries.
- Company names and product names appearing in this document are registered trademarks or trademarks of their respective owners.
Introduction
Check the Included Items
After opening the package, check that all of the included items are present. If anything is missing, contact your dealer. * When you open the package, small spots appearing to be moisture might be visible on the surface of the product. This is some of the preservative that is applied to rubber components of the striking surface in order to protect its functionality. It has no effect on the functionality or operation of the product, and you can use the product with confidence. The spots will naturally disappear with the passage of time.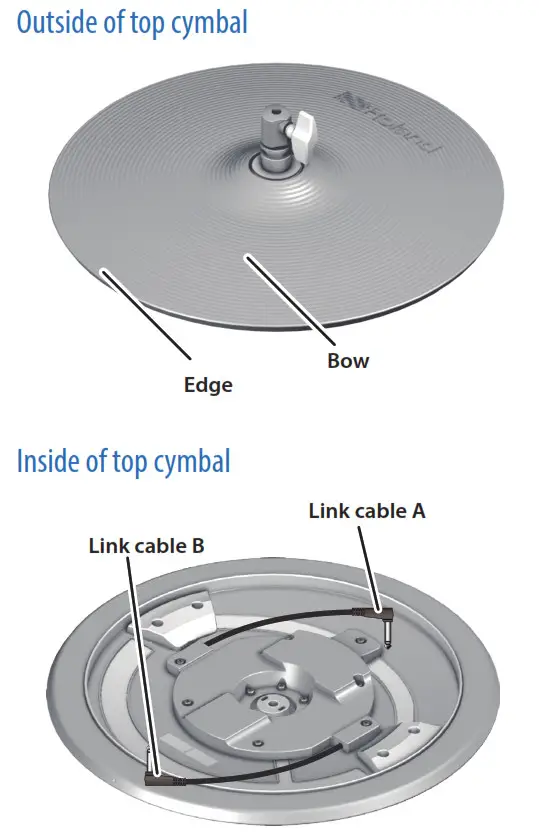
Installing the Cymbals onto the Hi-Hat Stand
- Assembling the Bottom Cymbal
1. Remove the clutch included with the hi-hat stand from the cymbal rod.* The clutch included with the hi-hat stand will not be used.* It is not necessary to remove the felt (or rubber) pad on the hi-hat stand used for supporting the bottom cymbal.2. Confirm that the cymbal rod is firmly secured.* For instructions on tightening the cymbal rod, refer to the owner’s manual for your cymbal stand.* Looseness or play in the cymbal rod can make the top cymbal unstable, causing it to shake or turn, and prevent proper functioning.3. Place the bottom cymbal on the hi-hat stand with the cymbal rod passing through the bottom cymbal hole.If your unit allows the angle of the cymbal receiver to be adjusted, adjust it to the horizontal position. Malfunction may occur if this is tilted.At this point, position the 7 mark so it’s facing the performer.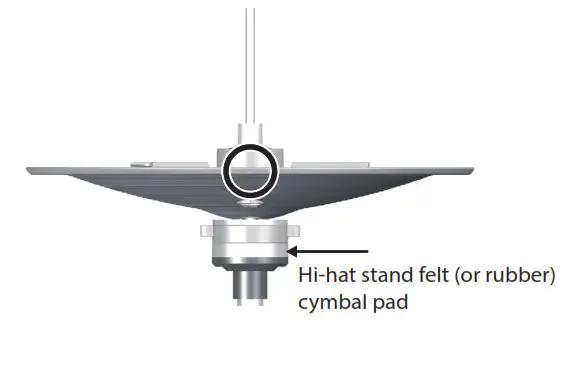 Precautions regarding placement of this unit on a standBe sure to follow the instructions in the Owner’s Manual carefully when placing this unit on a stand (p. 4–p. 7). If it is not set up properly, you risk creating an unstable situation which could lead to the unit falling or the stand toppling, and may result in injury.
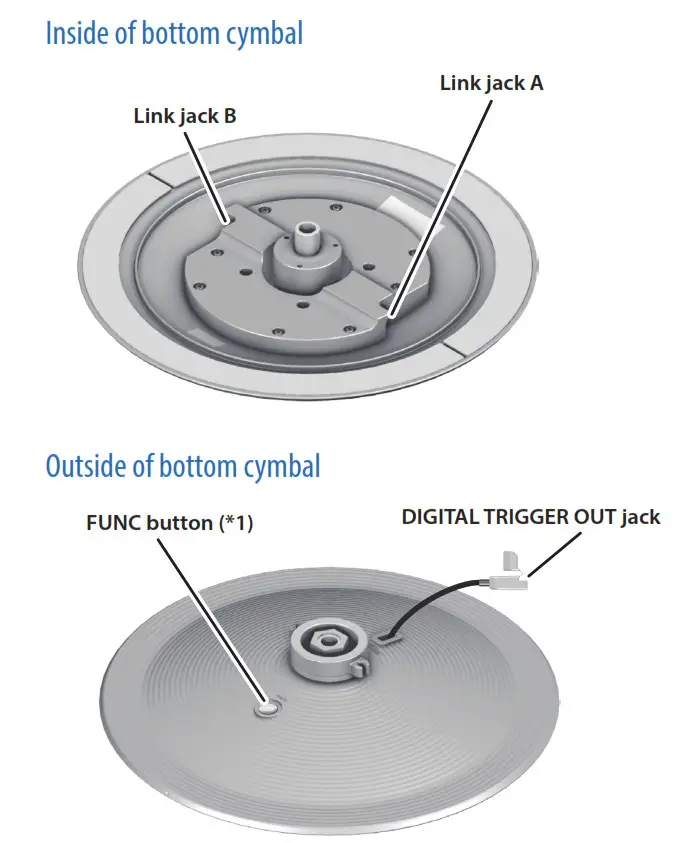
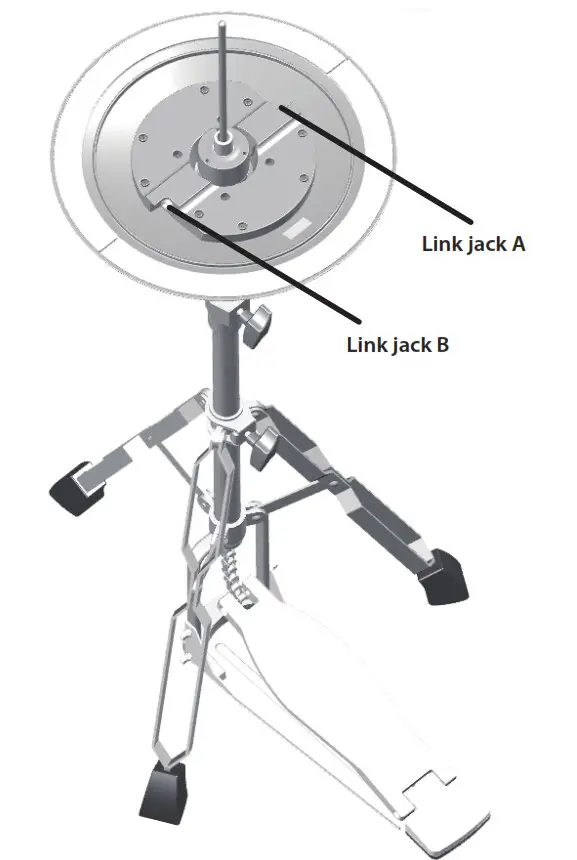
The link jacks A/B should be on the left and right sides from the player’s perspective at this time.
4. Select the spacer that matches the diameter of the pipe at the top of the hi-hat stand.There are three spacers to match different pipe diameters.L: 25.4 mm (1”)M: 22.2 mm (7/8”)S: 19.1 mm (3/4”)Without spacer: 28.6 mm5. Remove the clamp bolt, then fit the spacer and the clamp so they are nested together.
Installing the clamp (1)
6. Attach the clamp and holder to the pipe on the upper part of the hi-hat stand, then slightly tighten the assembly with the drum key. 7. Pass the ends of the clamp through the grooves in the metal portion of the bottom cymbal, then while strongly pulling the clamp downward, secure it with the drum key.
* Not pulling strongly enough on the clamp can make the bottom cymbal unstable, causing it to shake or turn, and prevent proper functioning.* After extended use of the hi-hat stand, the stand’s felt (or rubber) pad on which the bottom cymbal rests becomes compressed, which may cause the bottom cymbal to become unstable. If this occurs, loosen the clamp bolt and perform Step 7 again.
Installing the clamp (2)If the clamp holder does not reach the hi-hat groove, attach the holder facing upwards instead, as shown in the illustration.
(2) Assembling the Overall Unit1. Firmly tighten the two lock nuts on the top cymbal.
* If the lock nuts are too loose, the hi-hat may not operate correctly.2. Place the top cymbal on the hi-hat stand with the cymbal rod passing through the top cymbal hole.At this point, position the “Roland” logo on the farther side, as viewed from the performer.3. Connect the link cables A/B on the top cymbal to the link jacks A/B of the bottom cymbal.4. Pull the bend of the cable softly with your fingers. View from the side
* Don’t pull the link cables too hard when assembling this product.* Make sure that both the top cymbal and bottom cymbal can be closed smoothly.
(3) Connecting to a Sound Module* Use a Roland drum sound module that is compatible with the VH-14D.1. Insert the plug of the connection cable into the VH-14D’s DIGITAL TRIGGER OUT connector.
2. Use a cable tie to hold the cable in place, making sure to leave some slack.
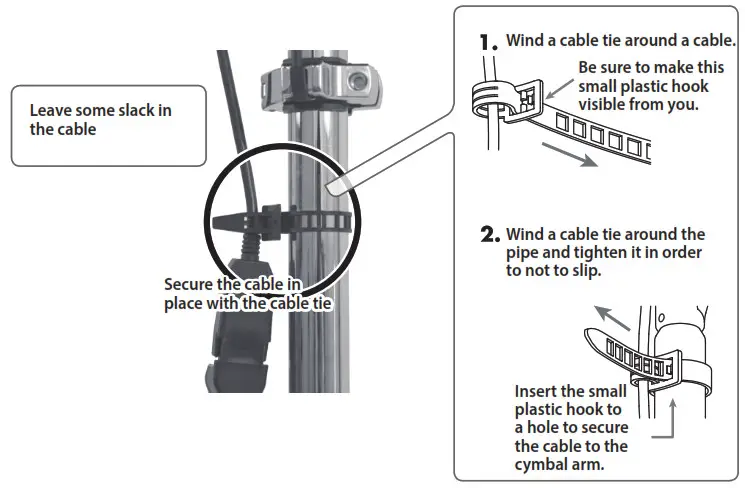
3. Insert the plug of the connection cable into the drum sound module’s DIGITAL TRIGGER IN port.
(4) Adjusting the Sound ModuleWhen using the VH-14D, you will need to make the settings for the sound module.When Using with the TD-50X
- Press the TD-50X’s [TRIGGER] button.
- Press the PAGE [UP] button several times to access the top page.
- Press the [F4] (HI-HAT) button.The TRIGGER HI-HAT screen appears.
- Press the [F5] (OFFSET) button.The VH OFFEST ADJUSTMENT screen appears.
- Loosen the clutch screw of the top cymbal and let it sit on the bottom cymbal.* Do NOT touch the hi-hats or the pedal.
- Press the [F5] (EXECUTE) button.

The “VH offset” parameter is set automatically (approx. 3 seconds).The [TRIGGER] button stops flashing and remains lit.MEMOYou can also press the [TRIGGER] button while holding down the [KIT] button on the TD-50X to adjust the offset.When first connecting the VH-14D to the drum sound module, the trigger parameters are set to the recommended values. The trigger parameters may need to be adjusted depending on the environment where the VH-14D is used, including how it is mounted and the position in which it is set up. Refer to the Owner’s Manual of the sound module you are using for details on how to configure the settings.
(5) Adjusting the Hi-Hat1. Adjust the gap between the top cymbal and bottom cymbal to a clearance of approximately 10 mm, then tighten the clutch screw.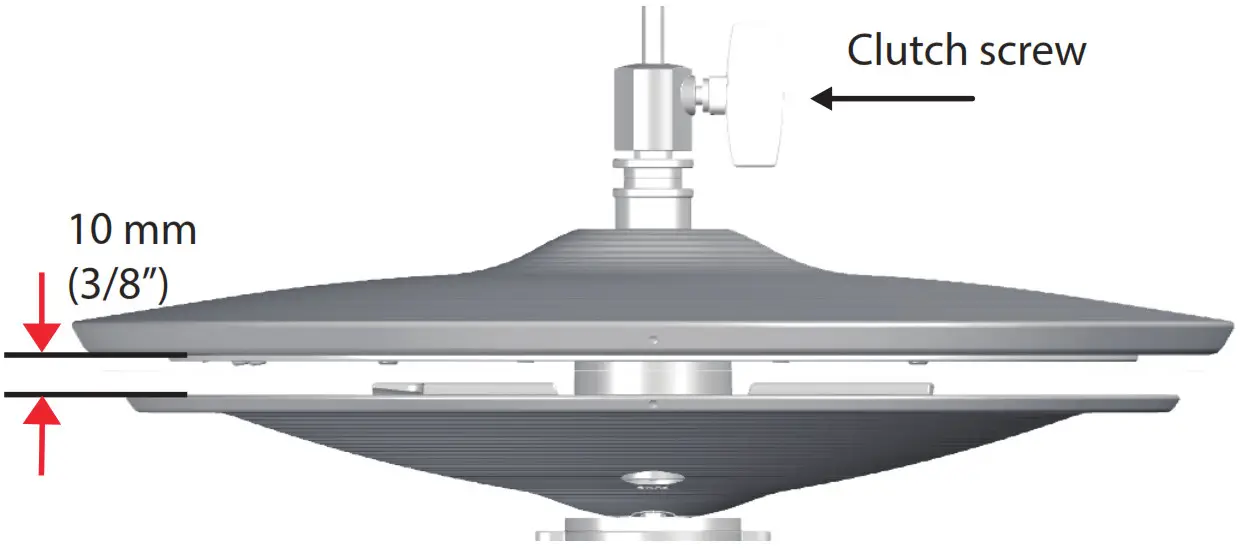 * Although the gap can be adjusted to a clearance that makes playing the hi-hat easier, setting too narrow or wide a gap can cause improper function of the unit and prevent the hi-hat from sounding as you intend. Setting the gap to 10 mm provides the most natural feel when playing the VH-14D.
2. Change the spring tension by adjusting the hi-hat stand.For instructions on adjusting the tension, refer to the owner’s manual for your hi-hat stand.* If the spring tension is too high or too low, the hi-hat may not operate correctly and you might not be able to play the way you intended.* The tension may not be adjustable on some stands.NOTEWhile playing, the![]() (round dot) marks on the top and bottom cymbals should be lined up, as shown in the illustration. The product may not work correctly if the marks aren’t lined up.
(round dot) marks on the top and bottom cymbals should be lined up, as shown in the illustration. The product may not work correctly if the marks aren’t lined up.
Position the ![]() mark so it’s facing the performer.
mark so it’s facing the performer.
When Not Playing
When you’re not playing, secure the top cymbal and bottom cymbal so that they are separated by at least 10 mm of space. Malfunction may occur if they are not separated.

Playing Methods
Different drum sound modules support methods of playing in different ways.Refer to the Owner’s Manual of the drum sound module you are using for details.NOTE
- Use either wooden or plastic sticks.
- Using carbon or metal sticks may cause the sensors to malfunction.
- Use nylon brushes. Using metal brushes may cause the sensors to malfunction or damage the pads.
Open/Closed
The hi-hat tone changes smoothly and continuously from open to closed in response to how far the pedal is pressed. You can also play the foot closed sound (playing the hi-hat with the pedal completely pressed down) and foot splash sound (playing the hi-hat with the pedal fully pressed and then instantly opening it).
Pressure
When you strike the hi-hat while pressing on the pedal with the hi- hat closed, you can then change the closed tone in response to the pressure you place on the pedal.
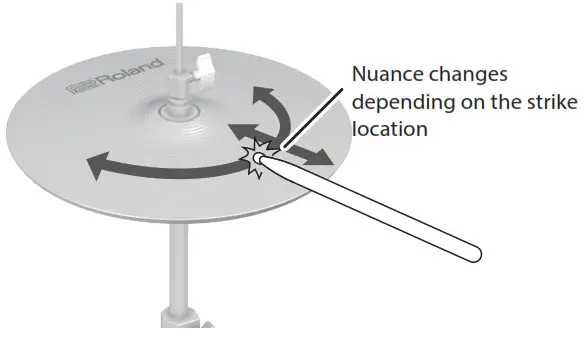
Bow Shot
This technique involves striking the surface of the top cymbal of the hi-hat. Doing this triggers the sound of the head side. For certain hi-hat sounds, the nuances of the sound change depending on where you strike the bow.
Edge Shot
This technique involves striking the edge of the top cymbal with the shoulder of your stick. When the edge sensor shown in the illustration is struck, this triggers a sound on the rim side. Striking directly on the edge (i.e., exactly from the side) will not produce the correct sound.Strike as shown in the illustration.For certain hi-hat sounds, the nuances of the sound change depending on where you strike the edge.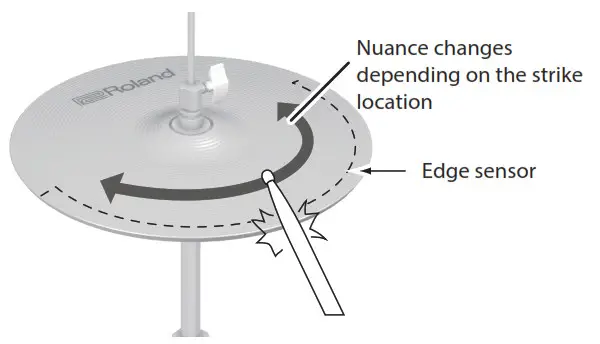 NOTEDo not strike the bottom of the top cymbal, and do not strike the bottom cymbal.
Choke Play
If you use your hand to choke (grasp) the edge sensor after striking the hi-hat, the sound stops. The sound stops (is muted) even if you simply place your hand on the sensor detection area. When you strike the hihat in the choked state, the sound is shorter.
Main Specifications
| Size | 14 inches |
| Trigger | 2 (Bow/Edge) |
| Connectors | DIGITAL TRIGGER OUT jack(compatible with Roland drum sound module equipped with DIGITALTRIGGER IN port) |
| Power Supply | Supplied from DIGITAL TRIGGER IN port (DC 5 V) |
| Current Draw | 90 mA |
| Dimensions | 356 (W) x 356 (D) x 160 (H) mm14-1/16 (W) x 14-1/16 (D) x 6-5/16 (H) inches |
| Weight | 2.2 kg / 4 lbs 14 oz |
| Accessories | Owner’s Manual, Connection cable, Clamp,Spacer (3 types), Cable Tie, Drum Key |
| Options | Noise eater: NE series |
* This document explains the specifications of the product at the time that the document was issued. For the latest information, refer to the Roland website.
Compatible Stand
[xyz-ips snippet=”download-snippet”]