
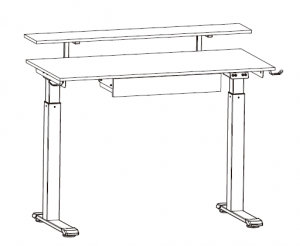
ROLANSTAR Height Adjustable Desk Instructions
General Guidelines
- Please read the following instructions carefully and use the product accordingly.
- Please keep this manual and hand it over when you transfer the product.
- This summary may not include every detail of all variations and considered steps. Please contact us when further information and help are needed.
Notes
- Product is intended for indoor use only. It must be assembled and used according to the instructions. The seller does not accept any responsibility for damage or injury resulting from improper assembly or use.
- Please avoid long-term exposure to humid environment to prevent mildew.
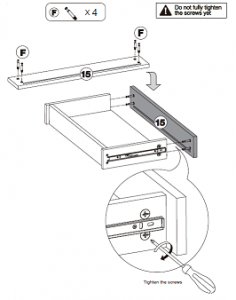
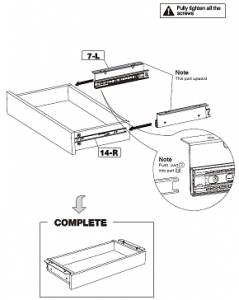
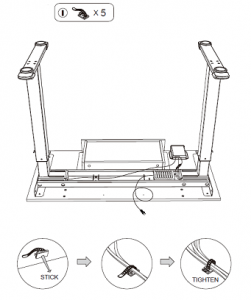
- During assembly, align all screws with the corresponding pre-drilled holes first and then tighten them one by one.
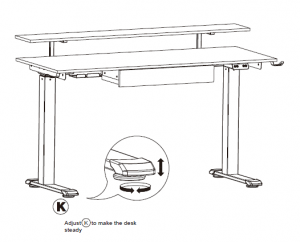
- Inspect the screws regularly. Screws may become loose during long-term use. If necessary, retighten them to ensure stability and security.
Warnings
- Children are not allowed to assemble the product. During assembly, keep any small part out of reach of children as they may be fatal if swallowed or inhaled.
- Children are not allowed to stand, climb or play on the product to avoid serious bodily injury by the toppling.
- Keep plastic packing bags out of reach of children to avoid any potential danger, such as suffocation.
- Avoid sharp objects and corrosive chemicals to prevent damage to the product or bodily injury.
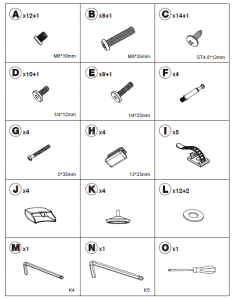
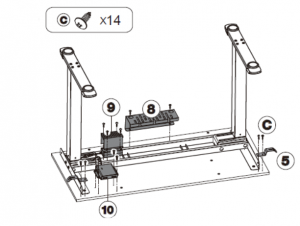
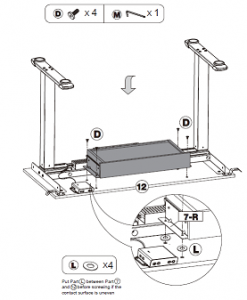
ACCESSORIES LIST

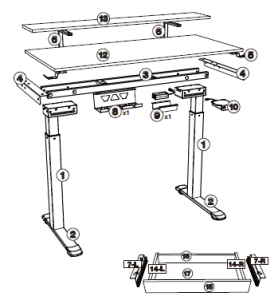
EXPLODED
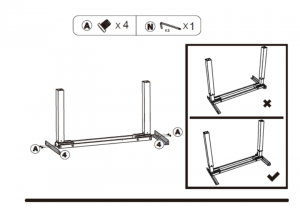
STEP 1

STEP 2
STEP 3

STEP 4

STEP 5
STEP 6

STEP 7
STEP 8
STEP 9
STEP 10

STEP 11
STEP 12

STEP 13
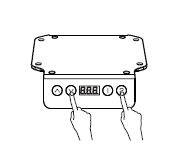
OPERATION INSTRUCTIONS
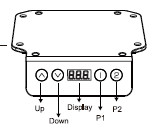
Up / Down Button

Press the ∧ to raise the desk, when you release the button it will stop. Press the ∨ to lower the desk, when you release the button it will stop. When pressing the ∧ / ∨, thedesk travels a very short distance, so that users can fine-tune the desk height according to preference
Desktop Height Memory Setting
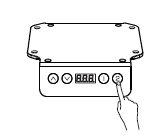
POSITION SETTING: Can set up two memories. Adjust the desktop to the appropriate height with ∧ or ∨ buttons. And then press “1 or 2” button, about 4 seconds until thedisplay flashes “S -1 or S-2 “, indicating that memory setting is successful. LOCATION QUERY: In the run mode, press any of the 1 / 2 keys to flash the height of the key memory.POSITION REACHING: In the run mode, when the desktop stops, press any of the 1 / 2 keys twice to adjust to the de sktop height of the key memory. When desktop is moving,pressing any button can stop it.
The Lowest Height Position Setting
POSITION SETTING: Please adjust the desktop to the appropriate height; and thenhold both “2” and “∨” button for 5 seconds; when the display appears “- d o”, the lowest height is memorized successfully. Once the desktop is dropped to its lowest height position, the display shows “- L o”.POSITION CANCELLATION:Option 1 – Refer to the initial setting process.Option 2 – Adjust the desktop to the lowest height where the display shows “- L o”, hold both “2” and the down button for 5 seconds; at this time, the display willshow “- d o” indicating the set lowest height position has been successfully canceled
The Highest Height Position Setting

POSITION SETTING: Please adjust the desktop to the appropriate height; and then hold both “1” and the up button for 5 seconds; when the display appears “- u p”, the highestheight is memorized successfully. Once the desktop is raised to its highest height position, the display shows “- h I”.POSITION CANCELLATION:Option 1 – Refer to the initial setting process.Option 2 – Adjust the desktop to the highest height where the display shows “- h I”, hold both “1” and the up button for 5 seconds; at this time, the display will show “- u p” indicatingthe set highest height position has been successfully canceled..
Initial Settings

(Under normal state, can be operated at any time; Or replace the controller for the first time) Press and hold both the ∧ and ∨ until the display appears ” – – – “, release the keys,then the tabletop will automatically move up and down. When the top stop moving, the initial setting process succeeds.
Restore Factory Settings

When the display appears error code “rST” or “E16″, press and hold the “V” button for 5 seconds until the display flashes ” – – – “; release the key, then the adjustable desk legswill automatically move down to its mechanical lowest point, and move up and stop at a factory-preset position. Finally, the desk can work normally.
AUTOMATED EXERCISE REMINDER
Once the desktop stays at a same height position over 45 mins, the display shows “Chr”. The flash of “Chr”will disappears when you press any of button or after 1 minute without any operation. The reminder will work for 3 times in a row.
COMMON ERROR CODE (PROBLEM DESCRIPTION AND SOLUTION)
|
E01、E02 |
Cable Connection Between Desk Leg(s) And Control Box is Loose
(press the up or down button; if it doesn’t work, please check the cable connection) |
|
E03、E04 |
Desk Leg(s) is Overloaded (press the up or down button; if it doesn’t work, reduce desk load or contact seller) |
|
E05、E06 |
Sensing Element in the Desk Leg(s) Fails (press the up or down button; if it doesn’t work, please check cable connection or contact seller) |
|
E07 |
Control Box Breaks Down (cut off the power supply for a while and restart the desk; if it doesn’t work, please contact seller) |
|
E08、E09 |
Desk Leg(s) Breaks Down (cut off the power supply for a while and restart the desk; if it doesn’t work, please contact seller) |
|
E10、E11 |
Controller Components Breaks Down (cut off the power supply for a while and restart the desk; if it doesn’t work, please contact seller)t |
| E12 | Desk Leg(s) Malposition(refer to the initial setting process) |
|
E13 |
Thermal Shutdown Protection (wait for temperature drop) |
|
E14、E15 |
Desk leg(s) is Stuck, and or They Do Not Work Properly (press the up or down button; if it doesn’t work, reduce desk load or contact seller) |
|
E16 |
Unbalance Desktop (restore factory settings) |
|
E17 |
Key Data Stored in Control Box are Lost (please contact seller directly) |
|
rST |
Abnormal Power-Down (check the cable connection then restore factory settings) |
Read More About This Manual & Download PDF:
[xyz-ips snippet=”download-snippet”]