
RolliMini Vacuum CleanerModel: 81100User Manual
Safety Instructions
Before using this product, please read the safety instructions and follow all normal safety precautions.
- Read this user manual thoroughly and carefully before using this product.
- Keep this user manual in your sight.
- Any operation not following the instructions in this user manual may lead to harm to human or this product.
Safety Instructions
- Only use the original battery and power adapter (model: 2DD240060) of the product for charging. Using other un-matched adapter may cause electric shock, fire or product damage.
- Do not touch the power mrd, plug or adapter with wet hands.
- Before starting the product, make sure the dust bin f lter is properly installed.
- Do not use this product in wet or moist environment (any environment with liquid), e.g. Bathroom or laundry.
- Before use, mllect the floor environment ( remove all the fragile objects and cords, clothing, papers, loose cables, as well as making sure to lift curtains and drapes off the floor to avoid any possible accidents. In case that a loose cable is tangled with the product, the cable might move around with the product as it woks and topple down tables, chairs, or cabinets and might cause injury or property damage.)
- Do not sit on top of this product or attach an object on the top of it. Beware of children or pets while the product is in operation.
- Only use the product indoors, do not use it outdoors. B.
- Do not let this product get close to cigarettes, lighter, match,es or any flammables.
- Never use the product to clean up combustible or highly volatile liquids such as gasoline.
- lf the product needs cleaning, do not clean it while charging.
- Do not over-bend the power cord or pressure the power cord with heavy or sharp objects.
- Do not place this product where it is easy to drop off (tables, chairs, etc).
- Tum of the power switch during transportation or when the product is not in use for seveal days
- To avoid tripping, inform all the people in the house when this product is in use.
- Before use, check whether the adapter and outlet are properly connected.
- Empty dust bin every time after robot cleaning.
- Use this product in a temperature from 0″C to 40″C.
- Do not use this product in hightemperature environment.
- The plug must be removed from the socket-outlet before undergoing maintenance.
- The product must be disconnected from the power outlet when removing the battery.
- The baftery must be removed from the product before it is scrapped.
- The battery should be disposed of properly for safety.
Warning:This product can only be used by children aged from 8 years and above and persons with reduced physical, sensory or mental capabilities or lack of experience and knowledge if they have been given supervision or instruction concerning the use of the product in a safe way and understand the hazards involved. Children shall not play with the product. Cleaning and maintenance shall not be made by children without supervision.
Features
Powerful Suction. Intelligent Suction AdjustmentPowerful SuctionThe Product possesses superb cleaning capabilities-even particle dust on the floor will be thoroughly removed.Intelligent Suction power AdjustmentThis product is able to automatically adjust its suction power when different floor environments are detected. Not only it makes cleaning more easier, but also energy efficient.
Considerate Design
Easy step-by-step operation
 By pressing a single button. “
![]() “, you can easily direct the robot!
“, you can easily direct the robot!
Washable Dust BinDust bin can be washed directly by tap water.Simply wash dust bin under tap water and let or wipe dry before use.

Various Cleaning ModesFour cleaning modes are provided to meet your needs.1. Auto cleaning modeThe robot will clean a room automatically and adjust its cleaning mode according to the environment.

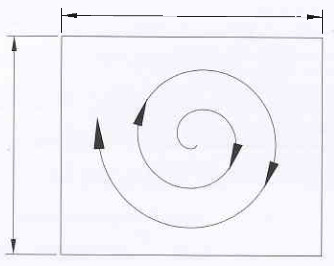
2. Spot cleaning modeWhen the robot detects a heavily soiled area, it will activate the sport cleaning mode, which will clean in a spiral direction.
3. Edge cleaning modeWhen the robot detects that it is along the wall, it will activate the edge cleaning mode.

4. Scheduling modeUser can schedule the robot cleaning time as they want. When a certain time is scheduled, the robot will leave the charging home base and start working at the scheduled time.
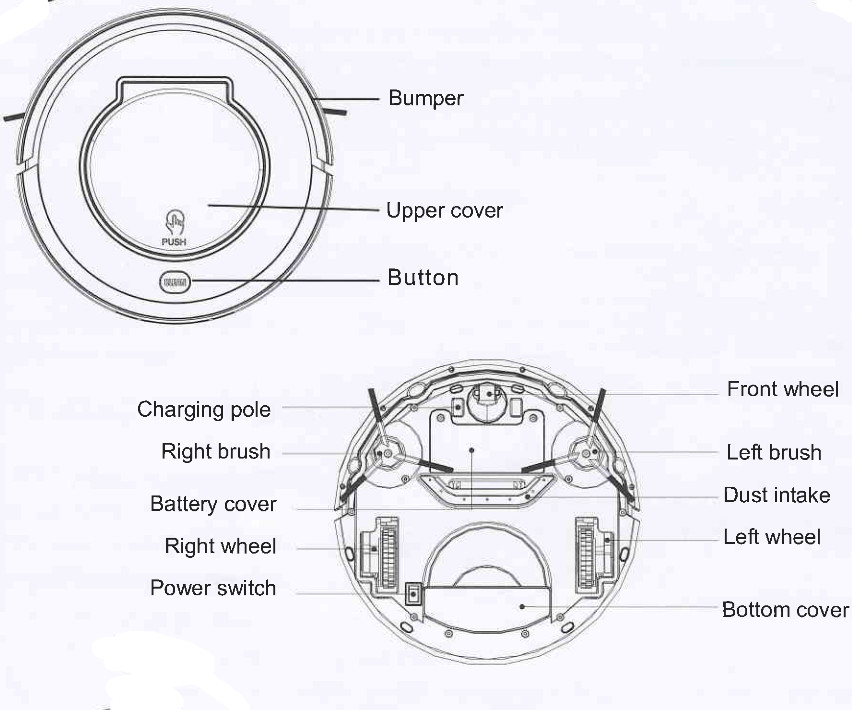
Components
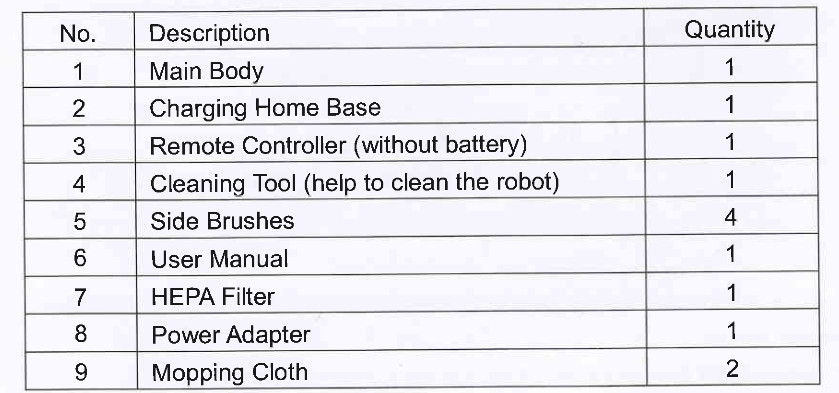
Main body and accessories

Robot anatomy
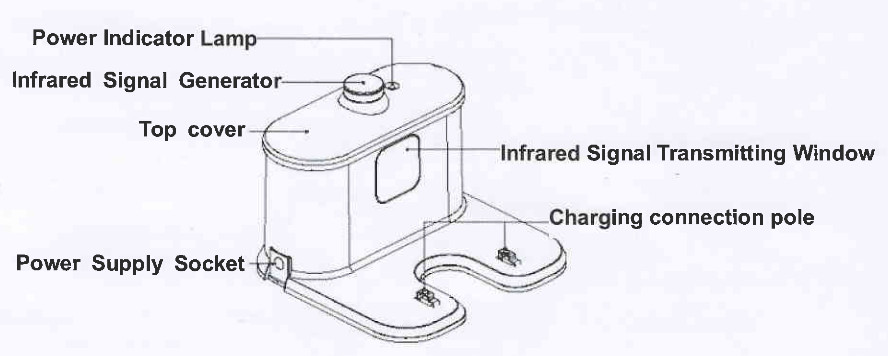
Charging home base
Remote Controller

To operate using the remote control, point the remote control to the robot and select your desired command. You can also select your command through the robot on board control menu.
Remote controller time setting: press CLK button, then you can press the direction buttons to set up time. After time selected, press CLK again to save the time and then it will show the right synched time.Cleaning function: press ON/OFF buttonSleep function: press ON/OFF button for a few seconds, robot will enter sleep mode(Or if no operation after 30s, it will enter sleep mode automatically). To exit out of sleep mode, press ON/OFF.Spot cleaning: press SPOT buttonCleaning mode selection: press MODE button and robot will change to the mode shown on the LCD (Mode 1: spiral cleaning. Mode 2: random cleaning. Mode 3: edge cleaning. Mode 4: S shape cleaning.)Scheduling function: press PLAN button to set up and for a detailed operation guide please see Scheduling Cleaning section. Users can press PLAN to check whether robot has already scheduled.Auto charging: press HOME button, robot will direct itself automatically to the charging station.
Note:*Please install two MAtype batteries into the remote controller before use.*lf the remote controller of the robot is used around the charging home base, those commands given above might not work properly because of signal interference.*lf remote controller is not in use for a long time, please take out its battery.
Display panel
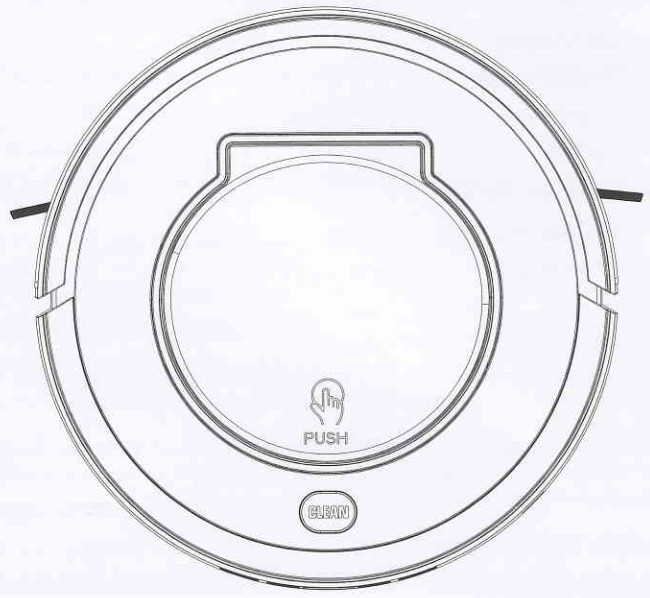
![]() Clean ng buttonA. Sw tch on the robot CLEAN button indicator will be in gradual blueB. Touch CLEAN button, the robot will have 3 beeps and the indicator will flash in blue, then it will start cleaning if the robot is in good state. The indicator light will keep in blue during cleaning.C. lf the robot has malfunctioned, its indicator will be indifferent status ( please take reference in troubleshooting guide).D. The indicator will flash in red when the robot is low in power.E. During charging (robot on charging home base or connected by charging adaptor), CLEAN button indictor will tum red gradually. After fully charged, the robot will have 5 beeps and CLEAN button indicator will turn blue.F. When the robot is successfully scheduled, the indicator will be pink for two seconds.(Press PIAN button for a few seconds to check whether robot has the scheduled time. if yes, the indicator will be in pink for two seconds. Otherwise, the indicator will have no color change.
Clean ng buttonA. Sw tch on the robot CLEAN button indicator will be in gradual blueB. Touch CLEAN button, the robot will have 3 beeps and the indicator will flash in blue, then it will start cleaning if the robot is in good state. The indicator light will keep in blue during cleaning.C. lf the robot has malfunctioned, its indicator will be indifferent status ( please take reference in troubleshooting guide).D. The indicator will flash in red when the robot is low in power.E. During charging (robot on charging home base or connected by charging adaptor), CLEAN button indictor will tum red gradually. After fully charged, the robot will have 5 beeps and CLEAN button indicator will turn blue.F. When the robot is successfully scheduled, the indicator will be pink for two seconds.(Press PIAN button for a few seconds to check whether robot has the scheduled time. if yes, the indicator will be in pink for two seconds. Otherwise, the indicator will have no color change.
Operation
Battery Charging
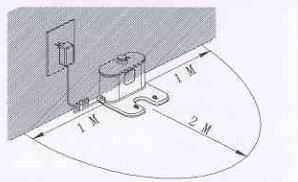
- Place charging home base against the wall, plug-in adapter, and the signal light on the charging home base will flash.Note: Put charging home base against the wall and remove obstacles about 1-meter distance at two sides and 2 meters ahead.

- Turn on the power switch at the bottom side of the robot, and then the display indicator will be in gradual blue, the robot is in standby.(lf no command received, the robot will turn to sleep mode after 30 seconds.)Note: A. Please always keep the power switch turned on. lf not, it is unable to make the robot work.B. lf power switch is turned off, all the scheduled operation will be lost.C. Before charging the robot, please make sure the power switch is turned on, or else the robot can not be charged.
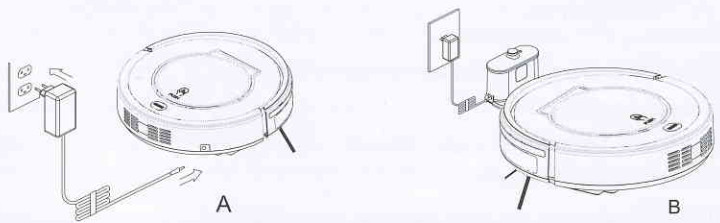
- Charge the robot in either way as shown below:A. Plug the adapter into the robot and the other end to the power socket as below on the left;B. Press HOME button on the remote controller to direct the robot to charge home base for charging.Note:A. Make sure the power switch at the bottom side of the robot is on before charging. Otherwise, CLEAN button indicator will flash red and the robot beeps.B. During charging, CLEAN button indicator will be in gradual red.C. After a full charge, the robot will have 5 beeps. (Every full charge will take no more than 5 hours).D. For first use, please run the battery out of power and then fully charge the robot.E. lf the robot is not used for long time, fully charge the battery, turn the power switch off, remove the battery and store it in a cool, dry place.
- Auto chargingThe robot will automatically return to charging home base when battery is low.Note: Keep the home base well connected to the power socket. Otherwise, the robot can not find the home base for charging.*This product complies with the EU ERP standard.
 Note:A. Make sure the power switch at the bottom side of the robot is on before charging. Otherwise, CLEAN button indicator will flash red and the robot beeps.B. During charging, CLEAN button indicator will be in gradual red.C. After a full charge, the robot will have 5 beeps. (Every full charge will take no more than 5 hours).D. For first use, please run the battery out of power and then fully charge the robot.E. lf the robot is not used for long time, fully charge the battery, turn the power switch off, remove the battery and store it in a cool, dry place.
Start /Pause/Sleep mode
- Starting upA. Power on the switch at bottom side of the robot, and CLEAN button indicator will be in gradual blue.B. Press CLEAN button on main body or on remote controller to start cleaning. The robot will have 3 beeps, and the CLEAN indicator will be in gradual blue.Note: lf robot is in sleep mode, press CLEAN button to wake the robot from sleep mode. Then press CLEAN for a second time, the robot starts cleaning automatically.
- PauseTo stop the robot temporarily from cleaning:A. Press CLEAN button on main body;B. Or press ON/OFF button on remote controller.Note: When robot is paused, user can have new operation on it.
- Sleep modeTurn robot into sleep mode, and its display indicator will be dark (robot in standby, not powered off):A. The robot will automatically turn to sleep mode if no command received in 30 seconds.B. Press CLEAN button on the main body for two seconds or press ON/OFF on remote controller for two seconds, robot will turn to sleep mode.Note: lf the robot is not in use for a long time, please turn the power switch off.
Schedule cleaning
You can schedule the robot to start cleaning at a certain time. (Time delays up to 23 hours.)For example, it’s 9:00 AM now, you set 6:30 on the remote controller, and then the robot will start cleaning after 6 hours and 30 minutes, i.e. at 15:30 PM. On a daily schedule, the robot will start cleaning at 15:30 PM everyday-unless users turn off the power switch on its bottom.
Note:A. The robot will always work at the scheduled time after scheduled time is confirmed.B. All scheduled time will be canceled if the robot is turned off.C. lf charging by adapter directly (charging without home base), robot will not accept scheduled time set operation.
How to Schedule the robot by remote controller:A. To schedule the robot on standby mode or charging on home base. (Press CLEAN to wake up the robot, or press ON/OFF to wake up it.)B. Press PLAN button until the remote displays flashed figure”00:00″.C. Press “…’ to set the flashing numbers.D. Press – … to switch between hour and minute.E. After time confirmed, press ON/OFF to save scheduled setting-robot will have one beep, and the CLEAN button indicator will be in pink for two seconds-robot is successfully scheduled.F. Press ON/OFF again, scheduled setting will be cancelled, robot will have two beeps and the CLEAN button indicator on the robot will be blue.G. Press PLAN button for a few seconds, it will return out from scheduling setting.H. User can press PLAN button to check whether robot has stored the desired scheduled time.lf yes, robot CLEAN button indicator will be in pink for two seconds. Otherwise, the indicator will have no color change and robot will beep once.
Cleaning mode1. Auto cleaningThe robot will clean a room automatically and adjust its cleaning mode according to the environment.
Note:* Press ON/OFF button on remote controller or CLEAN button on robot to start auto cleaning.
2. Spot cleaningUnder two situations, the robot will activate spot cleaning:1) When it detects a heavily soiled area.2) Press SPOT on the remote to start spot cleaning.
Note:* lt is recommended that users select spot cleaning mode only for heavily soiled area, it will automatically stop spot cleaning mode and turn to auto cleaning mode.
3. Edge cleaningPress MODE on the remote and select edge cleaning.Under edge cleaning mode, the robot will do cleaning along corners and edges with its side burshes.
Note:A. By pressing MODE on the remote controller, user can select edge cleaning. And user can also press ON/OFF button to stop it.B. Mode 1 for spiral cleaning, model 2 for random cleaning, mode 3 for edge cleaning, mode 4 for S shape cleaning.
Maintenance
1. Cleaning side brushesA. Check side brushes to see whether they are damaged or whethere there are foreign objects stuck on the brushes.B. Clean the side brushes by tool or cloth.C. Replace the side brushes if it’s damaged. Make sure L side brush at L place and R side brush at R place on the bottom, then push to lock rnplace. (Carefully pull brush to remove)
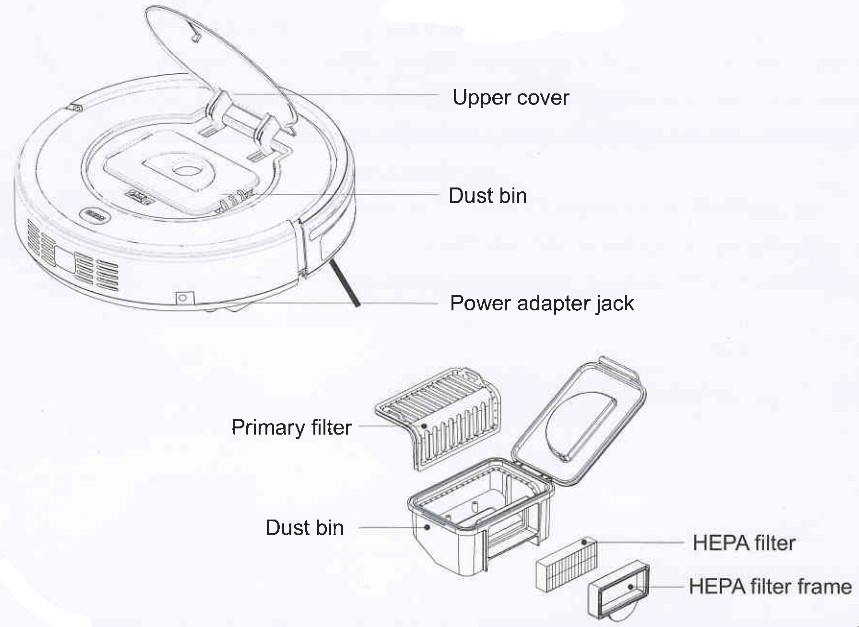
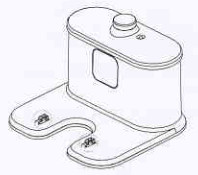
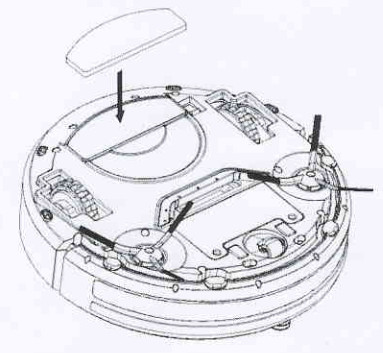
2. Gleaning dust bin and filter
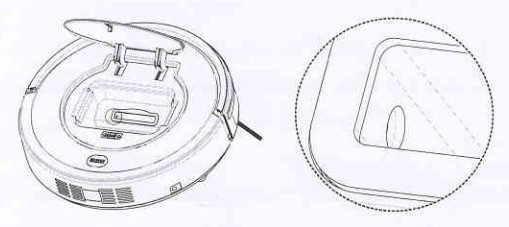
Empty dust bin after each use, the procedures are shown in figures below.A. Press “PUSH” mark to open the robot upper coverB. Take out the dust bin by its handle.C. Separate HEPA filter first from dust bin.D. Open dust bin cover and take out primary filter.E. Empty the dust bin.F. Wash dust bin and primary filter under tap water, clean HEPA with the cleaning brush.G. Install primary filter and HEPA filter into dust bin after it is dry, close dust bin cover, and then install it into the robot.
Note:
- After taking out dust bin, check whether there are foreign objects stuck in dust passage and clean it.
- Rinse HEPA filter after 15-30 days use. lt is recommended to replace the HEPA filter after 6-8 months.
- After rinsing HEPA and primary filter, dry them in a ventilated & cool area for optimum results. and install them after they are fully dry. Do not dry filters under the sun.
- HEPA and primary filter are both replaceable.

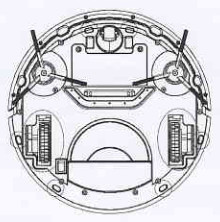
3. Cleaning sensors and charging connection poleA. Slightly wipe the sensor window at the robot bottom and auto charging sensors with cleaning tool or a soft dry cloth, as circled below:
B. Clean suction passage and dust sensor as shown below (with cleaning tool or a soft dry cloth).
C. Clean charging connection pole on charging home base (with cleaning tool or a soft dry cloth).
Note: Keep the sensors free from liquids and debris.
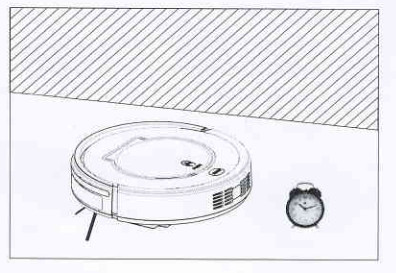
4. Mopping clothA. Stick mopping cloth on the bottom of the robot as shown in right figure to mop the floor.B. When the mopping cloth is dirty, users can take it away and stick a new one on the bottom.
Note: Keep the appliance dry. Do not clean the appliance underwater.
Troubleshooting
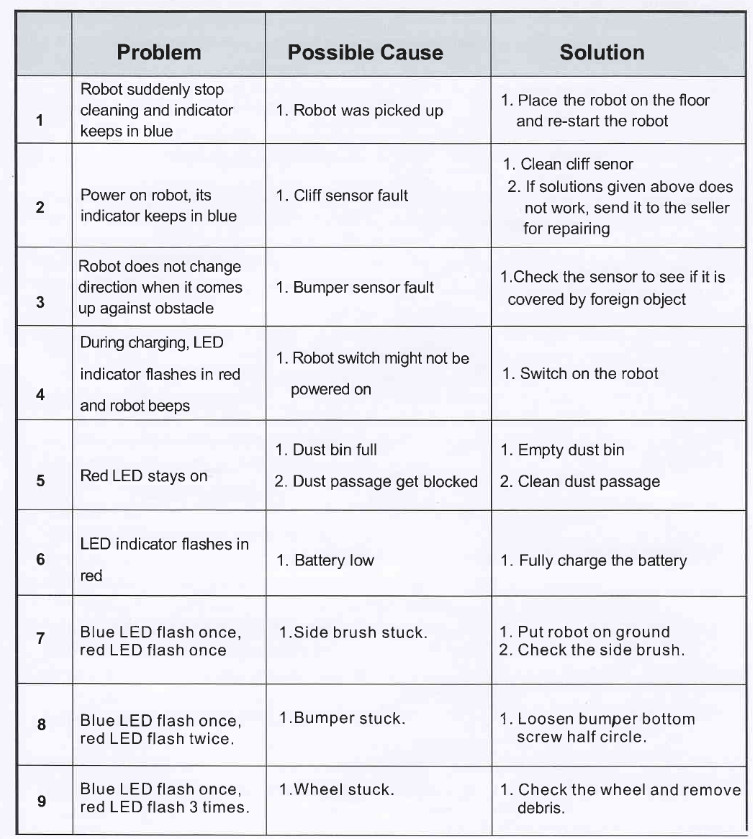
Note: if all solutions given above does not work, please take actions below:1) Re-set the robot by switching the power button on the control panel.2) lf re-set action doesn’t work, please send the robot to seller for repair.
Exploded diagram
Below are exploded parts:

Battery Removal
Please follow below procedures:A. Remove the screws on battery cover with a screwdriver.B. Pull out the battery cover.C. Grasp the isolated strips at two sides of the battery and pick the battery up.Separate the wire connector that links battery and robot.
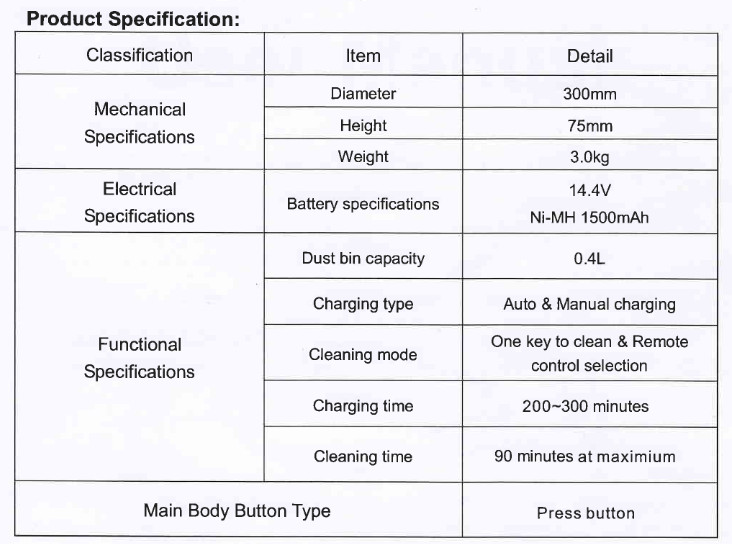
Note: Particular specifications are subjected to change without prior notice.
RolliMini Vacuum Cleaner 81100 User Manual – RolliMini Vacuum Cleaner 81100 User Manual –
[xyz-ips snippet=”download-snippet”]