
Rosewill Induction Cooktop Instruction Manual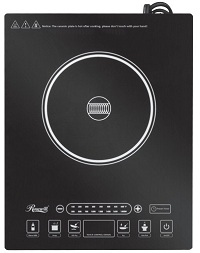
Product Configuration
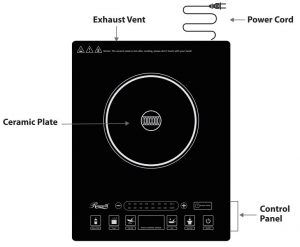
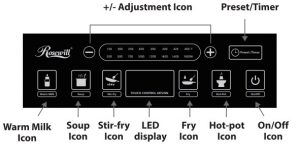
Control Panel (Detail)
 Safety Cautions
 Safety Cautions
Warning: Turn off, unplug the induction cooktop in case of any cracks or damage to the unit.
- 1Do not touch the plate while the unit is working to avoid to getting burned or hurt.
- Avoid touching any metal on the unit,; metal can get hot and can cause harm..
- Do not cook with an empty pot. It will cause multifunction Or harm.
- To avoid danger, make sure to uncover any sealed or canned food before heating.
- The cooktop remains hot after immediate use. Surface area is dangerous while cooling down.
- Do not let children operate the unit alone to avoid getting burned or hurt.
- Do not place the unit near gas or a hot environment in order to avoid damage or malfunction.
- To reduce risk and damage, plug directly into an outlet with current rating at least 16A.
- Place the unit on a level surface, while keeping the underneath and surrounding areas free (10cm) for air circulation.
- Do not place paper, cloth or other articles under the bottom of the pan, they can get heated and cause fire or damage.
- Do not cover the gas vent with anything during cooking, otherwise it will cause danger.
- Do not place the unit on cloth or carpet to avoid blocking the gas vent.
- Do not operate the unit on the gas stove.
- Do not immerse the appliance or cord in water, or allow liquid to contact inner electrical parts.
- Unplug the power cord before cleaning.
- Always clean the unit to prevent any dirt going into the fan which may damage it.
- Those with a cardiac pacemaker, please confirm with doctor that there is no affect.
- Only use the power cord recommended by the appliance manufacturer if it is no replaced.
- If the unit has been accidentally cracked or damaged, unplug the appliance and contact customer service.
- Do not attempt to open and service this unit yourself. If is is still not working after your inspection, please immediately contact our customer service department.
- Do not touch the control panel with any sharp implements.
Product Operating Instructions
Insert the plug into the socket, a “Beep” will sound, and the [On/Off] key will flash. This indicates the appliance has made connection with a power source and is in standby mode. Place suitable cookware on the center of the cooking zone. Press [On/Off] key once, and the LED display shows [—–], confirming the unit is in selection mode. The [On/OFF] lights up. Press your desired cooking mode key to start operation. To stop the operation and switch to standby mode, press the [On/Off] key.
Cooking Mode
- Hot-Pot:Press the [Hot-pot] key and the [Hot-pot] indicator lights up, and the display shows [1200] representing that the default power is It can be adjusted by pressing the [+] or [—] key to set the desired power level. There are 8 power levels in total: 300W, SOOW, 700W, 1000W, 1200W, 1400W, 1600W, 1800W. To cancel this mode, press other keys to switch to other cooking modes or [On/Off] key to stop the operation.
- Fry:Press the [Fry] key and the [Fry] indicator lights up, and the display shows [425] representing that the default temperature is It can be adjusted by pressing the [+] or [—] key to set the desired temperature level. There are 8 power levels in total: 150F, 200F, 250F, 300F, 350F, 400F, 425F, 450F. To cancel this mode, press other keys to switch to other cooking modes or [On/Off] key to stop the operation.
- Stir-fry:Press the [Stir-fry] key and the [Stir-fry] indicator lights up, and the display shows [425] representing that the default temperature is 425F. It can be adjusted by pressing the [+] or [—] key to set the desired temperature There are 8 power levels in total: 150F, 200F, 250F, 300F, 350F, 400F, 425F, 450F. To cancel this mode, press other keys to switch to other cooking modes or [On/Off] key to stop the operation.
- Soup:Press the [Soup] key and the [Soup] indicator lights up, and the display shows [AU] representing that the appliance works under default power level, where it cannot be The default power is 1400W. To cancel this mode, press another key to switch to other cooking modes or [On/Off] key to stop the operation.
- Warm Milk:Press the [Warm Milk] key and the [Warm Milk] indicator lights up, and the display shows [AU] representing that the appliance works under default power level, where it cannot be adjusted. The default temperature is 150F. To cancel this mode, press another key to switch to other cooking modes or [On/OFF] key to stop the operation.
Preset/Timer Function:
- Timer Function (only for Hot-pot, Fry, and Stir-fry)You can set a cooking time when a specific cooking mode is selected. Press the [Preset/Timer] key once to access the timer function, and the [Preset/Timer] indicator will light. Display will show [00:00]. Press [+] or [—] key to set the desired time; [+] key to set the minute and [—] to set the hour (press and hold for 3 seconds for quick setting). The time can be adjusted from 1 minute to 2 hours and 59 minutes. After selecting time, press [Preset/Timer] key once to confirm or wait until the display stops flashing. After the “Beep” signal, the appliance will stop the operation and change to standby mode automatically at the end of the countdown. To cancel this function, either press the [On/OFF] key to return to standby mode or press the [Preset/Timer] key to resume the desired power or temperature operation.
- Preset Function (Soup and Warm Milk only)Under standby mode, enter the selection mode after pressing [On/Off] key. Then press [Preset/Timer] key once to access preset function. The [Preset/Timer] indicator key will light. LED display will flash and show [00:10]. Adjust time from 1 minute to 23 hours and 59 minutes. Press [Preset/Timer] key to confirm or wait until the display stops flashing. After setting, the select mode and the indicator will light. The appliance will start to countdown by showing the remaining time on the display. A “Beep” will sound after the countdown, and the appliance will operate based on the desired setting.
Selection of Cookware
Material Required
- Steel, cast iron, enameled iron, stainless steel, flat-bottom pans/pots with bottom diameter from 12 cm to 26.
- It is suggested to use the required Do not attempt to use other pot instead (especially pressure sensors vessels).
 Stainless Steel Pot
 Iron blast Pan
 Magnetic Stainless Steel Pan
 Magnetic Stainless Iron Pan
 Iron board Pan
Please follow the below requirements if it is necessary to use a vessel purchased separately:
- Pan/pot must be suitable for induction cooktop.
- Pan/pot should be tried out if it’s bought by self to see if there are unusual occurrences.
- Pan/pot bought by self should be flat and come with the cover with gas vent.
- Check compatibility by using a magnet: if a refrigerator magnet will stick to the bottom of the pan, it is ok to use on the induction cooktop.
Maintenance and Daily Care
- Remove the power plug prior to cleaning the Only clean the cooktop when the surface is cool to the touch. Never put in the dishwasher or submerge in water.
- Clean glass plate, panel and the shell:
- Soft cloth for slight stain.
- For greasy, dirt, blot by using a clean damp cloth with neutral detergent.
- Use a brush or cotton stick to regularly clean the radiator-fan and gas vent.
- Protect the cooktop by making sure the plug is firmly secured into the outlet.
- Do not pull the power Always plug/unplug at the connector while the unit is OFF.
- Store the unit safely away if it will be unused for a This will improve the life of the cooktop by keeping it free from accidents.
Troubleshooting and Tearement
If any error occurred, please check the following table before calling for service. Below are common errors, check points, and remedies.
|
Symptoms |
Check Points |
Remedy |
| After connecting the Power and pressing the “Power” Key the appliance has not response | Is the electricity off? | Use after resuming the electricity. |
| Is the fuse broken? | Check the root causes carefully. If the problem cannot be fixed, please contact Service Centre for checking and repairing. | |
| Is the plug firmly connected? | ||
| Heating being interrupted in normal use and a “Beep” will be heard. | Incomputable cookware or no cookware being used? |
Replace compatible cookware for the induction cooktop. |
| Is the cookware not placed in the center of the heating zone? | Place the cookware at the center of the defined heating zone. | |
| Is the cookware continually being removed from the cooktop? | Keep the cookware ontop of the heating zone until its hot.
|
|
| No operation during the heating. | Is the cookware empty or the temperature too high? | Has the unit been misused or had been damaged? |
| Is the air intake/exhaust vent clogged, blocked, or has dirt accumulated? | Remove the debris clogging the air intake/exhaust vent. Operate the appliance again after its cooled down. | |
|
Is the cooktop working over 2 hours without any further timing set? |
Rest cooking modes or use the timer function. | |
| Error codes occur. |
E0 Internal circuit error |
When showing error signal E1, E2 and E7, please check if the cookware is not suitable, or switch on the appliance again after it is cooled down naturally. When showing E0, E3-E6, please contact Service Centre for inspection and repairing. |
| EJ Without cookware or Incompatible cookware used | ||
| E2 Internal overheat | ||
| E3 Over-voltage | ||
| E4 Under-Voltage | ||
| ES Top plate sensor open/short circuit | ||
| E6 IGBT sensor open circuit/short circuit | ||
| E7Top plate overheat |
Product Specifications
| Dimensions | 37/5x30x6cm/14.75×11.8×2.34in |
| Cord Length | 150 cm / 59 in |
| Weight | 98.5 oz / 6.2 lb |
| COIOF | Black |
| Voltage | 120V-60Hz |
| Power | 1800W |
| Material | Plastic Case |
Rosewill Technical Support Information:techsupportBrosewilLcomI-800-575-98B5
[xyz-ips snippet=”download-snippet”]