![]() Handrail Kit Fitting InstructionsPlease retain for future reference.Batch 000000
Handrail Kit Fitting InstructionsPlease retain for future reference.Batch 000000
Step 1.
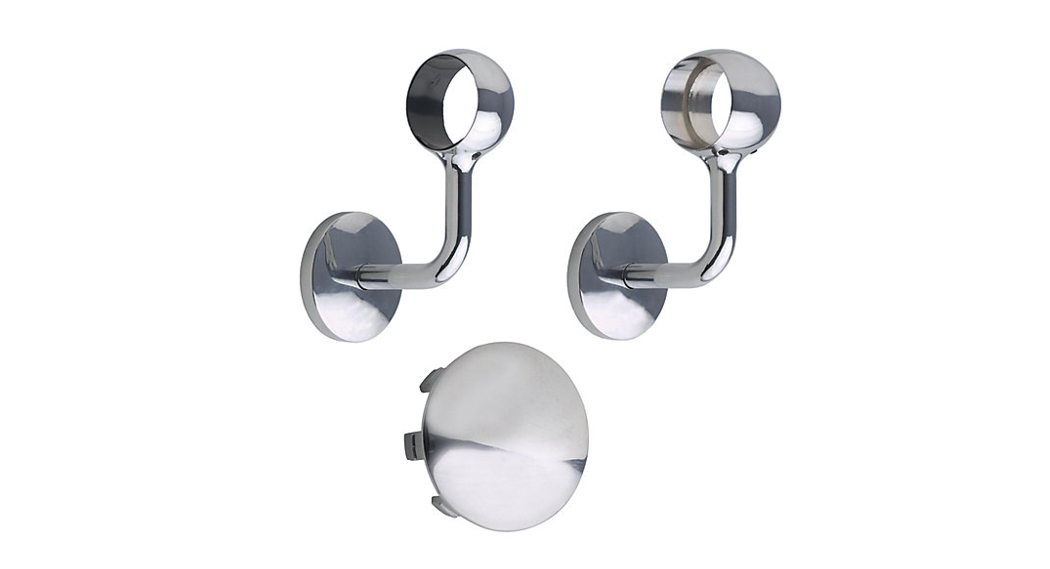
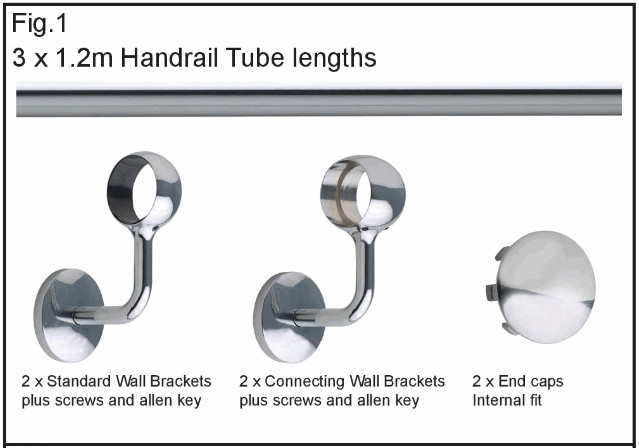
Before you start please identify and check you have all the kit parts as shown in Fig.1.
Important:
- Rothley Handrail kits are designed for domestic and light commercial use only.
- load 130kg along the length of the rail (as tested by FIRA)
- Rothley Handrail kits are suitable for indoor use only.
- Before beginning installation ensure the wall surface is solid and in a sound condition.
- Wall plugs included are for use in solid masonry walls only and may not be suitable for your application. Please ensure you use the correct wall plugs suitable for your application.
- Before drilling holes ensure no pipes or cables located in the wall will interfere with installation.
- Rail should not be fitted to plasterboard partition.

Step 2.
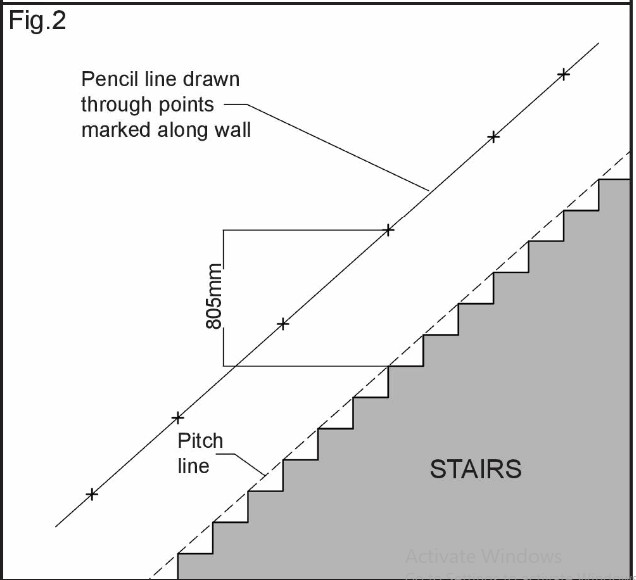
Mark the wall at regular intervals down the length of the stairs at a position 805mm vertically from the pitch line, as shown in Fig 2.
The use of a spirit level is advisable when measuring the vertical position.Using a straight edge draw a light pencil line through the marked points.
 Step 3.
Mark the center position of the stairs on the pencil line as shown in Fig 3.
From the center position measure 600mm towards the top of the stairs and mark this position on the pencil line.Place a Connecting Wall Bracket so it is central to the 600mm, mark and position the two top screw-holes on the bracket to the pencil line as shown in Fig 3. Using a pencil, mark the position of all three screw holes on the wall.Drill correct size holes for the wall plugs being used, insert wall plugs, and using screws provided, screw the Connecting Wall Bracket to the wall.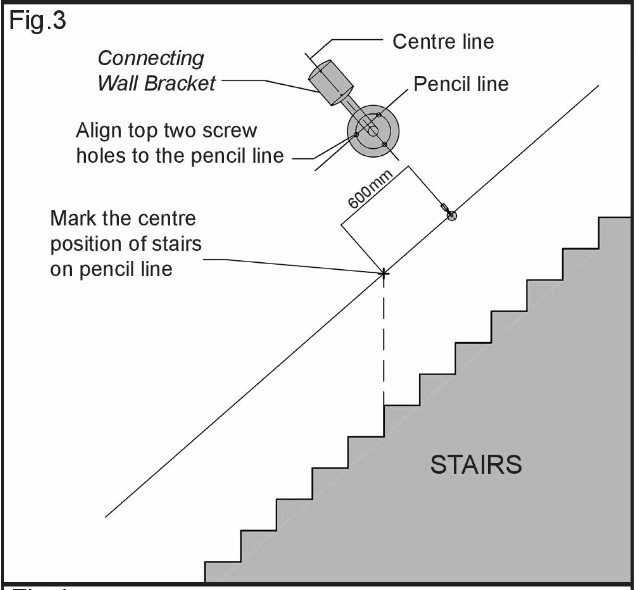
Step 4.
Working towards the bottom of the stairs, attach a Connecting Wall Bracket to the end of one length of tube as shown in Fig 4. The end to which the bracket is fitted will depend upon which side of the stairs your handrail will be fitted.

Step 5.
Working towards the bottom of the stairs, insert the other end of the tube into the fixed Connecting Wall Bracket making sure that the tube is fully inserted, as shown in Fig 5.Position the two top screw-holes on the unfixed Connecting Wall Bracket to the pencil line.Using a pencil, mark the position of all three screw holes.Drill correct size holes for the wall plugs being used, insert wall plugs, and using screws provided, screw the Connecting Wall Bracket to the wall.Tighten the two tube retaining screws at either end holding the tube in place using the alien key provided, ensuring you do not overtighten.
 Step 6.Assemble Wall Brackets at a distance of 200mn from the end of the tube as shown in Figs 6 & 7Tighten tube retaining screw using the alien key provided, but do not overtighten. Fit End Caps as shown in Figs 6 & 7.
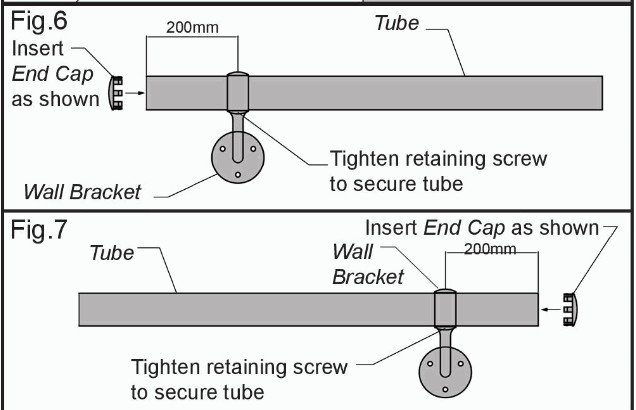

Step 7.
Select relevant tube assembly from Fig. 6 or 7 and working towards the bottom of the stairs, insert the open end of the tube into the fixed Connecting Wall Bracket making sure the tube is fully inserted as shown in Fig 8.Position the two top screw-holes on the unfixed Wall Bracket to the pencil line. Using a pencil, mark the position of all three screw holes.Drill correct size holes for the wall plugs being used, insert wall plugs and using screws provided, screw the wall bracket to the wall.Tighten tube retaining screw on Connecting Wall Bracket using the alien key provided, ensuring that you do not overtighten.
Step 8.
Using the final tube assembly from Figs. 6 or 7 and working towards the top of the stairs, repeat Step 7 to finish (as shown in Fig.9).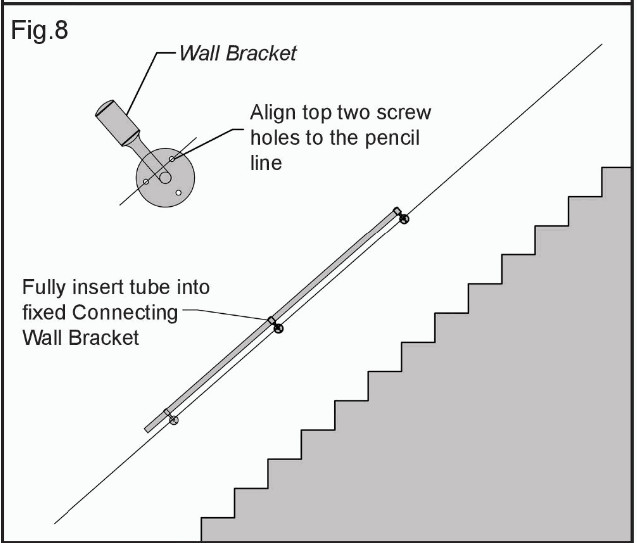

ROTHLEY LTD MACROME ROAD WOLVERHAMPTON WV6 9HG WWW.ROTHLEY.COM
[xyz-ips snippet=”download-snippet”]