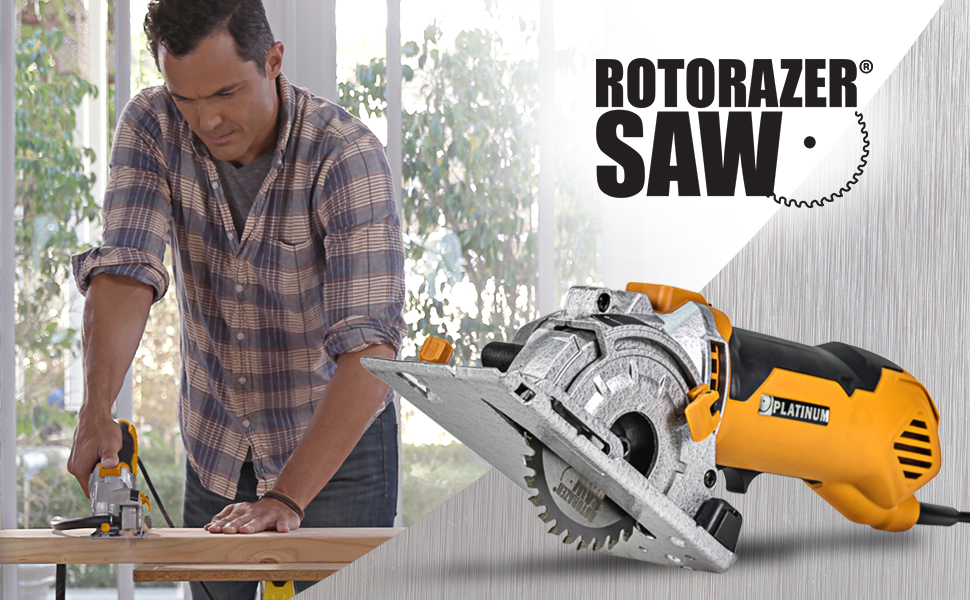
Rotorazer Saw Platinum
Congratulations on the purchase of your new electric Rotorazer Saw® Platinum. This mini saw is a multipurpose tool that can be used to cut a wide range of materials simply by choosing the right blade.Please carefully read these instructions and all the safety instructions before you start using it. Keep this manual in an accessible place for future reference buyrotorazer.com
SAFETY WARNINGS
General Rotorazer Saw® Platinum Safety WarningsWARNING: Read all safety warnings and all instructions. Failure to follow the warnings and instructions may result in electric shock, fire and/or serious injury. Save all warnings and instructions for future reference. The term “Rotorazer Saw® Platinum” in the warnings refers to your electric (corded) Rotorazer Saw® Platinum or battery-operated (cordless) Rotorazer Saw® Platinum.
Work area safety
- Keep work area clean and well lit. Cluttered or dark areas invite accidents.
- Do not operate Rotorazer Saw® Platinum in explosive atmospheres, such as in the presence of flammable liquids, gases or dust. Rotorazer Saw® Platinum can create sparks which may ignite the dust or fumes.
- Keep children and bystanders away while operating Rotorazer Saw® Platinum. Distractions can cause you to lose control.
Electrical safety
- Rotorazer Saw® Platinum plugs must match the outlet. Never modify the plug in any way. Do not use any adapter plugs with earthed (grounded) Rotorazer Saw® Platinum. Unmodified plugs and matching outlets will reduce risk of electric shock.
- Avoid body contact with earthed or grounded surfaces, such as pipes, radiators, ranges and refrigerators. There is an increased risk of electric shock if your body is earthed or grounded.
- Do not expose Rotorazer Saw® Platinum to rain or wet conditions. Water entering Rotorazer Saw® Platinum will increase the risk of electric shock.
- Do not abuse the cord. Never use the cord for carrying, pulling or unplugging the Rotorazer Saw® Platinum. Keep cord away from heat, oil, sharp edges or moving parts. Damaged or entangled cords increase the risk of electric shock. Do not use the cord for purposes other than those for which it was designed.
- When operating Rotorazer Saw® Platinum outdoors, use an extension cord suitable for outdoor use. Using a cord suitable for outdoor use reduces the risk of electric shock.
- If operating Rotorazer Saw® Platinum in a damp location is unavoidable, always use a Ground Fault Circuit Interrupter (GFCI) protected supply. Use of an GFCI reduces the risk of electric shock.
Use Proper Extension Cord: Make sure your extension cord is in good condition. When using an extension cord, be sure to use one heavy enough to carry the current your product will draw. An undersized cord will cause a drop in line voltage resulting in loss of power and overheating. Table 1 shows the correct size to use depending on cord length and nameplate ampere rating. If in doubt, use the next heavier gauge. The smaller the gauge number, the heavier the cord.
Personal safety
- Stay alert, watch what you are doing and use common sense when operating the Rotorazer Saw® Platinum. DO NOT USE a Rotorazer Saw® Platinum while you are tired or under the influ-ence of drugs, alcohol or medication. A moment of inattention while operating Rotorazer Saw® Platinum may result in serious personal injury.
- Use personal protective equipment. Always wear eye protection. Protective equipment such as dust mask, non-skid safety shoes, hard hat, or hearing protection used for appropriate conditions will reduce risk of personal injuries.
- Prevent unintentional starting. Ensure the switch is in the OFF-position before connecting to a power source and/or battery pack, picking up or carrying the tool. Carrying Rotorazer Saw® Plati-num with your finger on the switch or powers up Rotorazer Saw® Platinum may invite accidents.
- Remove any adjusting key or wrench before plugging in & turning the Rotorazer Saw® Platinum ON. A wrench or a key left attached to a rotating part of the Rotorazer Saw® Platinum may result in personal injury.
- Unplug the machine when replacing the blade, then properly press the RED spindle lock button to the lock the spindle and remove the clamping flange.
- Do not overreach. Keep proper footing and balance at all times. This enables better control of the Rotorazer Saw® Platinum in unexpected situations.
- Use suitable clothing. Do not wear loose clothing or jewelry. Keep your hair, clothing and gloves away from moving parts. Loose clothes, jewelry or long hair can be caught in moving parts.
- Whenever dust extraction or dust collection devices are needed for connection, ensure these are connected and properly used. Use of dust collection can reduce dust-related hazards.
Rotorazer Saw® Platinum use and care
- Do not force the Rotorazer Saw® Platinum. Use the correct power tool for your application. The correct power tool will do the job better and safer at the rate for which it was designed.
- Do not use the Rotorazer Saw® Platinum if the switch does not turn it ON and OFF. Any Rotoraz-er Saw® Platinum that cannot be controlled with the switch is dangerous and must be repaired.
- Disconnect the plug from the power source from the Rotorazer Saw® Platinum before making any adjustments, changing accessories, or storing the Rotorazer Saw® Platinum. Such preventive safety measures reduce the risk of starting the Rotorazer Saw® Platinum accidentally.
- When idle, store Rotorazer Saw® Platinum out of the reach of children and do not allow persons unfamiliar with the Rotorazer Saw® Platinum or these instructions to operate the Rotorazer Saw® Platinum. Rotorazer Saw® Platinum is dangerous in the hands of untrained users.
- Take care of your Rotorazer Saw® Platinum. Check for misalignment or binding of moving parts, breakage of parts and any other condition that may affect the Rotorazer Saw® Platinum’s operation. If damaged, have the Rotorazer Saw® Platinum repaired before use. Many accidents are caused by a poorly maintained power tool.
- Keep cutting tools sharp and clean. Properly maintained cutting tools with sharp cutting edges are less likely to bind and are easier to control.
- Use the Rotorazer Saw® Platinum, accessories and tool bits etc. in accordance with these instructions, taking into account the working conditions and the work to be performed. Use of the Rotorazer Saw® Platinum for operations different from those intended could result in a hazardous situation.
- Use a clamp or other practical way to secure and support the work piece to a stable platform.
Service
Have your Rotorazer Saw® Platinum serviced by a qualified repair person using only identical replacement parts. This will ensure that safety of the tool is maintained.Turn off the Rotorazer Saw® Platinum immediately if:
- The power plug and/or power cord are defective.
- The switch is defective.
- Smoke comes out or there is a burning smell.
WARNING: Some dust created by power sanding, sawing, grinding, drilling and other construction activities contains chemicals known to the state of California to cause cancer, birth defects or other reproductive harm. Some examples of these chemicals are: Lead from lead-based paint, crystalline silica from bricks and cements and other masonry products, and Arsenic and chromium from chemically-treated Lumber.
Safety instructions for all saws
- DANGER: Keep hands away from cutting area and the blade. Keep your second hand on the body of the motor housing. If both hands are holding the saw, they cannot be cut by the blade.
- Do not reach underneath the work piece. The guard cannot protect you from the blade below the work piece.
- Adjust the cutting depth to the thickness of the work piece. Less than a full tooth of the blade teeth should be visible below the work piece.
- Never hold the work piece being cut in your hands or across your leg. Secure the work piece to a stable platform. It is important to support the work piece properly to minimize body exposure, blade binding, or loss of control.
- Hold the Rotorazer Saw® Platinum by insulated gripping surfaces when performing an operation where the cutting tool may contact hidden wiring or its own cord. Contact with a “live” wire will also make exposed metal parts of the Rotorazer Saw® Platinum “live” could/may shock the operator.
- When ripping always use a rip fence or straight edge guide. This improves the accuracy of cut and reduces the chance of blade binding.
- Always use blades with the correct size and shape (diamond versus round) of arbor holes that adapt perfectly to the hole they are inserted. Blades that do not match the mounting hardware of the saw will run eccentrically, causing loss of control.
- Never use damaged or incorrect blade washers or bolt. The blade washers and bolt were specially designed for your saw, for optimum performance and safety of operation.
Further safety instructions for all saws: Causes and operator prevention of kickback:
- Kickback is a sudden reaction to a pinched, bound or misaligned saw blade, causing an uncontrolled saw to lift up and out of the work piece toward the operator;
- When the blade is pinched or bound tightly by the kerf closing down, the blade stallsand the motor reaction drives the unit rapidly back toward the operator;
- If the blade becomes twisted or misaligned in the cut, the teeth at the back edge of the blade can dig into the top surface of the wood causing the blade to climb out of the kerf and jump back toward the operator.
Kickback is the result of saw misuse and/or incorrect operating procedures or conditions and can be avoided by taking proper precautions as given below.
- Maintain a firm grip with both hands on the saw and position your arms to resist kickback forces. Position your body to either side of the blade, but not in line with the blade. Kickback could cause the saw to jump backwards, but kickback forces can be controlled by the operator, if proper precautions are taken.
- When blade is binding, or when interrupting a cut for any reason, release the trigger and hold the saw motionless on the work piece until the blade comes to a complete stop. Never attempt to remove the saw from the work piece or pull the saw backward while the blade is in motion or kickback may occur. Investigate and take corrective actions to eliminate the cause of blade binding.
- When restarting a saw in the work piece, center the saw blade in the kerf/groove and check that saw teeth are not engaged into the material. If saw blade is binding, it may walk up or kickback from the work piece as the saw is restarted.
- Provide support for large panels to minimize the risk of blade pinching and kickback. Large panels tend to sag under their own weight. Supports must be placed under the panel on both sides, near the line of cut and near the edge of the panel.
- Do not use dull or damaged blades. Unsharpened or improperly set blades produce narrow kerf/groove causing excessive friction, blade binding and kickback.
- Blade depth and bevel adjusting locking levers must be tight and secure before making cut. If blade adjustment shifts while cutting, it may cause binding and kickback.
- Use extra caution when making a “plunge cut” into existing walls or other blind areas. The protruding blade may cut objects that can cause kickback.
Safety instructions
- Check blade guard for proper closing before each use. Do not operate the saw if blade guard does not move freely and close instantly. Never clamp or tie the blade guard into the open position. If saw is accidentally dropped, blade guard may be bent. Raise the blade guard by the sole plate and make sure it moves freely and does not touch the blade or any other part, in all angles and depths of cut.
- Check the operation of the blade guard spring. If the guard and the spring are not operating properly, they must be serviced before use. Blade guard may operate sluggishly due to damaged parts, sticky residue, or an accumulation of debris.
- Blade guard may be retracted manually only for special cuts such as “plunge cuts” and “compound cuts.” Raise blade guard by sole plate and as soon as blade enters the material, the lower guard must be released. For all other sawing, the blade guard should operate automatically.
- Always observe that the blade guard is covering the blade before placing saw down on bench or floor. An unprotected, spinning blade will cause the saw to walk backwards, cutting whatever is in its path. Be aware of the time it takes for the blade to stop spinning after switch is released.
- DO NOT use any abrasive wheels.
- Use only blade diameter(s) in accordance with the markings.
WARNING: Working with some kinds of wood and metal or with paint that contains lead can generate harmful or toxic gases that are a risk for the user and other people in the work area. Always wear suitable personal protection and keep people from getting too close to the work area.
TECHNICAL DATAVoltage 120 volt – 60 HzWatt 500 wattNo load Speed 4500 rpmBlade size 85mmMax cutting depth 1 inch
OPERATING INSTRUCTIONS
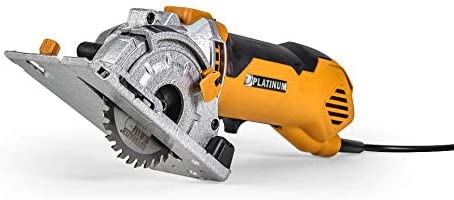
Intended UseThis power tool is intended for ripping and cross-cutting wood and other material, while resting firmly on the work piece.Rotorazer Saw® Platinum is a multifunctional mini saw which can cut different material such as wood, laminate flooring, plastics, ceramic tiles, slate, aluminum sheet and other material. It comes with cutting depth adjustment and 3 interchangeable blades.
TOOL DESCRIPTION
WARNING! When in operation, this Rotorazer Saw® Platinum generates an electromagnetic field. Under certain circumstances, this field can have a harmful effect on active and passive medical implants. To reduce the risk of serious and fatal injury, people with medical implants are recommended to consult their doctor and the implant manufacturer before using this tool.Never use the spindle lock as a brake to stop the moving blade, this may result in the spindle lock being blocked and cause damage to the machine.
Description of the tool
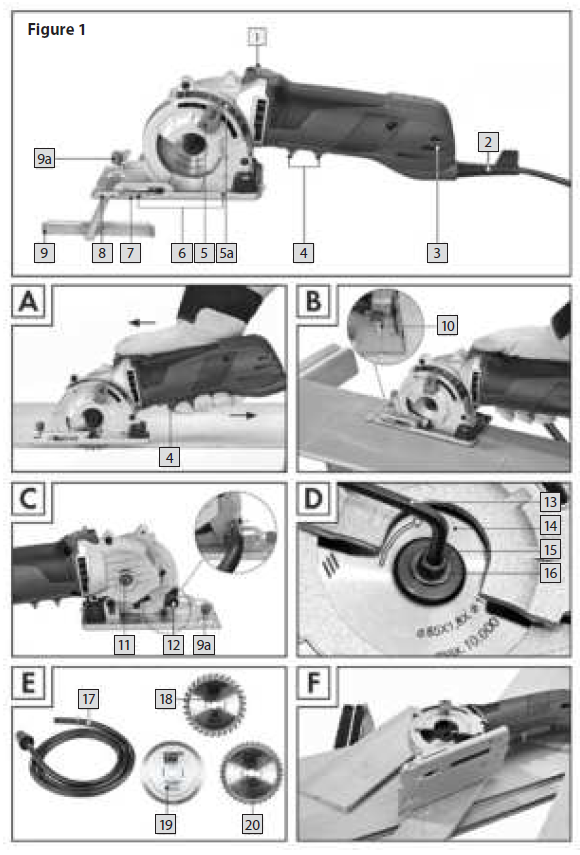
Parts Breakdown (See Figure 1, A-E)
- Mechanical plunge blocker release
- Power cord
- Ventilation slits
- ON/OFF switch
- Pre-selector for cutting depth
- Scale for cutting depth
- Marking for Plunge cut length
- Base plate
- Parallel fence slot
- Parallel fence9a. Screw for parallel fence
- Window for cutting line
- Spindle lock
- Connection for dust extraction
- Allen key
- Saw blade
- Clamping flange
- Clamping screw and washer
- Dust extractor hose
- Circular Saw Blade for cutting wood
- Circular Saw Blade for cutting tile & ceramic
- Circular Saw Blade for cutting soft metal & plastics
The Package Contains
- 1 Rotorazer Saw® Platinum
- 1 circular saw blade for cutting tile & ceramic
- 1 circular saw blade for cutting soft metal & plastic
- 1 circular saw blade for cutting wood
- 1 dust extraction hose
- 1 Allen key
- 1 parallel fence
- 1 protective storage case
ASSEMBLY
Before using for the first time Unpacking
- Open the shipper box and carefully remove the case.
- Remove the packing material.
- Remove the packing protection and transport materials (as applicable).
- Check to make sure the case contains all the parts.
- Check the tool and accessories to determine if any damaged occurred during transport.
- If possible, keep the box until the warranty has expired. Then dispose of the box while respecting the environment by taking it to a recycling center.
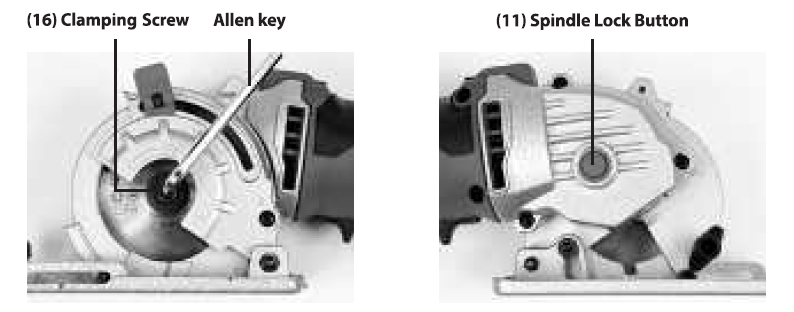
Replacing the Saw Blade
- Push down the spindle lock (11) and loosen the clamping screw (16) with the Allen key (to open turn clockwise). Now lift off the clamping screw and washer (16) and the clamping flange (15).
- Adjust cutting depth to the maximum position.
- Swing the base plate (7) upwards.
- Take off the saw blade.
- Refitting of the saw blade is the reversal of the removal.
- Push down the spindle lock (11) (until it clicks into place) and, using the Allen key (13), tighten the clamping screw (16). The arrow on the saw blade must coincide with the arrow for the direction of rotation (marked on the appliance).

WARNING:
- Unplug the machine when replacing the blade, and properly press the RED spindle lock button to lock the spindle and remove the clamping flange.
- Do not use the machine in any case when the spindle lock is blocked. Slightly push the spindle lock button.
- If the spindle lock can not reset by pressing the spindle lock button, loosen the clamping flange with the Allen key and turn the blade back and forth manually. The spindle lock will reset to its normal position.
Dust Extraction Hose (see Figure C, E)
Extracting dust is very helpful for keeping the work area clean because a great deal of dust is produced when working with the Rotorazer Saw® Platinum. Because the cutting blade is almost completely enclosed in the saw body, extracting dust is particularly effective in this case. A dust extractor or vacuum cleaner can be attached to the hose (17), which is in turn attached to the connector for the dust extraction device.
- Unplug the Rotorazer Saw® Platinum and attach the hose (17) to the connector for the dust extraction device (12).
- Check to make sure the blade guard moves freely. Use a cone-shaped adapter to connect the hose to a dust extractor or a vacuum cleaner.
Tips:
- Make sure that a dust extractor can be used with a Rotorazer Saw® Platinum.Most dry and wet household vacuum cleaners can be used.
- Using a dust extractor is very practical when making several cuts one after another because it reduces the need to stop as often to clean the tool and the work area.
- Always use a dust extractor when cutting materials that generate dust that can be harmful, such as certain kinds of wood flooring, medium-density fibre board and ceramic.
INSTRUCTIONS FOR USE
Operation / Start-UpWith this tool, the material to be cut is held between the base plate (7) and the support surface. The blade penetrates into the material to make a clean cut that is faster and safer.
Turning On and Off
- Slide the ON/OFF switch (4) forward to turn on the tool. The device will be operating whenever the switch is moved forward.
- To turn off the power, slide the switch to the OFF position.
WARNING:Always unplug the tool before making any adjustments to it.Adjusting the Cutting Depth (See Figure 1)
Note: We recommend adjusting the cutting depth at least 2 mm deeper than the thickness of the material. This will result in a clean cut.The cutting depth can be changed by adjusting the lever.
- Loosen the adjustment screw (5) and move the depth lever until the front end of the lever is on the mark of the depth scale you want (5a). The even millimeter values on the depth scale are indicated with long lines and the odd values with short lines.
- Tighten the adjusting lever (5) again.
Fitting the Parallel Fence
Release the screw of the parallel fence (9a) at the base plate (7) and insert the parallel fence (11) into the parallel fence fixture (9) . Retighten these screws (9a).
Handling the Plunge Saw
- Put the machine onto the material and switch it on as described in the chapter “Turning on and off ”.
- If necessary adjust the machine to the parallel fence (9) or a drawn line.
- Hold the machine as shown in Figure A and cut with light pressure.
- Push the plunge blocker release 1 towards the front and keep it pressed.
Recommendations for working with the Rotorazer Saw® Platinum
- Select the right blade for the material you are going to cut.
- Make sure the blade is sharp and in good condition.
- Adjust the blade to the desired cutting depth (Figure A).
- Place the work piece you want to cut on a table, workbench or any other suitable surface and hold it in place with clamps or a vice. Place sufficient scrap material under the work piece so you do not make cuts in the support surface or break the blade due to contact with the hard support surface such as a concrete floor.
- Hold the Rotorazer Saw® Platinum in your hand in a comfortable position. Your thumb or index finger should be resting on the ON/OFF switch. Make sure your hand does not cover the ventilation holes on the front or back of the device.
- Place the base plate on the work piece. To leave a gap from the work piece, place the saw so the back part of the base plate sticks out. Do not let the saw blade penetrate into the work piece yet.
- Turn on the tool and wait a few seconds until the blade is moving at the operating speed. Press the lever (1) for releasing the blade guard and allow the blade to slowly penetrate into the work piece while applying some pressure.
- Move the tool forward while you cut through the work piece. Never move the tool backward while the blade is in the work piece.
- Do not apply great force when cutting with the tool. Applying too much pressure creates wear and tear and can tire you unnecessarily.
- Make sure the base plate (7) is always flat on the work piece. This is particularly important when cutting narrow bars that are not completely covered by the base plate.
Cutting Along a Line
Using the indicator on the front and rear of the blade guard makes it easier to cut along a straight line.
CLEANING & MAINTENANCE
WARNING: Remove the plug from the wall outlet before cleaning or doing maintenance work on the tool.
Cleaning
- Keep protectors, ventilation holes and the motor body as free of dust and dirt as possible.
- Wipe the tool with a clean cloth or use low-pressure compressed air.
- Clean the tool immediately after each use.
- Do not use any cleaning products or solvents that could damage the plastic parts.Make sure water does not get inside the tool.
Storage: When the tool is not in use, place it in the storage case and store it in a dry, well-ventilated place out of reach of children, such as a high cupboard or a closed space.
ARBITRATION AGREEMENT
PLEASE READ THIS AGREEMENT CAREFULLY. YOU ACCEPT THE TERMS OF THIS AGREEMENT BY RETAINING THE PRODUCT(S) SHIPPED IN CONNECTION WITH THIS AGREEMENT (THE “PRODUCTS”) FOR MORE THAN THIRTY (30) DAYS AFTER RECEIPT. IF YOU DO NOT AGREE TO THE TERMS OF THIS AGREEMENT, YOU MAY RETURN THE PRODUCT TO COMPANY WITHIN THIRTY (30) DAYS OF RECEIPT FOR A FULL REFUND.
THIS ARBITRATION AGREEMENT (“AGREEMENT”) AFFECTS YOUR LEGAL RIGHTS AND REMEDIES BY PROVIDING THAT DISPUTES BETWEEN YOU AND THE MANUFACTURER, DISTRIBUTOR AND/OR SELLER OF THIS PRODUCT (COLLECTIVELY, “COMPANY”), MUST BE RESOLVED THROUGH BINDING ARBITRATION AND NOT IN COURT. IT ALSO PROVIDES THAT ANY DISPUTE CANNOT BE RESOLVED IN A CLASS ACTION OR OTHER PROCEEDING WHERE YOU REPRESENT OTHER PERSONS OR OTHER PERSONS REPRESENT YOU, AND THAT NO CLASS OR REPRESENTATIVE ARBITRATIONS ARE PERMITTED. PLEASE CAREFULLY READ ALL TERMS IN THIS AGREEMENT.
1. RESOLUTION OF CLAIMS OR DISPUTES.Any claim or dispute between you and Company (or any of Company’s subsidiaries or affiliates) arising out of or relating in any way to the Product or this Agreement shall be resolved through final, binding arbitration. This arbitration obligationis reciprocally binding on both you and the Company and applies regardless of whether the claim or dispute involves atort, fraud, misrepresentation, product liability, negligence, violation of a statute, or any other legal theory. Both you and Company specifically acknowledge and agree that you waive your right to bring a lawsuit based on such claims or disputes and to have such lawsuit resolved by a judge or jury.
2. LIMITATION OF LEGAL REMEDIES.All arbitrations under this Agreement shall be conducted on an individual (and not a class-wide) basis, and an arbitrator shall have no authority to award class-wide relief. You acknowledge and agree that this Agreement specifically prohibits you and the Company from commencing arbitration proceedings as a representative of others or joining in any arbitration proceedings brought by any other person. The parties agree that no class or representative actions of any type are permitted.
3. ARBITRATION PROCEDURES.a. Before instituting an arbitration, if you have any dispute, we strongly encourage you to contact the Company to try to resolve the matter by calling 800-218-3560, although you are not required to do so.b. The arbitration of any claim or dispute under this Agreement shall be conducted in accordance with the expedited procedures set forth in the JAMS Comprehensive Arbitration Rules and Procedures as those Rules exist on the date you receive the Product, including Rules 16.1 and 16.2 of those Rules. These rules and procedures are available by calling JAMS or by visiting its web site at www.jamsadr.com. The arbitration of any claim or dispute under this Agreement shall be conducted by an arbitrator who has at least five years of experience conducting arbitrations.c. The arbitration of any claim or dispute under this Agreement shall be conducted in the State of California or the location in which you received this Agreement. For claims of $10,000 or less, you may choose whether the arbitration proceeds in person, by telephone, or based only on submissions.d. The Company shall pay costs for the arbitration of claims, including any JAMS Case Management Fee and all professional fees for the arbitrator’s services. The Company shall pay the fees and costs of its own counsel, experts and witnesses and shall not be able to recoup them from you even if you do not prevail in the arbitration. Unless otherwise provided by law, you acknowledge and agree that you shall pay the fees and costs of your own counsel, experts and witnesses.
4. CHOICE OF LAW.The arbitration provisions of this Agreement and any arbitration conducted pursuant to the terms of this Agreement shall be governed by the Federal Arbitration Act (9 U.S.C. Secs. 1-16). In this respect, the parties acknowledge that this Agreement involves a transaction conducted in interstate commerce. Otherwise, this Agreement and the rights of the parties hereunder shall be governed by and construed in accordance with the laws of the State of California, exclusive of conflict or choice of law rules.
5. SEVERABILITY.If any provision of this Agreement is declared or found to be unlawful, unenforceable or void, such provision will be ineffective only to the extent that it is found unlawful, unenforceable or void, and the remainder of the provision and all other provisions shall remain fully enforceable.
ONE YEAR WARRANTY
Your Rotorazer Saw® Platinum is warranted to be free from manufacturing defects in materials and workmanship for one year from the original purchase date. Should the product have a defect in materials or workmanship, we will repair or replace it without charge to you (a shipping and processing fee will apply). To obtain service under warranty, simply call our customer service center toll-free at 800.220.7975.
This warranty does not cover damage caused by accident, misuse or any use other than as intended and described in this product manual, or damage resulting from failure to maintain and clean this product as specified in this product manual. This warranty applies only to the original purchaser of the Rotorazer Saw® Platinum.
ALL EXPRESS AND IMPLIED WARRANTIES FOR THIS PRODUCT, INCLUDING IMPLIED WARRANTIES OF MERCHANTABILITY FOR A PARTICULAR PURPOSE, ARE LIMITED IN DURATION TO THE WARRANTY PERIOD, AND NO WARRANTIES, WHETHER EXPRESS OR IMPLIED, WILL APPLY AFTER THIS PERIOD.
Some states do not allow limitations on the duration of implied warranties, so the above limitation may not apply to you. While this warranty gives you specific legal rights, you may also have other rights which may vary from state to state.
![]()
Contact Info for Warranty Service:Razer Tools, LLCPO BOX 9169Van Nuys, CA 91409800.220.7975buyrotorazer.com
References
[xyz-ips snippet=”download-snippet”]