![]()
OWNER’S MANUALCOMMERCIAL DEHUMIDIFIER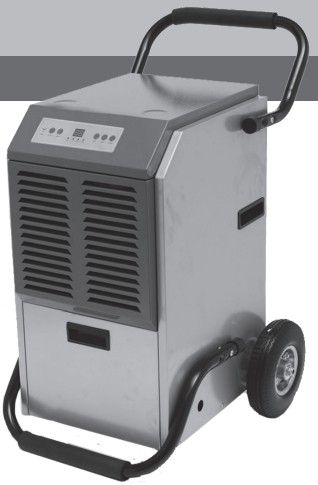 RDHC-110Read and retain these instructions for future reference.For any Customer Support needs, please choose the Support tab onwww.royalsovereign.com (USA)www.royalsovereign.ca (Canada)Royal Sovereign International Inc.
COMMERCIAL DEHUMIDIFIERModel RDHC-110
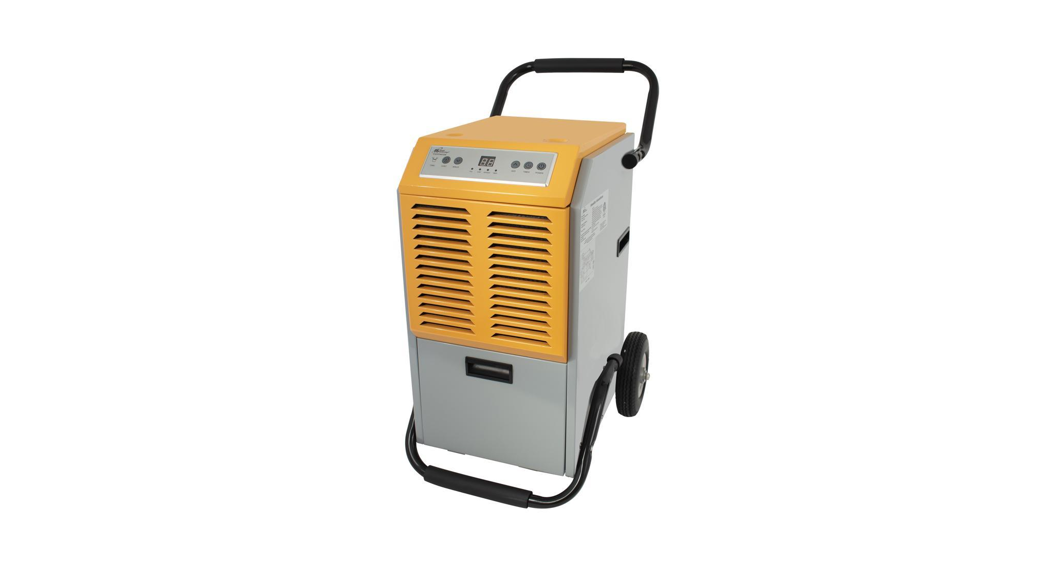
INTRODUCTIONThank you for purchasing the Royal Sovereign Commercial Dehumidifier. This manual will provide you with safety information, instructions for optimal use, and proper care and maintenance of your product. Please read this manual carefully before operating.
IMPORTANT SAFETY INSTRUCTIONS
Read all instructions before useYour safety and the safety of others are very important.We have provided many important safety messages in this manual and on your appliance. Always read and obey all safety messages.![]() This is the safety alert symbol. This symbol alerts you to potential hazards that can hurt you and others.All safety messages will follow the safety alert symbol and either the word “WARNING” or “CAUTION”. These words mean:
This is the safety alert symbol. This symbol alerts you to potential hazards that can hurt you and others.All safety messages will follow the safety alert symbol and either the word “WARNING” or “CAUTION”. These words mean:![]() WARNING This symbol indicates the possibility of death or serious injury.
WARNING This symbol indicates the possibility of death or serious injury.![]() CAUTION This symbol indicates the possibility of injury or damage to property.Basic safety precautions
CAUTION This symbol indicates the possibility of injury or damage to property.Basic safety precautions![]() WARNING To reduce the risk of fire, electric shock, or injury to persons when using this appliance, follow basic precautions, including the following:
WARNING To reduce the risk of fire, electric shock, or injury to persons when using this appliance, follow basic precautions, including the following:
- Do not attempt to repair or replace any part of your dehumidifier unless it is specifically recommended in this manual. All other services should be referred to a qualified technician.
- If the power cord becomes worn or damaged, the cord should only be replaced by a qualified service technician using genuine replacement parts.
- The dehumidifier should be plugged into its own grounded (13A, 60Hz, 115VAC circuit) .
- Do not plug other appliances into the same outlet; it can overload the circuit and cause a fire or electric shock.
- Do not remove the round grounding prong from the plug. It can result in the risk of electric shock.
- This appliance is not designed for use by young children. Young children should be supervised to ensure that they do not play with or climb on the unit.
- Be sure all packaging materials are removed from the appliances before use. It can result in personal injury.
- Do not disassemble or modify the appliances or the power cord. It can result in the risk of electric shock or fire.
- Do not place the power cord or appliances near a heater, radiator, or another heat source. It can result in the risk of electric shock or fire.
- Do not use this or any appliance near flammable gases or liquids or other combustibles, such as gasoline, benzene, thinner, etc. It can result in the risk of electric shock or fire.
- Make sure the power cord is plugged firmly and completely into the outlet. It can result in the risk of electric shock or fire.
- Do not start or stop operation by plugging in or unplugging the power cord. It can result in the risk of electric shock.
- If the appliances are making unusual sounds or are emitting smoke or an unusual odor, unplug them immediately. It can result in the risk of electric shock or fire.
- Do not use if the electrical socket is loose or damaged. It can result in the risk of electric shock or fire.
- Do not operate with wet hands or in an excessively damp environment. It can result in the risk of electric shock.
- Do not use this or any electrical appliance if you smell gas. It can result in the risk of fire or explosion.
- Turn off and unplug the appliances before cleaning to avoid the risk of electric shock.
- Do not clean the unit with water. Water can enter the unit and damage the insulation, creating a shock hazard. If water enters the unit, unplug it immediately and contact Customer Service. It can result in the risk of electric shock.
Basic safety precautions![]() CAUTION To reduce the risk of fire, electric shock, or injury to persons when using this appliance, follow basic precautions, including the following:
CAUTION To reduce the risk of fire, electric shock, or injury to persons when using this appliance, follow basic precautions, including the following:
- To avoid possible cuts, avoid contacting the metal parts of the appliances when removing or reinstalling the filter. It can result in the risk of personal injury.
- Do not block the air inlet or outlet of the appliance. Reduced airflow will result in poor performance and could damage the unit.
- Always grasp the plug when plugging in or unplugging the appliance. Never unplug by pulling on the cord. It can result in the risk of electrical shock and damage.
- Always turn off and unplug the appliances when they will not be used for an extended period of time. This conserves energy and reduces the chance of accidents.
- Install the appliance on a sturdy, level floor capable of supporting up to 110 lbs (50 kg). Installation on a weak or unlevel floor can result in the risk of property damage and personal injury.
- Make sure the appliance is the correct size for the area you wish to dehumid. Using an appliance that is the wrong size can waste energy and damage the unit.
- Close all doors and windows to the room for the most efficient operation.
- To prevent damage to the surface finish, use only a soft cloth to clean the appliances. Do not use wax, thinner, or a strong detergent.
- To prevent spills and property damage, be sure to drain the appliance properly.
- Do not position the appliances so that pets or house plants are exposed to the direct airflow. It can result in the risk of injury to pets or house plants.
- Do not drink the water from the bucket. Dispose of it properly outdoors or down the drain.
- Do not operate the appliance without the filter securely in place. Operation without the filter could damage the unit.
- Clean the filter every two weeks, or more often if needed.
- If you do not have a properly grounded outlet, or if there is any doubt that the outlet is not properly grounded, a qualified electrician should check the outlet and circuit, and, if necessary, install a properly grounded outlet.
- This dehumidifier must be plugged into a grounded 60 Hz, 115 VAC outlet protected by a 13 amp time-delay fuse or circuit breaker.
- This dehumidifier must be installed in accordance with national wiring codes.
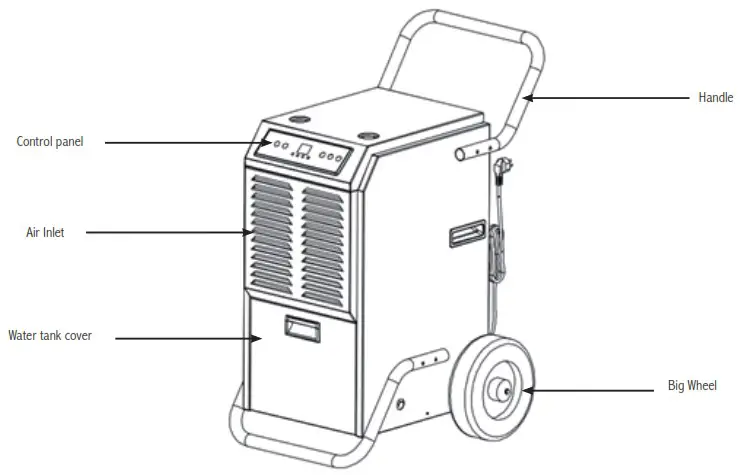
Product View
Front View
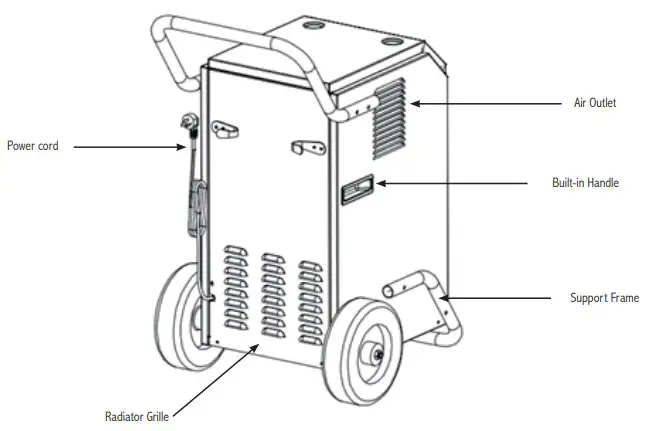
Back View
Handle Installation
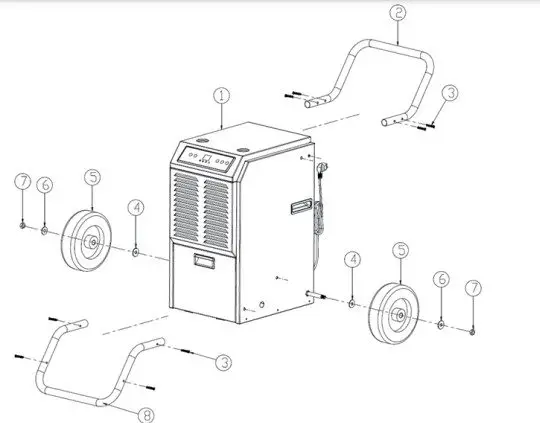
| 1. Main Body | 2. Handle | 3. Stainless Steel Bolt | 4. Spacer |
| 5. Wheel | 6. Spacer | 7. Nut | 8. Support Frame |
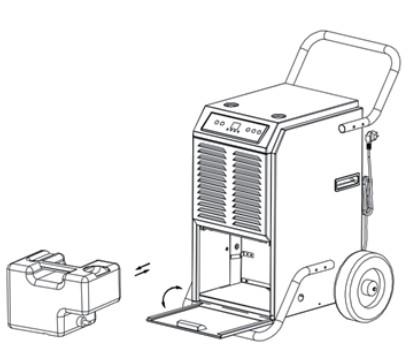
Dehumidification (using built-in water tank)
- When the tank is full, the “FULL” light will turn on and the unit will make a buzzing sound. Press the power button.
- Open the front panel to access the water tank to empty the water tank.
- Grab the handle of the water tank and pull it out horizontally.
- Dispose of the water. Replace the tank, close the front panel.

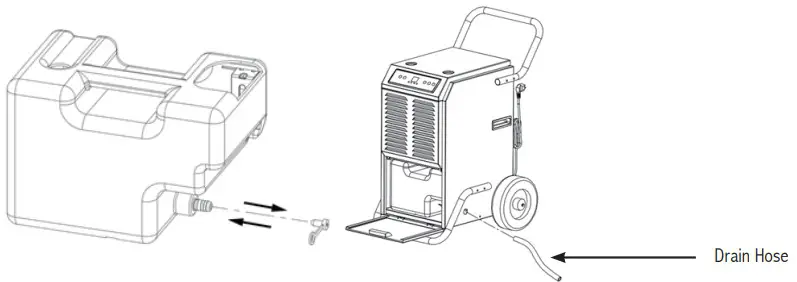
Continuous drainage
Note: In extremely wet conditions, the tank may need frequent cleaning.
- Open the front cover, remove the water tank, and dispose of any water from the tank.
- Remove the plug and install the included drain pipe to the connector (refer to picture below). Next, direct the pipe/hose to the desired area before operating the machine
- Clean the water tank, drain the hose and pipe connector. Close the front panel.
NOTE: To return to water tank usage, use the sealing washer, without the hole to stop water flowing out of the openingWARNING: Do not block the drainage hose. The end of the drainage pipe should not be higher than the outlet hole. If the drainage pipe end is higher than the outlet hole, water will not drain properly and could possibly damage components of the unit.
Product Operation
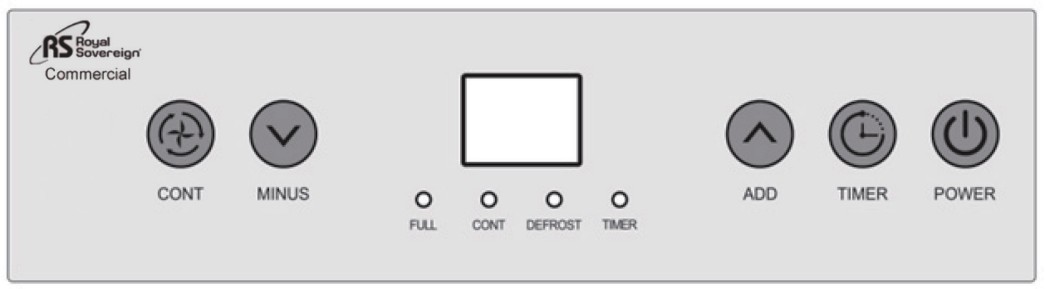
![]() Press this button while the screen light is ON. The unit will automatically enter continuous mode. The display screen will show the environmental humidity and the compressor will be on. After the fan runs for about 3 seconds; press this button again. The compressor will stop and the display screen will show “- -“. The unit will be in standby mode with the fan running for another minute before stopping.
Press this button while the screen light is ON. The unit will automatically enter continuous mode. The display screen will show the environmental humidity and the compressor will be on. After the fan runs for about 3 seconds; press this button again. The compressor will stop and the display screen will show “- -“. The unit will be in standby mode with the fan running for another minute before stopping.![]() Hold down this button for 3 seconds and release. The Timer light will turn ‘ON’. Press “MINUS” and “ADD” (1-24) to set the start time. When the count down is over, the fan and compressor will start. To power off the unit, hold down this button until the button light powers ON. Press “MINUS and ADD to set the stop. When the time is complete, the fan and compressor will turn off. Press this button for 3 seconds to show the current temperature After 10 seconds, the display will return to show the current humidity. Continue to hold this button to show the current temperature.
Hold down this button for 3 seconds and release. The Timer light will turn ‘ON’. Press “MINUS” and “ADD” (1-24) to set the start time. When the count down is over, the fan and compressor will start. To power off the unit, hold down this button until the button light powers ON. Press “MINUS and ADD to set the stop. When the time is complete, the fan and compressor will turn off. Press this button for 3 seconds to show the current temperature After 10 seconds, the display will return to show the current humidity. Continue to hold this button to show the current temperature.![]() The humidity can be increased by increments of 5 %RH during normal mode. Hold this button for 1 second to increase the humidity.
The humidity can be increased by increments of 5 %RH during normal mode. Hold this button for 1 second to increase the humidity.
![]() The humidity can be decreased by increments of 5 %RH during normal mode. Hold this button for 1 second to decrease the humidity.Note: 1) The default humidity is 50 %RH,with increase and decrease increments as outlined below: 20 %-25 %-30 %-35 %-40 %-45 %-50 %-55 %-60 %-65 %-70 %-75 %-80 %-85 %-90 % 2) Environmental and the unit set humidity will control the status of the units compressor and fan. If the environmental humidity is >= the machine set humidity +3 %, the compressor and fan will operate. If the environmental humidity is < the machine set humidity +3 %, the compressor and will not operate.Press the continue button for continuous mode or switch to normal dehumidification mode to set the humidity normally
The humidity can be decreased by increments of 5 %RH during normal mode. Hold this button for 1 second to decrease the humidity.Note: 1) The default humidity is 50 %RH,with increase and decrease increments as outlined below: 20 %-25 %-30 %-35 %-40 %-45 %-50 %-55 %-60 %-65 %-70 %-75 %-80 %-85 %-90 % 2) Environmental and the unit set humidity will control the status of the units compressor and fan. If the environmental humidity is >= the machine set humidity +3 %, the compressor and fan will operate. If the environmental humidity is < the machine set humidity +3 %, the compressor and will not operate.Press the continue button for continuous mode or switch to normal dehumidification mode to set the humidity normally![]() During continuous mode, the humidity setting is unavailable. The continuous mode light turns on and the screen will display the current humidity. Press this button to switch to normal mode where the humidity setting will be available.OPERATION When the water tank is full, the water tank LED light will be red and an alarm will sound after 5 seconds. A buzzer sound beeps 15 times and the compressor and fan will shut off. Empty the water tank and restart. After the water tank is empty, the unit will automatically switch to its previous setting with the compressor will remain in a 3-minute self-protect stat. The alarm will stop 3 seconds after the water tank is emptied and replaced. The fan and compressor will start again after 3 minutes.Note: The compressor will not go into `self-protect mode if it is the first time the unit has been used. Press “POWER” to restart the compressor.The system has an auto memory function. If there is a sudden power cut during operation, or the power jack slips out, the unit will return to the previous setting.DEFROST FUNCTION
During continuous mode, the humidity setting is unavailable. The continuous mode light turns on and the screen will display the current humidity. Press this button to switch to normal mode where the humidity setting will be available.OPERATION When the water tank is full, the water tank LED light will be red and an alarm will sound after 5 seconds. A buzzer sound beeps 15 times and the compressor and fan will shut off. Empty the water tank and restart. After the water tank is empty, the unit will automatically switch to its previous setting with the compressor will remain in a 3-minute self-protect stat. The alarm will stop 3 seconds after the water tank is emptied and replaced. The fan and compressor will start again after 3 minutes.Note: The compressor will not go into `self-protect mode if it is the first time the unit has been used. Press “POWER” to restart the compressor.The system has an auto memory function. If there is a sudden power cut during operation, or the power jack slips out, the unit will return to the previous setting.DEFROST FUNCTION
- The compressor and fan will shut off automatically when the environmental temperature goes below 5°C (41 °F) or above 38°C (100.4°F).
- Defrost requirement: The compressor will run for 30 minutes, Once the temperature sensor reaches -1°C (S30.2°F) -lasting for 10 seconds, the compressor will stop, and defrosting will begin. The fan will continue operation with the defrost light on. When the pipe temperature reaches 5°C (41°F) or the defrost function lasts for 15 minutes. the defrost function will stop.Note: During defrost function, the LED light will be on until defrosting is complete.
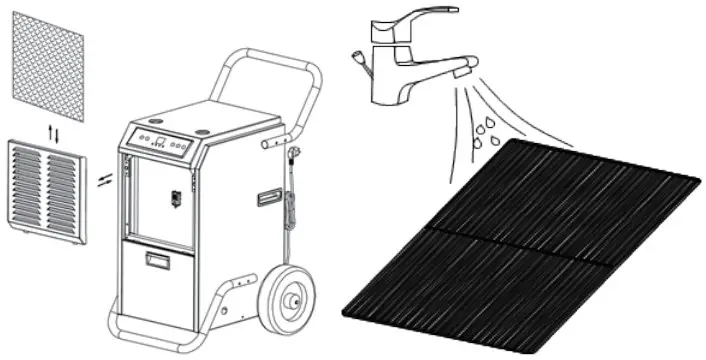
Maintenance
- Clean the machine with a soft wet cloth.
- Pull the louver on the front panel out to access the filter.
- Remove the filter mesh out of the unit.
- Use a clean rag to adsorb the surface dust on the filter mesh. If the filter is extremely dirty, use tap water to flush and clean the filter. Fully dry the filter before putting it back into position. A clean filter will increase the machine’s capacity.
MACHINE STORAGE
 MACHINE STORAGE
If you don’t use the unit for an extended period of time, please store it per the following steps:
- Clean the filter mesh.IMPORTANT: The evaporator inside the machine must dry before the unit is packed as this will avoid component damage and possible mold. Unplug the unit and place it in a dry open area for days to ensure it is completely dry. A second alternative to dry the unit is to set the humidity point more than 2% higher than the ambient humidity of the room. This will enable the fan inside the unit to dry the evaporator after a few hours of usage.
- Neatly wind the power cord and place it at the back of the unit. (3) Store the unit in a clean, dry environment.
Specifications
| Model# | RDHC•110 |
| Rated capacity | 110Rnts/Day @ 86.F. 80% RH |
| Power supply | 115V/60Hz |
| Power Consumption & Current | 728W/ 6.75 A @ 86.R 80% RH |
| Noise | 560dB(A) |
| Air Circulation | 450m3/hr (264.8 CFM) |
| Freon type & Capacity | R410A/ 11.60z(330g) |
| Recommended Room Size | 40.50m2 (height 2.6m) |
| Water tank capacity | 5.5L (1.45 Gallons) |
| Net Weight | 36kg (79.3 lbs.) |
| Gross Weight | 39.5kg (87 lbs.) |
| Dimensions | 430’515’825mm(17.0″ x 20.3″ x 32.5″) |
Error Messages
- “E1”: – This error message is displayed if the temperature sensor fails. The system works in cycles of dehumidification for 30 minutes and defrosting for 15 minutes. A failed temperature sensor should be replaced.
- “E2”: This error message is displayed if the humidity sensor fails. The humidity adjusting button will not work. The system works in cycles of dehumidification for 30 minutes and defrosting for 15 minutes. A failed temperature sensor should be replaced.
- “CL”: This error message shows when the room temperature is <5°C (41°F). A “CL” code will be displayed and the unit will stop running.
- “CH”: This error message shows when the room temperature is >38°C (100.4°F). A “CH” code will be displayed and the unit will stop running.
- “LO”: This error message shows when the room humidity is <20%RH. A “LO” code will be displayed and the unit will stop running.
TROUBLESHOOTING
| Problem | Cause |
Solution |
| The machine does not work | The unit is not plugged in | Plugin the unit |
| Room temperature is <5°C or above 35°C(<41°F. >95°F). | To protect the machine, use it only when ambienttemperature is between 5 and 35 degrees. | |
| The machine runs but does notdehumidify | The humidity setpoint is 2% higher than ambienthumidity. | Reset the humidity to a lower set point. |
| Reduced dehumidifier capacity | Filter mesh is jammed | Clean the filter mesh |
| Air-in and/or Air-out louvers jammed. | Clear the blockage of the Air-in and/or Air-out louvers. | |
| No air inlet | Filter mesh or air-in louver jammed. | Clean filter according to instructions or clean the louverblockage |
| Loud Operation | Machine situated on an incline or decline slope | Move to a flat ground |
| Filter mesh is jammed. | Clean filter mesh according to instructions |
Cautions: Switch off the unit and unplug it immediately if anything abnormal happens. Contact a qualified electrician. Do not dispose of electrical appliances as unsorted municipal waste, use separate collection facilities. Contact your local government for information regarding the collection systems available.
WARRANTY
Royal Sovereign International, Inc.warranties this product to be free from defects in material and workmanship for a period of one (1) year. This warranty is extended to the original purchaser only.This warranty only covers products that are properly installed, properly maintained, and properly operated in accordance with the instructions provided. This limited warranty does not cover any failures or operating difficulties due to normal wear and tear, accident, abuse, misuse, alteration, misapplication, improper installation, or improper maintenance and service by you or any third party.Returned products will not be accepted without a Return Authorization number. To request a Return Authorization number, please visit us at www.royalsovereign.com. All transportation costs for the return of damaged products or parts will be the responsibility of the purchaser. Return the defective product, in original packaging, to the address below.Royal Sovereign International, Inc. requires reasonable proof of your date of purchase from an authorized retailer or distributor. Therefore, you should keep your receipt, invoice, or canceled check from the original purchase. The limited warranty shall be limited to the repair or replacement of parts that prove defective under normal use and service within the warranty period.Royal Sovereign International, Inc. (and its affiliated companies) SHALL HAVE NO LIABILITY WHATSOEVER TO PURCHASER OR ANY THIRD PARTY FOR ANY SPECIAL, INDIRECT, PUNITIVE, INCIDENTAL, OR CONSEQUENTIAL DAMAGES. Some states do not allow the exclusion or limitation of incidental or consequential damages so the above exclusion and limitations may not apply to you.
| ROYAL SOVEREIGN INTERNATIONAL, INC.2 Volvo Drive Rockleigh, NJ 07647 USATEL : +1) 800-397-1025FAX : +1) 201-750-1022www.royalsovereign.com | RS INTERNATIONAL CANADA INC.191 Superior Blvd., Mississauga, ON L5T 2L6 CANADATEL: +1) 905-461-1095 TF: +1) 866-961-6673FAX: +1) 905-461-1096www.royalsovereign.ca |
References
[xyz-ips snippet=”download-snippet”]