ROYALE CLASSICAL 34” and 36” GUITAR
SAFETY AND WARNINGS
WARNING – KEEP BATTERIES OUT OF REACH OF CHILDREN
- Swallowing may lead to serious injury or death in as little as 2 hours, due to chemical burns and potential perforation of the esophagus.
- If you suspect your child has swallowed or inserted a button battery immediately call the 24-hour Poisons Information Centre on 13 11 26 (Australia) or 0800 764 766 (New Zealand) for fast, expert advice.
- Examine devices and make sure the battery compartment is correctly secured, e.g. that the screw or other mechanical fastener is tightened. Do not use if compartment is not secure.
- Dispose of used button batteries immediately and safely. Flat batteries can still be dangerous.
- Tell others about the risk associated with button batteries and how to keep their children safe.
GETTING STA RTED
Out of the box, your guitar’s strings will be loose and require a full tune up.The built-in tuner requires 1x button battery (3V, CR2032) to operate.Please note that a new guitar’s wood will take 2-3 days to stabilize to the new temperature, and as such will not stay in tune as long. Once stabilized, the strings will hold tune correctly.
Overview
TUNING
- Guitar strings naturally fall out of tune, not only with regularly playing, but also from temperature changes throughout seasons.
- The most common tuning for guitar is ‘E Standard’.
- E A D G B E; starting from the thickest, lowest pitched string (the Low E), to the thinnest, highest pitched one (the high E). These are both the same ‘E’ note, but two octaves apart.
- When in tune, these are the notes you will hear when you strum just one string, with no frets held. The same note, one octave higher, will also play if you hold a finger on the 12th fret (the one with two dot symbols) while strumming.
- To tune your guitar, simply turn the turning pegs on the headstock tighter or looser until the string for that tuning peg can be strummed gently, ringing out with a nice sound.
- If the string feels too tight, you may be an octave too high. Overtightening will lead to broken strings, so be careful.
Built-in Tuner
Use the built-in tuner to check each string’s note as you go. Simply press the “On/Off” switch to turn it on. The screen will display the note’s letter in green when the string is in tune.If close, the screen will display the note’s letter in blue if the string is flat (♭) or sharp (♯) –simply turn the tuning pegs to adjust the string until it is holding the correct note (green).
RESTRINGING
Over your guitar’s life, it will be necessary to change the strings. Strings break if overtightened or strummed too heavily, but even if not broken, strings will sound dull and less vibrant over time. A fresh set of strings will bring new life to an old guitar.
- To change your guitar strings, first loosen the current set by turning the tuning pegs until each string is loose. When fully loosened, you will be able to remove them from the headstock easily.
- With all the strings off, it’s a great time to clean your fretboard.
- When restringing, start with the Low E (thickest) string. Feed the string into the bridge, starting from the sound hole side, feeding through towards the bottom of the guitar. With about 10-15cms worth of string through, tie the straight by looping the fed portion back over the unfed section to create a circle, then looping the string into that circle twice (two loops) before pulling tight to knot it around the bridge.
- Next, guide the string up along the fret board and place it into the groove of the nut.
- You will need wire cutters to trim the strings to size, but be sure to allow enough extra room for the string to wrap around each post. A good rule of thumb is to cut it at the next rod’s length, or roughly 50 millimeters passed the rod.
- Feed the string into the appropriate tuning rod for the string (for the low E, this will be the first rod on the lower-left side of the headstock). Allow the string to protrude a few millimeters from the other side of the hole, then kink the string to stay in place.
- Now begin turning the turning peg so that the string winds over the rod, returning from below. Continue so the string winds around the rod, and until the string becomes tight enough to hear musical sounds when strummed.
- From here, follow the tuning instructions to tune the string to pitch. Repeat these steps for each of the strings.
CHORDS
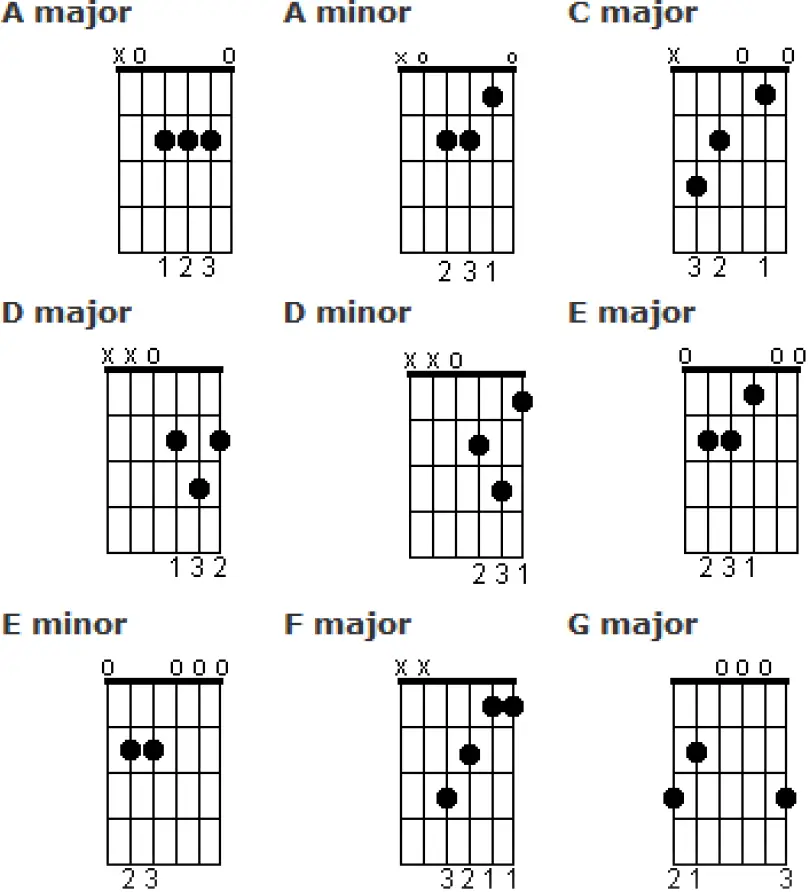
With your guitar tuned to E Standard, the following chords are a great place to begin learning.Each row represents a fret – the below chords are all played among the first three frets.Each black circle represents a finger, and the numbers below indicate which finger.
- 1 = Index finger
- 2 = Middle finger
- 3 = Ring finger
Your 4th (pinky) finger is not required for any of these beginner chords, but will be used in more advanced chords as you progress.0 above the nut means this string is strummed ‘open’, with no finger on any fret.X above the nut indicates a ‘muted’ string, using your thumb to touch the string so that it does not play a note when strummed.

Need more information?We hope that this user guide has given youthe assistance needed for a simple set-up.For the most up-to-date guide for your product,as well as any additional assistance you may require,head online to help.kogan.com
[xyz-ips snippet=”download-snippet”]
