Obsidian45 User Manual

WARNING
Read the operator’s manual in its entirety before use. Failure to follow all operating instructions,assembly and disassembly, installation, cleaning and maintenance instructions before using thesuppressor could result in serious injury or death. If you are at all unsure about any of the operations or instructions outlined in the operator’s manual, STOP and CONTACT US for further clarification.
SERVICE/MAINTENANCE
WARNING!
Never attempt to clean a suppressor while it is attached to a host weapon, asthis could lead to personal injury or death.
WARNING!Always wear proper protective equipment while performing service/maintenance. Failure to do so could result in serious personal injury or death.
WARNING!Before performing service/maintenance on the muzzle device remove the magazine and check the chamber of the host weapon to confirm that it is in a safe condition and completely unload. Failure to do so could result in serious personal injury or death.
WARNING!The suppressor tube, ADAPT Module body, front cap and spring retainer are constructed of aluminum and should NOT be used in an ultrasonic cleaner to avoid damage.
OBSIDIAN CLEANING
Rugged Suppressors recommends cleaning of the piston, spring and baffles with an ultrasonic cleaner using a 50/50 mixture of Purple Power and water. Allow the suppressor to be cleaned for approximately 1 hour, then remove the parts and allow to dry. There may be some carbon residue remaining on the parts after ultrasonic cleaning. You can continue cleaning these with a brush and cleaning solution if you desire; however, it is not necessary.
A non-ammonia based cleaner and brush can be used on the suppressor tube, ADAPT Module body, front cap and spring retainer in order to remove any carbon buildup.
When using a booster system, lubricate the outside of the piston with white lithium grease to allow the suppressor and pistol to cycle efficiently.
Unconditional lifetime warranty
 IF FOR ANY REASON YOU HAVE AN ISSUE WITH A RUGGED SUPPRESSORS PRODUCT, WE WILL REPAIR OR REPLACE IT FREE OF CHARGE.
WARNING!While suppressors reduce the sound impulse of a gun shot they do not eliminate the impulse all together. It is still necessary for the shooter and any bystanders to wear OSHA approved hearing protection when exposed to impulses over 85db.
MOUNTING SYSTEM
WARNING!Before installation of the Obsidian45™ suppressor to your host weapon, remove the magazine and check the chamber of the firearm to confirm that it is in a safe condition and completely unloaded. Failure to do so could result in serious personal injury or death.
WARNING!Since thread mounted suppressors are known to unscrew during firing, it is extremely important that the operator ensures the suppressor remains securely threaded to the barrel. The threading of the suppressor to the host firearm should be check at 30 round intervals.
MOUNTING TO YOUR HOST FIREARM
For proper bore alignment, it is important that the suppressor is threaded against a 90-degree barrel shoulder. During any of the following installation steps, if the suppressor becomes tight before firmly seating against the shoulder of the barred or if still feels loose after seating against the shoulder, stop and contact rugged suppressors.
CHANGING THE MOUNT SYSTEM
- Unscrew and remove the spring retainer from the rear of the suppressor.
- Align the appropriate mount to the suppressor.
- Hand tighten the mount until it is securely against the rear of the suppressor.
THREAD MOUNT/PISTON INSTALLATION
A fixed mount should be used on all fixed barred firearms. The piston should be used on all Browning Action Pistols.
- Verify the host firearm is unloaded.
- Place the base of the suppressor mount on the barrel threads and rotate the suppressor to start thread engagement.
- Hand tighten the suppressor until it is seated securely against the machined barrel shoulder or muzzle of the barrel. DO NOT force the suppressor onto the barrel.
OBSIDIAN DISASSEMBLY
WARNING! Before disassembling your Obsidian45″, first remove the magazine and check the chamber of the firearm to confirm that it is in a safe condition and completely unloaded. Failure to do so could result in serious personal injury or death.
WARNING!Never attempt to remove your Obsidian45 while the suppressor is hot without the proper protective gear. Allow the suppressor to cool before removal.
OBSIDIAN DISASSEMBLY
- Unscrew the spring retainer counter-clockwise from the main suppressor body.

Remove the piston assembly from the main suppressor body.
- Remove the front cap from the Adapt Module. You can use the piston as a tool to aid in removal. For additional leverage, an allen wrench may be inserted into the piston slot.
- Remove the Adapt Module from the main suppressor body by unscrewing it counter-clockwise.
- Remove the baffle stack from the main suppressor body and Adapt Module by pushing forward on the baffle cone from inside the mount with your finger or a wooden dowel rod.
- Break the baffles apart one at a time. If the baffles are stuck together, a hex key can be used as a tool to aid in disassembly. Insert the long end of the key into the baffle port and pry against the inside of the baffle to release it.

BAFFLE STACK ASSEMBLY
WARNING!
Never attempt to remove a hot suppressor without the proper protective gear. Allow the suppressor to cool before removal. Failure to do so could result in serious personal injury or death.
WARNING!
Never allow a hot suppressor to come into contact with anything. Allowing a hot suppressor to come in contact with anything could result in fire, serious personal injury or death.
WARNING!
Before installation of the Obsidian45″ suppressor, remove the magazine and check the chamber of the firearm to confirm that it is in a safe condition and completely unloaded. Failure to do so could result in serious personal injury or death.
WARNING!
Before installation of the Obsidian 45 suppressor, check the bore of the suppressor to make sure it’s free of any obstructions. Failure to do so could result in serious personal injury or death.
MAIN BAFFLE STACK ASSEMBLY
The main baffle stack consists of 8 baffles – 1 blast baffle, 6 standard baffles and 1 short baffle.


- Start by placing the short baffle on a flat, level surface with the cone facing up.
- Place a standard baffle on top of the short baffle with the ports aligned. Each baffle willl index with one another with the indexing tabs machined to each mounting surface.
- Assemble the remaining standard baffles to the stack.
- The last baffle will be the blast baffle. It is easily identified by a “#1” engraved on its body
- Once the main baffle stack is fully assembled, check for any spacing between the baffles. If a space is present, a rubber mallet can be used to fully seat each baffle.
When changing between the short and long configurations, make sure the suppressor body has cooled to ambient temperatures before attaching/detaching the ADAPT” Module.
ADAPT” MODULE ASSEMBLY
WARNING!
Before removal or installation of your Obsidian45″ ADAPT Module, first remove the magazine and check the chamber of the firearm to confirm that it is in a safe condition and completely unloaded. Failure to do so could result in serious personal injury or death.
WARNING!
Never attempt to remove your Obsidian45 ADAPT Module while the suppressor is hot without the proper protective gear. Allow the suppressor to cool before removal.
ADAPT MODULE REMOVAL
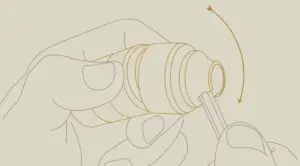
- To remove the ADAPT Module, first remove the muzzle cap from the end of the Module by using a piston. This is accomplished by inserting the grooves of the piston into the corresponding grooves in the muzzle cap and rotating the piston counter-clockwise until removed.
- With the muzzle cap removed, hold the suppressor body with one hand and rotate the Module counter-clockwise until removed.
ADAPT MODULE ASSEMBLY
The Adapt Module baffle stack contains 4 baffles – 3 standard baffles and 1 short baffle.


It is important to make sure the ADAPT Module and main tube baffle ports are in alignment for maximum performance of your suppressor.
- First, thread the empty Adapt Module onto the main suppressor body.
- Next, start the baffle assembly by placing the short baffle on a flat, level surface with the cone facing up.
- Place the standard baffle on top of the short baffle with the ports aligned. Each baffle will index with one another with the indexing tab that is machined to each surface.
- Continue assembling the remaining 2 ADAPT Module baffles.
- Once the ADAPT Module baffle stack is fully assembled, it can be inserted into the ADAPT Module housing and then rotated to time the baffle ports in the ADAPT Module with the main suppressor body baffle stack ports.
Read More About This Manual & Download PDF:
Obsidian45-User-Manual-
Obsidian45-User-Manual-
Questions about your Manual? Post in the comments!
[xyz-ips snippet=”download-snippet”]


