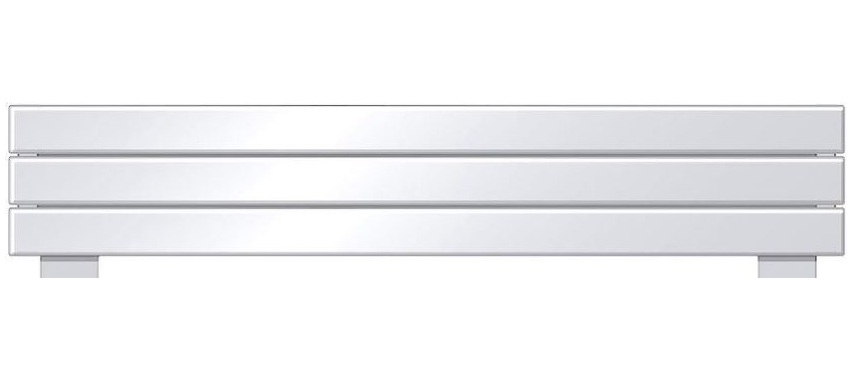
Runtal Electric Baseboard User Manual
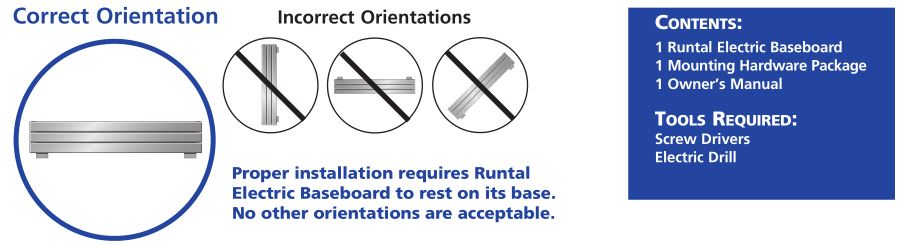
Thank you for purchasing the Runtal Electric Baseboard. We are very proud of our workmanship and quality, and we are certain that you will be thoroughly satisfied with your new Runtal Electric Baseboard. We urge you to contact your local Runtal representative if you have comments or questions. This manual is intended to show installation and care for your Runtal Electric Baseboard. The electrical wiring connections must be made by a qualified professional electrician. Wiring procedures and connections should be in accordance with the National Electric Code (NEC) and local codes. The Runtal Electric Baseboard must be installed against the floor in a horizontal orientation as shown below. The electrical wiring can connect at either end. Knockouts in the junction box offer options of rear, bottom and side wiringNote: Multiple Runtal Electric Baseboards cannot be wired in series, or significant loss of heating will result.
Operating Instructions
- Runtal Electric Baseboard must be properly installed before it is used.
- Runtal Electric Baseboard must be connected to a switching device, thermostat relay switch, etc.
- The heating element and high-limit thermostat should not be tampered with.
Mounting & Wiring Hardware
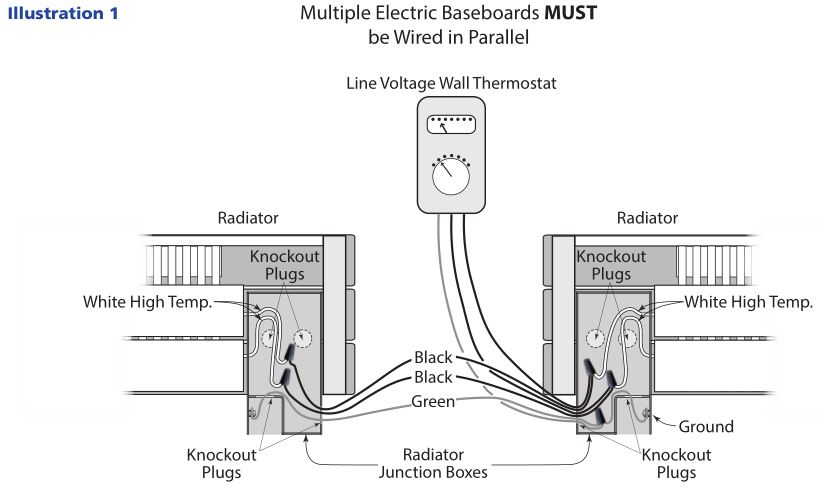
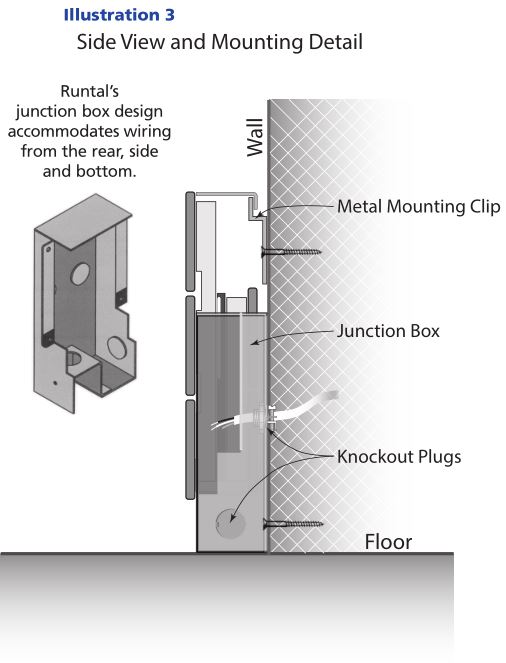
The Runtal Electric Baseboard junction boxes which extend down from the bottom of the radiator must be in contact with the floor. The metal mounting clips described in Step 5 keep the radiator from tipping away from the wall, and must be screwed to the wall near each end of the radiator and in the center on longer lengths. The wiring can connect to either end of the baseboard, and wiring connections are made in the junction boxes provided. (See Illustration 1).
Installation
Thermostat: A line voltage thermostat or a low voltage thermostat with a relay is recommended for room temperature regulation, and for switching off the baseboard when not in use. Thermostat and/or relay are not supplied with the baseboard.
Note: Thermostat location recommendations
- Locate the thermostat away from the heater and other appliances that give off heat.
- Locate the thermostat where it will not be in direct sunlight.
- Locate the thermostat on an inside wall away from drafts.
- Do not exceed the electrical rating of the thermostat, relay or other switching device.
- Most thermostats are mounted 4 to 5 feet off of the floor. Check with your local code officer, as ADA regulations may apply.
Location: For best results locate the baseboard heater on an outside wall, under a window or near an entry door.
Voltage: It is important that you verify that the electrical supply wiring is the same voltage as the electric baseboard heater. Connecting a 208 volt electric baseboard radiator to 240 volt supply will increase the heater’s output; connecting a 240 volt heater to a 208 volt supply will decrease the heater’s output.
Warning: Do not install heaters against combustible low-density cellulose fiberboard surfaces. Keep drapes 2 inches away from the electric baseboard radiator. Do not install baseboard heater below an electrical convenience receptacle. To reduce the risk of fire, do not store or use gasoline or other flammable vapors and liquids in the vicinity of the heater. Only install as illustrated in this manual.
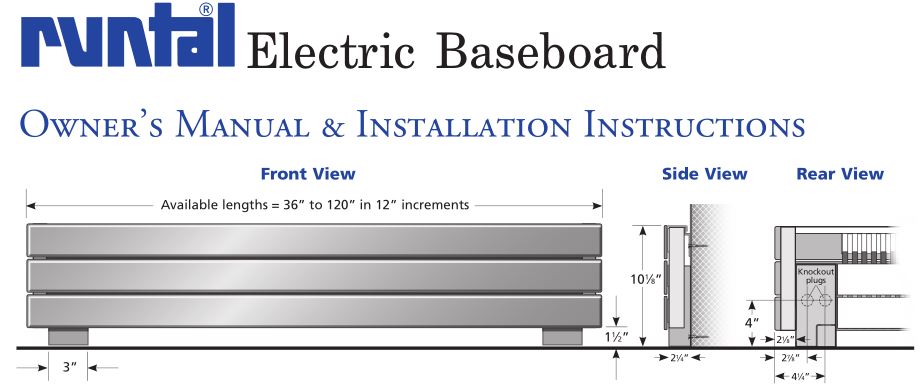
Name Plate Location: (UL Label) The name plate is located on the right side of the radiator.
The Runtal Electric Baseboard is available in one foot increments from 3’to 10’ long.The heat output is 500 BTUH per foot of radiator.
CAUTION: High temperature, keep electrical cords, drapes, and other furnishings away from heater.
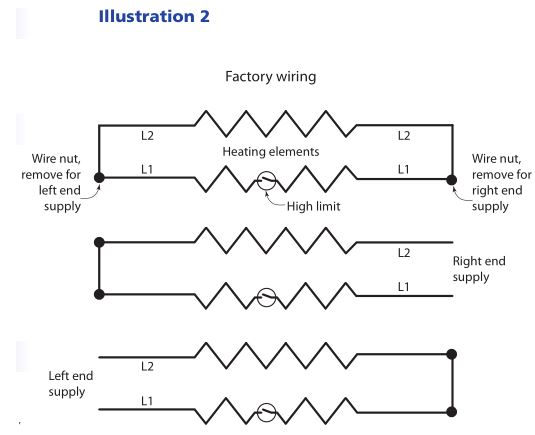
Wiring of multiple electric Baseboards
Step 1 determine the supply side
Determine which end of the baseboard you will be connecting the supply wires to and remove the front junction box cover on that end of the baseboard.
Step 2 determine the mounting location
Determine the heater mounting location on the wall, and then lay the radiator face down on the floor with the feet of the radiator towards the wall. If the floor is a hard surface you may want to lay the radiator down on the foam the radiator came in or on some other soft material.
Note: Do not lean the baseboard against a wall as it may tip over and be damaged.
Step 3 attach the cable connector
Remove the back of the junction box. The junction box has knockouts for rear, side and bottom wiring. Remove a knockout plug and attach a cable connector (Romex connector).
Step 4 connect the supply lines
Disconnect the factory wire connector in the open junction box. These are the heater wires.
- Connect one supply wire to one of the heater wires (white wire).
- Connect the other supply wire to the remaining heater wire (white wire).
- Connect the supply cable ground wire to the green grounding lead in the junction box.
Note: Always connect multiple radiators in parallel.Note: Do not run wires through the radiator. The radiator is not a UL approved raceway and damage to wires could result.
Step 5 install mounting clips
Locate wall studs behind the radiator and attach the appropriate number of metal mounting clips to the wall studs. Place the baseboard top grille over the mounting clips. The top of the mounting clip should be 9.75 inches off of the floor.
Step 6 attach to the Wall
Locate the slots in the junction box and secure a screw through the center of the slots into the wall. Tighten the screws and then back them out one turn. This allows for expansion of the baseboard.
Note: In most cases the wall will have a lower plate to screw to. If this is not the case, a hollow wall anchor should be used.
Step 7 attach Junction Box cover
Install the front cover on the junction box.
Step 8 connect the thermostat
Connect a thermostat and/or relay to the baseboard and connect to the circuit breaker load center.
Operation & Maintenance
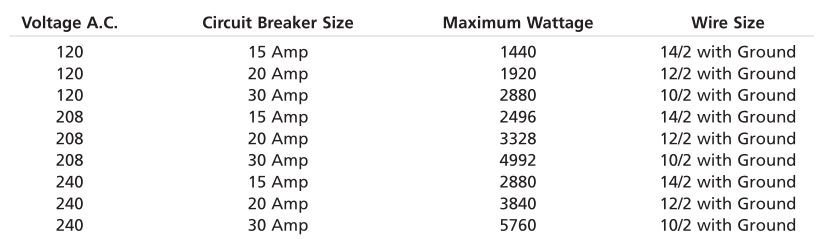
Maximum Wattage on a Circuit
For installation of multiple electric baseboard radiators, the following chart should be used. The chart indicates supply voltage, circuit breaker rating, minimum wire size, and maximum total wattage of electric baseboard radiators on the circuit.
Maintenance
Your Runtal Electric Baseboard has been designed to require the absolute minimum maintenance and care under normal use. However, care should be taken when cleaning the surface of the panel. Periodically vacuum across the top of the grille to remove dust from the grille. A slight odor may be noticeable during initial operation and will dissipate within a few hours.
Cleaning
The baseboard’s powder coated finish provides an elegant yet durable finish to a welded steel product. Occasional cleaning of this finish is best done with a water dampened cloth. Under no circumstances should abrasive cleaner be used. Before cleaning make sure the power has been turned off at the circuit breaker panel, and the heating element is cool. Be sure to restore power when cleaning and maintenance is complete. All other servicing should be performed by qualified service personnel.
IMPORTANT INSTRUCTIONS
When using electrical appliances, basic precautions should always be followed to reduce the risk of fire, electric shock, and injury to persons, including the following:
- Read all instructions before using this heater.
- A heater has hot and arcing or sparking parts inside. Do not use it in areas where gasoline, paint, or flammable liquids are used or stored.
- This heater is hot when in use. To avoid burns, do not let bare skin touch hot surfaces. Keep combustible materials, such as furniture, pillows, bedding, papers, clothes, and curtains away from heater.
- To prevent a possible fire, do not block air intakes or exhaust in any manner. Do not use on soft surfaces, like a bed, where openings may become clogged.
- Do not insert or allow foreign objects to enter any ventilation or exhaust opening as this may cause an electrical shock or fire, or damage the heater.
- Use heater only as described in this manual. Any other use not recommended by the manufacturer may cause fire, electric shock, or injury to persons.
- SAVE THESE INSTRUCTIONS
![]()
Runtal Electric Baseboard User Manual – Runtal Electric Baseboard User Manual –
[xyz-ips snippet=”download-snippet”]