Russell Hobbs Air Fry Crisp’n Bake Toaster Oven RHTOV25 User Manual
IMPORTANT SAFEGUARDS
When using this appliance, basic safety precautions should always be followed, including but not limited to the following:
- To protect against electrical hazards do not immerse the power cord, plug or toaster oven in water or any other liquid.
- Do not use in the bathroom or near any source of water.
- Do not use outdoors.
- Always use the appliance’s handles or use oven gloves/mitts as some parts will be hot.
- The temperature of accessible surfaces/parts may become very hot when the appliance is operating and may remain hot for some time after the appliance has been switched off.
- This appliance is not intended for use by persons (including children) with reduced physical, sensory or mental capabilities, or lack of experience and knowledge, unless they have been given supervision or instruction concerning use of the appliance by a person responsible for their safety.
- Keep the toaster oven and the power cord away from the edge of table or countertops and out of reach of children and persons with reduced physical, sensory or mental capabilities.
- This appliance is not a toy. Children should be supervised to ensure they do not play with the appliance.
- Do not leave this appliance unattended when in use.
- Always switch off and unplug from the power outlet when not in use.
- Always switch off and unplug from the power outlet and allow the toaster oven to cool before cleaning.
- To disconnect, set controls to OFF. Switch off the wall power outlet, then grasp the plug and remove from wall power socket. Never pull by the cord.
- Do not operate this appliance with a damaged cord/plug or after the appliance has malfunctioned, or been dropped or damaged in any manner. Contact Customer Service for replacement, examination, repair or adjustment.
- There are no user serviceable parts. If power cord or appliance is damaged, it must be replaced by the manufacturer or similarly qualified person in order to avoid a hazard.
- Do not use on an inclined plane or unstable surface.
- Do not move the toaster oven while it is switched on.
- Do not cover the toaster oven when in use.
- Oven gloves should be used when removing food items.
- Always take care when removing hot food items from the toaster oven.
- Food may burn. Always monitor when using this appliance.
- Heat rises from the toaster oven when in use. To avoid possible damage, do not use directly below overhead cupboards.
- Do not use the toaster oven near or below any curtains or other combustible materials.
- Do not cook food items too large for the toaster oven.
- Do not use the toaster oven without the crumb tray fitted.
- Do not cook food wrapped in plastic film or polythene bags. It will cause a fire hazard.
- Do not place on or near any heat sources.
- Do not clean with metal scouring pads. Pieces can break off the pad and touch electrical parts, creating a risk of electric shock.
- Follow the instructions when cleaning this appliance.
- Do not use appliance for anything other than its intended purpose.
- Do not store any material, other than manufacturer’s recommended accessories, in this toaster oven when not in use.
- Do not place any of the following materials in the oven: paper, cardboard, plastic, and the like.
- Clean the toaster oven and crumb tray regularly. Failure to do so may cause a fire hazard.
- Do not cover crumb tray or any part of this oven with metal foil. This will cause overheating of the toaster oven.
- This appliance is not intended to be operated by means of an external timer or separate remote control system.
- For added safety, electrical appliances should be connected to a power outlet that is protected by a residual current device (RCD), also often referred to as a ‘Safety Switch’. Your switchboard may already incorporate an RCD. If unsure, call an electrician for verification and fitting if necessary.
- The appliance must be disconnected from the main outlet and allowed to cool down before cleaning any surfaces including internal racks and crumb tray.
CAUTION: Do not leave toaster oven unattended when in operation. Food ignition may occur. If this happens, unplug unit but DO NOT open door. To reduce the risk of fire, keep oven interior completely clean and free of food residues, oil, grease and any other combustible materials.
CAUTION: A fire may occur if the toaster oven is covered or touching flammable materials including curtains, draperies, walls and the like when in operation or after, when still hot. Do not place any of the following materials in the toaster oven, on top of the toaster oven, or in contact with the toaster oven sides or bottom surfaces: paper, cardboard, plastic or the like.
SAVE THESE INSTRUCTIONS
THIS APPLIANCE IS INTENDED TO BE USED IN HOUSEHOLD AND SIMILAR APPLICATIONS SUCH AS: STAFF KITCHEN AREAS IN SHOPS, OFFICES AND OTHER WORKING ENVIRONMENTS;FARM HOUSES;
BY CLIENTS IN HOTELS, MOTELS, AND OTHER RESIDENTIAL TYPE ENVIRONMENTS; BED & BREAKFAST TYPE ENVIRONMENTS
HOT SURFACE:
 The areas with the hot surface symbol may be hot during and after appliance use. Use caution when touching these areas, as there is a burn risk. Wear protective gloves for protection when possible.
Congratulations on the purchase of your new Air Fry Crisp’n Bake Toaster Oven. Each unit is manufactured to ensure safety and reliability. Before using the appliance for the first time, please read this instruction booklet carefully and keep it for future reference. Pass it on if you pass on the appliance.
When using this appliance, basic safety precautions should always be followed.
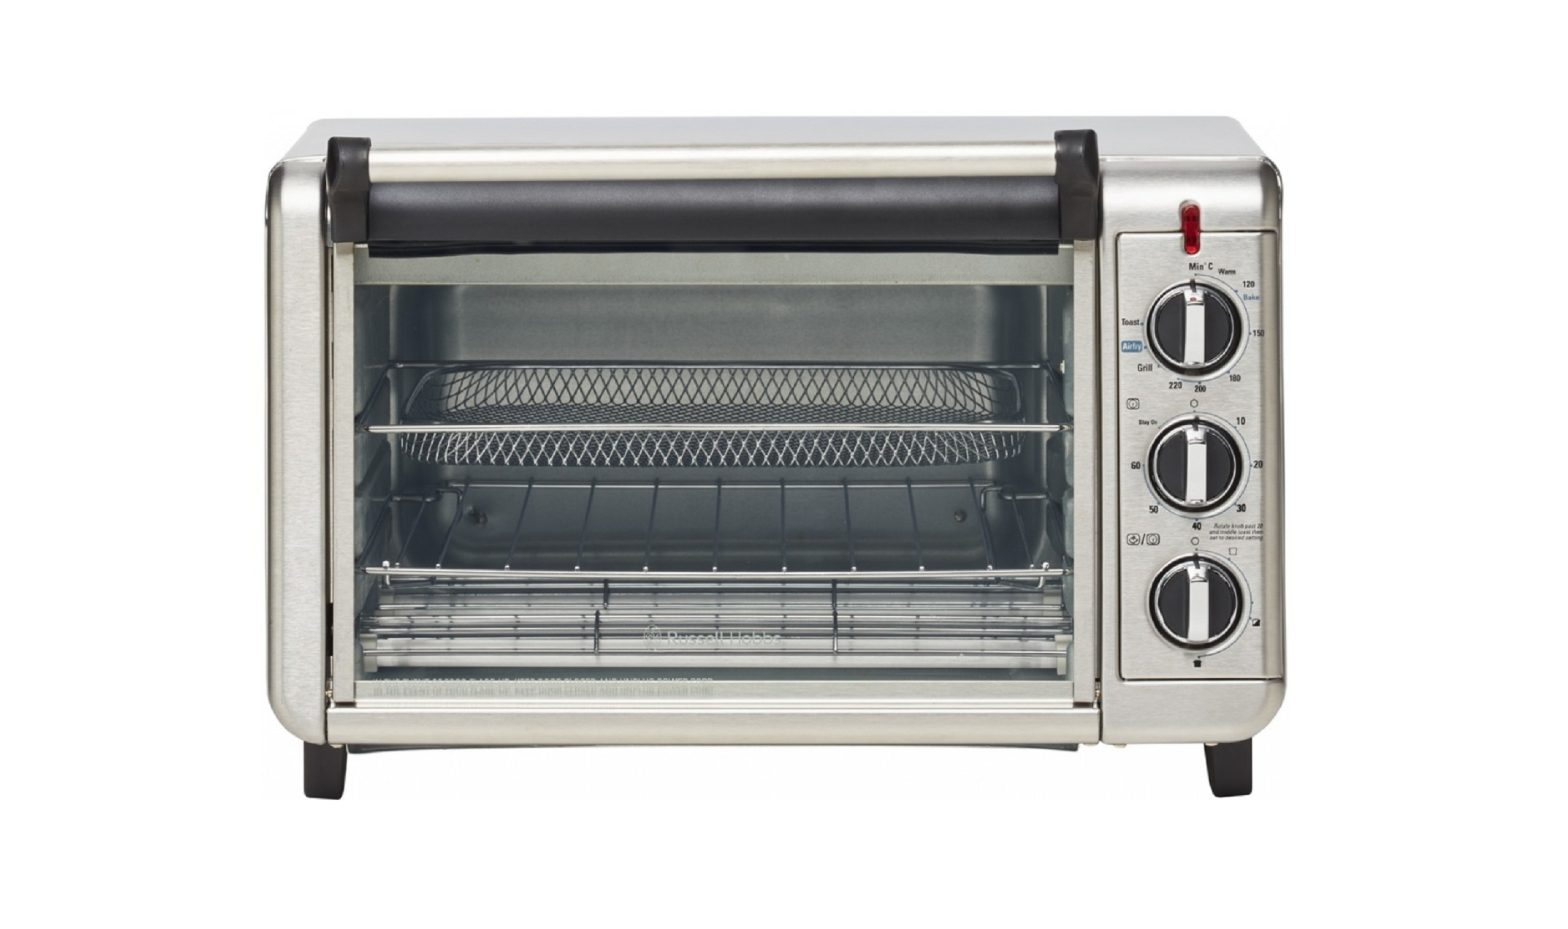
Product Overview
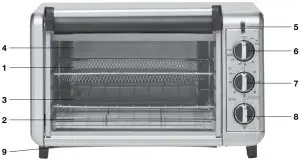
- Air fry mesh cooking rack
- Bake pan/Drip tray
- Wire rack
- Easy-view glass door
- Power indicator light
- Temperature/Cooking function control
- Timer 1 – Warm/Bake/Grill/Air Fry
- Timer 2 – Toast
- Crumb tray
There are two ways to turn the toaster oven ON:
- For cooking functions, use the top control to select a bake temperature,AirFry mode or Grill mode. Then, using ‘Timer 1’, select a cooking time or set to ‘Stay On’.
- For toasting, set the top control to ‘Toast’. Then, rotate ‘Timer 2’ to the desired toast shade.


To turn OFF the toaster oven:
- Rotate the timers to the ‘O’ position and the top control to the ‘Min’ position.
BEFORE FIRST USE
- Read all of the instructions included in this manual.
- Remove all packing material and any stickers.
- Wash all removable parts in warm soapy water.
- Thoroughly dry all parts before reassembling.
- Position your toaster oven in a well ventilated area, on a firm, level, heat-resistant surface, clear of curtains, drapes, overhead cupboards and other combustible materials.
- Leave enough space (≈150mm/6 inches) around the unit to allow heat to flow without damage to adjacent cabinets and walls.
- Plug unit into power outlet and switch the outlet on.
NOTE: It is normal during this process for the new elements to give off some odour and a small amount of vapour.
IMPORTANT INFORMATION ABOUT YOUR TOASTER OVEN
- This toaster oven gets hot. When in use, always use oven mitts or pot holders when touching any outer or inner surface of the toaster oven.
- During first few minutes of use you may notice smoke and a slight odor. This is normal and should cause no concern.
- Temperatures in the toaster oven will be lower than your set point. This is due to advanced heating elements used in this toaster oven. Temperature dial settings have been calibrated to provide expected results for most recipes taking into account the advanced heating elements.
- You must set the timer or select Stay On for the toaster oven to function.
- Be sure food or baking dish does not come within 1½ inches of the top heating elements.
- Food should not extend beyond the edges of the bake pan/drip tray to avoid drippings from falling onto the heating elements.
- You can cook your food 3 ways:
- Use the bake pan/drip tray placed on the slide rack.
- Place the bake pan/drip tray under the slide rack / grilling rack .
- Place food on Air Fry mesh rack with bake pan/drip tray underneath
TOAST
It is not necessary to preheat the oven for toasting.
CAUTION: This toaster oven gets hot. Always use oven mitts when touching any outer or inner surface of the toaster oven.
- Set the Temperature/Cooking function control to TOAST position.
- Open toaster oven door and insert the wire rack in the bottom slot.
- Place items to be toasted directly onto the wire rack and close the door.
- Turn the TIMER 2 control to the middle and then turn back or forward to set the desired toast shade.
- The power indicator light will illuminate and remain on until the toasting cycle is complete.NOTE: Watch the toast to ensure the desired level of browning is obtained. The Toast/Timer knob can be rotated to extend the toasting time or to the Off position at any time.
- When the toast cycle is complete, there will be an audible signal. The oven and the power indicator light will turn off.
- Open the toaster oven door. Using oven mitts, slide the wire rack outward, just far enough to remove the toast.
- Unplug appliance when not in use.NOTE: The toast shade knob must be set as desired for the toaster oven to begin toasting.
GRILL
When grilling, preheat until oven is warm. For optimal results use top rack position. Be sure food or baking dish does not come within 40mm (1 1/2 inches) of the top heating element.
- Set temperature selector knob to GRILL.
- Set the TIMER 1 selector control to 20 then turn back or forward to desired grilling time. Select Stay On to bake longer than 60 minutes or to control cooking time yourself. The power indicator light comes on and remains on during the entire grilling time.NOTE: You must set the timer for the oven to function.
- Once the oven is preheated, open oven door and insert food. Close toaster oven door.
- If using the oven timer, there will be an audible signal once the grilling cycle is complete.The oven turns off and the power indicator light goes out. If not using the oven timer, turn the oven off once the cooking cycle is complete.
- Open the oven door. Using oven mitts or pot holders, slide the rack out to remove the cooked food.
- Unplug appliance when not in use.
AIR FRY
It is not necessary to preheat the toaster oven in the air fry function as it may cook slightly faster than recommended cooking times.
- Place food on Air Fry mesh rack
- Open door and slide Air Fry mesh rack with food into the middle or lower rack position
- Set Temperature selector knob to AIR FRY position
- Turn TIMER 1 selector control to 20 and then turn to desired Air Frying time. Select Stay On to air fry longer than 60 minutes or to control cooking time yourself. The power indicator light comes on and remains on during the entire Air Frying time.NOTE: You must choose Stay On or set the timer for the oven to start.
- If using the toaster oven timer, there will be an audible signal once the Air Fry cycle is complete. The toaster oven turns off and the power indicator light goes out. If not using the toaster oven timer, turn the toaster oven off once the cooking cycle is complete.
- Open the toaster oven door. Using oven mitts or pot holders, slide the rack out to remove the cooked food.NOTE: Clean out the crumb tray frequently when using the air fry setting.
- Unplug the appliance when not in use.
BAKE
For best results, when baking or cooking, always preheat the oven for at least 10 minutes at the desired temperature setting. For optimal results use middle or lower rack position.
- Set temperature selector knob to the desired temperature.
- Turn TIMER 1 selector control to 20 and then turn to desired baking time. Select Stay On to bake longer than 60 minutes or to control cooking time yourself. The power indicator light comes on and remains on during the entire baking time.NOTE: You must set the times for the oven to FUNCTION.
- Once toaster oven has preheated, open oven door and insert food. Close toaster oven door.
- If using the toaster oven timer, there will be an audible signal once the baking cycle is complete. The oven turns off and the power indicator light does out. If not using the toaster oven timer, turn the oven off once the cooking cycle is complete.
- Open the toaster oven door. Using oven mitts or pot holders, slide the rack out to remove the cooked food.
- Unplug appliance when not in use.
CARE AND CLEANING
This product contains no user serviceable parts. Refer service to qualified service personnel.
IMPORTANT: Before cleaning any part, be sure the toaster oven is off, unplugged, and cool. It is important that you clean the entire appliance after each use to prevent accumulation of grease and to avoid unpleasant odours.
IMPORTANT: Do not immerse the appliance, power cord or plug in any liquid.
- Clean the glass door with a damp cloth or sponge dipped in warm to hot soapy water. Do not use a spray glass cleaner. Wipe clean with a soap free damp cloth to remove residual suds and streaks from the glass.
- Wash the wire rack in warm to hot soapy water. Rinse and dry thoroughly.
- Wash the bake pan/drip tray in warm to hot soapy water. Rinse and dry thoroughly.
- If any food is baked onto the wire rack or bake pan/drip tray, soak in warm to hot soapy water for 1 hour before cleaning. Use a sponge or soft cleaning brush to remove stains. Rinse and dry thoroughly.
CRUMB TRAY
How to install:
With the oven door closed, slide the tray into the base of the toaster oven from the front exterior.
How to clean:
- When the device is cool enough to touch safely, grab the handle of the crumb tray at the base front of the toaster oven.
- Dispose of crumbs and wipe tray with a damp cloth. Dry thoroughly before placing back in the oven.
EXTERIOR SURFACES
Clean the exterior with a damp cloth or sponge. A mild dishwashing detergent can be used to remove difficult marks. Do not use any abrasive material or sharp utensils on the exterior of the oven, it will damage the surface and finish. Dry thoroughly.
COOKING CONTAINERS
Metal, ovenproof glass or ceramic bake ware without glass lids can be used in your toaster oven. Follow manufacturer’s instructions. Be sure the top edge of the container is at least 40mm (1½ inches) away from the upper heating elements.
NOTE: Do not use any abrasive material or sharp utensils to clean the oven or any of its parts.NOTE: Allow all parts and surfaces to dry thoroughly before using the appliance again.
Spectrum Brands Australia Pty LtdLocked Bag 3004 BraesideVictoria 3195 Australia
Customer Service in AustraliaTollFree: 1800 623 118Email: [email protected]Website: www.spectrumbrands.com.au
Spectrum Brands New Zealand LtdPO Box 9817 NewmarketAuckland 1149 New Zealand
Customer Service in New ZealandTollFree: 0800 736 776Email: [email protected]Website: www.spectrumbrands.co.nz
Spectrum Brands Australia Pty Ltd and Spectrum Brands New Zealand Ltd Warranty Against Defects
In this warranty:
Australian Consumer Law means the Australian consumer law set out in Schedule 2 to the Competition and Consumer Act 2010;
CGA means the New Zealand Consumer Guarantees Act 1993;
Goods means the product or equipment which was accompanied by this warranty and purchased in Australia or New Zealand, as the case may be;
Manufacturer, We or us means:
- for Goods purchased in Australia, Spectrum Brands Australia Pty Ltd ABN, 78 007 070 573; or
- for Goods purchased in New Zealand, Spectrum Brands New Zealand Ltd, as the case may be, contact details as set out at the end of this warranty;
Supplier means the authorised distributor or retailer of the Goods that sold you the Goods in Australia or in New Zealand; and You means you, the original end-user purchaser of the Goods
- Our goods come with guarantees that cannot be excluded under the Australian Consumer Law, or the CGA. You are entitled to a replacement or refund for a major failure and compensation for any other reasonably foreseeable loss or damage. You are also entitled to have the goods repaired or replaced if the goods fail to be of acceptable quality and the failure does not amount to a major failure.
- The benefits provided by this Warranty are in addition to all other rights and remedies in respect of the Goods which the consumer has under either the Australian Consumer Law or the CGA. The original purchaser of the Goods is provided with the following Warranty subject to the Warranty Conditions:
- We warrant the Goods for all parts defective in workmanship or materials for a period of 2 years (Warranty Period) from the date of purchase.Warranty Conditions
- The Goods must be used in accordance with the manufacturer’s instructions. This Warranty does not apply should the defect in or failure of the Goods be attributable to misuse, abuse, accident or non-observance of manufacturer’s instructions on the part of the user. As far as the law permits, the manufacturer does not accept liability for any direct or consequential loss, damage or other expense caused by or arising out of any failure to use the Goods in accordance with the manufacturer’s instructions.
- Exhaustible components (such as batteries, filters and brushes) of the Goods are included under this Warranty only where there is a defect in workmanship or materials used.
- The warranty granted under clause 3 is limited to repair or replacement only.
- Any parts of the Goods replaced during repairs or any product replaced remain the property of the manufacturer. In the event of the Goods being replaced during the Warranty Period, the warranty on the replacement Goods will expire on the same date as for the Warranty Period on the original Goods which are replaced.
- In order to claim under the warranty granted under clause 3 you must:
- Retain this warranty with your receipt/proof of purchase; and
- Return the Goods to us at the relevant address or to the Supplier by prepaid freight within the Warranty Period accompanied with (i) the legible and unmodified original proof of purchase, which clearly indicates the name and address of the Supplier, the date and place of purchase, the product name or other product serial number and (ii) this warranty.
- This warranty is immediately void if:
- Any serial number or appliance plate is removed or defaced;
- The Goods have been serviced or otherwise repaired by a person not authorised to do so by us or where non approved replaced parts are used.
- The Goods are designed for domestic use only. The Goods must be connected to the electrical voltage requirements as specified in the ratings label located on the Goods.
- This warranty does not cover the cost of claiming under the warranty or transport of the Goods to and from the Supplier or us.
- This warranty is only valid and enforceable in Australia against Spectrum Brands Australia Pty Ltd and in New Zealand against Spectrum Brands New Zealand Ltd.
Contact us or the Supplier for further details.
Register your product online
If you live in Australia please visit: www.spectrumbrands.com.au/warrantyIf you live in New Zealand Please visit: www.spectrumbrands.co.nz/warrantyRegistration of your warranty is not compulsory, it gives us a record of your purchase AND entitles you to receive these benefits: Product information; Hints and tips; Recipes and news; Information on special price offers and promotions.
Any questions? Please contact Customer Service for advice.
WHITE CHOC-CHIP BIKKIES
- Preparation Time: 10 minutes
- Cooking Time: 12 minutes
Ingredients:
- 90g caster sugar
- 90g unsalted butter
- 3 tsp apricot jam
- 125g self-raising flour
- ½ cup white choc-chips
Method:
- Line the bake pan with baking paper.
- Cream the butter and sugar until pale and fluffy then mix in the apricot jam.
- Add the self-raising flour and choc chips and mix to dough consistency. Bring the mix together with your hands to form a ball.
- Place the biscuit mix in the refrigerator for 10 minutes. Shape small balls of biscuit dough with your hands and place onto the prepared bake pan. Leave plenty of room between each biscuit as they will expand.
- Meanwhile, insert wire rack on the lowest shelf, turn the temperature/cooking function knob to 160°C and preheat toaster oven for 10 minutes. Once pre-heated, place the bakepan on the wire rack and set the timer knob to bake for 10-12 minutes until golden brown. Cool biscuits on the bake pan for 10 minutes before transferring to a cooling rack.
GREEK LEMON CHICKEN WITH CRISPY POTATOES
- Serves: 4
- Preparation Time: 15 minutes
- Cooking Time: 1 hour 15 minutes
Ingredients:
- 1.5kg free range chicken
- 500g roasting potatoes, cut into 3cm pieces
- 1 lemon, zest grated
- 2 Tbsp olive oil
- 2 tsp salt flakes
- 1 tsp dried oregano
- ½ tsp cracked black pepper
Method:
- Wash the chicken and pat dry with paper towel. Rest for 20 minutes at room temperature.
- Add the potatoes to a saucepan of cold salted water. Bring to the boil, then reduce heat and simmer for 15 minutes, or until tender. Drain potatoes and leave to steam dry.
- Whisk lemon zest with remaining ingredients. Coat the chicken all over using half the marinade. Cut the lemon in half and place both halves inside the chicken cavity. Cut a piece of foil large enough to fit the chicken, breast side down.
- Place the chicken and foil on the air fry rack and slide into the middle shelf of the toaster oven. Insert the drip tray on the bottom shelf. Air-fry for 30 minutes. Rotate the air fry rack during cooking, for even browning.
- Toss the potatoes in the remaining marinade. Carefully remove the air fry rack from the toaster oven and use tongs to turn the chicken over, breast side up. Arrange potatoes around the chicken and return to the toaster oven for 30 minutes.
- Remove the cooked chicken from the toaster oven. To test, insert a meat thermometer into the thickest part of the leg meat. The temperature should read 73°C or above. Otherwise, pierce the thickest part with a skewer. If the juices run clear, the chicken is likely cooked.
- Rest the cooked chicken on a board for 15 minutes. Return the potatoes to the toaster oven to crisp up, making sure to remove the foil and the bottom drip-tray for evenly golden potatoes.
- Carve the chicken and serve slices with the crispy potatoes, along with a Greek salad or steamed vegetables.
ROAST PORK LOIN WITH CRACKLING
- Serves: 4
- Preparation Time: 15 minutes (Overnight)
- Cooking Time: 1 hour 20 minutes
Ingredients:
- 1kg pork loin roast
- 2 tsp white vinegar
- 1 Tbsp olive oil, plus extra for the rind
- 1 Tbsp finely chopped sage, thyme or rosemary leaves
- 1 clove garlic, peeled and roughly chopped
- 2 tsp salt flakes
- 1 tsp ground fennel seeds
- ½ tsp ground black pepper
Method:
- Pat the pork dry with paper towel. Using a small sharp knife, score the skin in long parallel cuts about 5mm apart, being careful not to cut into the meat. Rub the skin with the vinegar. If time permits, refrigerate uncovered for 1 hour, or overnight if possible.
- Combine the oil, herbs, garlic, 1 teaspoon of salt, fennel and pepper. Rub all over the meat, but not the skin. Cut a piece of foil large enough to wrap the pork. Place the pork in the center, skin facing up. Brush the skin with oil and rub in the remaining salt. Wrap the foil to cover the meat, but not the skin.
- Sit the pork on the air fry rack and slide into the middle shelf of the unit. Insert the drip tray on the bottom shelf. Air-fry for 30 minutes, or until the crackling is golden and crisp all over. Rotate the air fry rack during cooking, for even browning.
- Turn the top dial to the Bake function and set the temperature to 190°C. Roast for 50 minutes – 1 hour, or until the pork is cooked through. To test, insert a meat thermometer into the thickest part of the meat. The temperature should read 63°C or above. Otherwise, pierce pork with skewer. If the juices run clear, the pork is likely cooked.
- Transfer the pork roast to a board to rest for 15 minutes. To serve, remove the crackling and cut into strips. Carve the meat across the grain into slices.
CHUNKY EGGPLANT FRIES
- Serves: 4 (As a side)
- Preparation Time: 15 minutes
- Cooking Time: 15 minute
Ingredients:
- 1 medium (350g) eggplant
- 2 medium eggs
- 1 cup panko breadcrumbs
- 2/3 cup plain all purpose flour
- Salt flakes and ground pepper, to taste
Method:
- Trim the top off the eggplant and discard. Slice the eggplant lengthways into 1.5cm thick slices. Cut each slice into 1.5cm batons, then cut each of these batons in half across the middle. You should have around 36 pieces, each around 6cm long.
- Place the eggs, breadcrumbs and flour in three separate bowls. Whisk the eggs with a tablespoon of water, and season the flour with salt and pepper.
- Dip each eggplant piece in egg, then dredge in flour to coat well. Dip in egg once more, then coat evenly in breadcrumbs. Repeat with all the eggplant chips.
- Transfer to the air fry rack and slide into the middle shelf of toaster oven. Air-fry for 15 minutes, turning the chips and the rack for even cooking.
- When deep golden brown all over, remove eggplant chips from the toaster oven and season with extra salt and pepper if desired. Serve with a dipping sauce.
SALT & PEPPER CALAMARI
- Serves: 4
- Preparation Time: 15 minutes
- Cooking Time: 5 minutes
Ingredients:
- 2 x 200g calamari tubes, fresh or frozen
- ¼ cup corn flour
- ¼ cup rice flour
- 1 Tbsp sea salt flakes
- 1 Tbsp mixed peppercorns, freshly ground
- Olive oil spray
Method:
- Clean the calamari tubes, then slice down the long edge to open out like a book. Using a sharp knife, gently score the inside of the calamari tubes in a criss-cross pattern, making sure not to cut all the way through. Once scored, cut the calamari into 3cm pieces, including the tentacles if using.
- Combine the remaining ingredients in a large bowl. Toss half the calamari pieces in the flour mixture to coat well. Spread pieces evenly over the air fry rack, criss-cross pattern facing down, and spray lightly with oil spray.
- Transfer to the middle shelf of the toaster oven and cook on air fry mode for 5 minutes, shaking the rack every now and then for even cooking. Calamari should be lightly golden and curled up when cooked. Be careful not to overcook the calamari, as it can become tough.
- Repeat with remaining calamari and flour mixture. Serve with a dipping sauce or herb salad.
HOT CINNAMON DOUGHNUTS
- Makes: 12
- Preparation Time: 2 hours
- Cooking Time: 8 minutes
Ingredients:
- ¾ cup full-cream milk
- ¼ cup caster sugar
- 55g unsalted butter
- 1 large egg
- ½ tsp salt
- 2 ¾ cups all-purpose flour, plus extra for dusting
- 2 tsp (7g sachet) active dry yeast
- oil spray
Cinnamon sugar
- ¼ cup caster sugar
- 1 tsp ground cinnamon
- ¼ cup full-cream milk, to coat doughnuts
Method:
- Heat the milk, sugar and butter in a saucepan until the butter melts. Cool to room temperate, then whisk in the egg and salt.
- In a separate bowl (or bowl of a stand mixer) combine the flour and yeast. Add the wet ingredients and stir with a wooden spoon (or mix with a dough hook), until the dough forms a ball. Knead until smooth and elastic, about 6-8 mins.
- Transfer dough to a lightly greased bowl covered with a damp tea towel. Leave to rise in a warm place until doubled in size, about 1 hour.
- Divide dough into 12 even pieces; about 60g each. On a floured surface, roll each into a tight ball. Press your thumb through the center to make a hole. Repeat to use all the dough.
- Transfer doughnuts to oiled baking sheets, leaving space for the doughnuts to rise. Cover with a towel and leave in a warm place until doubled in size; about 45 minutes.
- Arrange half the doughnuts on the air fry rack and spray with oil. Slide into the middle shelf of the toaster oven. Air-fry for 3-4 minutes or until golden on top. Flip the doughnuts and cook a further 3-4 minutes, until evenly browned.
- Combine the cinnamon and sugar in a shallow dish. Carefully remove the hot doughnuts from the toaster oven using tongs. Brush each with milk and roll in cinnamon sugar to coat. Repeat with remaining doughnuts. Enjoy!
STICKY PORK & PINEAPPLE KEBABS
- Preparation Time: 20 minutes
- Cooking Time: 12 minutes
Ingredients:
- 500g pork loin fillets, cut into 2cm pieces
- 1 x 225g tin pineapple chunks
- 2 tbs soy sauce
- 1 tbs rice vinegar
- 1 tsp sesame oil
- 12 long wooden skewers
- 1 red capsicum, cut into 2cm pieces
- 1 red onion, cut into 2cm pieces
- 1 tsp sesame seeds
 report this ad
Method:
- Place the pork in a large bowl. Pour the pineapple juice from the tinned pineapple over the pork and set aside the pineapple pieces. Pour the soy, rice vinegar and sesame oil into the bowl and mix through the pork to combine.
- Thread the kebabs starting with a piece of pork, red capsicum, onion, pineapple and repeat, finishing each skewer with a piece of pork.
- Insert the wire rack on the middle shelf with slide the bake pan underneath to form a drip tray. Place the kebabs directly on the wire rack. Set the temperature/cooking function knob to Grill and turn the timer knob to cook for 12 minutes. Turn the kebabs over every 2 minutes so they are cooked through on each side.
- To serve, pile the kebabs on a large serving platter and garnish with a sprinkle of sesame seeds.
Makes at least 10
References
Buy Kettles, Toasters, Irons & More Online | Russell Hobbs New Zealand
Redirecting to Spectrum Brands Registration
Spectrum Brands – Global Consumer Products | Providing Quality & Value to Consumers Worldwide
Buy Kettles, Toasters, Irons & More Online | Russell Hobbs Australia
Redirecting to Spectrum Brands Registration
Spectrum Brands – Global Consumer Products | Providing Quality & Value to Consumers Worldwide
[xyz-ips snippet=”download-snippet”]