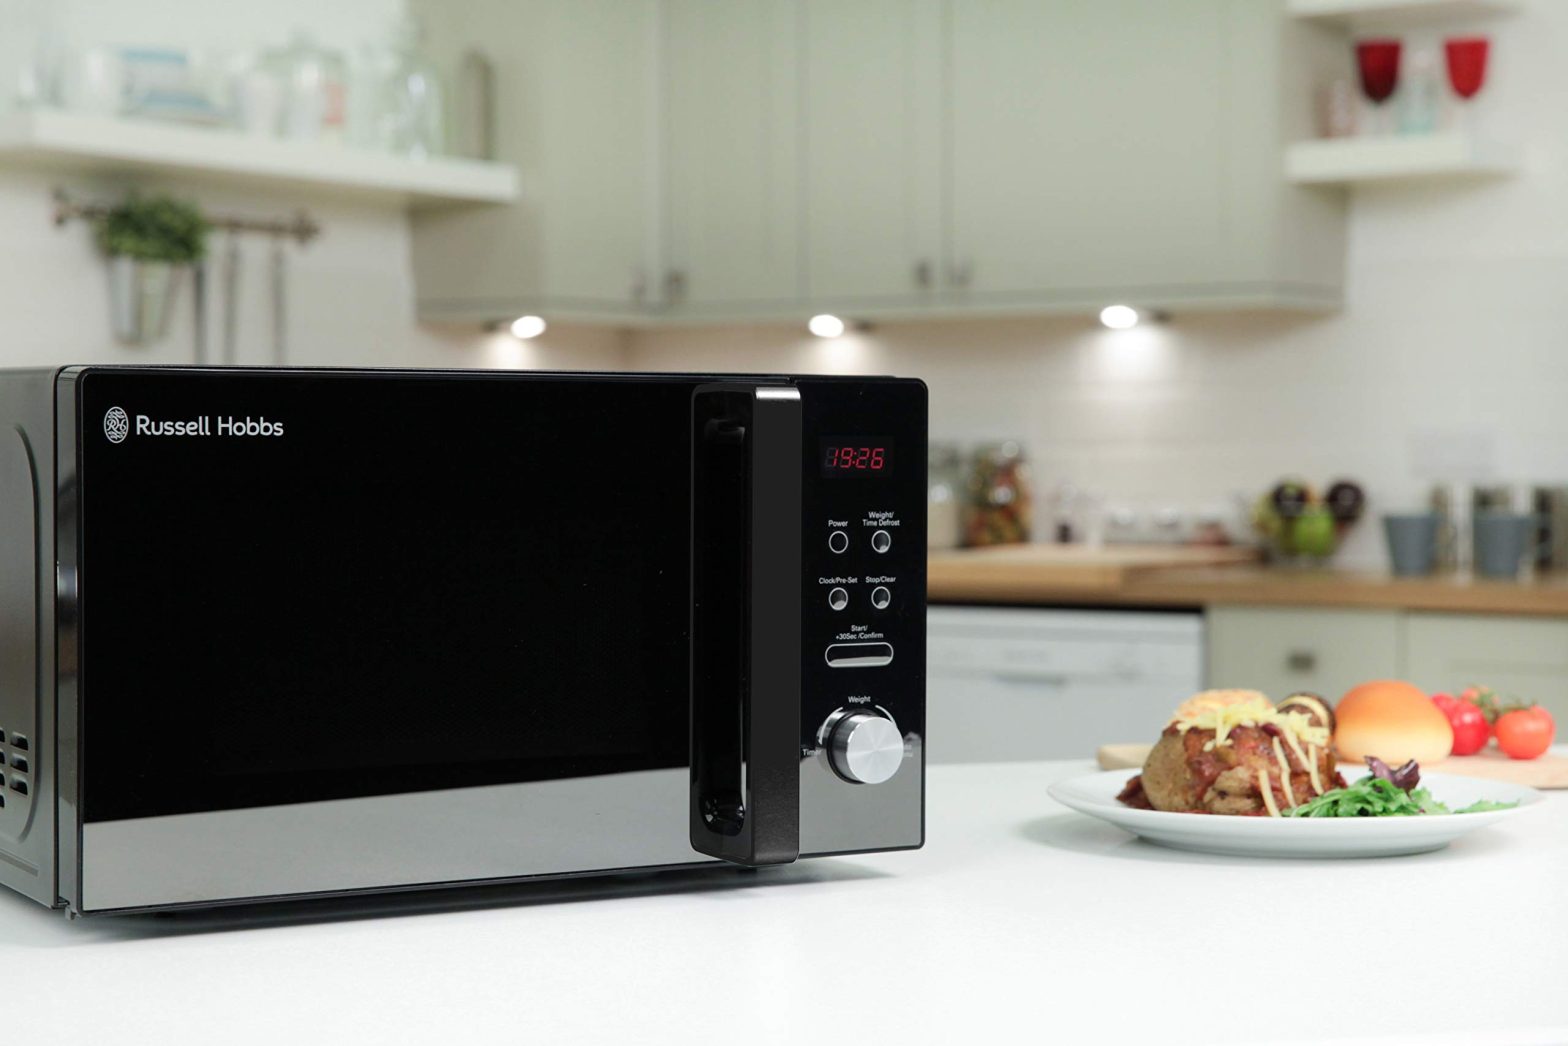

Russell Hobbs 20L Compact Digital Microwave RHMO10
IMPORTANT SAFEGUARDS
General Safeguards
- To protect against electrical hazards do not immerse the power cord, plug, or microwave oven in water or any other liquid.
- This appliance is not intended for use by persons (including children) with reduced physical, sensory or mental capabilities, or lack of experience and knowledge, unless they have been given supervision or instruction concerning use of the appliance by a person responsible for their safety.
- This appliance is not a toy. Children shall be supervised to ensure they do not play with the appliance.
- Do not operate this appliance with a damaged cord/plug or after the appliance has malfunctioned or has been dropped or damaged in any manner.
- There are no user serviceable parts. If the power cord or appliance is damaged, it must be replaced/repaired by a qualified person in order to avoid a hazard.
- Utensils should be checked to ensure that they are suitable for use in microwave ovens. To check whether or not a utensil is suitable, please refer to the “Microwave Safe Containers/Utensils” section.
- Do not use corrosive chemicals or vapours in this appliance.
- Do not use this microwave for commercial purposes. This microwave oven is made for household use only.
- This microwave oven is specifically designed to heat or cook food. It is not designed for industrial or laboratory use.
- The microwave oven has several built-in safety switches to ensure that the power remains off when the door is open. Do not tamper with these switches.
- Do not use the microwave oven cavity for storage purposes. Do not store combustible items such as bread, cookies, paper products etc. inside the oven.
- Do not use the microwave oven for the purpose of dehumidification. Do no dry clothes, newspapers or other materials in the microwave oven. They may catch on fire.
- Do not heat warming pads, slippers, sponges, damp cloth or similar materials as it may lead to risk of injury, ignition or fire.
- Do not store flammable materials next to, on top of, or in the microwave oven. It could be a fire hazard.
- Always turn off and unplug from the power outlet before cleaning the appliance.
- Failure to maintain the microwave oven in a clean condition could lead to deterioration that could adversely affect the life of the appliance and possibly result in a hazardous situation.
- When cleaning door and microwave oven surfaces, use only mild, non-abrasive soaps or detergents applied with a sponge or soft cloth. The heating of corrosive chemicals in this microwave oven may create microwave radiation leaks.
- To disconnect, set the switch on the wall power outlet to OFF, then grasp the plug and withdraw it from the wall socket. Never pull by the cord.
- Do not use appliance for other than its intended purpose as described in the Instruction Manual.
- This appliance is not intended to be operated by means of an external timer or separate remote control system.
- Do not leave the microwave oven unattended when in use.
Location of Microwave Oven
- Install or locate this microwave oven only in accordance with the installation instructions provided.
- Do not use in the bathroom or near any source of water.
- Plug into a wall socket that is properly installed and grounded.
- Do not use on an inclined plane or unstable surface.
- Do not use the microwave oven near or below any curtains or other combustible materials.
- The microwave oven shall not be placed in a cabinet.
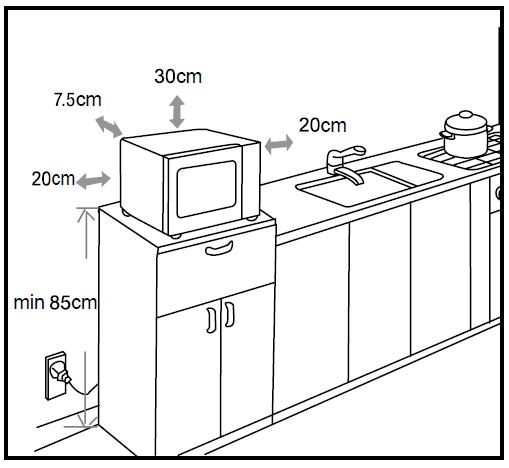
- Minimum height of free space necessary above the top surface of the microwave oven is 30cm.
- A minimum of 20cm is required between the microwave oven and any adjacent walls. One side must be open.
- The microwave oven must be placed on a countertop with a minimum height of 85cm.
- Do not move the microwave oven while it is switched on.
- Do not cover or block any vents on the microwave oven.
- Do not store or use this appliance outdoors.
- Keep cord away from heated surfaces.
- Do not cover the microwave oven when in use.
- Keep the microwave oven and the power cord away from the edge of table or countertops and out of reach of children and persons with reduced physical, sensory or mental capabilities.
- Do not place on or near any hot or damp surface.
- Do not install microwave oven over a range cook-top or other heat-producing appliance. If installed near or over a heat source, the microwave oven could be damaged.
Food
- Do not overcook food.
- The turntable and turntable ring assembly must be in the oven during cooking in all cooking modes. Place the cookware gently on the turntable and handle it carefully to avoid possible breakage.
- Do not operate the microwave oven unless there is food or liquid content inside. Operating the oven with no food or food that is extremely low in moisture can cause fire, charring or sparking.
- Incorrect use of browning dish may cause the turntable to break.
- Do not cook food directly on the turntable. Excessive local heating of the turntable may cause the turntable to break.
- Do not use newspaper or paper bags for cooking.
- Do not cook food wrapped in paper towels, unless your cook book contains instructions, for the food you are cooking.
- Remove wire twist ties and metal handles from paper or plastic containers / bags before placing them in the microwave oven.
- Only use the rack when operating in Grill or Convection cooking mode. Never use in conjunction with the Microwave function as this may cause arcing.
- Do not attempt to deep fry in your microwave oven.
- Do not attempt home canning in this microwave oven, as it is impossible to be sure all contents of the jar have reached boiling temperature.
- Carefully attend the appliance when paper, plastic or other combustible materials are placed inside the microwave oven to facilitate cooking. When heating food in plastic or paper containers, check the microwave oven frequently due to the possibility of ignition.
- Eggs in their shell and whole hard-boiled eggs should not be heated in microwave ovens since they may explode, even after microwave heating has ended.
- Potatoes, apples, egg yolks, chicken wings, whole squash and sausages are examples of foods with non-porous skins. This type of food must be pierced before cooking to prevent bursting.
- SCALDING HAZARD! Liquids, such as water, coffee or tea are able to be overheated beyond the boiling point without appearing to be boiling. Visible bubbling or boiling when the container is removed from the microwave oven is not always present. This could result in very hot liquids suddenly erupting when the container is disturbed or a spoon or other utensil is inserted into the liquid. Care must be taken when handling the container.
- Stir liquids both before and halfway through heating for best results.
- After heating, allow the container to stand in the microwave oven for a short time.
- Use extreme care when inserting a spoon or other utensil into the container.
- Liquids or other food must not be heated in narrow necked or sealed containers since they are liable to explode.
- If smoke is observed, switch off and unplug the appliance and keep the door closed in order to stifle any flames.
- The contents of feeding bottles and baby food jars are to be stirred or shaken and the temperature is to be checked before consumption, in order to avoid burns.
- Always monitor when food is heated or cooked in disposable containers of plastic, paper or other combustible materials due to the possibility of ignition or of the food container deteriorating.
- Always take care when removing food items as it is hot.
- Do not attempt to cook items that are too large for the microwave oven.
IMPORTANT SAFETY INSTRUCTIONS
PRECAUTIONS TO AVOID POSSIBLE EXPOSURE TO EXCESSIVE MICROWAVE ENERGY
- Do not attempt to operate this microwave oven with the door open as this can result in harmful exposure to microwave energy. The door is fitted with safety interlock switches that prevent the microwave oven from operating with the door open.DO NOT tamper with or attempt to override the safety interlocks.
- Do not place any object between the microwave oven front face and the door, or allow food or cleaner residues to accumulate on sealing surfaces.
IF MATERIALS INSIDE THE MICROWAVE OVEN IGNITE:
- Keep the microwave oven door closed to contain and stifle any flames.
- Turn the microwave oven off and remove the plug from the wall power outlet.
Please ensure cooking times are correctly set as overcooking may result in the FOOD catching fire and subsequent damage to your microwave oven.Read these instructions before using your microwave oven. Keep this booklet in a safe place for future reference. When using electrical appliances, basic safety precautions should always be followed. For additional safety information, please refer to the “Important Safeguards” section.
GENERAL USE
MICROWAVE SAFE CONTAINERS / UTENSILSThe glass plate, turntable ring assembly and turntable shaft must remain installed for use for all cooking modes.Tightly-closed containers can explode. Closed containers must be opened and plastic pouches must be pierced before cooking.
To test a container / utensil for safe microwave oven use:Add 1 cup of cool water to a heat resistant glass jug and place it in the microwave oven alongside the empty container/utensil to be tested; heat for one (1) minute at maximum power.If the container/utensil you are testing is microwave oven safe (transparent to microwave energy) it should remain comfortably cool, the water in the glass jug should be hot. If the container/utensil being tested is hot, it has absorbed some microwave energy and should NOT be used.This test is not applicable for plastic items. Check the markings on plastic items to ensure they are microwave safe.CAUTION: Personal Injury Hazard. Use an oven mitt or tea towel when handling containers and utensils that have been heated in the microwave.
| Cookware | Microwave |
| Glass plate, Turntable ring assembly and Turntable shaft (provided) | Yes |
| Heat–Resistant Glass | Yes |
| Non Heat–Resistant Glass | No |
| Heat–Resistant Ceramics | Yes |
| Microwave–Safe Plastic Dish | Yes |
| Kitchen Paper/Paper towel | Yes |
| Metal Tray/Tin | No |
| Metal Rack | No |
| Aluminium Foil & Foil Container | No |
** CAUTION: Microwaving with the metal rack, tray, foil, etc. may cause arcing / sparks.
MATERIALS YOU CAN USE IN THIS MICROWAVE OVEN
NOTE: Always try to use items labelled as microwave safe to minimise any uncertainty.
Aluminium foilShielding only. Use only small amounts of foil to wrap or cover thinner sections of meator poultry, for example, the small end of a shank or the wings of a chicken, to prevent overcooking. Ensure the foil is securely attached to the item being shielded and fold all edges and corners down neatly to prevent possible arcing. Sparks can occur if foil is too close to microwave oven walls. The foil must be at least 2.5cm (1 inch) away from microwave oven walls.
Browning dishFollow browning dish manufacturer’s instructions.NOTE: An overly hot browning dish sitting directly on the glass turntable could cause the turntable to break!
DinnerwareMicrowave-safe only. Follow manufacturer’s instructions. Do not use cracked or chipped dishes.
GlasswareHeat-resistant oven glassware only. Make sure there is no metallic trim. Do not use cracked or chipped dishes. Confirm glassware is heat-resistant before using in the microwave oven.
Oven cooking bagsFollow manufacturer’s instructions. Do not close with metal tie. Make slits to allow steam to escape.
Paper plates and cupsUse for short–term cooking/warming only. Do not leave microwave oven unattended while cooking. Do not place waxed or recycled paper items in the microwave.
Paper towelsUse to cover food for reheating and absorbing fat. For short-term cooking only. Do not leave unattended while cooking.
Parchment paperUse as a cover to prevent splattering or a wrap for steaming.
PlasticMicrowave-safe only. Follow the manufacturer’s instructions. Should be labelled “Microwave Safe”. Some plastic containers soften as the food inside gets hot. “Boiling bags” and tightly closed plastic bags should be slit, pierced or vented as directed by package.
Plastic wrapMicrowave-safe only. Use to cover food during cooking to retain moisture.
ThermometersMicrowave-safe only (meat and candy thermometers).
MATERIALS TO BE AVOIDED IN MICROWAVE OVEN
Aluminium trayMay cause arcing. Transfer food into microwave-safe dish.
Food carton with metal handleMay cause arcing. Transfer food into microwave-safe dish.
Metal or metal trimmed utensilsMetal shields the food from microwave energy. Metal trim may cause arcing.
Metal twist tiesMay cause arcing and could cause a fire in the microwave oven.
Paper bagsMay cause a fire in the microwave oven.
Recycled paper productsUnless the paper product is labelled as microwave safe. Recycled paper products may contain impurities which may result in sparks and/or fires when used.
Plastic foamPlastic foam may melt or contaminate the liquid inside when exposed to high temperatures. WoodWood will dry out when used in the microwave oven and may split or crack.
CeramicDo not use ceramic containers which have metallic inlays.
UNPACKING THE MICROWAVE
NAMES OF MICROWAVE OVEN PARTS AND ACCESSORIESRemove the microwave oven and all materials from the carton and oven cavity.
BEFORE YOU USE YOUR MICROWAVE OVEN
- Remove all the packaging. Do not remove the large piece of plastic from the right hand side of the cavity wall (Refer to the below image). This is called a waveguide cover and allows the microwaves to pass through to cook the food.
 Please ensure you keep this cover clean at all times by wiping with a damp cloth Do not remove/place in a dishwasher
 - Check the oven after unpacking for any visual damage such as• A misaligned door• Damage to the door• Dents or holes in the door window and screen• Dents in the inside
This microwave oven weighs approximately 11.5kg so you must put it on a horizontal surface that is strong enough to support this weight. The oven must be placed away from high temperatures and steam. Do not put anything on the top of the microwave oven.
- Safety interlock latches
- Door assembly and window
- Glass turntable
- Oven cavity
- Microwave top
- Plastic waveguide cover (do not remove)
- Screen display
- Control panel – buttons and dial
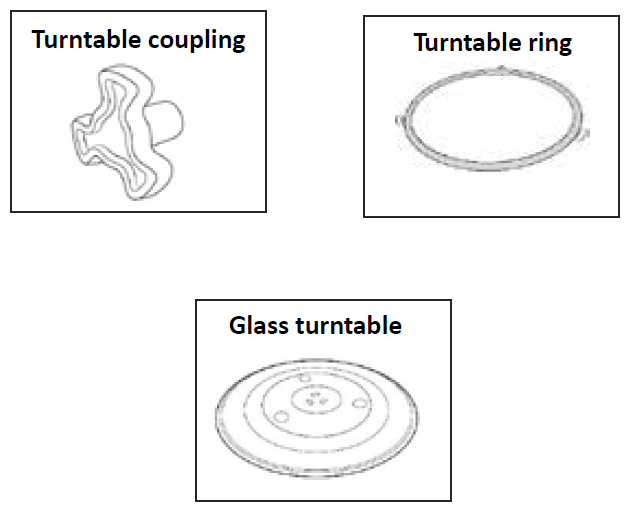
- Turntable coupling
- Turntable ring
- Glass turntable
INSTALLATION
Remove all packing material and accessories. Examine the microwave oven for any damage such as dents or a broken door. Do not install if microwave oven is damaged in any way.Cabinet: Remove any protective film found on the microwave oven cabinet and control panel surfaces. Do not remove the light brown Mica cover that is attached to the inside of the microwave oven cavity. This is required to protect the magnetron.
- Place the oven as far away from radios and televisions as possible. Using the oven may cause interference with the reception.
- Plug the oven into a suitable mains socket, make sure the voltage is the same as on the rating label (do not use extension cables or mains socket adaptors.)
- The microwave oven should be used free standing only and must not be built-in or used in a cabinet.
1. Select a level surface that provides enough open space for the intake and/or outlet vents.2. The minimum installation height is 85cm.3. The rear surface of the appliance shall be placed against a wall.4. A minimum clearance of 30cm is required above the microwave oven.5. A minimum clearance of 20cm is required between the microwave oven and any adjacent walls.6. Do not remove the legs from the bottom of the microwave oven.7. Blocking the intake and/or outlet vents can damage the microwave oven.
WARNING: Do not install microwave oven over a range cook top or other heat-producing appliance. If installed near or over a heat source, the microwave oven could be damaged and the warranty would be void. The microwave oven is designed for bench-top use only and must not be placed in a cabinet.
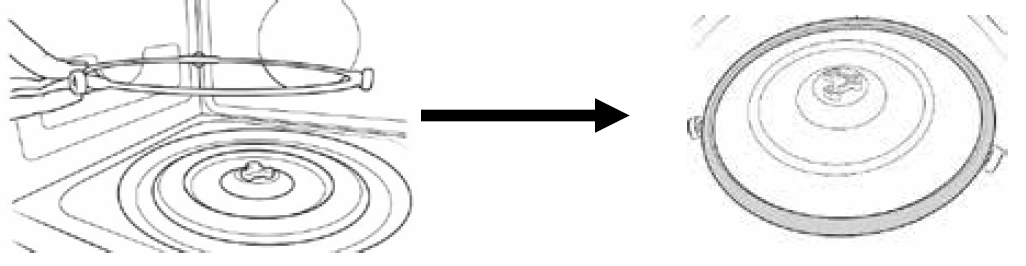
TURNTABLE INSTALLATION
Before first use, check that any securing tape and all packaging has been removed from the glass tray and turntable ring assembly.
- Never place the glass turntable upside down. The glass turntable movement should never be restricted.
- Both glass turntable and turntable ring assembly must always be used during cooking.
- All food and containers of food are always placed on the glass turntable for cooking.
- Do not use the microwave if the glass turntable or turntable ring assembly cracks or breaks. Contact Customer Service.
- Do not place the food directly onto the glass tray, always place on or in suitable microwaveable cookware.
Please check that crockery is microwave safe before using.
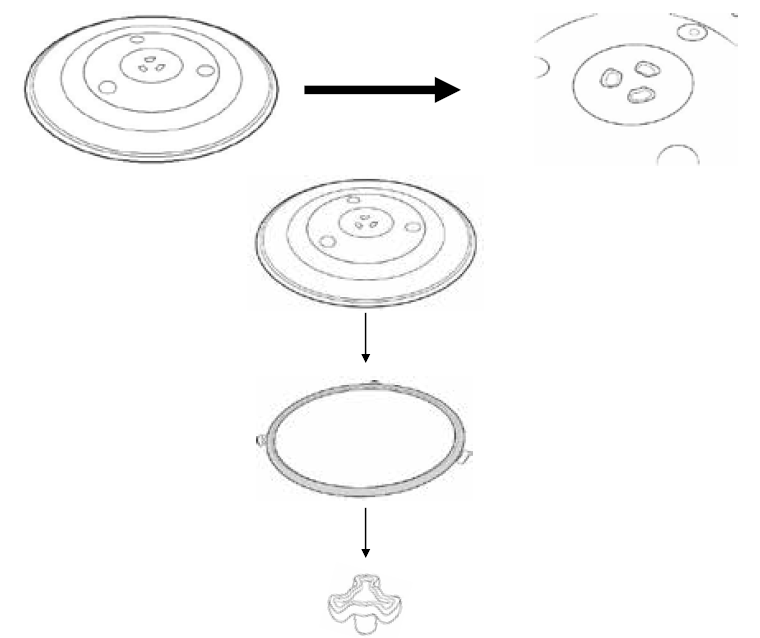
To assemble the turntable, follow the steps below in number order.
STEP 1: The turntable coupling should slot into the centre of microwave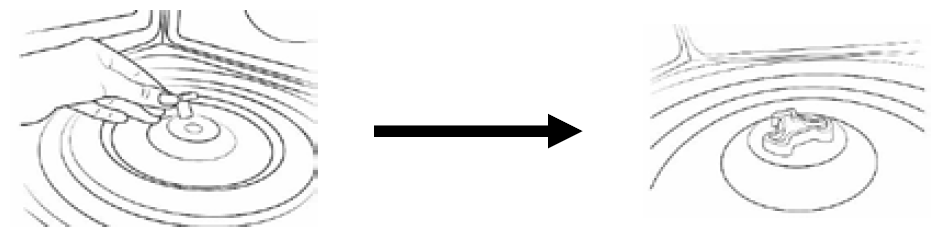
STEP 2: The turntable ring slots into the indents in the microwave base
STEP 3: The g lass tray should align with the turntable coupling
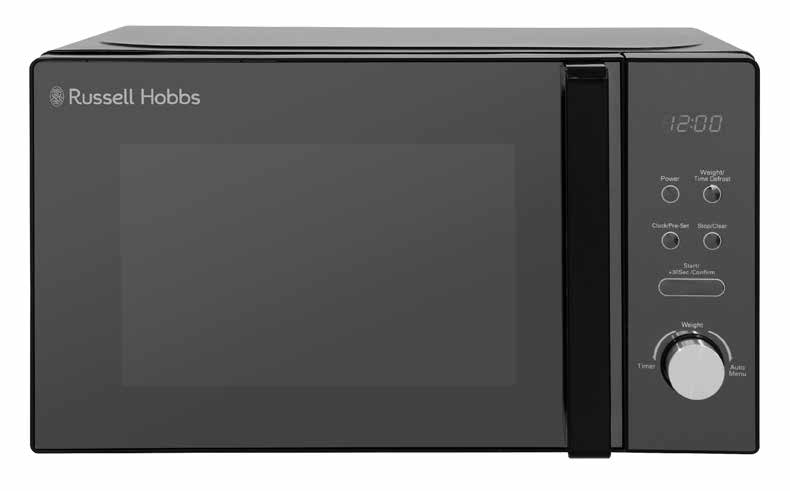
CONTROL PANEL & FEATURES
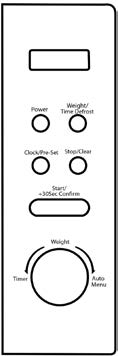
Screen DisplayCooking time, power, action indicators, and clock time are displayed.
PowerPress this button a number of times to set a cooking power level.
Weight/Time DefrostPress this button to input weight or time for defrosting.
Clock/Pre-SetPress this button to set the clock and use the pre-set function.
Stop/ClearPress once to stop the cooking process and press twice to clear the settings.
Start/+30Sec/ConfirmPress this button to start the cooking process and confirm when programming.
Timer/Weight/Auto MenuTurn to select food you want to cook from the auto menu, select weight or to select time for normal microwave power cooking. Confirm using the Start button.
HOW TO USE THE MICROWAVE
Setting the clock (24 hour)For example, if you want to set the time to 08:30 (am:)
- Press the Clock/Pre Set button. The display will show ‘0:00’.
- Turn the Timer/Weight/Auto Menu dial clockwise until the hour display shows 8 :’. Press the Clock/Pre Set button to confirm.
- The display will show ‘8:00’ and the minutes will flash.
- Set the minutes by turning the Timer/Weight/Auto Menu dial clockwise until the display shows ‘08:30‘. Press the Clock/Pre Set button to confirm.
The clock is now set and the colon will continue to flashNote: If the clock is not set, the clock will not function when powered. During the process of clock setting, if you press ‘Stop/Clear’ button, the oven will go back to the previous status.
MICROWAVE COOKING
Once you have correctly installed the unit, turned on the power and set the clock, you are ready to start cooking.Your microwave has 5 power levels, the lowest at 10%, then 30%, 50%, 80%, up to 100% (or full power.)Most recipes are cooked on full power this should be indicated on the packaging of microwavable food.
- To select a power level, press the ‘ Power ’
- When pressed once the screen display will show ‘P100’ (100% power)
- When pressed twice the screen display will show ‘P80’ (80% power)
- When pressed three times the screen display will show ‘P50’ (50% power)
- When pressed four times the screen display will show ‘P30’ (30% power)
- When pressed five times the screen display will show ‘P10’ (10% power)ORPress the power button and turn the Timer/Weight/Auto Menu dial to select the microwave power ‘P100’, ‘P80’, ’P50’, ‘P30’, ‘P10’ will display in order.
- Press the Start/+30Sec/Confirm
- Once you have selected your microwave power you can turn the Timer/Weight/Auto Menu dial clockwise to set the cooking time desired.
- Press the Start/+30Sec/Confirm button to commence cooking. The maximum cooking time is 95 minutes. Do not operate the oven empty, this can cause irreparable damage.
PAUSING COOKINGIf you want to pause the cooking to turn over or stir contents, simply open the door, then close again and press the Start/+30Sec/Confirm button to continue the cycle.If you wish to stop cooking with time left on the display, take out the contents, close the door and press the Stop/Clear button twice to clear.When cooking has finished the microwave will beep five times and the screen display will go back to the clock, indicating that the microwave has stopped.
QUICK START FUNCTIONFor quick and easy microwave cooking, you can press the Start/+30Sec/Confirm button to automatically add 30 seconds of cooking time. This can be pressed multiple times for cooking up to 95 minutes on full power.Note: This function does not work for defrost, auto menu or multi stage cooking.
DEFROST FUNCTIONEnsure food is thoroughly defrosted before starting the cooking process.There are 2 defrosting methods:
| Defrost Setting | Defrost Method |
| dEF1 | By weight |
| dEF2 | By time |
The microwave generally penetrates 4cm into most foods.For even defrosting results, ensure you turn the food over during the cycle.Defrosting generally takes longer than the cooking time of food.Defrosted food should be consumed as soon as possible, do not put it back in the fridge or freeze again.Defrosting example – by weightAs an example, to defrost 0.4kg of poultry:
- Press the Weight/Time Defrost button dEF1 will be displayed.
- Turn the Timer/Weight/Auto Menu dial clockwise until you reach the desired weight 400
- To commence defrosting, press the Start/+30sec/Confirm button.
- Remember to turn over the food half way through the defrosting cycle. Open the door and turn over the food.
- Close the door and press the Start/+30Sec/Confirm button to continue defrosting.
To defrost by time follow the above steps but pressing the Defrost button twice to display dEF 2 and turning the dial to set the time. The defrosting power is 30%, and cannot be changed.
AUTO COOKING FUNCTIONAs a digital microwave, the appliance features a default cooking menu, automatically calculating the cooking time based on the type of food and weight.
- If the colon on the display is flashing you are able to activate the auto menu by turning the Timer/Weight/Auto Menu dial clockwise.This will display: A-1 – A-8. Continue to rotate the dial to access the other auto selections, up to A8.You will need to use your discretion regarding food type, temperature and weight as times may vary below is a guideline for each auto cooking setting:
Display Auto Menu Weight (g) on the Display Power A-1
Reheat
200 400
600
100%
A-2
Vegetables (Add water)
200 300
400
100%
A-3
Fish
250 350
450
80%
A-4
Meat
250 350
450
100%
A-5 Pasta 50 (add 450ml water) 100 (add 800ml water)
80% A-6
Potato
200 400
600
100%
A-7 Pizza 200 400
100% A-8 Soup 200 400
80% - Once you have turned the dial to select the appropriate setting, press the Start/+30sec/Confirm button to
- Turn the Timer/Weight/Auto Menu dial to choose the food weight, these are pre set and listed in the above table.
- Press the Start/+30sec/Confirm button to commence.
Make sure you monitor cooking progress as times can vary. Allow the food to stand in the microwave for 1-2 minutes after the cooking cycle is complete.
MULTI SEQUENCE COOKING FUNCTION
For some recipes, results may be better if you wish to cook on different power levels for different times, for one dish.Note: This can be used to set a maximum of two different stages. The auto menu cannot be set as one of the multi stage cooking functions.For example, if you wanted to defrost 500g of food, then cook it at 80% microwave power for 7 minutes the steps are as follows:
- Press the Weight/Time Defrost button once the screen will display
- Turn the Timer/Weight/Auto Menu dial to adjust the defrost weight to 500g.
- Press the Power button once.
- Turn the Timer/Weight/Auto Menu dial to choose 80% microwave power until the display shows ‘ P80 ’.
- Press the Start/+30Sec/Confirm button to confirm.
- Turn the Timer/Weight/Auto Menu dial to adjust the cooking time to 7 minutes.
- Press the Start/+30Sec/Confirm button to start the cooking process.
PRE SET COOKING FUNCTIONYou can set your microwave to start cooking at a pre set time, without the need to be present to input the programmes. Make sure your food is in the microwave and prepared when you programme the pre-set function.You will need to set the clock and the cooking menu and time.It is possible to input a maximum of 2 cooking stages. Do not use the defrost function in the pre set function. The auto menu can be set for a single stage only.
PRE SET COOKING FUNCTION EXAMPLEIf the current time is, say, 12:30 and you want the microwave to cook on 80% power for 7 minutes at 14:20
- With the colon flashing on the display screen, press the Power button
- Turn the Timer/Weight/Auto Menu dial to choose 80% microwave power P80 is
- Press Start/+30Sec/Confirm button to confirm.
- Turn the Timer/Weight/Auto Menu dial to adjust the cooking time to 7 minutes.
- After the above steps, DO NOT press Start/+30Sec/Confirm button, but do as follows:
- Press the Clock/Pre Set button, the current time displays and the hour figures flash.
- Turn Timer/Weight/Auto Menu dial to adjust the hours to display 14:. Press Clock/Pre Set button and the minute figures will flash. Turn the Timer/Weight/Auto Menu dial to adjust the minutes to display 20. This sets the start time.
- Press Start/+30Sec/Confirm button to finish setting.
The “:” will illuminate, the buzzer will ring twice when the set start time arrives, and then cooking will commence automatically.If you wish to cancel the pre set cooking, press the Stop/Clear button.
CHECKING FUNCTIONSDuring the cooking cycle, press the Power button and the current power will be displayed for 2-3 seconds.In pre set state, press the Clock/Pre Set button to check the time when the cooking will start. The pre set time will flash for 2 3 seconds, then the oven will turn back to the clock display.During the cooking cycle, press the Clock/Pre Set button to check the current time. It will be displayed for 2-3 seconds.
CHILD LOCK FUNCTIONThe child lock function is ideal to stop children from altering cooking times if unsupervised. No buttons will function in this mode.To set the child lock when in standby, press and hold the Stop/Clear button for 3 seconds. A loud ‘beep’ will sound to indicate the lock is now functional.A rectangle will illuminate on the display.To cancel the child lock, again press and hold the Stop/Clear button for 3 seconds. A loud‘beep’ will sound to indicate the microwave is no longer locked.The current time will continue to display.
GENERAL INFORMATION
- The Start/+30Sec/Confirm button must be pressed again to continue cooking if the door is opened during a cooking cycle.
- Once the cooking programme has been set, if the Start/+30Sec/Confirm button is not pressed within 1 minute the current time will display and the setting will be cancelled.
- The buttons will ‘beep’ if they are pressed correctly, if not pressed correctly they will not ‘beep’.
- The buzzer will sound five times to remind you when cooking is finished.
DEFROSTING TIPSMicrowaves penetrate around 4cm into most food. To maximize defrosting effectiveness follow the below guidelines:
- For thick foods, turn regularly during operation in order to defrost evenly.
- If food weighs over 500g, it is advised to turn at least 2 times.
- Defrosted food should be consumed as soon as possible, it is not advisable to put back into the fridge or freeze again.
COOKING TIPS
The following may affect cooking results:
FOOD ARRANGEMENTIf possible, thicker bits of food should be placed around the outside of the dish and the thinner parts toward the centre, spread out as evenly as possible. Do not overlap food if possible as this could result in uneven cooking results.
COOKING TIMEIf you are unsure of cooking times it is advisable to start with a short cooking time and monitor cooking progress before adding further time. Overcooking could lead to a risk of fire. Ensure food is cooked thoroughly before consuming.
COOKING FOOD EVENLYFoods such as meat should be turned frequently to ensure more even cooking results. If the food is liquid based, stirring during the cooking time is advisable.
ALLOW STANDING TIMEWhen the microwave has stopped cooking, leave the food to rest for an adequate length of time to allow for cooking completion and cooling.
CARE & CLEANING
- Switch off at the wall power outlet and remove the plug from the socket before cleaning and when not in use.
- If food spills or splatters in the microwave, wipe over all the interior surfaces with a sponge or soft damp cloth. Try to clean spills and splatters straight away. If ingredients have built up and stuck to the walls a mild detergent can be used.
- Wipe the exterior with a damp cloth and dry thoroughly. Do not let water enter the ventilation openings.
- On the right hand side wall of the cavity is the waveguide cover, microwaves are passed through this to enable your food to cook. It is important that this waveguide cover is kept clean at all times. To do this wipe with mild detergent and water, then dry.
- Do not use harsh or abrasive cleaners.
- Do not allow the control panel to become wet. Clean with a soft, damp cloth. Do not use detergents, abrasives or spray-on cleaners on the control panel.
- Carefully wash the glass turntable and turntable ring in warm soapy water. Rinse with clean water and dry thoroughly before placing back into the microwave. Ensure these parts are correctly in place before use.
- Wipe the bottom of the microwave oven interior with a soft damp cloth to ensure smooth operation of the turntable ring.
- To remove odours from the microwave; in a deep microwave safe bowl combine 1 cup of water with the juice of 1 lemon (or 1 tbsp of white vinegar) and microwave for 5 minutes at 100% power. Carefully remove the bowl and wipe the interior of the microwave with a dry soft cloth.
- Do not immerse the microwave oven in water or any other liquid.
- If steam builds up inside or around the outside of the oven door, wipe with a soft cloth. This may happen when the microwave oven is used in humid conditions.
- Failure to maintain the oven in a clean condition, especially if liquid is left under the turntable, could lead to deterioration of the surface that will adversely affect the life of the appliance that may result in a hazardous condition.
DISPOSAL/RECYCLINGLegislation in some localities mandates that e-waste (anything with a plug, battery or cord) is disposed of through controlled recycling facilities and must not be disposed of in general household waste. For more information about recycling of electrical and battery operated appliances, please contact your local council or your local household waste disposal service.
PROBLEM SOLVING
WARNING: To reduce the risk of personal injury, always unplug the microwave before performing maintenance or trouble shooting checks.The microwave oven may cause interference to your radio, TV or similar equipment. If this happens , you can stop the interference by moving the radio, TV or equipment as far away from your microwave oven as possible.
| Problem | Potential reason | Potential solution |
|
If the microwave doesn’t work |
1. Microwave is not plugged in |
Make sure the plug is plugged in securely into the mains and the plug is switched on. If it is not, remove the plug from the
socket, wait 10 seconds and plug it in again securely. |
|
2. Plug is not working |
The plug socket that the microwave is plugged into may have become faulty.
Plug the microwave into another known good plug socket, ensure that the socket is turned on and check if the microwave now works. |
|
| 3. The plug has a blown fuse or the mains circuit
has a blown fuse/ tripped fuse |
Check the plug for a blown circuit fuse or a tripped main circuit breaker. If these seem to be working properly, test the socket with another appliance. | |
|
4. Microwave has developed a fault |
Contact customer services to talk through the problem to see if any solution for the fault can be found. If not and the product is within its warranty period, then the
microwave should be returned to the retailer it was purchased from for a replacement or refund. |
|
|
If the microwave power will not work |
1. Door is not closed |
Make sure the door is securely closed. Otherwise, the microwave will not engage or operate. |
| 2. The power has not been set/the timer dial has not been turned | Set the microwave power by pressing the ‘Power’ button. Select the time by turning the dial and pressing Start to confirm | |
|
Not heating |
Magnetron not working |
The component that produces the microwaves is called a magnetron, if food is not being heated or is ‘luke’ warm then it is likely this component has developed a
fault. If the microwave is within its warranty period, please contact customer services for further advice or take the microwave back to the retailer it was purchased from for a refund or replacement. |
| Problem | Potential reason | Potential solution |
| Sparking | 1. Burnt on food debris | Spillages or splashes can burn and catch fire, all food that is put into the microwave should be appropriately covered. All spillages or splashes must be cleaned, and all areas of microwave cleaned after each use.
Burnt on food debris in the microwave, on the waveguide and the behind the waveguide can cause the microwave to ‘spark’. This is because burnt on debris can be focused on by the microwaves and spark. Microwaves must be thoroughly cleaned after every use to ensure no food is burnt on to any part of the microwave. |
| 2. Metal or foil | No metal or foil should be put inside a microwave as it can cause ‘sparking’ which can damage the microwave.
The only metal accessories that should be used inside the microwave are the ones supplied by the manufacturer. |
|
| 3. Pressure build up in food | Food with none porous skins (potatoes for example), must be pierced to allow steam to escape. As the build up of pressure can cause food to burst and create a ‘fire hazard‘. | |
| Heat spots | Operated empty or with no moisture | Microwaves cannot be run empty, microwaves need moisture to operate correctly.
If microwaves are operated empty or are used to heat up plates (this is not permitted), the microwaves can focus on a single point inside the microwave. This can cause a heat spot, which can cause the area to become deformed, warped or start to melt. If microwaves are operated empty or to heat up foreign objects this will void the warranty. |
| Problem | Potential reason | Potential solution |
| Condensation or excess water | 1. Food that is being cooked | Spillages or splashes can burn and catch fire, all food that is put into the microwave should be appropriately covered. All spillages or splashes must be cleaned, and all areas of microwave cleaned after each use.
Burnt on food debris in the microwave, on the waveguide and the behind the waveguide can cause the microwave to ‘spark’. This is because burnt on debris can be focused on by the microwaves and spark. Microwaves must be thoroughly cleaned after every use to ensure no food is burnt on to any part of the microwave. |
| 2. Cooling vents covered | Cooling vents allow the heat and steam to escape from the microwave. These cannot be covered as it can cause excessive water to settle inside the microwave or the microwave to overheat.
The installation instructions in the instruction manual must be followed or the warranty will be void. |
|
| Paint damage/ peeling | Maintenance | If the microwave is within its warranty period, please contact customer services for further advice or take the microwave back to the retailer it was purchased from for a refund or replacement. |
| Light not working | Bulb not working | Due to the construction of microwaves and certain ‘dangerous’ components t he light bulb can only be changed by a qualified service engineer.
If the microwave is within its warranty period, please contact customer services for further advice or take the microwave back to the retailer it was purchased from for a refund or replacement |
| Over heating | Cooling vents covered | Cooling vents allow the heat and steam to escape from the microwave. These cannot be covered as it can cause excessive water to settle inside the microwave or the microwave to overheat.
The installation instructions in the manual must be followed or the warranty will be void. |
| Problem | Potential reason | Potential solution |
| Too noisy | 1. Glass turntable fitted incorrectly | Check that the glass turntable has been placed correctly on the turntable and is not hitting the walls/doors of the microwave during operation. |
| 2. Dishes/plate are too large for the microwave | Check that the dishes/plates are the correct size for the microwave and that they are not hitting the walls/door of microwave during operation. | |
| Door not shutting/ locking | 1. Glass turntable fitted incorrectly | Check that the glass turntable has been placed correctly on the turntable and is not stopping the door from shutting correctly. |
| 2. Latches have become deformed | If the microwave is within its warranty period, please contact customer services for further advice or take the microwave back to the retailer it was purchased from for a refund or replacement. | |
| Turntable not rotating | 1. Turntable coupling not fitted or tape not
removed |
Check that the turntable coupling is fitted correctly and the transportation tape has been removed. |
| 2. Turntable roller ring not fitted or fitted
incorrectly |
Check that the coupling has be placed under the turntable and that it is position correctly. | |
| 3. Glass turntable fitted incorrectly | Check that the glass turntable has been placed correctly on the turntable. | |
| 4. Turntable has developed a fault | If the microwave is within its warranty period, please contact customer services for further advice or take the microwave back to the retailer it was purchased from for a refund or replacement. |
SPARE PARTS
Spectrum Brands Australia Pty LtdLocked Bag 3004 BraesideVictoria 3195 AustraliaCustomer Service in Australia TollFree: 1800 623 118Email: [email protected] Website: www.spectrumbrands.com.au
Spectrum Brands New Zealand LtdPO Box 9817 NewmarketAuckland 1149 New ZealandCustomer Service in New Zealand TollFree: 0800 736 776Email: [email protected] Website: www.spectrumbrands.co.nz
Spectrum Brands Australia Pty Ltd and Spectrum Brands New Zealand Ltd Warranty Against Defects
In this warranty:
Australian Consumer Law means the Australian consumer law set out in Schedule 2 to the Competition and Consumer Act 2010;CGA means the New Zealand Consumer Guarantees Act 1993;Goods means the product or equipment which was accompanied by this warranty and purchased in Australia or New Zealand, as the case may be;Manufacturer, We or us means:
- for Goods purchased in Australia, Spectrum Brands Australia Pty Ltd ABN, 78 007 070 573; or
- for Goods purchased in New Zealand, Spectrum Brands New Zealand Ltd, as the case may be, contact details as set out at the end of this warranty;
Supplier means the authorised distributor or retailer of the Goods that sold you the Goods in Australia or in New Zealand; andYou means you, the original end-user purchaser of the Goods.
- Our goods come with guarantees that cannot be excluded under the Australian Consumer Law, or the CGA. You are entitled to a replacement or refund for a major failure and compensation for any other reasonably foreseeable loss or damage. You are also entitled to have the goods repaired or replaced if the goods fail to be of acceptable quality and the failure does not amount to a major failure.
- The benefits provided by this Warranty are in addition to all other rights and remedies in respect of the Goods which the consumer has under either the Australian Consumer Law or the CGA. The original purchaser of the Goods is provided with the following Warranty subject to the Warranty Conditions:
- We warrant the Goods for all parts defective in workmanship or materials for a period of 1 year from the date of purchase (Warranty Period).
If the Goods prove defective within the Warranty Period by reason of improper workmanship or material, we may, at our own discretion, repair or replace the Goods without charge.
Warranty Conditions
- The Goods must be used in accordance with the manufacturer’s instructions. This Warranty does not apply should the defect in or failure of the Goods be attributable to misuse, abuse, accident or non-observance of manufacturer’s instructions on the part of the user. As far as the law permits, the manufacturer does not accept liability for any direct or consequential loss, damage or other expense caused by or arising out of any failure to use the Goods in accordance with the manufacturer’s instructions.
- Exhaustible components (such as batteries, filters and brushes) of the Goods are included under this Warranty only where there is a defect in workmanship or materials used.
- The warranty granted under clause 3 is limited to repair or replacement only.
- Any parts of the Goods replaced during repairs or any product replaced remain the property of the manufacturer. In the event of the Goods being replaced during the Warranty Period, the warranty on the replacement Goods will expire on the same date as for the Warranty Period on the original Goods which are replaced.
- In order to claim under the warranty granted under clause 3 you must:(a) Retain this warranty with your receipt/proof of purchase; and(b) Return the Goods to us at the relevant address or to the Supplier by prepaid freight within the Warranty Period accompanied with (i) the legible and unmodified original proof of purchase, which clearly indicates the name and address of the Supplier, the date and place of purchase, the product name or other product serial number and (ii) this warranty.
- This warranty is immediately void if:(a) Any serial number or appliance plate is removed or defaced;(b) The Goods have been serviced or otherwise repaired by a person not authorised to do so by us or where non approved replaced parts are used.
- The Goods are designed for domestic use only. The Goods must be connected to the electrical voltage requirements as specified in the ratings label located on the Goods.
- This warranty does not cover the cost of claiming under the warranty or transport of the Goods to and from the Supplier or us.
- This warranty is only valid and enforceable in Australia against Spectrum Brands Australia Pty Ltd and in New Zealand against Spectrum Brands New Zealand Ltd.
 report this ad
Contact us or the Supplier for further details.Register your product onlineIf you live in Australia please visit: www.spectrumbrands.com.au/warrantyIf you live in New Zealand Please visit: www.spectrumbrands.co.nz/warranty Registration of your warranty is not compulsory, it gives us a record of your purchase AND entitles you to receive these benefits: Product information; Hints and tips; Recipes and news; Information on special price offers and promotions.Any questions? Please contact Customer Service for advice.
References
Redirecting to Spectrum Brands Registration
Buy Kettles, Toasters, Irons & More Online | Russell Hobbs New Zealand
Spectrum Brands – Global Consumer Products | Providing Quality & Value to Consumers Worldwide
Redirecting to Spectrum Brands Registration
Buy Kettles, Toasters, Irons & More Online | Russell Hobbs Australia
Spectrum Brands – Global Consumer Products | Providing Quality & Value to Consumers Worldwide
[xyz-ips snippet=”download-snippet”]