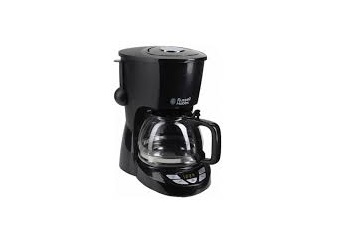
Russell Hobbs 22620-56 Texture Plus Coffee Maker User Manual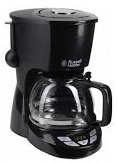
Read the instructions, keep them safe, pass them on if you pass the appliance on. Remove all packaging before use
IMPORTANT SAFEGUARDS
Follow basic safety precautions, including:
This appliance can be used by children aged from 8 years and above and persons with reduced physical, sensory or mental capabilities or lack of experience and knowledge if they have been supervised/instructed and understand the hazards involved.
Children shall not play with the appliance.
Cleaning and user maintenance shall not be done by children unless they are older than 8 and supervised.
Keep the appliance and cable out of reach of children under 8 years.Misuse of the appliance may cause injury.
![]() The surfaces of the appliance will get hot. Residual heat will keep the surfaces hot after use. Don’t immerse the body of the appliance in liquid.
The surfaces of the appliance will get hot. Residual heat will keep the surfaces hot after use. Don’t immerse the body of the appliance in liquid.
If the cable is damaged, it must be replaced by the manufacturer, its service agent, or someonesimilarly qualified, to avoid hazard.
The surface of the heating element is subject to residual heat after use.
The coffee-maker shall not be placed in a cabinet during use.
Use the appliance according to these instructions. Any misuse may cause potential injury, electric shock or other hazards.
This appliance can be used by persons with reduced physical, sensory or mental capabilities or lack of experience and knowledge if they have been given supervision or instruction concerning use of the appliance in a safe way and understand the hazards involved.This appliance is intended to be used in household and similar applications such as:
- staff kitchen areas in shops, offices and other working environments;
- by clients in hotels, motels and other residential type environments;
- bed and breakfast type environments;
- farm houses.
 Do not use this appliance near bathtubs, showers, basins or other vessels containing water.
 - Sit the appliance on a stable, level, heat-resistant surface.
- Keep the appliance and cable away from the edges of worktops.
- Don’t use accessories or attachments other than those we supply.
- Don’t use the appliance for any purpose other than those described in these instructions.
- Don’t use the appliance if it’s damaged or malfunctions.
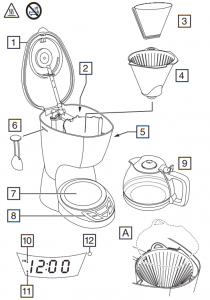
PARTS
- Lid
- Water reservoir
- Paper filter #4 (not supplied)
- Filter holder
- Water gauge
- Scoop
- ot plate
- Control panel
- Carafe
- PM light
- AUTO light
- Brewing light
BEFORE USING FOR THE FIRST TIME
Fill the reservoir to the max mark, and run the appliance without coffee.
FILLING
- Remove the carafe from the hotplate.
- Use the grip to open the lid, and expose the reservoir.
- Fill the reservoir with the exact amount of water required.
- Open up a #4 paper filter, and put it into the filter holder.
- Put 1 scoop of filter-ground coffee into the filter for each cup.
- Close the lid.
- Replace the carafe on the hotplate.
SET THE CLOCK
- Put the plug into the power socket.
- 12:00 will blink on the display.
- Set the clock to the correct time.
- Use the h and min buttons to set the correct hour and minute.
A small dot in the display indicates PM.The clock will retain its settings until the coffee maker is unplugged.
MAKING COFFEE
CAUTION: DO NOT open the lid during brewing as there is the potential risk of scalding.
- Press the W button. The brewing light will come on.
- Shortly afterwards, coffee will start to drip into the carafe.
- When it’s done, the hotplate will keep the carafe warm. After 40 minutes, the hotplate will shut down.
- If you want to stop the coffee maker while it’s brewing, press the W button.
COFFEE LATER
- Set the timer to the time you want to start brewing.
- Press the T button.
- Use the h and min buttons to set the correct hour and minute.
- If you don’t press either the h or min buttons within 5 seconds, the coffee maker will revert to “normal”, and the time will show. You’ll have to press the T button, and start again.
- Press the T
- Press the AUTO button until the auto light stops flashing and stays on.
- At the time you set, the brewing light will come on and the coffee maker will start up.
- To cancel the timer before brewing has started, press the AUTO button again.
- If you forget what time you’ve set it to, press the T button.
A QUICK CUP
You can remove the carafe at any time. To prevent the filter holder overflowing, replace the carafe on the hotplate within about 20 seconds.
CARE AND MAINTENANCE
- Unplug the appliance and let it cool.
- Tip the contents of the filter holder into the bin.
- Clean the outside surfaces of the appliance with a damp cloth.
- Press the lever at the rear of the carafe lid, above the handle, to open the carafe lid.
- Hand wash the carafe and filter holder.
- With the filter oriented as shown in FIG A, lower it into the coffee maker. The lid will not close unless the filter holder is correctly fitted.
- Close the lid, and press down to lock it.
DESCALE REGULARLY
DESCALE REGULARLYDescale the appliance at least monthly with a proprietary descaler. Follow the instructions on the package of descaler.Products returned under guarantee with faults due to scale will be subject to a repair charge.
RECYCLING
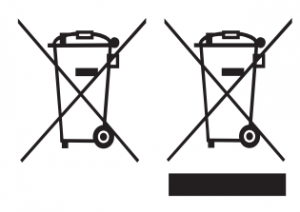 To avoid environmental and health problems due to hazardous substances, appliances and rechargeable and non-rechargeable batteries marked with one of these symbols must not be disposed of with unsorted municipal waste. Always dispose of electrical and electronic products and, where applicable, rechargeable and non-rechargeable batteries, at an appropriate official recycling/collection point.
References
[xyz-ips snippet=”download-snippet”]