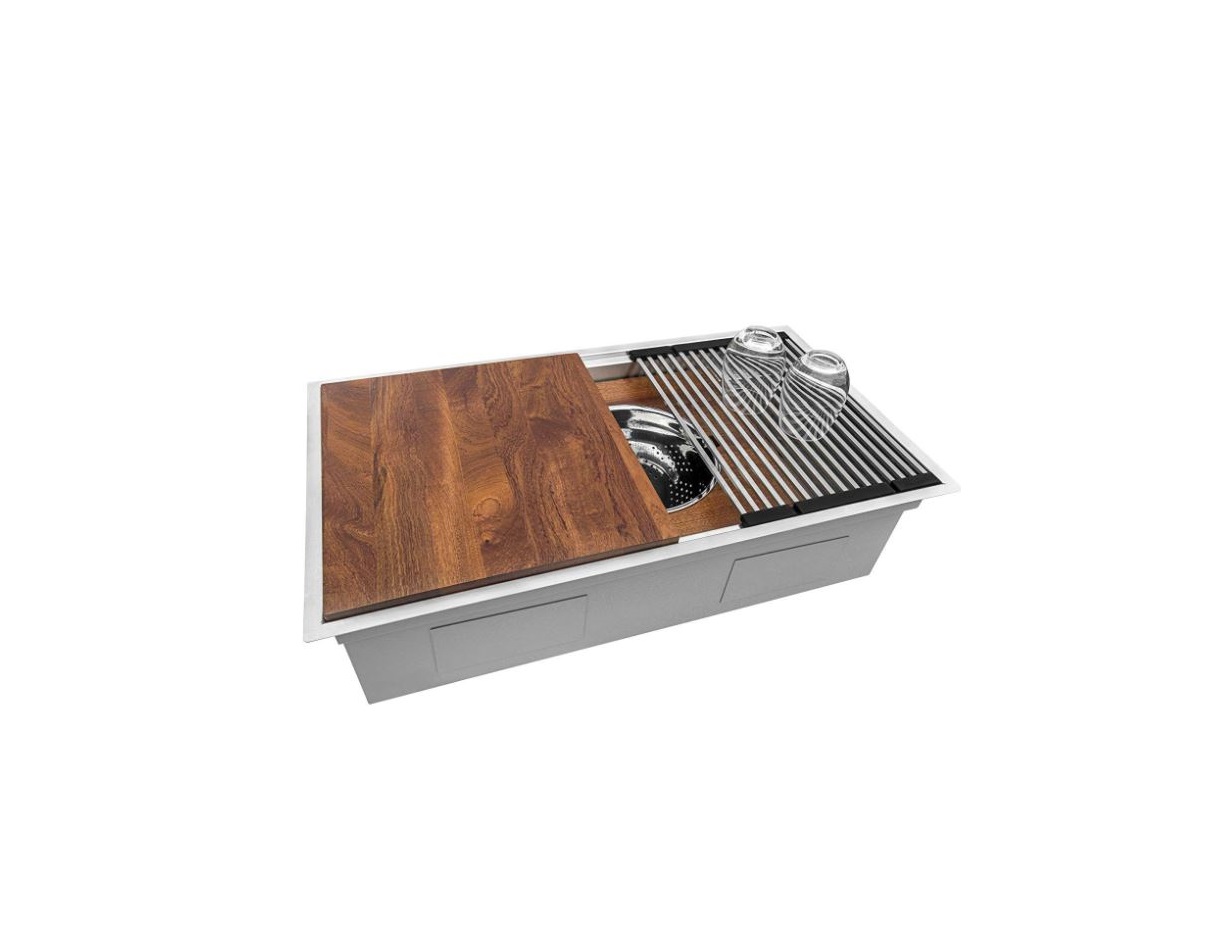
RUVATI RVH8222 Undermount WorkStation Sink Installation Guide

ATTENTION INSTALLER:
Please read all information below and keep this installation guide for future reference. Ruvati recommends that this sink be installed only by a professional installer.
Sink edges may be sharp and can cause accidental injury if not careful. Wear cut-resistant protective gloves during installation.
Inspect the sink and box contents immediately upon delivery. If you see any shipping damages on the sink, or missing parts, contact Ruvati Support.
Templates are only provided as a guide. Place template on sink to ensure the template will give you the proper cutout for the sink. Ruvati is not responsible for improper sink or countertop installation. Ruvati is not liable for any damages to sink or countertop or personal injury during installation.
Follow all local plumbing and building codes.
TOOLS REQUIRED
- Plumbers Putty
- Drill with Depth Stop
- Sink Mounting Clips
- Silicon Caulk
- Phillips Head Screwdriver
- Jigsaw or Keyhole Saw
- Pencil
- Sink Cut-Out Template
REVEAL
Alignment of sink to cutout is critical for a superior fit and finished look. This sink can be installed either with a 1/4″ reveal or a flush fit. Ruvati recommends 1/4″ Reveal. DO NOT INSTALL WITH AN OVERHANG.
1/4″ Reveal (Recommended): The countertop edge sits approximately 1/4″ back from the edge of the sink and exposes the rim of the sink.
Flush Fit (OK): The countertop meets the edge of the sink, fitting flush with the sink bowl.
Overhang (Don’t): The countertop extends over the edge of the sink on all sides.

INSTRUCTIONS
- Place template on countertop. Position it such that the sink will have proper clearance from cabinet.
- Trace a line around the template. Determine what “reveal” you want your sink to have (see previous page) and based on that, adjust the line accordingly. Cut along the line.
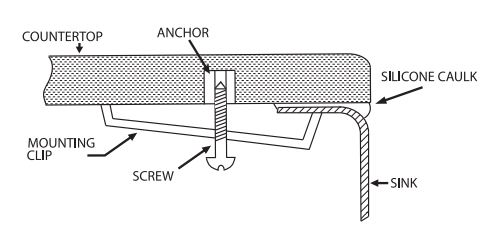
- Turn the countertop upside down, and mark evenly-spaced positions for the anchors for the mounting clip. We recommend 3 mounting clips for the longer sides (20″ or longer), and 2 mounting clips for the shorter sides.
- Drill holes for the anchors as shown below (follow countertop manufacturer’s instructions). Use a 3/s” drill bit with a ½” Depth Stop to avoid drilling through the countertop. Secure anchors into the countertop (use glue if needed) and fasten mounting clips to the anchors using the screws.
- Clean the underside of the countertop and the rim of the sink. Apply silicone caulk evenly around the rim of the sink.
- Place sink over the countertop opening. Tighten the screws until mounting clips are snug against sink.
- Check alignment of sink to countertop opening and move slightly if you have to.
- Tighten down clips evenly without overtightening. Remove excess silicone.
RUST SPOTS?
This sink is made ofT-304 stainless steel which can never rust. If you see rust spots in your sink, it’s due to external rust or iron particle contaminants. These rust particles attach to the sink surface, forming rust stains. Clean the rust stains with “Barkeeper’s Friend” cleaning powder and a dish scrubbing sponge. Scrub in the direction of the grain. Use toothbrush for corners and edges. Rinse thoroughly with water.
CARE AND MAINTENANCE:
- Clean regularly with normal detergent and warm water.
- Always make a habit of drying your sink after use and buffing with a soft cloth. This will ensure that no buildup of limescale or other mineral deposits can occur.
- Clean the sink once or twice a month using a nonabrasive cleanser such as Barkeeper’s Friend and a clean, soft sponge. Scrub in the same direction as the natural grain of the sink.
- Never let soap or other household cleaners dry on the surface of the sink. Most products contain additives which will affect the finish of the sink.
- Never use bleach solutions on the sink, as it is harmful to stainless steel. If left on the sink too long, it can cause surface pitting.
- Never use a steel wool pad to clean your sink. Doing so may damage the sin k’s surface and cause discoloration.
- Minor scratching of the sin k’s surface is extremely difficult to avoid and is not something to be unduly concerned about. These marks are usually only superficial and can be removed with a proprietary stainless steel cleaner.
- Use of rinse grids will reduce exposure of the bottom of the sink to scratches.
RUVATI LIMITED LIFETIME WARRANTY
This product has been manufactured and inspected to the highest possible quality standards. Ruvati sinks carry a limited lifetime warranty for residential use.
Should you experience any defects in materials or workmanship within the warranty period, we will repair or replace the defective product, subject to the following conditions:
- Any claim made under this warranty must include a copy of a valid proof of purchase showing the date and place of purchase.
- Our obligation under this warranty is to the original purchaser only, and may not be transferred.
- Product replacement does not include shipping costs or labor installation costs.
- This warranty applies to residential installations only.
- Ruvati reserves the right to examine product in question and its installation prior to replacement.
- If an identical replacement product is not available, Ruvati reserves the right to replace the defective product with a similar product.
NOTE: Accessories such as rinse grids, cutting boards, strainers are not covered by this warranty.
This warranty relates to defects in manufacture, materials or workmanship in a Ruvati stainless steelkitchen sink supplied for installation into domestic premises in the United States. It does not extend to :
- Damage resulting from failure to maintain the product in accordance with the Care and Maintenance instructions in this manual.
- Normal wear and tear, scratches or accidental damage.
- Faults arising from improper use and/or installation.
- Defects in accessories, strainers and rinse grids.
All incidental or consequential damages are specifically excluded. No additional warranties, express or implied are given, including but notlimited to, any implied warranty of merchantability or fitness for a particular purpose.
Some states do not allow the exclusion or limitation of incidental or consequential damages or limitations on how long an implied warranty lasts, so the above limitations or exclusions may not apply to you. This warranty gives you specific legal rights, and you may also have other rights which vary from state to state.
Register your product at: www.ruvati.com/register
![]()
Address: 2712 Meister Pl, Round Rock, TX 78664USA Phone: 1.855.478.8284Email: [email protected]
 report this ad
RUVATI USAwww.ruvati.com
[xyz-ips snippet=”download-snippet”]