
![]() THE CURSIBLEMANUAL
THE CURSIBLEMANUAL
THANK YOU FOR PURCHASING THE CRUCIBLE FROM SACRAMENT!THE CURSIBLE IS A 14HP 6 CHANNEL, MORPHING EFFECTS-SEND MATRIX WITH AN INCREDIBLE FEATURE SET AND A VAST AMOUNT OF APPLICATIONS FROM MORPHING / SEQUENCING THROUGH AND BLENDING EFFECTS THROUGH TO CADAVRE EXQUIS STYLE MIXING OF SOUND SOURCES OR CONTROL VOLTAGES. THE CURSIBLE FEATURES MULTIPLE MODES OF OPERATION INCLUDING:PIANO MODE: Send your signal through your effects chains manually via a momentary button push with user-defined fade times.CLOCK MODE : Sequence your signal through your effects chains via the clock input. Clock sub-modes include clockwise, counter-clockwise, pendulum and random sequencing options!CONTROL VOLTAGE MODE : Morph and switch your way through your effects via the control voltage input/attenuator using any CV source.MANUAL MODE : Select your routing using the central knob for a more hands-on approach.RANDOM MANUAL MODE : Randomly advance through your sequence with a turn of the central knob.CV + CLOCK MODE : Choose your routing destinations using a sample and hold style approach.FILL OPERATION : When sequencing through one effects chain at a time isn’t cutting it, use Fill to stack from 0 to all 6 sends and returns!All modes feature user-defined “morph” timing to allow you to adjust from click-less switching to long attack and decay times and everything in between.
SPECIFICATIONS :
* 14 HP* 52mA +12V* 26mA -12V
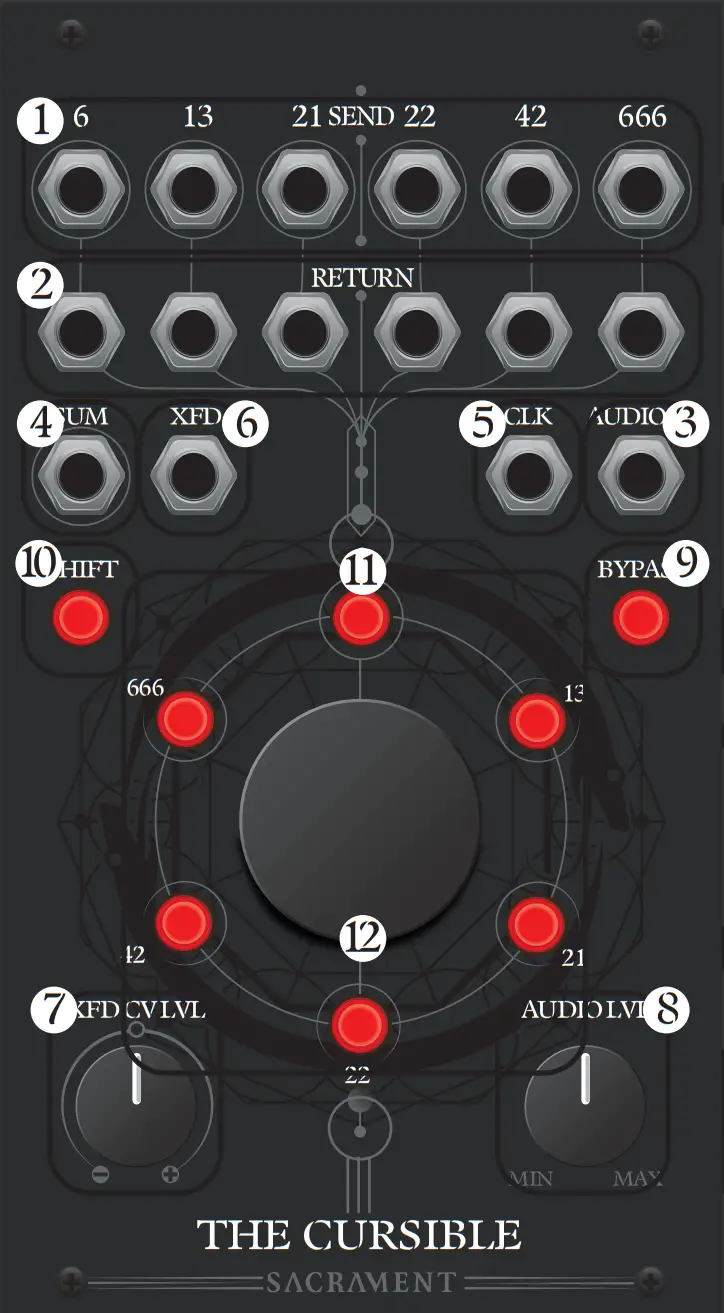
| 1. 6 send outputs (1)2. 6 return inputs (2)3. Audio/signal input (3)4. Sum audio/signal output (4)5. CLK clock input (5)6. XFD CV input (6) | 7. CV attenuator (7)8. Audio input attenuator (8)9. Bypass latching button (9)10. Shift function button (10)11. 6 central channel buttons (11)12. Central push-button encoder (12) |
APPLICATIONS FOR THE CURSIBLE INCLUDE :
Morphing your signal through 6 reverbs, delays, distortions, waveshapers, flangers, phasers, etc and truly creating your own sound.Sending your signal to 0-6 destinations in any order you want with adjustable fade times.Morphing through multiple sound sources to create an ever-evolving oscillator timbre.Morphing through multiple cv sources for an utterly unique, evolving voltage source.Sequencing oscillator “stacks” for rich, blooming soundscapes.And much, much more.
INSTALLATION :
Be sure that your Eurorack case is powered down prior to installation.Using the supplied IDC power cable, connect the module to an empty slot on your Eurorack bus board making sure that polarities aren’t inverted (-12 goes to -12). Once the power connections are secure, screw The Cursible into place before powering your system on.
GETTING STARTED :
When patching The Cursible for the first time, make sure you set it up by selecting which channels you intend to use, whether you want to use INDIVIDUAL or FILL modes (described below) and what MORPH settings (also described below) you’ll want to use. To do this, hold SHIFT and tap the first central channel button (labeled 6). The SHIFT button is now blinking. You are now in LATCHING mode and this is also where you’ll select which channels are active. Highlight any / all of the channels that you plan on using. Each central channel button corresponds to a SEND and RETURN channel (IE: button 1 {labeled 6} corresponds to SEND and RETURN channel 1 {also labeled 6}). If you intend to patch out to 6 effects and sequence through them, for example, you’ll want to make sure that all 6 buttons are highlighted in LATCHING mode first.
INDIVIDUAL AND FILL MODES :
By holding SHIFT and pressing the encoder knob, you can toggle between individual and fill modes. These only apply to the various sequencing modes listed above. Individual mode lets you sequence through the channels of The Cursible one at a time while fill mode acts as a parallel processing hub of sorts.In fill mode, we can “stack” one channel on top of another.
MORPH SETTINGS :
The Cursible has 6 Morph presets that change the curve shape, attack, and release times of the internal VCA’s. These can be selected by long-holding the SHIFT button for about two seconds. You will see one of the 6 central buttons highlighted. While continuing to hold SHIFT, turn the encoder knob to select one of the 6 MORPH presets. They are ordered in the shortest-to-longest configuration with 1 being the shortest and 6 being the longest.
THE CURSIBLE IS CAPABLE OF A LOT AND FEATURES QUITE A FEW MODES OF OPERATION THAT WE WILL LIST HERE :
PIANO MODEL: Piano mode is the default mode of The Cursible. You can access it by holding the encoder knob for 2 seconds. In Piano mode, the channel buttons act as momentary switches that turn the channels on while pressing and holding the buttons. This mode can be a great performance tool for live or improvised effects, audio, or CVrouting.LATCHING MODE: in this mode, you can select which channels are active. To do this, press SHIFT together with the 1st central channel button (labeled 6). The selected channels are activated when their buttons are pressed and turned off when the buttons are pressed again. Remember – the channels you select in LATCHING mode arealso, the ones that will be active in any of the following modes.MANUAL SEQUENCING MODE: After selecting which channels are active in LATCHING mode, we can use the MANUAL SEQUENCING mode by holding SHIFT and pressing the 2nd central channel button (labeled 13) to sequence through them using the encoder knob. The highlighted channel buttons are visual indicators of where thesequence is as you turn the encoder. (Try toggling between INDIVIDUAL and FILL modes here by holding SHIFT and pressing the encoder button).CV SEQUENCING MODE: By holding SHIFT and pressing the 3rd central channel button (labeled 21) you can enter CV SEQUENCING MODE. You can now use a CV source (IE: LFO, CV sequencer, envelope, etc.) to choose which channels are selected with +5v being the full span. You can use the CV attenuator to fine-tune your incoming CV sources (Again, the sequencing modes can only access the channels that are activated in LATCHING mode). INDIVIDUAL and FILL modes are both available here as well so be sure to toggle between them to see which you prefer by holding shift and pressing the encoder.RANDOM MANUAL SEQUENCING MODE: You can access RANDOM MANUAL SEQUENCING MODE by holding SHIFT and pressing the 4th central channel button (labeled 22). In this mode, you can randomly cycle through the channels by turning the encoder knob. This can be a lot of fun to inject some chaos and unpredictability into a patch.CLOCK DRIVE SEQUENCING MODE: We can access clock drive sequencing mode by holding shift and pressing the 5th central channel button (labeled 42). In clock drive sequencing mode we can patch a clock or other gate signal to the CLK input and sequence through the channels with each clock/gate pulse. It’s important to know that the clock drive has a sub-menu that allows us to select a sequence direction. We can access the sub-menu by holding shift, holding the 5th central channel button (labeled 42), and then turning the encoder knob to highlight one of the 4 sequence directions (1: FORWARD 2: BACKWARD 3:PENDULUM 4:RANDOM)CV + CLOCK SEQUENCING MODE: This is essentially a sample and holds in which the incoming CV can only select a new channel when a clock pulse is received at the CLK input. To enter CV + clock sequencing mode we can hold shift and press the 6th central channel button (labeled 666). Now we can apply a CV source to the CV inputand a clock or gate-source to the CLK input and The Crucible will select a channel based on the voltage level of the incoming CV when it receives a pulse at the CLK input.
PATCH EXAMPLES :
SEQUENTIAL EFFECTS MORPHING: Try patching an audio source to the audio input and then patch each of the send and returns into various effects modules (IE: patch send 6 to the audio input of and effects module and then patch the output of that effect into return 6).We can then sequence our signal through the effects modules sequentially by holding shift and tapping the 5th central channel button (labeled 42) to enter CLOCK DRIVE mode. Long holding shift + the 5th central channel button will give you access to the sequencer directions. 1 being forward, 2 being backward, 3 being pendulum and 4 being random. Now when patching a clock signal to the CLK input, The Cursible will morph your audio signal through your effects sequentially. Depending on the speed of your clock, you may want to adjust the morph settings by long-holding shift and then select a shorter or longer morph setting by highlighting one of the 6 presets (1 being shortest and 6 being the longest).PIANO CV PERFORMANCE: Tap shift once to enter piano mode then try patching 6 CV sources (IE: LFO’s, Envelopes, etc) into the 6 returns. Patch the sum output to the FM/cutoff CV input of your favorite filter or the 1v/o input of a VCO. Now when you press one of the central channel buttons, you’ll be routing the corresponding CV source to your destination.MORPHING CORPSE: Based on the classic cadavre exquis or exquisite corpse patch we can take any 6 sound sources and let The Cursible choose which of the sounds we are listening to. First, choose CLOCK DRIVE mode by holding shift then tapping the 5th central channel button (labeled 42). While holding shift and the 5th button, turnthe encoder knob to highlight the 4th central channel button (labeled 22) to set the sequencer in a random direction. Now try patching 6 sound sources into the 6 return inputs (I like to use multi-waveform oscillators such as DPO, Furthrrrr Generator, or Mindphaser but any sources will suffice). Now when you add a clock signal to the CLK input The Cursible will morph from one signal to the next in a random direction with each clock pulse. Depending on the speed of your clock, you may want to adjust the morph settings by long-holding shift and then turning the encoder knob to select a shorter or longer morph setting highlighting one of the 6 presets indicated on the central channel buttons(1 being shortest and 6 being the longest).6 CHANNEL MULTIPLE: Patching an audio or cv source to the audio input will multiply that signal across the 6 send outputs. When in any mode, try patching a 1v/o sequence to the audio input and then distributing it to the oscillators in your system.6 CHANNEL LATCHING MIXER: We can use The Cursible as a 6 channel mixer by first entering FILL MODE by holding shift and pressing down on the encoder knob and then patching up to 6 audio or CV sources into the RETURN inputs. Now enter LATCHING mode by holding shift and tapping the 1st central channel button (labeled 6) and now you’ll be able to choose which sounds are present at the SUM output by pressing and highlighting their channel buttons.SYNCED MODULATION SHIFTER: We can send up to 6 CV sources into the RETURN inputs, sequence through them using a clock signal, and send the resulting sum to a CV input of our choice. If we want a simple, 4 steps repeating pattern we can go into LATCHING mode by holding shift and tapping the 1st central channel button (labeled 6) and highlighting only the first 4 channel buttons (disable the 5th and 6th by giving them a tap). Now patch 4 of your favorite modulation sources (I like to use different synced LFO’s, envelopes, and S&H) into the first 4 RETURN inputs then enter CLOCK DRIVE mode by holding shift and pressing the 5th central channel button (labeled 42). Now patch a clock to the CLK input and The Cursible will sequence through your 4 modulation sources in sync with your patch. Try using different clock divisions for different patterns. I like to send the resulting CV pattern into filter cutoffs and 1v/o inputs on VCO’s.
report this ad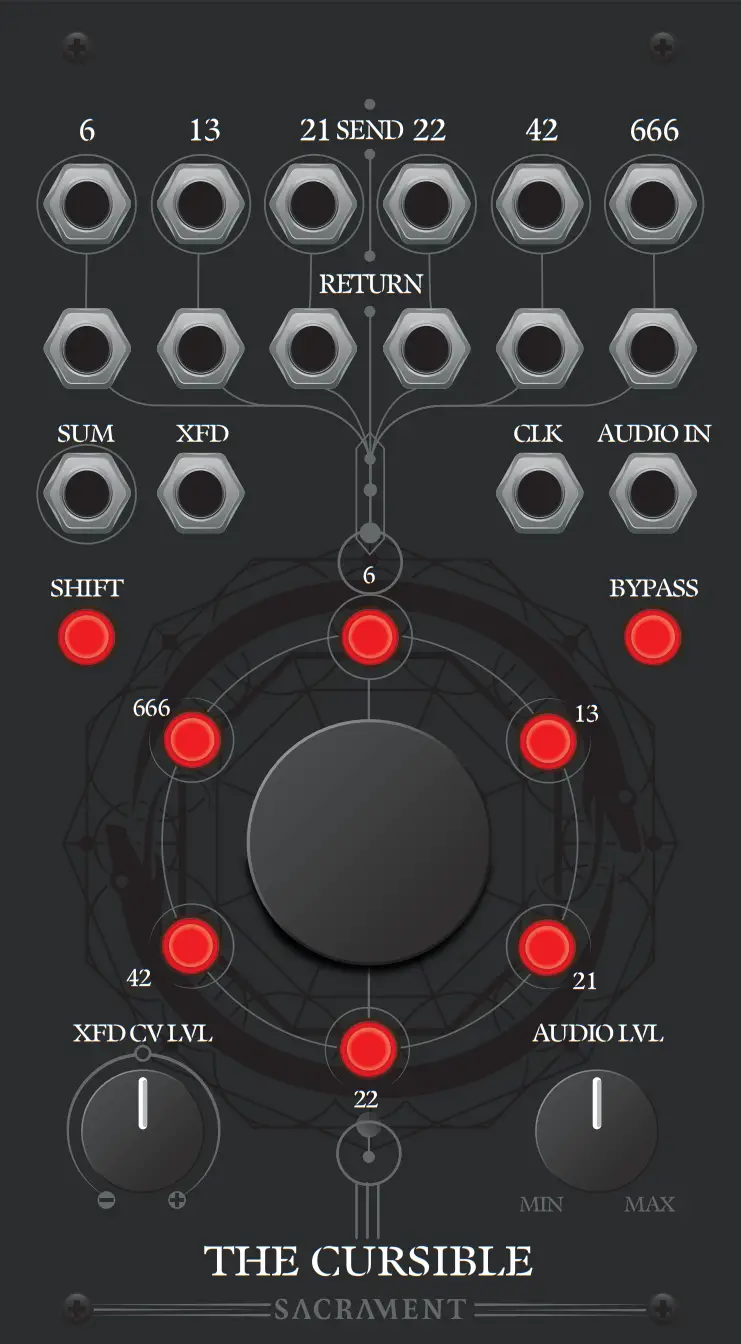
SAFETY INSTRUCTIONS
Please follow the following instructions to ensure that the module is used safely. This module is NOT intended for use in a humid or wet environment.Should liquids or other conducting substances get into the module, the module should be disconnected from mains power immediately, dried, examined, and cleaned by a qualified technician.
![]() Do not expose the module to temperatures above +50° C or below -20° C.If the module has been exposed to extremely low temperatures, leave it at room temperature for an hour before plugging it in.
Do not expose the module to temperatures above +50° C or below -20° C.If the module has been exposed to extremely low temperatures, leave it at room temperature for an hour before plugging it in.![]() Transport the module carefully, never let it drop or fall over. Warranty does not apply to modules with visual damage.
Transport the module carefully, never let it drop or fall over. Warranty does not apply to modules with visual damage.![]() The module has to be shipped in the original packaging only. Any module shipped to us for return, exchange, and/or warranty repair has to be in its original packaging. All other deliveries will be rejected and returned to you.Make sure you keep the original packaging and technical documentation.
The module has to be shipped in the original packaging only. Any module shipped to us for return, exchange, and/or warranty repair has to be in its original packaging. All other deliveries will be rejected and returned to you.Make sure you keep the original packaging and technical documentation.![]() This device complies with the EU guidelines and is manufactured RoHS conforming without the use of lead, mercury, cadmium, and chrome.Nevertheless, this device is special waste, and disposal in household waste is not recommended.
This device complies with the EU guidelines and is manufactured RoHS conforming without the use of lead, mercury, cadmium, and chrome.Nevertheless, this device is special waste, and disposal in household waste is not recommended.
The module is developed in collaboration with Erica Synths and is manufactured in Latvia.You will find the Sacrament terms of warranty at www.ericasynths.lvItems for return, exchange, and/or warranty repair must be registered at SUPPORT on www.ericasynths.lv and sent back to us according to the instructions on the support page.
Made in Latvia.User manual by Nero Bellum.Design by Ineta Copying, distribution, or any commercial use in any way is prohibited and requires written permission from Sacrament.Specifications are subject to change without notice.
References
[xyz-ips snippet=”download-snippet”]