![]() the AdjustaGrill & Press™Instruction Booklet
the AdjustaGrill & Press™Instruction Booklet
BGR250
WE RECOMMEND SAFETY FIRST
At Sage® we are very safety conscious. We design and manufacture appliances with your safety foremost in mind. In addition, we ask that you exercise a degree of care when using any electrical appliance and adhere to the following precautions.
IMPORTANT SAFEGUARDS
READ ALL INSTRUCTIONS BEFORE USE AND SAVE THEM FOR FUTURE REFERENCE
- Before using it for the first time please ensure that your electricity supply is the same as shown on the rating label on the underside of theappliance. If you have any concerns please contact your local electricity company.
- Your Sage® appliance includes a BS 13 amp moulded mains plug on the supply cord.
- Should you need to change this plug, please complete the rewiring as follows (after safe disposal of the molded plug).
- Please note that a cut-off plug inserted into a socket is a serious danger risk.
- Wires are colored as follows:− Blue = Neutral− Brown = Live− Green & Yellow = Earth
- As the colours of the wire may not correspond with the coloured markings which identify the terminals in your plug, please refer to the following:− The Blue wire must be connected to the terminal which is marked ‘
 ’.− The Brown wire must be connected to the terminal which is marked with the letter ‘L’.− The Green & Yellow wire must be connected to the terminal which is marked with the letter E or the earth symbol .
 - Please note that if a 13 amp plug is used, a 13 amp fuse should be used.
- Remove and safely discard any packaging material and promotional labels before using the grill for the first time.
- To eliminate a choking hazard for young children, remove and safely discard the protective cover fitted to the power plug of this appliance.
- Do not place the grill near the edge of a bench or table during operation. Ensure the surface is level, clean and free of water and other substances.
- Do not use the grill on a sink drainboard.
- Do not place the grill on or near a hot gas or electric burner, or where it could touch a heated oven.
- Position the grill at a minimum distance of 20cm away from walls, curtains, clothes, and other heat-sensitive materials.
- Always operate the grill on a stable and heat-resistant surface. Do not use on a cloth-covered surface, near curtains or other flammable materials.
- Always ensure the grill is properly assembled before use. Follow the instructions provided in this book.
- Do not place anything on top of the grill when the lid is closed, when in use, and when stored.
- Always switch the variable temperature control dial to the SANDWICH position, switch the grill off at the power outlet, then unplug the power cord and cool completely if the appliance is not in use, before cleaning, before attempting to move the appliance and when storing the appliance.
- Do not touch hot surfaces.Grill surfaces are hot during and after the operation.To prevent burns or personal injury, always use protective hot pads or insulated oven mitts, or use handles or knobs where available.
- When operating the grill, ensure the power cord is kept away from any heat source including the surface of the grill. Ensure the power cord does not become trapped between the upper and lower hot plates of the appliance during use and storage.
- Do not attempt to operate the grill by any method other than those described in this booklet. Do not leave the grill unattended when in use.
- Do not use harsh abrasives, caustic cleaners or oven cleaners when cleaning this grill. Keep the appliance clean and refer to the care and cleaning section.
IMPORTANT SAFEGUARDS FOR ALL ELECTRICAL APPLIANCES
- Fully unwind the power cord before use.
- Connect only to 230V power outlet.
- Do not let the power cord hang over the edge of a bench or table, touch hot surfaces or become knotted.
- To protect against electric shock do not immerse the power cord, power plug or appliance in water or any other liquid.
- This appliance can be used by children aged 8 years and above if they have been given supervision or instruction concerning the use of the appliance in a safe way and they understand the hazards involved.
- Cleaning and user maintenance should not be made by children unless theyare aged 8 years and above and are supervised.
- Keep the appliance and its cord out of reach from children aged less than 8 years.
- Children should not play with the appliance.
- This appliance can be used by people with reduced physical, sensory or mental capabilities or lack of experience and knowledge if they have been given supervision or instruction concerning use of the appliance in a safe way and understand the hazards involved.
WE RECOMMEND SAFETY FIRST
- The appliance should be positioned in a stable situation with the handles positioned to avoid spillage of oil.
- Surfaces are liable to get hot during use.
- Do not use the appliance if power cord, power plug or appliance becomes damaged in any way. If damaged or maintenance other than cleaning is required, please contact Sage ® Customer Service on 0808 178 1650 or go to sageappliances.com.
- This appliance is for household use only.Do not use this appliance for anything other than its intended use.Do not use in moving vehicles or boats.Do not use outdoors.Misuse may cause injury.
- The installation of a residual current device (safety switch) is recommended to provide additional safety protection when using electrical appliances. It is advisable that a safety switch with a rated residual operating current not exceeding 30mA be installed in the electrical circuit supplying the appliance.See your electrician for professional advice.
- Always turn the appliance to the OFF position, switch off at the power outlet and unplug at the power outlet when the appliance is not in use.
- Before cleaning, always turn the appliance to the OFF position, switch off at the power outlet, unplug at the power outlet and remove the power cord, if detachable, from the appliance and allow all parts to cool.
- The appliance is not intended to be operated by means of an external timer or a separate remote control system.
- Regularly inspect the supply cord, plug, and actual appliance for any damage. If found damaged in any way or maintenance other than cleaning is required, immediately cease use of the appliance and contact Sage® Customer Service on 0808 178 1650.
- Do not place this appliance on or near a heat source, such as a hot plate, oven, or heater.
- Position the appliance at a minimum distance of 20cm away from walls, curtains and other heat or steam sensitive materials and provide adequate space above and on all sides for air circulation.
![]() IMPORTANTFully unwind the power cord before use. Ensure the appliance is fully cooled before storing the power cord inside the control box.
IMPORTANTFully unwind the power cord before use. Ensure the appliance is fully cooled before storing the power cord inside the control box.
![]() The symbol shown indicates that this appliance should not be disposed of in normal household waste. It should be taken to a local authority waste collection center designated for this purpose or to a dealer providing this service. For more information, please contact your local council office.
The symbol shown indicates that this appliance should not be disposed of in normal household waste. It should be taken to a local authority waste collection center designated for this purpose or to a dealer providing this service. For more information, please contact your local council office.
 This appliance is marked with a hot surface symbol, the lid and the outer surface will be hot when the appliance is operating and for some time after use.
SAVE THESE INSTRUCTIONS
GETTING TO kNOW YOUR NEW APPLIANCE
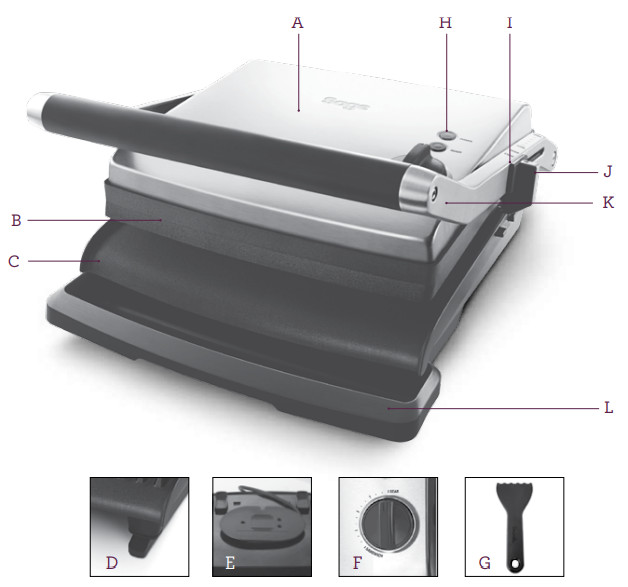
A. 2200 watt elementFast heat up and quick searing and toasting.B. Floating hinged top plateAutomatically adjusts to thick or thin meats, seafood, vegetables and sandwiches.C. Durable non-stick cooking platesD. Angle adjust non-slip feetE. Cord storageConveniently wraps in base.F. Variable temperature control dialSear steaks in minutes or toast gourmet café-style sandwiches.G. Cleaning spatulaH. POWER and READY lightsI. Adjustable height controlWith 7 settings to suit grilling preferences. Locking storage clipLock the plates closed for convenient upright storage.K. Heavy-duty die-cast armsL. Removable drip trayDishwasher safe.
OPERATING YOUR NEW APPLIANCE
BEFORE FIRST USERemove and safely discard any packaging material or promotional labels before using your grill for the first time. Check that the cooking plates are clean and free of dust. If necessary, wipe over with a soft damp cloth. Dry thoroughly.
NOTEWhen using the grill for the first time you may notice a fine smoke haze.This is caused by the heating of some of the components. There is no need for concern.
The grill can be used as a grill for searing meats and vegetables or as a sandwich press for toasting bread and focaccias. It also features an adjustable height control feature which allows you to fix the top plate to a range of positions above the bottom plate.
TO USE AS A GRILL
- Insert the power plug into a 230/240V power outlet and turn the power ON.The red POWER light will illuminate.
- Turn the variable temperature control to SEAR for fast heat up. Allow the grill to pre-heat with the top cooking plate in the closed position until the green READY light illuminates.
- When the grill has preheated, place the foods to be cooked onto the bottom cooking plate. Always place foods towards the rear of the bottom cooking plate.NOTEThe grill can be used to cook foods in the open or closed position.
- Close the top cooking plate. The top cooking plate has a floating hinge that is designed to evenly press down on food. The top plate must be fully lowered to achieve grill marks on the selected foods.
- Grilling times will depend on the food being cooked. Refer to Grilling Guide (page 12).
- Once food is cooked, use the handle to open the grill and raise the top cooking plate. Remove food with the help of a plastic or wooden spatula.Never use metal tongs or a knife as these can cause damage to the non-stick coating.

NOTEAlways allow the grill to pre-heat until the green READY light illuminates.
![]() WARNINGFully unwind the power cord from the cord storage facility before use.
WARNINGFully unwind the power cord from the cord storage facility before use.
GETTING TO kNOW YOUR NEW APPLIANCE
TO USE AS A SANDWICH PRESS
- Insert the power plug into a 230/240V power outlet and turn the power ON.The red POWER light will illuminate.
- Turn the variable temperature control to the SANDWICH setting. Allow the grill to preheat with the top cooking plate in the closed position until the green READY light illuminates.
- When the sandwich press has pre-heated, place the sandwich onto the bottom cooking plate. Always place sandwiches towards the rear of the bottom cooking plate.NOTEThe grill can be used to cook foods in the open or closed position.
- Close the top cooking plate. The top cooking plate has a floating hinge that is designed to evenly press down on the sandwich. The top plate must be fully lowered to cook sandwiches.
- Toasting should take approximately 5–8 minutes. The exact roasting time will be a matter of taste. It will also depend on the type of bread and type of filling used.
- Once the sandwich is cooked, use the handle to open the grill and raise the top cooking plate. Remove the sandwich with the help of a plastic or wooden spatula. Never use metal tongs or a knife as these can cause damage to the non-stick coating.
USING THE ADJUSTABLE GRILLINGHEIGHT CONTROL FEATUREThe adjustable height control feature allows you to fix the top plate to a range of positions above the bottom plate. This allows your grill to be used to grill delicate ingredients such as fish and hamburger buns without squashing. It can also be used for toasting open sandwich melts and snacks where you don’t need to apply the height of the top plate.
- Turn the variable temperature control to SEAR or SANDWICH setting and allow the grill to pre-heat until the green READY light illuminates.
- Place food to be grilled or your sandwich to be melted on the bottom plate.
- Move the adjustable height control clip on the right-hand side of the grill to the desired height.
- Slowly lower the top plate until it rests on the adjustable height control clip.
- The top plate will radiate the desired heat to lightly grill foods or melt ingredients such as cheese. Grilling and toasting times will be a matter of taste. It will depend on the height of the top plate.

NOTEThe adjustable height control can be moved to accommodate thick or thin foods by sliding the clip forwards or backward along the arm.
GETTING TO KNOW YOUR NEW APPLIANCE
USING THE ANGLE ADJUSTNON-SLIP FEETYour grill features unique extendable feet which are designed to level the bottom plate when cooking foods such as sausages.This ensures the sausages do not roll off the hotplate but still drain the maximum amount of fat while cooking.
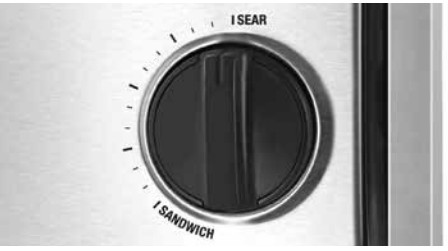
VARIABLE TEMPERATURECONTROL DIALThe grill features a variable temperature control dial which allows a variety of foods to be cooked. With the dial set on SEAR, the temperature is correctly suited to grill meats or other foods.

With the dial set on SANDWICH, the temperature is correctly suited to toasting sandwiches. The variable temperature control dial allows you to select a setting suited to the foods which are being cooked.
HINTS FOR BEST RESULTS FORGRILLING MEATFor best grilling results use meat cuts that are thick enough to touch the top and baseplate when the grill is closed.
|
RECOMMENDED CUTS |
|
| Beef | • Sirloin (New York), Rump, Rib Eye (Scotch Fillet), Fillet. |
| Lamb | • Trim Lamb Leg Steaks, Fillet, Eye of Loin, Cutlets, and Diced Lamb. |
| Pork | • Butterfly loin Steaks, Spare Ribs, Leg Steaks, Fillets, Diced Pork. |
GRILLING GUIDE
Contact grilling is a healthy and efficient way to cook. The cooking times are approximate due to variances in ingredient thickness. It is not recommended to cook items with thick bones such as T-bone steaks.
| INGREDIENT AND TYPE | COOKING TYPE |
| Beef sirloin steak | 3 minutes for medium-rare 5-6 minutes for well done |
| Beef minute steak | 1-2 minutes |
| Beef hamburger patties | 4-6 minutes |
| Pork scotch fillet | 4-6 minutes |
| Pork loin steaks | 4-6 minutes |
| Pork fillet | 4-6 minutes |
| Lamb loin | 3 minutes |
| Lamb cutlets | 4 minutes |
| Lamb leg steaks | 4 minutes |
| Chicken breast fillets | 6 minutes or until cooked through |
| Chicken thigh fillets | 4-5 minutes or until cooked through |
| Sausages thin | 3-4 minutes |
| Sausages thick | 6-7 minutes |
| Sandwich or Foccacia | 3-5 minutes or until golden brown |
| Vegetables sliced 1cm thick — eggplant | 3-5 minutes |
| Vegetables sliced 1cm thick — zucchini | 3-5 minutes |
| Vegetables sliced 1cm thick — sweet potato | 3-5 minutes |
| Seafood: Fish fillets | 2-4 minutes |
| Seafood: Fish cutlets | 3-5 minutes |
CARE & CLEANING
Before cleaning, switch the power off at the power outlet and then remove the power plug. Allow your grill to cool before cleaning. The grill is easier to clean when slightly warm.Always clean your grill after each use to prevent a build-up of baked-on foods.Wipe cooking plates with a soft cloth to remove food residue. For baked-on food residue squeeze some warm water mixed with detergent over the food residue then clean with a non-abrasive plastic scouring pad.CLEANING THE DRIP TRAYRemove and empty the drip tray after each use and wash the tray in warm, soapy water. Avoid the use of scouring pads or harsh detergents as they may damage the surface.Rinse and dry thoroughly with a clean, soft cloth and replace.Alternatively, the drip tray can be cleaned in the dishwasher.DURABLE NON-STICk COATINGCooking on a non-stick surface minimizes the need for oil, food does not stick and cleaning is easier. Any discoloration that may occur will only detract from the appearance of the grill and will not affect the cooking performance. When cleaning the non-stick coating, do not use metal (or other abrasive) scourers. Wash with warm soapy water. Remove stubborn residue with a non-abrasive plastic scouring pad or nylon washing brush.
NOTEThe cooking plates are coated with a non-stick surface, do not use abrasives.
NOTEDo not use spray-on nonstick coatings as this will affect the performance of the non-stick surface on the cooking plates.
STORAGETo store your grill:
- Switch off the grill and unplug the power cord from the power outlet.
- Allow the grill to fully cool.
- Slide the height control clip towards the front handle to the LOCK position so that the top and bottom cooking plates are locked together.
- Click the removable drip tray into place.
- Wrap the power cord in the cord storage area below the grill.
- Store on a flat, dry-level surface.
NOTEThe storage clip should not be used o clamp down the top plate when food is on the grill.
![]() WARNINGDo not immerse any part of the grill in water or any other liquid.
WARNINGDo not immerse any part of the grill in water or any other liquid.
STARTER RECIPES FROM SAGE®
LEMON, THYME & GARLIC CHICkENServes 4
INGREDIENTS
1 clove garlic, crushed1 tablespoon chopped fresh thyme Juice and zest of a lemon 40mls extra virgin olive oilSea salt and freshly ground black pepper4 chicken breast fillets
METHOD
- Combine garlic, thyme, zest and juice, and olive oil and mix well.
- Place chicken into a non-reactive dish and pour prepared marinade over.Allow standing for 30 minutes.
- Pre-heat grill using SEAR setting until the green READY light illuminates.
- Place chicken on preheated grill and allow the top plate to gently rest on chicken. Cook for 4–5 minutes until chicken is cooked through.
- Remove and allow to rest, loosely covered with foil for 5 minutes before serving. Serve with fresh salad leaves or steamed vegetables.
CHILLI, ROSEMARY & SOY LAMB FILLETServes 4
INGREDIENTS1 clove garlic, crushed1 Bird’s-eye chili, finely chopped1 tablespoon, chopped fresh rosemary50mls light soy sauce100mls extra virgin olive oilSea salt and freshly ground black pepper2 x 300g lamb fillets
METHOD
- Combine garlic, chili, rosemary, soya sauce, and olive oil and in a large mixing bowl.
- Add lamb and season with salt and pepper; toss to coat evenly and marinate for 30 minutes.
- Pre-heat grill using SEAR setting until the green READY light illuminates.
- Place lamb on preheated grill and allow the top plate to rest lightly on a lamb. Cook for 4–5 minutes or until cooked to your liking.
- Remove and allow to rest, loosely covered with foil for 5 minutes before serving.
ITALIAN FOCACCIAServes 2INGREDIENTS1 large focaccia2 tablespoons pesto1–2 Roma plum tomatoes, sliced150g thinly sliced Parma ham3 pieces marinated artichokes in oil, drained and sliced100g bocconcini cheese, drained and sliced½ medium red onion, thinly slicedSea salt and freshly ground pepper
METHOD
- Pre-heat grill using SANDWICH setting until the green READY light illuminates.
- Cut focaccia in half to form a sandwich.Spread base with pesto evenly and place tomatoes on top.
- Lay Parma ham over the tomatoes and top with artichoke, bocconcini, and red onion slices. Season with salt and pepper.
- Place focaccias on the bottom plate of the preheated grill and lower top plate.Cook 6–8 minutes or until golden, crisp and heated through. Cut into portions and serve immediately.
SMOkED SALMON TurkishTOASTED PIDEServes 4INGREDIENTS1 large Turkish pide, halved and split in half250g cream cheese2 tablespoon lime juice1 tablespoon drained capers, coarsely chopped2 tablespoons freshly chopped dillFreshly ground black pepper, to taste3 courgettes, ribboned with a vegetable peeler400g smoked salmon
METHOD
- Pre-heat grill using SANDWICH setting until the green READY light illuminates.
- Combine cream cheese, lime juice, capers, dill, and pepper. Spread base of Turkish bread with cream cheese mixture. Top with courgette ribbons and salmon. Season with freshly ground black pepper and cover with lid.
- Place on the bottom plate of the preheated grill and lower top plate and cook until golden, crisp, and heated through approximately 5–8 minutes.Slice and serve immediately.
BRG Appliances LimitedUnit 3.2, Power Road Studios, 114 Power Road, London, W4 5PYFreephone (UK Landline): 0808 178 1650Mobile Calls (National Rate): 0333 0142 970
![]()
Registered in Germany No. HRB 81309 (AG Düsseldorf).Registered in England & Wales No. 8223512.Aufgrund kontinuierlicher Produktverbesserungen kann das auf dieser Verpackung dargestellte Produkt leicht vom tatsächlichen Produkt abweichen.Due to continued product improvement, the products illustrated or photographed in this document may vary slightly from the actual product.Copyright BRG Appliances 2017.BGR250 – A18
References
[xyz-ips snippet=”download-snippet”]