
![]()
the Sage Smart Tea Infuser™BTM700/STM700
SAGE® RECOMMENDS SAFETY FIRSTAt Sage® we are very safety-conscious. We design and manufacture consumer products with the safety of you, our valued customer, foremost in mind. In addition, we ask that you exercise a degree of care when using any electrical appliance and adhere to the following precautions.
IMPORTANT SAFEGUARDS
READ ALL INSTRUCTIONS BEFORE USE AND SAVE FOR FUTURE REFERENCE
- A downloadable version of this document is also available at sageappliances.com
- Before using it for the first time please ensure that your electricity supply is the same as shown on the rating label on the underside of the appliance. If you have any concerns, please contact your local electricity company.
- Remove and safely discard any packaging materials before first use.
- To eliminate a choking hazard for young children, safely discard the protective cover fitted to the power plug.
- This appliance has been designed specifically for the purpose of heating and boiling quality drinking water and tea only. Under no circumstances should this product be used to heat or boil any other liquids or foodstuffs.
- Position the appliance on a stable, heat resistant, level, dry surface away from the edge and do not operate on or near a heat source such as a hot plate, oven, or gas hob.
- Do not place the appliance on or near a hot gas burner, electric element or where it could touch a heated oven.
- Position the appliance at least 20cm from walls or heat/steam sensitive materials and provide adequate space above and on all sides for air circulation.
- Do not operate the kettle on the sink drainboard.
- Always ensure the appliance is properly assembled before connecting to a power outlet and operating. Follow the instructions provided in this book.
- The installation of a residual current safety switch is recommended to provide additional safety when using all electrical appliances. Safety switches with a rated operating current of not more than 30mA are recommended. Consult an electrician for professional advice.
- The glass jug must be used only with the power base supplied.Do not use on a range top.
- The appliance is not intended to be operated by means of an external timer or separate remote control system.
- Do not touch hot surfaces. Use the handle for lifting and carrying the glass jug.
- Attach the jug lid securely to the glass jug before operation.
- Do not place anything on top of the lid.
- Do not open the jug lid during operation as scalding may occur.
- Extreme caution must be used when moving the glass jug containing hot liquid.
- Use caution when pouring water from the glass jug as boiling water and steam will scald. Do not pour the water too quickly.
- To avoid scalding, never fill the glass jug past the ‘MAX’ line marking.
- Do not operate the appliance without water. Always fill the glass jug to at least the ‘MIN’ marking. Should it be operated without water, the boil-dry protection will shut the power off automatically. Allow the appliance to cool before refilling.
 WARNING
- Do not remove the glass jug from the power base during heating or when the basket is in operation.Ensure the appliance has completed the water heating or tea brewing cycle before removing the glass jug from the power base.
- The use of accessory attachments not recommended by Sage ®may result in fire, electric shock or injury to persons.
- Always ensure the appliance is turned OFF, unplugged at the power outlet and has been allowed to cool before cleaning, attempting to move or storing.
- When the appliance is not in use or when left unattended, disconnect the power cord from the wall outlet.
- Allow the appliance to cool down in between brewing cycles.
- Keep the glass jug clean. Follow the cleaning instruction provided in this book.
- Do not use harsh abrasives or caustic cleaners when cleaning this appliance.
- Children should not play with the appliance.
- The glass jug has been specially treated to make it stronger, more durable, and safer than ordinary glass, however, it is not unbreakable. If dropped or struck extremely hard, it may break or weaken, and could at a later time shatter into many small pieces without apparent cause.
- Any maintenance other than cleaning should be performed by an authorized Sage® service center.
- The appliance can be used by children aged 8 or older and persons with reduced physical, sensory or mental capabilities or a lack of experience and knowledge, only if they have been given supervision or instruction concerning use of the appliance in a safe way and understand the hazards involved.
- Children should not play with the appliance.
- Always turn the appliance to the OFF position, switch off at the power outlet and unplug at the power outlet when the appliance is not in use.
WARNING
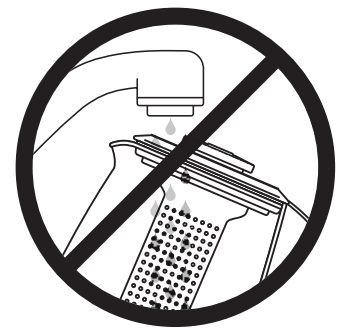
- Do not wash jug exterior under running water.
IMPORTANT SAFEGUARDS FOR ALL ELECTRICAL APPLIANCES
- Fully unwind the power cord before operating.
- This appliance is for household use only. Do not use the appliance for anything other than its intended use. Do not use in moving vehicles or boats. Do not use outdoors. Misuse may cause injury.
- Do not let the power cord hang over the edge of a bench or table, touch hot surfaces or become knotted.
- Close supervision is necessary when any appliance is used by or near children.
- Cleaning of the appliance should not be carried out by children unless they are 8 years or older and supervised.
- The appliance and its cord should be kept out of reach of children aged 8 years and younger.
- Do not use the appliance if the power cord, power plug, or appliance becomes damaged in any way. If damaged and maintenance other than cleaning is required please contact Sage Customer Service or go to sageappliances.com
WARNING
- Do not operate the appliance on an inclined surface.
- Do not move the appliance while it is switched on.
 The symbol shown indicates that this appliance should not be disposed of in normal household waste. It should be taken to a local authority waste collection center designated for this purpose or to a dealer providing this service. For more information, please contact your local council office.
 To protect against electric shock, do not immerse the glass jug base, power base, power cord, or power plug in water or allow moisture to come in contact with these parts. Avoid spilling water onto the power base’s connector. Do not immerse the glass jug or the power base for cleaning.
SAVE THESE INSTRUCTIONS
 Components
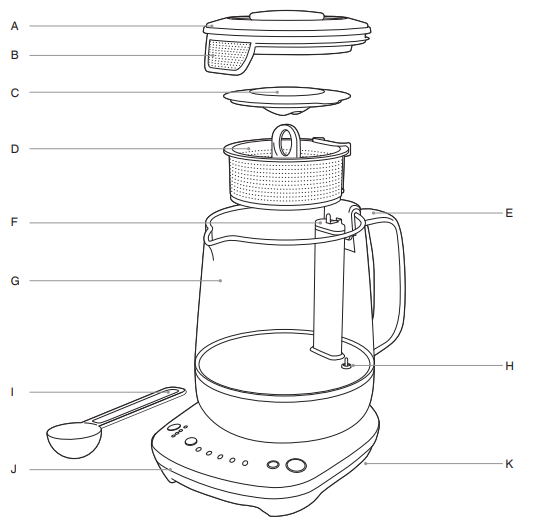
| A. Jug LidB. Scale FilterC. Tea Basket LidD. Tea BasketE. HandleF. Jug Post | G. Glass Jug1000ml water max. 800ml tea max.H. Immersed Temperature SensorI. Tea ScoopJ. Power BaseK. Cord StorageConcealed under power base. |
![]() Rating Information220–240V ~ 50-60Hz 1380W-1600W
Rating Information220–240V ~ 50-60Hz 1380W-1600W
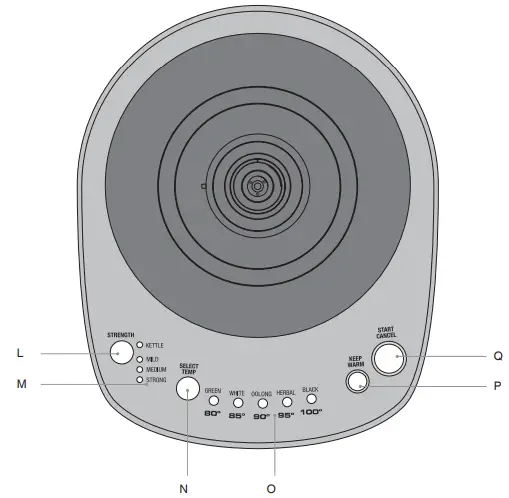
| L. STRENGTH buttonPreset brew times are recommended for mild, medium and strong brews of each tea type.M. Tea strength indicatorN. SELECT/TEMP buttonSelect the tea type/brew temperature recommended for green, white, oolong,herbal and black teas. | O. Temperature/tea type indicatorP. KEEP WARM buttonKeeps brewed tea or heated water warmfor up to 60 minutes.Q. START/CANCEL buttonStarts and stops the heating cycle. |
Functions
 Functions
BEFORE FIRST USEIn order to remove any dust or protective residues from the manufacturing process, it is recommended to run a boiling cycle then discard the water.
- Remove and safely discard any packing material, promotional labels, and tape from the Tea Maker™ Compact.
- Remove the jug lid then remove the tea basket from the magnetic jug post within the glass jug. Wash the jug lid, tea basket, basket lid, and tea scoop in warm soapy water with a soft sponge; rinse and dry thoroughly. WARNINGNever immerse the base of the glass jug, the power base, power cord, or power plug in water or allow moisture to come in contact with these parts.
- Place the power base on a flat, dry surface.
- Without the tea basket in place, fill the glass jug to the WATER MAX marking (1000ml) and place on the power base.Securely fit the jug lid onto the glass jug. WARNINGNever fill the glass jug with chilled water.Allow the Sage Smart Tea Infuser™ to cool before refilling. WARNINGFilling past the MAX line may result in serious burns or injuries as a result of overflowing hot or boiling water. Filling below the MIN line will result in the Sage Smart Tea Infuser™ switching off before the water has boiled or reached the selected temperature.
- Unwind the power cord completely and insert the power plug into a grounded wall outlet.
- Use the SELECT/TEMP button to select BLACK / 100°, then select the START/ CANCEL button. The light will change from red to white, indicating that the heating cycle is in progress.
- Once the water has reached the selected temperature, the tea maker will beep once.
- Discard the water. The Tea Maker™ The compact is now ready for use.
BREWING TEA
- Fill the glass jug with the desired amount of water. Ensure that you fill past the MIN mark and equal to or below the MAX mark. Note the MAX mark when brewing tea is 800ml.
- Place the tea basket on a flat, dry surface.Remove the basket lid by lifting it from the sides.
- Use the provided tea scoop to fill the tea basket with tea leaves. As a general guide, use 1 scoop of tea per cup / 250ml of water; however, this will depend on the tea instructions and your personal preference.Water to tea scoop ratio
500mL 2 scoops 750mL 3 scoops - Replace the basket lid and ensure it is securely clipped into place.
- Attach the tea basket to the jug post inside the glass jug.
- Replace the jug lid securely onto the glass jug, ensuring the filter aligns with the jug spout.


SELECTING THE TEA TYPE
- The tea type determines the brew temperature. The Tea Maker™ Compact has 5 preset tea types recommend for optimal brewing of Green, White, Oolong, Herbal and Black teas.
TEA TYPE Green White Oolong Herbal Black Preset Brew Temp 80°C 85°C 90°C 95°C 100°C Strength(mins) Mild 2 3 3 4 3 Medium 3 4 4 5 4 Strong 4 5 5 6 5 NOTEThis product is not calibrated for commercial or scientific use. Temperatures may vary -+3°C, which is within range for optimal brewing for each tea variety. - Press the SELECT / TEMP button until the desired tea/temperature is illuminated.The desired brew strength determines the brew times. The correct brew time depends on the tea type and your personal preference of strength. The Tea Maker™ Compact allows you to choose from mild, medium, and strong tea brews.
- Press the STRENGTH button to select the desired strength/steeping time. Refer to the TEA TYPE table above for steeping times. Selecting the kettle setting will boil water to the desired temperature but will not operate the tea basket.
- Press the START / CANCEL button to start heating.
- Once the selected brew temperature is reached, the tea basket will automatically lower into the heated water. It will stay in this position until the brew time has lapsed.
- At the end of the tea brewing cycle, the tea basket will automatically rise to the top of the glass jug to prevent over-brewing. Thetea alert will sound 3 times, to indicate your tea is ready.
WARNINGThe tea basket is hot to touch after the tea is brewed. Ensure that the tea basket handle has cooled before handling.
KEEP WARM
If selected prior to heating, Keep Warm will last for 30 minutes after tea is brewed. When the glass jug is removed from the power base, the Keep Warm function will cancel.To reactivate for another 30 minutes place the glass jug with the remaining tea back on the power base and press KEEP WARM, the light will illuminate when this is selected.
BOILING WATERTo boil water, remove the tea basket and fill the glass jug with water. Replace the jug lid and place the glass jug on the power base.Select the desired temperature by pressing the SELECT / TEMP button then press the STRENGTH button to select KETTLE.
Care & Cleaning
 Care & Cleaning
CLEANING THE GLASS JUG
- After each use, empty the glass jug.Do not allow brewed tea to stand overnight.Allow the glass jug to fully cool before cleaning.
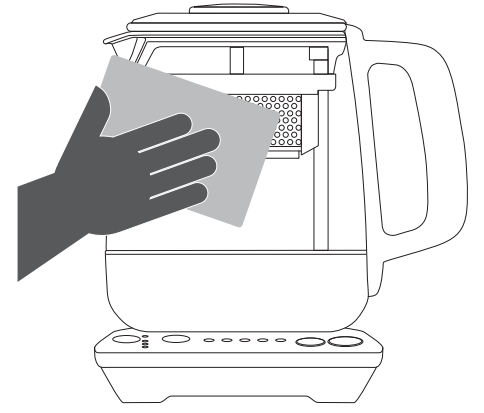
- Wipe the interior of the glass jug with a soft damp sponge or rinse with warm water.
- Wipe the exterior of the glass jug with a soft damp cloth to clean.
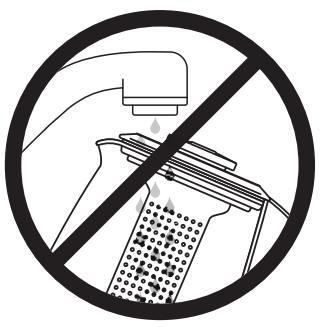
WARNINGNever immerse or wash the exterior of the glass jug under running water.
 WARNINGNever immerse the base of the glass jug, power base, power cord or power plug in water or allow moisture to come in contact with these parts.
 NOTEDo not use chemicals, steel wool, or abrasive cleaners to clean the inside or outside of the glass jug as these may scratch the surface.
- To remove the build-up of tannin; the astringent chemical constituent of tea, remove the tea basket, fill the glass jug with water up to the MAX mark, bring water to the boil and allow to cool for one minute.Add the contents of the Sage Tea Maker Cleaner (available on the Sage web page) and allow it to stand for 5 minutes.Empty tea maker, refill with fresh water, and bring water to a boil. Repeat this step again then rinse the inside of the glass jug thoroughly. Dry thoroughly with a soft, lint-free cloth before using.
NOTEThrough regular use over time, scale build-up can affect the performance and the life of the Tea Maker™ Compact. Lime and phosphate are common forms of scale that can damage your Sage Tea Maker™ Compact. Limescale, a harmless mineral, comes in the appearance of white-colored or rusty-looking build-up on the inner walls and inner base of the glass jug. The phosphate scale can’tbe seen; however, it can cause the water to appear cloudy when heated. To prevent scale from damaging your Tea Maker™ Compact,ensure to descale the glass jug regularly. Use the Sage Descaler (available at Sage web page) and follow the instructions. WARNINGCauses skin irritation. Wash hands thoroughly after handling. Wear protective gloves/protective clothing/eye protection/ face protection. NOTEAllow all parts of the Tea Maker™ Compact to cool completely before disassembling and cleaning. WARNINGNever immerse the base of the glass jug, jug lid, power base, power cord or power plug in water or allow moisture to come in contactwith these parts.
CLEANING THE BASKET
- Wash the basket lid and tea basket in warm, soapy water with a soft sponge, then rinse and dry thoroughly.
- A non-abrasive liquid cleanser or mild spray solution may be used to avoid the build-up of stains on the basket. Apply the cleaner to the sponge, not directly onto the basket surface, before cleaning.
- Let all surfaces dry thoroughly before using.
CLEANING THE POWER BASE
- Wipe the power base with a soft damp sponge.
- Let all surfaces dry thoroughly prior to inserting the power plug into the wall outlet.
STORAGE
- Ensure the Sage Smart Tea Infuser™ is switched off, cleaned, and dried before storing.
- Ensure that the tea basket is correctly assembled.
- Ensure that the jug lid is securely in place on the glass jug.
- Wrap the power cord around the power cord storage under the power base.
- Store the Sage Smart Tea Infuser™ upright on the power base. Do not store anything on top.
Troubleshooting
 Troubleshooting
| PROBLEM | WHAT TO DO |
| The Tea Maker™ Compactdoes do not switch on | • Check the power plug is securely inserted into the outlet.• Insert the power plug into an independent outlet.• Insert the power plug into a different outlet.• Reset the circuit breaker if necessary.• For additional safety the Tea Maker™ Compact is fitted with a thermal cut-out. In the event of severe overheating, the Tea Maker™ Compactwill automatically shut down to prevent further damage |
| The Tea Maker™ Compactpower base does notilluminate and functionscannot be selected. | • Remove the power plug from the wall outlet, then reinsert. Remove and replace the glass jug from the power base. All buttons should now illuminate and the Tea Maker™ Compact is ready for use. |
| The Tea Maker™Compact does not work | • Check the glass jug is securely positioned on the power base. |
| I cannot select acertain function | • Certain features cannot be selected or changed during the heating or brewing cycle. LED lights surrounding the buttons will indicate the availability of the functions. |
| After boiling water,bubbles appear aroundthe temperature sensor | • This is normal for the functionality of the Tea Maker™ Compact. |
| My tea tastes tooweak or too strong | • Ensure the correct strength was selected prior to brewing.• Follow the cleaning instructions in this booklet. |
| The tea basket isnot moving | • The tea basket will not move during the heat-up cycle.• The tea basket will only start moving once the selected temperature has been reached. The tea basket will remain lowered until the steeping time has passed.• Remove the plug from the wall outlet, wait 10 seconds then reinsert theplug. |
Guarantee

2 YEAR LIMITED GUARANTEESage Appliances guarantees this product for domestic use in specified territories for 2 years from the date of purchase against defects caused by faulty workmanship and materials. During this guarantee period, Sage Appliances will repair, replace, or refund any defective product (at the sole discretion of Sage Appliances).All legal warranty rights under applicable national legislation will be respected and will not be impaired by our guarantee. For full terms and conditions on the guarantee, as well as instructions on how to make a claim, please visit www.sageappliances.com.
Note
 Note
NoteBRG Appliances LimitedUnit 3.2, Power Road Studios, 114 PowerRoad, London, W4 5PYUK Landline: 0808 178 1650Mobile (National Rate): 0333 0142 970
 report this ad
![]()
www.sageappliances.comRegistered in England & Wales No. 8223512Registered in Germany No. HRB 81309Registered in France No. 879 449 866 RCS• Due to continued product improvement, the products illustrated or photographed in this document may vary slightly from the actual product.Copyright BRG Appliances 2020BTM700/STM700 UG6 D20
References
[xyz-ips snippet=”download-snippet”]