Sage the Dose Control Pro BCG600/SCG600 User Guide
SAGE® RECOMMENDS SAFETY FIRST
At Sage® we are very safety conscious. We design and manufacture appliances with your safety foremost in mind. In addition, we ask that you exercise a degree of care when using any electrical appliance and adhere to the following precautions.
IMPORTANT SAFEGUARDS
READ ALL INSTRUCTIONS BEFORE USE AND SAVE FOR FUTURE REFERENCE
- A downloadable version of this document is also available at sageappliances.com
- Before using the first time ensure your electricity supply is the same as shown on the label on the underside of the appliance.
- Remove and safely discard any packaging materials before first use.
- To eliminate a choking hazard for young children, safely discard the protective cover fitted to the power plug.
- This appliance is for household use only. Do not use the appliance for anything other than its intended use. Do not use in moving vehicles or boats.Do not use outdoors. Misuse may cause injury.
- Fully unwind the power cord before operating.
- Position the appliance on a stable, heat resistant, level, dry surface away from the edge and do not operate on or near a heat source such as a hot plate, oven or gas hob.
- Do not let the power cord hang over the edge of a bench or table, touch hot surfaces or become knotted.
- Do not leave the appliance unattended when in use.
- Always ensure the appliance is turned OFF, unplugged at the power outlet and has been allowed to cool before cleaning, attempting to move or storing.
- Always turn the appliance to the OFF position, switch off at the power outlet and unplug at the power outlet when the appliance is not in use.
- Do not use the appliance if the power cord, plug, or appliance becomes damaged in any way. If damaged and maintenance other than cleaning is required please contact Sage Customer Service or go to sageappliances.com
- Any maintenance other than cleaning should be performed by an authorised Sage® service centre.
- Children should not play with the appliance.
- Cleaning of the appliance should not be carried out by children unless they are 8 years or older and supervised.
- The appliance and its cord should be kept out of reach of children aged 8 years and younger.
- The installation of a residual current safety switch is recommended to provide additional safety when using all electrical appliances. Safety switches with a rated operating current not more than 30mA are recommended. Consult an electrician for professional advice.
- Do not use attachments other than those provided with the appliance.
- Do not attempt to operate the appliance by any method other than those described in this booklet.
- Do not move the appliance whilst in operation.
- Do not touch hot surfaces. Allow the appliance to cool down before moving or cleaning any parts.
- This appliance shall not be used by children. Keep the appliance and its cord out of reach of children.
- This appliance can be used by persons with reduced physical, sensory or mental capabilities or a lack of experience and knowledge, only if they have been given supervision or instruction concerning use of the appliance in a safe way and understand the hazards involved.
- Do not operate the grinder without the hopper lid in position. Keep fingers, hands, hair, clothing and utensils away from the hopper during operation.
The symbol shown indicates that this appliance should not be disposed of in normal household waste. It should be taken to a local authority waste collection centre designated for this purpose or to a dealer providing this service.
For more information, please contact your local council office.
To protect against electric shock, do not immerse the power plug, cord or appliance in water or any liquid.
FOR HOUSEHOLD USE ONLY SAVE THESE INSTRUCTIONS
GETTING TO KNOW YOUR NEW APPLIANCE
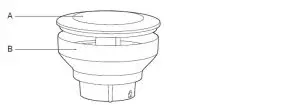
A. Bean Hopper LidB. Bean HopperC. Hardened Stainless SteelConical Burrs.Removable and AdjustableUpper BurrD. Grind Size CollarE. GRIND TIME DialF. START / CANCEL ButtonG. Grind OutletH. 50mm bladeI. Grind Tray
ACCESSORIESJ. Adjustable Razor™ DoseTrimming ToolK. Portafilter Cradle 50–54mmL. Portafilter Cradle 58mm
![]() Rating Information220–240V~ 50Hz 130W
Rating Information220–240V~ 50Hz 130W
OPERATING YOUR NEW APPLIANCE
BEFORE FIRST USERemove and safely discard all promotional labels and packing materials attached to your Sage® appliance. Wash hopper, and cradles in warm soapy water and dry thoroughly. Wipe exterior of grinder with a soft damp cloth and dry thoroughly. Place grinder on flat level surface and plug power cord into 220-240V outlet and switch Power ‘ON’.
ASSEMBLING YOUR SAGE CONTROL DOSE™ PROBean HopperAlign tabs on the base of the bean hopper and insert hopper into position. Holding the hopper, press down firmly and turn the bean hopper dial 45° to lock into position.
A “click” sound will be heard when the hopper is properly locked in place.
![]()
Ensure the hopper and the Grind Size Collar is aligned properly.Fill with fresh coffee beans and secure lid on top of bean hopper.
NOTEIf the bean hopper has not been locked into position, the GRIND TIME dial will not be illuminated.
GRINDING FOR ESPRESSO COFFEE
Use single wall filter baskets when grinding fresh coffee beans. Use the finer 1–25 settings in the ESPRESSO range.
![]()
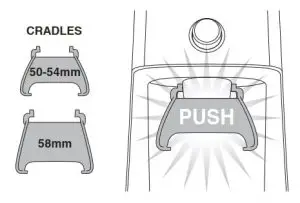
Step 1:Insert the appropriate portafilter cradle size. Insert your portafilter into the cradle.
Step 2:Selecting Grind AmountSelect the desired amount of ground coffee required by turning the GRIND TIME dial.

Step 3:Tamping the Ground CoffeeAfter dosing the portafilter with freshly ground coffee, tamp down with between 15-20kg of pressure.
Step 4:Trimming the DoseThe adjustable Razor™ Dose Trimming Tool allows you to trim the puck to the right level for a consistent extraction.
Select the correct width blade of the Razor™ to match the diameter of your filter basket. The Razor™ has three blades of varying widths: 58mm, 54mm and 50mm. The 58mm and 54mm are already fitted within the Razor™ body. The 50mm is separate.
If you require the 50mm blade, turn the adjustment dial past #1 until the 54mm blade is fully extended and able to be pulled from the body.
If you require the 50mm blade, turn the Adjustable Dial past #1 until the 54mm blade is fully extended and able to be pulled from the body.
NOTEThe Adjustable Dial may feel tight as you continue to wind it towards the end of its travel.
Insert the 50mm blade into the body. Wind the Adjustable Dial until the blade is retracted past #4. Press the 50mm and 58mm blades at the same time, towards the centre of the body until a “click” sound can be heard.
Adjust the Razor™ to the setting in the table below for your Sage® espresso machine. This is a starting point for your dose height.
After tamping the coffee, insert the Razor™ into the filter basket until it rests on the rim of the basket. The blade of the dosing tool should penetrate the surface of the tamped coffee. If the blade does not penetrate the surface of the tamped coffee, your coffee is under dosed. Increase the amount of dosed coffee by adjusting the GRIND TIME dial.
Rotate the Razor™ back and forth while holding the portafilter on an angle over the knock box to trim off a little excess coffee.
Step 5:Select Your Grind SizeFor espresso, we recommend starting with grind size setting 15 and rotating the Hopper (to adjust the Grind Size Collar) either coarser or finer.
NOTEIf the Grind Size Collar is tight, run the grinder by pressing the START / CANCEL button while turning the Hopper. This will release coffee grounds caught between the burrs.
GRINDING INTO A GRINDS CONTAINER OR COFFEE FILTER
Step 1:Remove cradle by sliding out from under the grind outlet.
Place your container or coffee filter directly under grind outlet.
Step 2:Select the required amount of ground coffeeby rotating the GRIND TIME dial.
Step 3:Select Your Grind SizeRotate the Hopper to adjust the Grind Size Collar until it reaches the required brewing method range.
FEATURES OF YOUR SAGE DOSE CONTROL™ PRO
Pause FunctionYou can pause the grinder during operation, allowing you to collapse or settle the coffee in the Portafilter.
- Press the START / CANCEL button to start the grinding operation.
- During grinding, press the START / CANCEL button to pause the grinding operation for up to 10 seconds.The START / CANCEL button will slowly flash while paused.
- Press START / CANCEL again within this time to resume grinding the remaining dose. Or press and hold the START / CANCEL button for 1 second to cancel.
ManualGrinding manually allows you to have complete control over how much coffee is dispensed.
- Press and hold the START / CANCEL button to grind for as long as you require.
- Release START / CANCEL button to stop grinding.
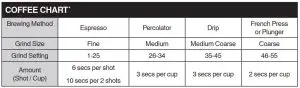
*This coffee chart should be used as starting point to adjust your grind time and / or size, as both may vary when using different coffee bean types, age and degree of roast.
ADJUSTING CONICAL BURRS
Some types of coffee may require a wider grind range to achieve an ideal extraction or brew.A feature of your Dose Control™ Pro is the ability to extend this range with an adjustable upper burr.
CARE, CLEANING & STORAGE
- Empty beans from the hopper and grind out any excess beans (see below).
- Unplug power cord from power outlet before cleaning.
- Wash the hopper lid and bean hopper in warm soapy water, rinse and dry thoroughly.
- Wipe and polish exterior of appliance with a soft damp cloth.
NOTEDo not use alkaline or abrasive cleaning agents, steel wool scouring pads, as these can damage the surface.
NOTEPlease do not clean any grinder parts or accessories in the dishwasher.
CLEANING CONICAL BURRSRegular cleaning helps the burrs achieve consistent grinding results which is especially important when grinding for espresso coffee.
TROUBLESHOOTING
GUARANTEE
2 YEAR LIMITED GUARANTEESage Appliances guarantees this product for domestic use in specified territories for 2 years from the date of purchase against defects caused by faulty workmanship and materials. During this guarantee period Sage Appliances will repair, replace, or refund any defective product (at the sole discretion of Sage Appliances).
All legal warranty rights under applicable national legislation will be respected and will not be impaired by our guarantee. For full terms and conditions on the guarantee, as well as instructions on how to make a claim, please visit www.sageappliances.com
www.sageappliances.comRegistered in England & Wales No. 8223512Registered in Germany No. HRB 81309 (AG Düsseldorf)Registered in France No. 879 449 866 RCS
Due to continued product improvement, the products illustrated or photographed in this document may vary slightly from the actual product.Copyright BRG Appliances 2020BCG600/SCG600 UG6 B20
 report this ad
References
[xyz-ips snippet=”download-snippet”]