
Sage the Smart Grill User Guide
SAGE RECOMMENDS SAFETY FIRST
At Sage we are very safety conscious. We design and manufacture consumer products with the safety of you, our valued customer, foremost in mind. In addition, we ask that you exercise a degree of care when using any electrical appliance and adhere to the following precautions. Misuse can cause potential injuries.
IMPORTANT SAFEGUARDS
READ ALL INSTRUCTIONS BEFORE USE AND SAVE FOR FUTURE REFERENCE
- A downloadable version of this document is also available at sageappliances.com
- Before using the first time ensure your electricity supply is the same as shown on the label on the underside of the appliance.
- Remove and safely discard any packaging materials before first use.
- The appliance is for household use only. Do not use the appliance for anything other than its intended use. Do not use in moving vehicles or boats. Do not use outdoors. Misuse may cause injury.
- Fully unwind the power cord before operating.
- Position the appliance on a stable, heat resistant, level, dry surface away from the edge and do not operate on or near a heat source such as a hot plate, oven or gas hob.
- Do not let the power cord hang over the edge of a bench or table, touch hot surfaces or become knotted.
- Position the appliance at least 20cm from walls or heat/steam sensitive materials and provide adequate space above and on all sides for air circulation.
- Ensure the power cord does not become trapped between the upper and lower hot plates of the appliance during use or storage.
- Do not leave the appliance unattended when in use.
- The appliance is not intended to be operated by the means of an external timer or separate remote-control system.
- Do not place anything on top of the grill when lid is closed, when in use and when stored.
 The appliance is marked with a HOT surface symbol. The lid and other surfaces will be hot when the appliance is operating and for some time after use. To prevent burns always use insulated oven mitts or use handles or knobs where appropriate.
 - Always ensure the appliance is turned OFF, unplugged at the power outlet and has been allowed to cool before cleaning, moving or storing.
- Do not use the appliance if the power cord, plug, or appliance becomes damaged in any way. If damaged or maintenance other than cleaning is required, please contact Sage Customer Service or go to sageappliances.com
- Any maintenance other than cleaning should be performed by an authorised Sage® service centre.
- Children shall not play with the appliance.
- The appliance can be used by children aged 8 or older and persons with reduced physical, sensory or mental capabilities or a lack of experience and knowledge, only if they have been given supervision or instruction concerning use of the appliance in a safe way and understand the hazards involved.
- Cleaning of the appliance should not be carried out by children unless they are 8 years or older and supervised.
- The appliance and its cord should be kept out of reach of children aged 8 years and younger.
- The installation of a residual current safety switch is recommended to provide additional safety when using all electrical appliances. Safety switches with a rated operating current not more than 30mA are recommended. Consult an electrician for professional advice.
![]() The symbol shown indicates that this appliance should not be disposed of in normal household waste. It should be taken to a local authority waste collection centre designated for this purpose or to a dealer providing this service. For more information, please contact your local council office.
The symbol shown indicates that this appliance should not be disposed of in normal household waste. It should be taken to a local authority waste collection centre designated for this purpose or to a dealer providing this service. For more information, please contact your local council office.
![]() To protect against electric shock, do not immerse the power plug, cord or appliance in water or any liquid.
To protect against electric shock, do not immerse the power plug, cord or appliance in water or any liquid.
Components
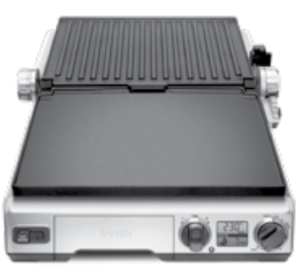 Open FlatBBQ ModeOpens flat into a 1650 sq. cm grilling surface.
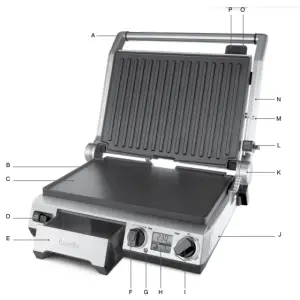
- A. Stainless Steel Housing with Die-Cast Arms
- B. Cast Aluminium, Non-Stick Plates Coated with titanium infused Quantanium”’ for scratch resistance and oil free cooking.
- C. Removable, Dishwasher Safe Plates Flat plate for eggs and pancakes, ribbed plate to sear meats.
- D. Bottom PLATE RELEASE Removes the bottom cooking plate. independently remove the top and bottom cooking plates for easy cleaning or to interchange plate positions.
- E. Integrated Removable Drip Tray Catches excess fat for healthier cooking. In BBQ mode, the unique design drains fat from both plates into the same drip tray.
- F. 30 Minute Timer Dial with Sound Alert Pressing the centre button of the dial activates the countdown timer.
- G. Temperature Conversion Button Converts the default Celsius reading to Fahrenheit.
- H. Temperature Responsive LCD Backlight illuminates blue (stand by) and orange (heating/ready).
- I. Temperature Dial (160°C – 230°C) With LOW, PANINI (sandwich) and SEAR modes.
- J. Cord Storage Located on the underside of the grill.
- K. Adjustable Tilt Adjusts the angle of the bottom cooking plate to drain fats or can be made flat for eggs and pancakes.
- L. Locking Storage Clip Locks the plates dosed for upright storage.
- M. BBQ Lock Release
- N. Six Adjustable Height Settings Reduces the weight of the top plate on delicate foods or can be set high enough for open melts.
- O. Levelling Support Integrated into the top plate release, use to adjust the position of the floating top plate.
- P. Top PLATE RELEASE Removes the top cooking plate.
1-Hour auto shut-off automatically stops heating the cooking plates after 1 hour of inactivity.
Element IQ™Sensors detect when the cooking plates drop in temperature and compensate by injecting heat for rapid recovery back to the selected cooking temperature. 2400-watt embedded heating elements ensure consistently high heat for faster cooking and reduced preheating time
![]() Rating Information220–240V ~ 50–60Hz 2000–2400W
Rating Information220–240V ~ 50–60Hz 2000–2400W
Assembly
PREPARING THE GRILL FOR USE
- Remove and safely discard any packing material and promotional labels from the grill.
- Wipe the cooking plates and drip tray with a soft damp sponge. Dry thoroughly.
- Ensure the drip tray is correctly inserted into the grill.
- Ensure the cooking plates are correctly inserted and securely locked into position.
- Place the grill on a flat, dry surface. Ensure there is a minimum distance of 10cm of space on both sides of the appliance.
- Unwind the power cord completely and insert the power plug into a grounded wall outlet.
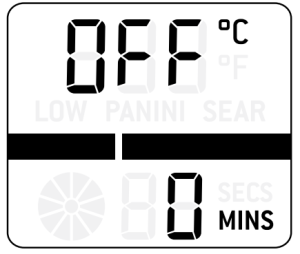
- The grill alert will sound, and the LCD screen will display OFF.
- . The grill is now ready for the preheating cycle.
![]() NOTEThe grill features 2 x PLATE RELEASE. These allow you to independently remove the top and bottom cooking plates for easy cleaning, or to interchange plate positions.
NOTEThe grill features 2 x PLATE RELEASE. These allow you to independently remove the top and bottom cooking plates for easy cleaning, or to interchange plate positions.
USING THE PLATE RELEASETo use the plate release, always ensure the grill is completely cool. Use the handle to open the top plate to a 90-degree position. Use the ‘Plate Release’ on the front, right side of the top plate to remove the top cooking plate, and the ‘Plate Release’ on the left side of the control panel to remove the bottom cooking plate. Once released, gently slide the plates off the grill.
![]() NOTEIf the cooking plates are incorrectly inserted, the LCD screen will display Er1. Use the 2 xPLATE RELEASE to remove the plates then re-insert so they securely lock into position. Always ensure the grill is completely cool before releasing and removing the cooking plates.
NOTEIf the cooking plates are incorrectly inserted, the LCD screen will display Er1. Use the 2 xPLATE RELEASE to remove the plates then re-insert so they securely lock into position. Always ensure the grill is completely cool before releasing and removing the cooking plates.
When the grill is turned on and heating for the first time, it may emit a fine smoke haze. This is due to the protective substances on the heating elements. It is safe and not detrimental to the performance of the grill.
Functions
OPERATING YOUR NEW APPLIANCE
PREHEATING THE GRILL
- Ensure the top plate of the grill is in the closed position, with the Height Control Clip in the OPEN position. This will ensure faster, more efficient preheating.
- Turn the temperature dial to adjust the temperature in 5°C increments. Rotate the dial to SEAR (210°C–230 °C) for fast preheating, PANINI (sandwich) (180°C– 205°C), LOW (160°C –175°C) or select an alternative temperature.
- The grill will start to heat, and the LCD screen will illuminate orange. The selected temperature as well as HEATING will be displayed.
- Once the grill has preheated to the selected temperature, one alert will sound, and HEATING will no longer illuminate. The LCD screen will display the selected temperature and the time will default to ‘0’.
NOTEAlways allow the grill to completely preheat to the selected temperature before cooking. The LCD screen may display HEATING during the cooking process. This is normal, indicating that the correct temperature is being maintained.
ADJUSTABLE HEIGHT CONTROLThis feature reduces the weight of the top plate on delicate foods like fish and accommodates varying thicknesses of food like artisan breads. Located on the right side of the top plate, the clip fixes the top plate to a range of positions above the bottom plate. To set the adjustable height control, use the handle to lift the top plate and simultaneously move the adjustable height control clip to the desired height. Then slowly lower the top plate until it rests on the adjustable height control clip.
ADJUSTABLE TILT CONTROLThe angle of the cooking plates can be adjusted by turning the PLATE TILT dial. The PLATE TILT dial is located on the lower back, right side of the grill. The unique indent between the two cooking plates channels juices from both plates into the same drip tray while cooking.
TEMPERATURE CONVERSION BUTTON
- The grill features a temperature conversion button on the left side of the LCD screen. The temperature reading on the grill ispreset to Celsius. Pressing the temperature conversion button converts the Celsius temperature reading into Fahrenheit. The corresponding °C or °F symbol will be displayed on the LCD screen.
- If you have changed the default Celsius temperature reading to Fahrenheit, the setting will remain in the memory of the grill until the Temperature Conversion Button is pressed a second time or the grill is unplugged from the wall outlet. When the grill is plugged back into the wall outlet, the temperature reading will automatically return to the preset Celsius setting.
USE IN OPEN FLAT BBQ MODE
The grill opens flat into a 1650 sq. cm grilling surface. The ribbed cooking plate is perfect for searing meats while the flat cooking plate is ideal for eggs, pancakes and vegetables.
- To open the grill into BBQ mode:a)Ensure the grill has completely preheated and the LCD screen no longer displays HEATING.b)Ensure the top cooking plate is in the closed position, with the Height Control Clip in the OPEN position.c)With your left hand, grip the handle. With your right hand, pull the Height Control Clip on the right side of the grill towards you, into the BBQ mode position. Continue to pull the clip forward and simultaneously lift the handle to open, then gently lower the top plate into the horizontal BBQ mode position.
- Place food on either or both of the cooking plates.
- The grill features an optional countdown timer which monitors the time elapsed during cooking. To activate the countdown timer:a)Ensure the grill has completely preheated, the LCD screen no longer displays HEATING and food has been placed on the cooking plates.b)Turn the timer dial to adjust the time in one-minute increments up to 30 minutes. Rotate the dial clockwise to increase the time, or counter clockwise to reduce the time. The LCD screen will display the selected time.c)Press the centre button of the timer dial once to activate the setting. The LCD screen will display a count-down indicator and the time will begin to count down.NOTEThe count-down timer can be stopped or paused at any time by pressing the centre button of the timer dial a second time. The LCD screen will no longer display the countdown indicator. To reset or clear the timer either:
- Rotate the timer dial clockwise to increase the time, or counter clockwise to reduce the time. Or,
- Press the centre button of the timer dial and hold for 3 seconds until the time on the LCD screen displays ‘0’ zero. Rotate the timer dial clockwise to increase the time, or counter clockwise to reduce the time.
- When food is cooked, remove meat from grill using heatproof plastic or wooden utensils.
- To turn off the grill, turn temperature dial to the OFF position.
USE AS A SANDWICH OR PANINI PRESS
- To open the grill:a)Ensure the grill has completely preheated and the LCD screen no longer display HEATING.b)Ensure the top cooking plate is closed. The Adjustable Height Control Clip, located on the right side of the top plate, should be in the OPEN position.c)Use the handle to open the top plate to a 90-degree position.
- Place food on the bottom cooking plate.
- Use the handle to close the top cooking plate. When cooking open melts, it is recommended that the top plate of the grill is in the closed position, with the Height Control Clip in the HIGH position. 4. The grill features an optional count-down timer which monitors the time elapsed during cooking. To activate the countdown timer:a)Ensure the grill has completely preheated, the LCD screen no longer displays HEATING and food has been placed on the bottom cooking plate.b)Turn the timer dial to adjust the time in one-minute increments up to 30 minutes. Rotate the dial clockwise to increase the time, or counter-clockwise to reduce the time. The LCD screen will display the selected time.c)Press the centre button of the timer dial to activate the setting. The LCD screen will display a count-down indicator and the time will begin to count down.
- When the food is cooked, remove from the cooking plates using heat proof plastic or wooden utensils.
- To turn off the grill, turn the temperature dial to the OFF position.
FOR BEST RESULTSWhen toasting sandwiches on the PANINI setting:
- Always place sandwiches in the centre bottom plate.
- Toasting should take approximately 5–8 minutes. Exact toasting time will be a matter of preference and the type of bread and fillings used.
- Never use metal or sharp utensils as these can cause damage to the non-stick coating of the cooking plates.
Tips
GRILLING TIPS
MeatsRecommended cuts:
- Beef – sirloin (New York), rump, rib eye (scotch fillet), fillet.
- Lamb – trim lamb leg steaks, fillet eye of loin, cutlets and diced lamb.
- Pork – butterfly loin steaks, spareribs, leg steaks, fillets, diced pork.
- It is not recommended to cook items with thick bones such as T-bone steaks.
- Tougher cuts such as beef blade, topsidesteak, lamb forequarter or neck chops can be used. To tenderize these cuts, marinate them for a few hours or overnight in a marinade with wine or vinegar to help break down the connective tissue.
- If using a marinade recipe or pre-marinated meats from your meat retailer, drain excess marinade off and dab the meat with paper towels before placing on the grill. Some marinades contain high sugar levels which can scorch on the cooking plate.
- Do not salt meat before cooking. Salt will draw out the juices, toughening the meat.
- Do not pierce meat with a fork or cut meat while cooking, this will let the juices escape, resulting in a tougher, dry steak. Use tongs instead.
- Do not over-cook meat. Some meats are better served pink and juicy.
- Parboiling sausages can alleviate the need to pierce sausages before cooking.
- When removing fish pieces from the grill, use a flat heat resistant plastic spatula to support the food.
JUDGING DONENESSThere is an art to determining when your steak, lamb chop or cutlet is cooked to the correct degree of doneness – rare, medium rare, medium, medium well or well done – but it is easily mastered with these handy hints and tips.
RareCook for a few minutes per side, depending on thickness. Turn once on1y. Cook until steak feels very soft with back of tongs. A meat thermometer will show the internal temperature or a rare steak as 50-60°C
Medium rareCook on one side until moisture is just visible on top surface. Tum once only. Cook on theother side until surface moisture is visible. Steak will be cooked to medium rare when it feels soft with back of tongs. A meat thermometer will slow the internal temperature or a medium rare steak as 60- 65°C.
MediumCook on one side until moisture is pooling on top surface. Turn once only. Cook on secondside until moisture is visible. Steak will be cooked to medium when it feels springy with back of tongs. A meat thermometer will show the internal temperature or a medium steak as 65-70°C.
Medium wellCook on one side until moisture is pooling ontop surface. Turn and cook on second side until moisture is pooling on top. Reduce heat slightly and continue to cook until steak feels firm with back of tongs.
A meat thermometer will show the internal temperature or a medium well steak as 70-75°C.
Well doneCook on one side until moisture is pooling on top surface. Tum and cook on second side until moisture is pooling on top. Reduce heat slightly and continue to cook until steak feels very firm with back of tongs.
A meat thermometer will show the internal temperature of a well done steak as 75°C.
NOTESteaks do not need turning if cooking in contact position. Turn steaks once only when grilling in open flat BBQ mode.
Care & Cleaning
Ensure the grill is turned OFF by turning the Temperature dial to the OFF position. The grill is OFF when the LCD screen displays Off and the default ‘0’ zero time. Remove the power plug from the wall outlet. Allow the grill to cool completely before disassembling and cleaning.
Always dean the outer body, drip tray and cooking plates after each use to prevent a build-up of ingredients.
NOTEDo not use abrasive cleansers or metal scouring pads on any of the interior or exterior surfaces of the grill. These will scratch the surfaces and damage the nonstick coating on the cooking plates.
CLEANING THE OUTER BODYWipe the outer body with a soft damp sponge. A non-abrasive liquid cleanser or mild spray solution may be used to avoid build-up of stains. Apply to the cleanser to the sponge, not the grill surface, before cleaning. Rinse. Let all surfaces dry thoroughly prior to inserting the power plug into a wall outlet.
CLEANING THE DRIP TRAYAfter each use. slide out the drip tray and discard contents. Wash the tray in warm soapy water with a soft, damp sponge. A non-abrasive liquid cleanser may be used to avoid build-up of stains. Apply the cleanser to the sponge, not the tray, before cleaning. Rinse and dry thoroughly. Always ensure to re-insert the drip tray into the grill after cleaning and prior to inserting the power plug into a wall outlet.
![]() WARNINGExtreme caution must be used when handling the drip tray containing hot fats and juices.
WARNINGExtreme caution must be used when handling the drip tray containing hot fats and juices.
CLEANING THE COOKING PLATES
- Wipe the cooking plates with a soft doth to remove food residue.
- Alternatively. release and remove the cooking plates:
- Always ensure the grill is completely cool.
- Use the handle to open the top plate to a 90-degree position.
- Use the PLATE RELEASE on the front, right side of the top plate to remove the top cooking plate, and the PLATERELEASE on the left side of the control panel to remove the bottom cooking plate/.
- Once released, gently slide the plates off the grill.
- Place the cooking plates in the dishwasher (top shelf only).
- Alternatively, wash the cooking plates in hot soapy water with a soft damp sponge. A non-abrasive liquid cleanser may be used to avoid build-up of stains. Apply the cleanser to the sponge, not the plate, before cleaning. Remove stubborn residue with a non-abrasive plastic scouring pad or nylon washing brush.
NOTEThe underside of the cooking plate may discolour over time and can form a layer of corrosion. This is normal. Any discolouration that may occur to either side of the cooking plate will only detract from the appearance of the plate and will not affect the cooking performance.To remove discoloration or corrosion, use a non-abrasive plastic scouring pod or nylon washing brush. Rinse and dry thoroughly.
NOTEEnsure the round pad on the underside of the plate is clean.
- Rinse and dry thoroughly. Always ensure the cooking plates are correctly re-inserted and securely locked back into position after cleaning and prior to inserting the power plug into a wall outlet.NOTEDo not use abrasive cleaners or metal pads to clean the cooking surface of the plates. These will damage the non-stick coating on the cooking plates.
STORAGE
- Ensure the grill is turned OFF by turning the Temperature dial to the OFF position. The grill is OFF when the LCD screen displays OFF and the default ‘0’ zero time.Remove the power plug from the wall outlet.
- Allow the grill, cooking plates and drip tray to cool completely,
- Ensure the grill cooking plates and drip tray are clean and dry.
- Ensure the drip tray is correctly re-inserted into the grill.
- Ensure the cooking plates are correctly reinserted and securely locked into position.
- Ensure the cooking plates are locked together by sliding the adjustable height control away from you, into the LOCK position.
- Wrap the power cord in the cord storage located on the underside of grill.
- Store on a flat, dry, level surface. Alternately, the grill may be stored in an upright position.
Troubleshooting
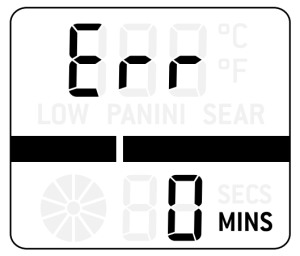
ERROR MODEWhen the LCD screen displays ‘Err’ error mode:
- Unplug the grill from the wall outlet
- Ensure the grill is completely cool.
- Ensure the cooking plates are correctly and securely inserted into position.
- Re-insert the plug into the wall outlet.
- The LCD screen should no longer display ‘Err’ error Mode.
- If the problem continues call Breville Customer Service.
Guarantee
2 YEAR LIMITED GUARANTEE
Sage Appliances guarantees this product for domestic use in specified territories for 10 years from the date of purchase against defects caused by faulty workmanship and materials. During this guarantee period Sage Appliances will repair, replace, or refund any defective product (at the sole discretion of Sage Appliances).All legal warranty rights under applicable national legislation will be respected and will not be impaired by our guarantee. For full terms and conditions on the guarantee, as well as instructions on how to make a claim, please visit www.sageappliances.com.
 the Smart Grill™BGR820/SGR820
References
[xyz-ips snippet=”download-snippet”]